
React Native 環境建置:在 Mac 上跑起第一個 iOS App
一、先認識 React Native
它是什麼?React Native 是 Facebook 在 2015 年初的 React.js 技術研討會上公布的開源專案,用 React.js 這套 JavaScript 函式庫來開發 iOS 與 Android 原生 App。初期只支援 iOS,同年 9 月加入 Android 支援。
原理是在 JavaScript 中以 React 抽象出作業系統的原生 UI 元件來取代 DOM:用 <View> 代替 <div>,用 <Image> 代替 <img>,最終渲染仍由原生元件負責。
有哪些優缺點?
最大的好處是門檻:只要會 JavaScript,就能寫出 App 的介面。對 Web 開發者而言,不必為了做一個小工具而額外投入時間學 Objective-C 或 Swift。
與其他「用 WebView 包一層」的行動方案相比,差異明顯:
- 不使用 WebView,徹底避開 WebView 帶來的互動延遲與效能瓶頸。
- 直接操作原生控制項,操作體驗更貼近真正的原生 App。
- 手勢辨識由原生層處理,反應更即時。
- 執行緒模型更合理,UI 運算不會互相阻塞。
缺點則是當時仍屬早期階段,相容性與效能的潛在問題尚未充分暴露,社群資料也不多,比較適合喜歡折騰的人先試水溫。
要預備哪些知識?
- HTML + CSS + JavaScript 的基本功
- Node.js 基本概念(API 文件:https://nodejs.org/dist/v4.2.2/docs/api/)
- JSX:JavaScript 的語法擴充,結構近似 XML(https://facebook.github.io/react/docs/jsx-in-depth.html)
- FLUX:Facebook 提出的客戶端應用架構模式(https://facebook.github.io/flux/docs/overview.html)
二、基礎環境建置
1. 安裝 Homebrew
ruby -e "$(curl -fsSL https://raw.githubusercontent.com/Homebrew/install/master/install)"
2. 安裝 nvm(Node 版本管理器,方便切換 Node 版本)
curl -o- https://raw.githubusercontent.com/creationix/nvm/v0.30.1/install.sh | bash
腳本跑完後,在終端啟用它:
. ~/.nvm/nvm.sh
3. 安裝最新版 Node.js 並設為預設
nvm install node && nvm alias default node
接著輸入 node 就能進入 Node 環境。
4. 安裝 watchman
brew install watchman
watchman 負責監看檔案變動,是 hot reload 能即時生效的基礎。至此基礎環境完成,建議定期執行 brew update && brew upgrade 保持工具為最新。
三、iOS 開發環境
前提:已安裝 Xcode 7.0 以上版本(可至 App Store 下載)。
用 npm 安裝 react-native-cli(遇到權限問題時在前面加 sudo):
npm install -g react-native-cli
初始化專案(這一步千萬不要加 sudo):
react-native init ReactNativeProject
若下載進度緩慢,可以把 npm 源換成國內鏡像:
 npm config set registry https://registry.npm.taobao.org
 npm config set disturl https://npm.taobao.org/dist
用 Xcode 執行與除錯
在 Finder 中按 Command + Shift + G,輸入專案路徑(例如 /Users/yangshebing/ReactNativeProject,使用者名稱請自行替換),前往後在 ios 資料夾中找到 ReactNativeProject.xcodeproj。
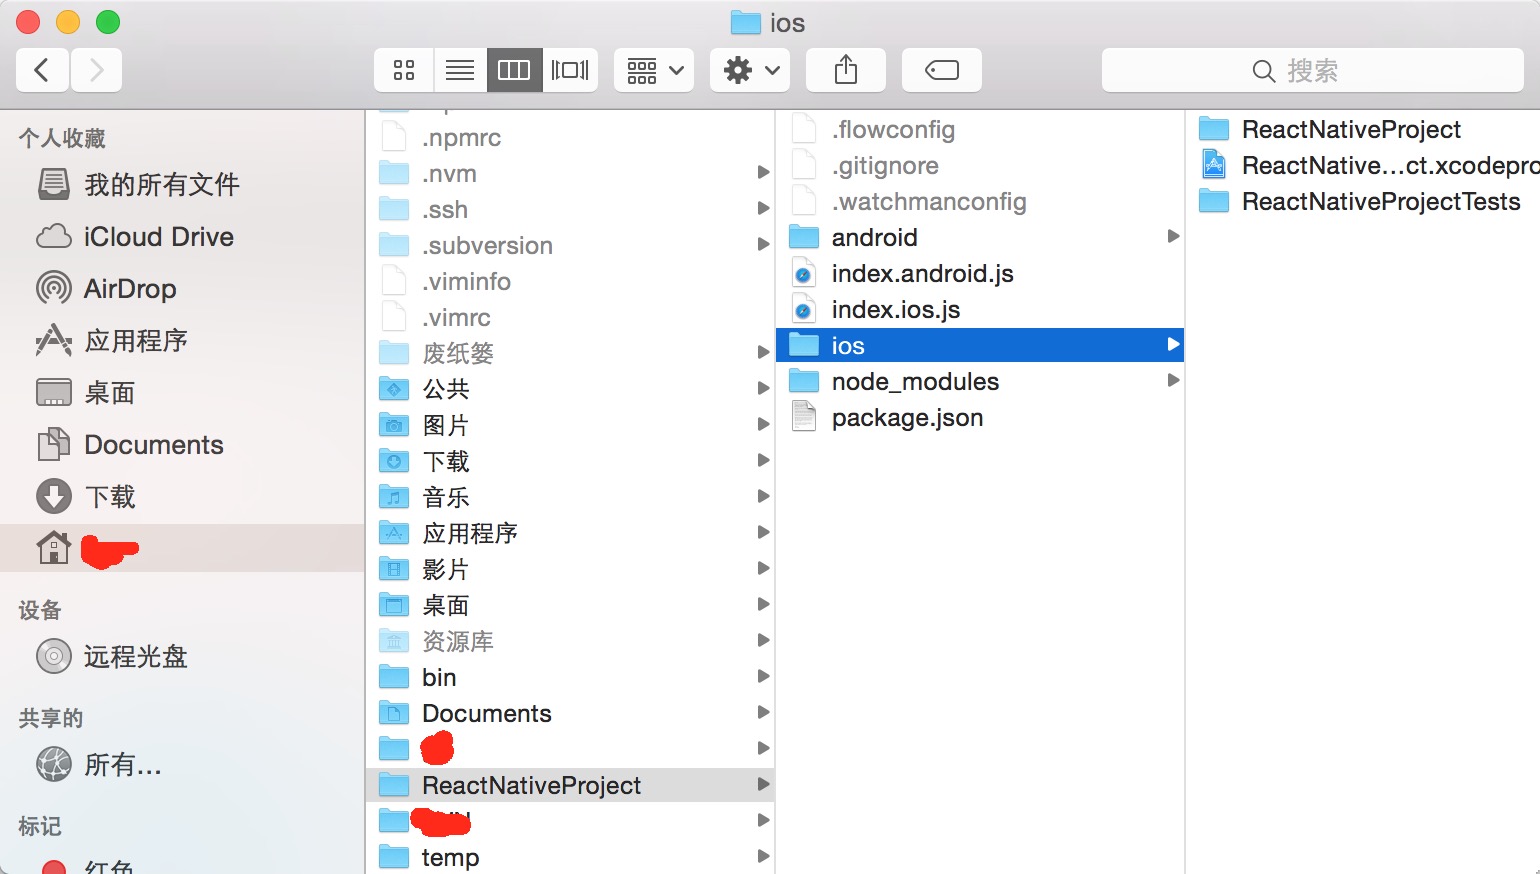
用 Xcode 打開並按 Command + R,編譯成功後即可在模擬器看到畫面。
修改 index.ios.js
每次存檔後,在模擬器中按 Command + R 即可重新載入,不必重新編譯。試著加上一個圖片:
 /**
  * Sample React Native App
  * https://github.com/facebook/react-native
  */
'use strict';

import React, {
  AppRegistry,
  Component,
  StyleSheet,
  Image,      // 新增:圖片元件
  Text,
  View
} from 'react-native';

class ReactNativeProject extends Component {
  render() {
    return (
      <View style={styles.container}>
        {/* 文字展示 */}
        <Text style={styles.welcome}>
          歡迎來到 React Native
        </Text>
        {/* 圖片展示:source 與 style 都必須提供尺寸 */}
        <Image source={require('./img/test.png')}
               style={styles.picture} />
      </View>
    );
  }
}

const styles = StyleSheet.create({
  container: {
    flex: 1,
    justifyContent: 'center',
    alignItems: 'center',
    backgroundColor: '#F5FCFF',
  },
  welcome: {
    fontSize: 20,
    textAlign: 'center',
    margin: 10,
  },
  picture: {
    width: 80,
    height: 150,
  },
});

AppRegistry.registerComponent('ReactNativeProject', () => ReactNativeProject);
這裡有個與 CSS 很不同、但很容易踩到的規則:React Native 的 Image 一定要明確給定寬高,它不會像瀏覽器那樣依原始檔尺寸自動撐開。

真機執行
找到 AppDelegate.m,把 localhost 換成電腦的區域網路 IP:
 // jsCodeLocation = [NSURL URLWithString:@"https://localhost:8081/index.ios.bundle?platform=ios&dev=true"];
 jsCodeLocation = [NSURL URLWithString:@"https://192.168.31.168:8081/index.ios.bundle?platform=ios&dev=true"];
改完再執行,這時搖晃裝置就能叫出開發者選單(Reload、Debug JS Remotely 等功能都在裡面)。記得手機與電腦要在同一個網段。
關閉開發選單
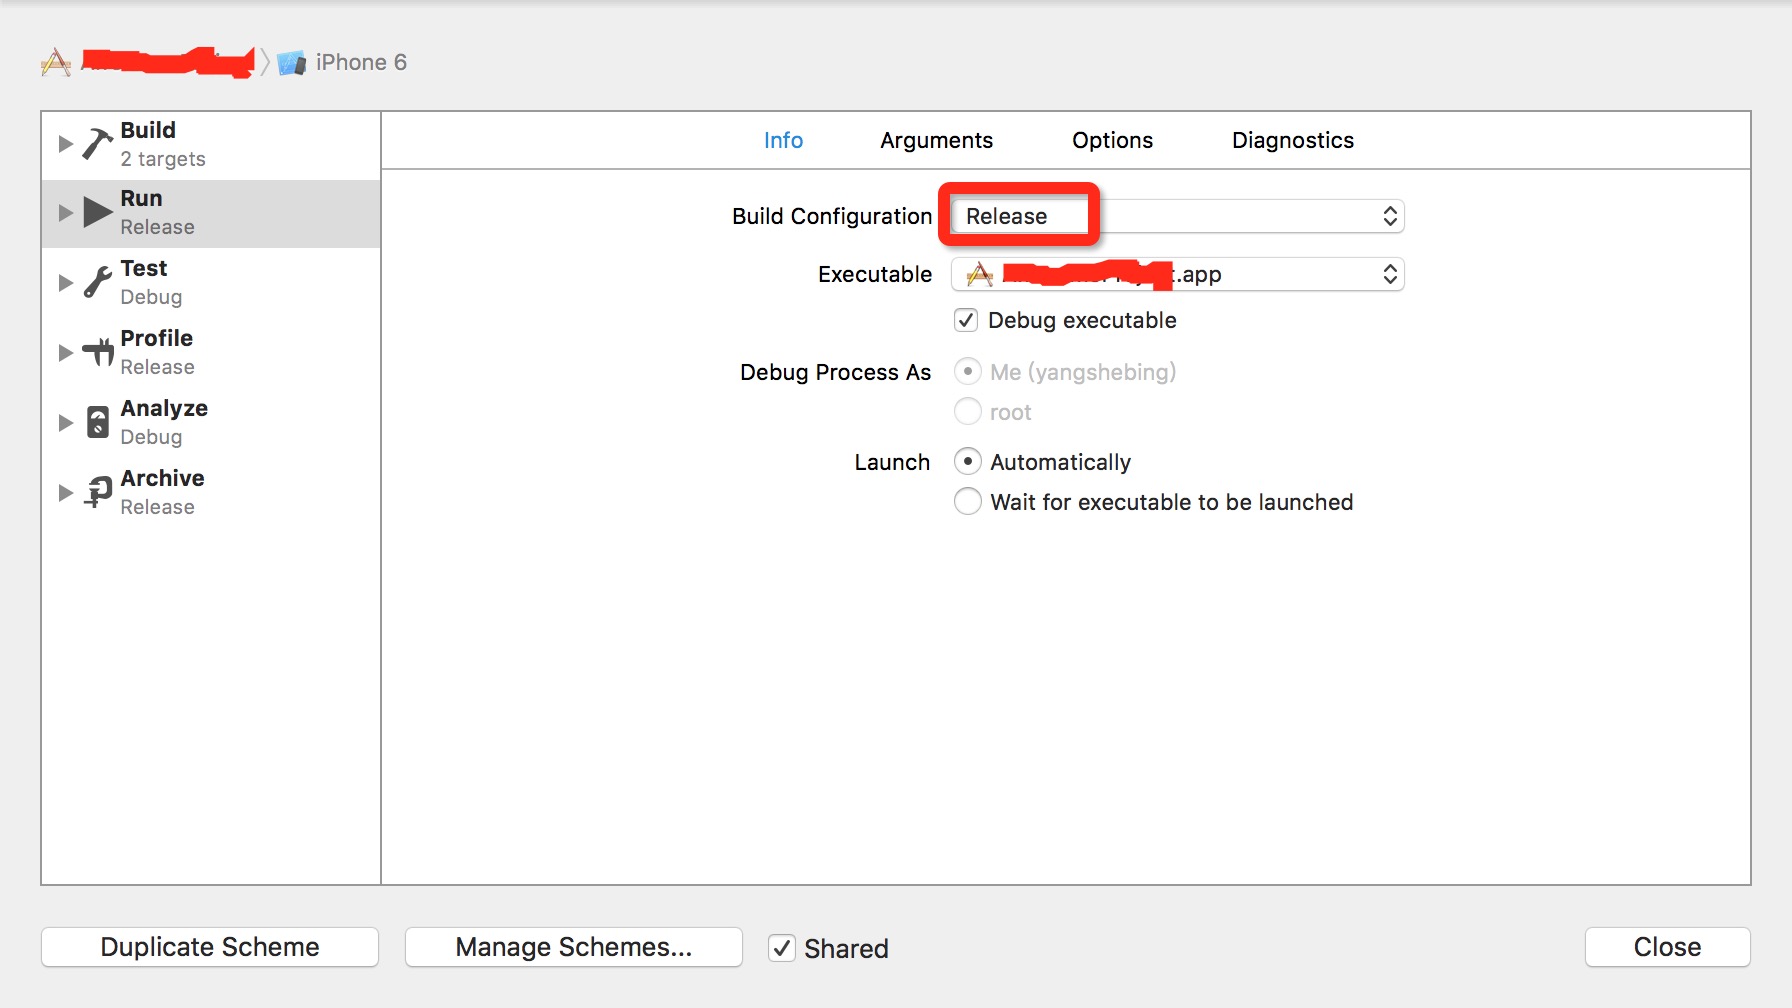
打包上架前必須停用。開啟 Product → Scheme → Edit Scheme(或按 Command + <),在左側選擇 Run,把 Build Configuration 改為 Release 即可。
總結
走到這裡,你應該已經完成環境建置並成功跑起第一個 React Native 專案了。整個過程甚至沒寫幾行程式碼就上螢幕,門檻確實不高。良好的開端是成功的一半,接下來才是真正開始。