
CocoaPods 詳解之進階篇:Podfile 語法與常用命令
一、別忽略 Podfile.lock
執行完 pod install 之後,專案裡會多出一個 Podfile.lock。它看起來與日常開發無關,實際上絕對不能忽略。這個檔案記錄了當下實際安裝的 Pod 版本。以安裝了 SBJson、AFNetworking、Reachability 三個庫為例,內容如下:
 PODS:
  - AFNetworking (2.1.0):
    - AFNetworking/NSURLConnection
    - AFNetworking/NSURLSession
    - AFNetworking/Reachability
    - AFNetworking/Security
    - AFNetworking/Serialization
    - AFNetworking/UIKit
  - AFNetworking/NSURLConnection (2.1.0):
    - AFNetworking/Reachability
    - AFNetworking/Security
    - AFNetworking/Serialization
  - AFNetworking/NSURLSession (2.1.0):
    - AFNetworking/NSURLConnection
    - AFNetworking/Reachability (2.1.0)
  - AFNetworking/Security (2.1.0)
  - AFNetworking/Serialization (2.1.0)
  - AFNetworking/UIKit (2.1.0):
    - AFNetworking/NSURLConnection
  - Reachability (3.0.0)
  - SBJson (4.0.0)

DEPENDENCIES:
  - AFNetworking (~> 2.0)
  - Reachability (~> 3.0.0)
  - SBJson (~> 4.0.0)

SPEC CHECKSUMS:
  AFNetworking: c7d7901a83f631414c7eda1737261f696101a5cd
  Reachability: 500bd76bf6cd8ff2c6fb715fc5f44ef6e4c024f2
  SBJson: f3c686806e8e36ab89e020189ac582ba26ec4220

COCOAPODS: 0.29.0
它最大的價值是團隊協作。當 Podfile 裡沒有鎖定版本時,例如:
pod 'SBJson'
這行的意思是「永遠抓最新版」。團隊中某個人執行 pod install 後,Podfile.lock 就把當時的最新版號記了下來;其他人把含這個檔案的專案 checkout 下來再執行 pod install,裝到的版本就會與第一位同事完全一致。
反過來說,若沒有 Podfile.lock,每個人每次抓到的都是最新版,同一個團隊跑著不同版本的庫——這是協作開發的災難。因此若團隊想升級,只有兩條路:改 Podfile 指向新版本,或執行 pod update。
結論很明確:Podfile.lock 必須納入版本控制。
二、Podfile 檔全解析
Podfile 是我們與 CocoaPods 打交道最頻繁的檔案。由於 CocoaPods 以 Ruby 實作,Podfile 的語法就是 Ruby 語法。
1. Podfile 放哪裡?
慣例是放在專案根目錄:
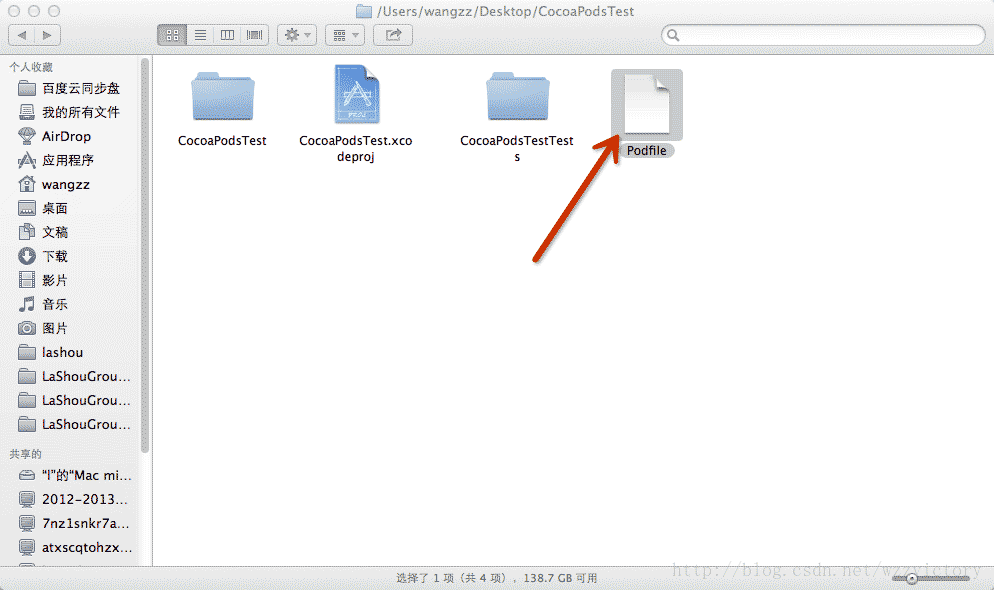
但其實它可以放在任何位置,代價是在 Podfile 開頭用 xcodeproj 關鍵字指明工程路徑:
 xcodeproj "/Users/wangzz/Desktop/CocoaPodsTest/CocoaPodsTest.xcodeproj"

platform :ios
pod 'Reachability', '~> 3.0.0'
pod 'SBJson', '~> 4.0.0'

platform :ios, '7.0'
pod 'AFNetworking', '~> 2.0'
之後進入 Podfile 所在目錄執行 pod install,行為與原本相同,只是產生的相關檔案會落在 Podfile 旁邊:
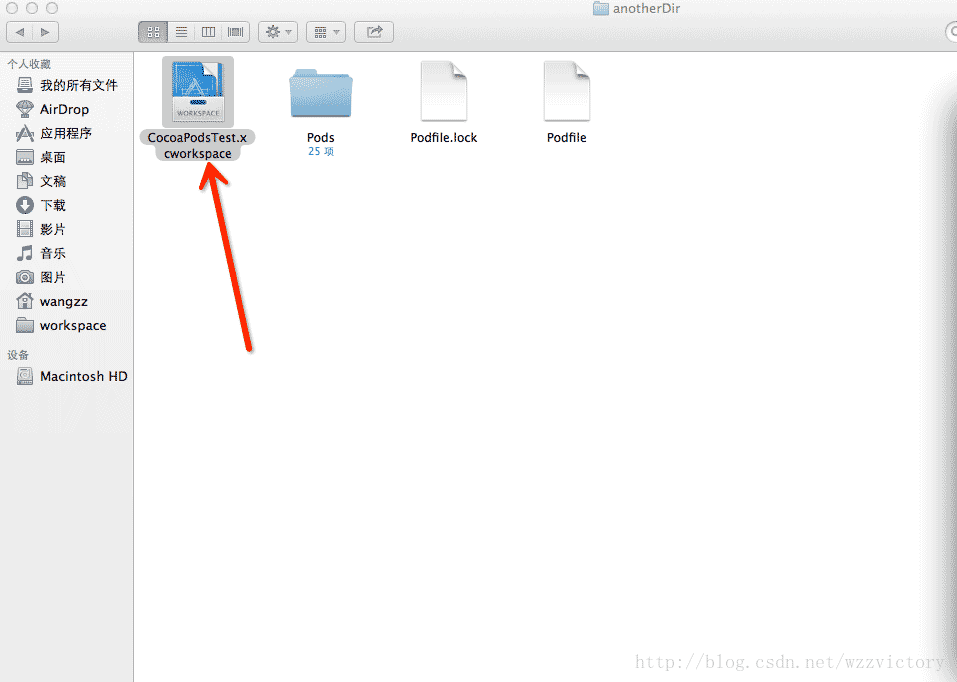
一樣要用這裡產生的 workspace 開啟專案。
2. Podfile 與 target 的對應
Podfile 本質上是在描述 Xcode 專案中的 targets。若沒有明確指定,CocoaPods 會建立一個名為 default 的隱性 target,對應專案中的第一個 target。也就是說,不寫 target 的話,只有第一個 target 能用上這些庫。
要在單一 Podfile 中描述多個 target,做法有兩種。假設專案裡有 CocoaPodsTest 與 Second 兩個 target:
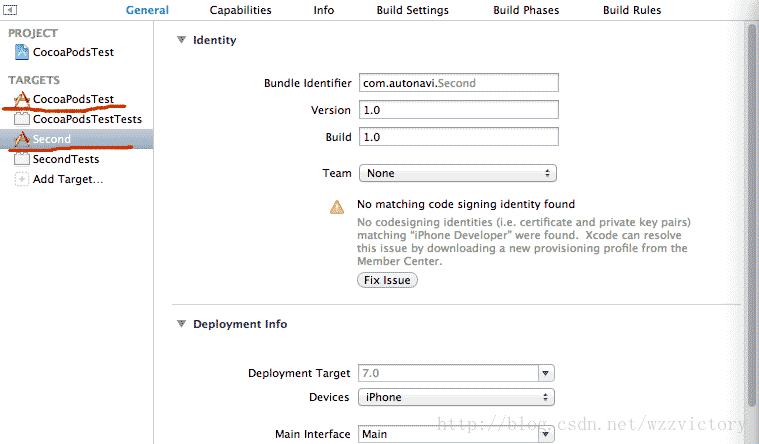
情況一:多個 target 共用同一批庫——用 link_with:
 link_with 'CocoaPodsTest', 'Second'

platform :ios
pod 'Reachability', '~> 3.0.0'
pod 'SBJson', '~> 4.0.0'

platform :ios, '7.0'
pod 'AFNetworking', '~> 2.0'
情況二:各 target 使用完全不同的庫——用 target 區塊:
 target :'CocoaPodsTest' do
    platform :ios
    pod 'Reachability', '~> 3.0.0'
    pod 'SBJson', '~> 4.0.0'
    platform :ios, '7.0'
    pod 'AFNetworking', '~> 2.0'
end

target :'Second' do
    pod 'OpenUDID', '~> 1.0.0'
end
其中 do / end 是一組區塊的起訖標記。
3. 版本寫法
 pod 'AFNetworking'          // 不指定版本,永遠抓最新
 pod 'AFNetworking', '2.0'   // 只用 2.0
 pod 'AFNetworking', '> 2.0'   // 高於 2.0
 pod 'AFNetworking', '>= 2.0'  // 大於或等於 2.0
 pod 'AFNetworking', '< 2.0'   // 小於 2.0
 pod 'AFNetworking', '<= 2.0'  // 小於或等於 2.0
 pod 'AFNetworking', '~> 0.1.2' // 大於等於 0.1.2 且小於 0.2
 pod 'AFNetworking', '~> 0.1'   // 大於等於 0.1 且小於 1.0
 pod 'AFNetworking', '~> 0'     // 效果等同不寫,都是抓最新
~> 是 Ruby 的「蝴蝶結運算子」,語意為「允許最後一位無限升位」,實務上最常用,能在拿到修補更新的同時避免破壞性升版。
三、常用命令
1. pod install
依 Podfile 指定的內容安裝。若 Podfile.lock 存在且 Podfile 未被修改,會以 lock 檔的版本為準。每次改動 Podfile 之後都要重新執行。
2. pod update
若 Podfile 中版本沒寫死,不論有沒有 lock 檔,都會去抓「目前符合條件的最新版」並更新 lock。
3. pod search
$ pod search OpenUDID
輸出範例:
 -> OpenUDID (1.0.0)
    Open source initiative for a universal and persistent UDID solution for iOS.
    pod 'OpenUDID', '~> 1.0.0'
    - Homepage: https://OpenUDID.org
    - Source: https://github.com/ylechelle/OpenUDID.git
    - Versions: 1.0.0 [master repo]
真正要複製的是第三行,貼進 Podfile 即可。
4. pod setup
$ pod setup
輸出會類似:
 Setting up CocoaPods master repo
 Updating 7cd4668..f3d3ced
 Fast-forward
這條命令負責把本地的 Pod 索引 tree 更新到最新。由於每天都有大量新庫與更新,執行起來會相當慢,請耐心等待。若太久沒跑,pod search 是搜不到新庫的。
四、參考文件
https://guides.cocoapods.org/using/index.html
- 上一篇文章: CocoaPods 詳解之製作篇:從零發布自己的第一個 Pod
- 下一篇文章: CocoaPods 完整使用教學:從安裝到第一個專案整合