
iOS 雷達掃描動畫實作:同心圓加扇形旋轉
編輯:iOS 開發綜合
新專案有個需求:做一個雷達掃描效果,中央放使用者頭像,外圈有一道光 continuously 繞著掃。
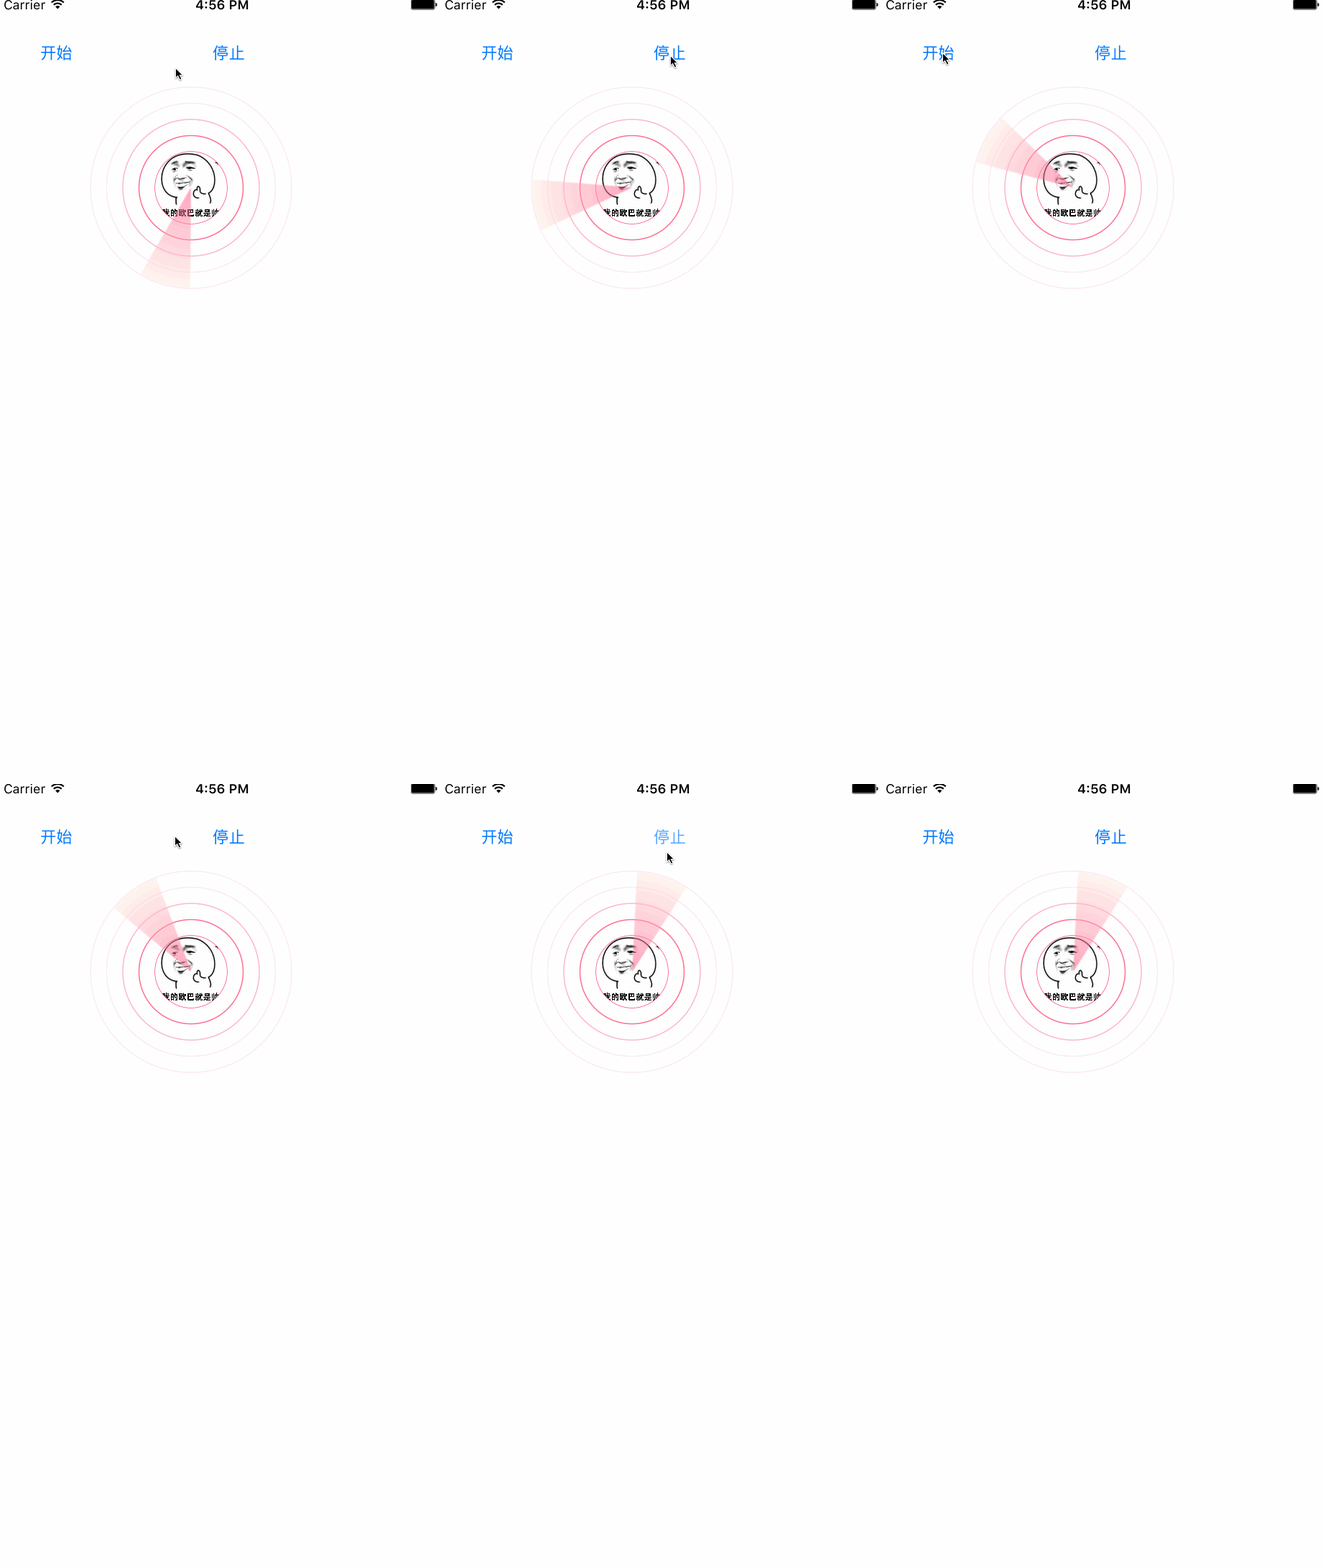
先拆結構
整個雷達圖可以拆成三層:
- 最底層一個圓形 UIImageView,放使用者頭像。
- 幾圈顏色漸層的同心圓,直接在雷達視圖的 drawRect: 裡畫。
- 最上層一個扇形,圓心與雷達圖圓心重合。掃描效果就是讓這個扇形繞圓心旋轉,所以把它獨立成一個類比較清爽。
對外只暴露兩個方法:開始與停止。
對外介面
@interface CPRadarView : UIView

- (void)start;   // 開始掃描
- (void)stop;    // 停止掃描

@end
CPRadarView 實作
typedef NS_ENUM(NSUInteger, SectorAnimationStatus) {
    SectorAnimationUnStart,
    SectorAnimationIsRunning,
    SectorAnimationIsPaused,
};

#define CircleGap 15

@interface CPRadarView ()
@property (nonatomic, strong) CPSectorView *sectorView;   // 扇形視圖
@property (nonatomic, assign) SectorAnimationStatus status;
@end

@implementation CPRadarView

- (instancetype)initWithFrame:(CGRect)frame {
    if (self = [super initWithFrame:frame]) {
        [self setupUI];
        _status = SectorAnimationUnStart;
    }
    return self;
}

- (void)setupUI {
    self.backgroundColor = [UIColor whiteColor];

    CGRect temp = self.frame;
    CGFloat avatarSide = temp.size.width / 3.0;

    // 中央頭像
    UIImageView *imageView = [[UIImageView alloc] initWithFrame:
        CGRectMake((temp.size.width  - avatarSide) / 2.0,
                   (temp.size.height - avatarSide) / 2.0,
                   avatarSide, avatarSide)];
    imageView.layer.cornerRadius = avatarSide / 2.0;
    imageView.layer.masksToBounds = YES;
    imageView.image = [UIImage imageNamed:@"hehe.JPG"];
    [self addSubview:imageView];

    // 上層扇形
    _sectorView = [[CPSectorView alloc] initWithRadius:avatarSide / 2.0 + 4
                                            CircleGap:CircleGap
                                               degree:M_PI / 6];
    CGRect sf = _sectorView.frame;
    sf.origin.x = (self.frame.size.width  - sf.size.width)  / 2.0;
    sf.origin.y = (self.frame.size.height - sf.size.height) / 2.0;
    _sectorView.frame = sf;
    [self addSubview:_sectorView];
}

- (void)start {
    if (_status == SectorAnimationUnStart) {
        _status = SectorAnimationIsRunning;

        CABasicAnimation *rotationAnimation =
            [CABasicAnimation animationWithKeyPath:@"transform.rotation.z"];
        rotationAnimation.toValue   = [NSNumber numberWithFloat:2 * M_PI];
        rotationAnimation.duration  = 5;
        rotationAnimation.cumulative = YES;
        rotationAnimation.removedOnCompletion = NO;
        rotationAnimation.repeatCount = MAXFLOAT;
        rotationAnimation.fillMode = kCAFillModeForwards;

        [_sectorView.layer addAnimation:rotationAnimation forKey:@"rotationAnimation"];
    }

    if (_status == SectorAnimationIsPaused) {
        _status = SectorAnimationIsRunning;
        [self resumeLayer:_sectorView.layer];
    }
}

- (void)stop {
    _status = SectorAnimationIsPaused;
    [self pauseLayer:_sectorView.layer];
}

#pragma mark - 動畫暫停與恢復

- (void)pauseLayer:(CALayer *)layer {
    CFTimeInterval pausedTime = [layer convertTime:CACurrentMediaTime() fromLayer:nil];
    layer.speed = 0.0;
    layer.timeOffset = pausedTime;
}

- (void)resumeLayer:(CALayer *)layer {
    CFTimeInterval pausedTime = [layer timeOffset];
    layer.speed = 1.0;
    layer.timeOffset = 0.0;
    layer.beginTime = 0.0;
    CFTimeInterval timeSincePause =
        [layer convertTime:CACurrentMediaTime() fromLayer:nil] - pausedTime;
    layer.beginTime = timeSincePause;
}

#pragma mark - 畫同心圓

- (void)drawRect:(CGRect)rect {
    CGContextRef context = UIGraphicsGetCurrentContext();

    NSArray *colors = @[
        [UIColor colorWithHexString:@"ff4e7d"],
        [UIColor colorWithHexString:@"fd7293"],
        [UIColor colorWithHexString:@"fcb8cd"],
        [UIColor colorWithHexString:@"fde9f2"],
        [UIColor colorWithHexString:@"fcebf3"]
    ];

    CGFloat radius = rect.size.width / 6.0;
    for (UIColor *color in colors) {
        CGFloat red, green, blue, alpha;
        [color getRed:&red green:&green blue:&blue alpha:&alpha];
        CGContextSetRGBStrokeColor(context, red, green, blue, alpha);
        CGContextSetLineWidth(context, 1);
        CGContextAddArc(context,
                        rect.size.width  / 2.0,
                        rect.size.height / 2.0,
                        radius, 0, 2 * M_PI, 0);
        CGContextDrawPath(context, kCGPathStroke);
        radius += CircleGap;
    }
}

@end
這裡的 pauseLayer: 與 resumeLayer: 是暫停 Core Animation 的標準手法:透過 timeOffset 記住暫停時刻、把 speed 歸零,恢復時再把 beginTime 補回差值。直接 removeAnimation 是沒辦法接著從原處繼續的。
CPSectorView:只負責畫扇形
@interface CPSectorView : UIView

- (instancetype)initWithRadius:(CGFloat)radius degree:(CGFloat)degree;

@end
radius 是扇形半徑,degree 是扇形張角(以弧度表示)。
@interface CPSectorView ()
@property (nonatomic, assign) CGFloat radius;
@property (nonatomic, assign) CGFloat degree;
@end

@implementation CPSectorView

- (instancetype)initWithRadius:(CGFloat)radius degree:(CGFloat)degree {
    self = [super initWithFrame:CGRectMake(0, 0, 2 * radius, 2 * radius)];
    if (self) {
        _degree = degree;
        _radius = radius;
    }
    self.backgroundColor = [UIColor clearColor];
    return self;
}

- (void)drawRect:(CGRect)rect {
    CGContextRef ctx = UIGraphicsGetCurrentContext();

    // 先畫出扇形遮罩
    UIGraphicsBeginImageContext(rect.size);
    CGContextRef imgCtx = UIGraphicsGetCurrentContext();
    CGPoint center = CGPointMake(CGRectGetMidX(rect), CGRectGetMidY(rect));

    CGContextMoveToPoint(imgCtx, center.x, center.y);
    CGContextSetFillColor(imgCtx, CGColorGetComponents([UIColor blackColor].CGColor));
    CGContextAddArc(imgCtx, center.x, center.y, _radius,
                    _degree / 2.0, -_degree / 2.0, 1);
    CGContextFillPath(imgCtx);

    CGImageRef mask = CGBitmapContextCreateImage(UIGraphicsGetCurrentContext());
    UIGraphicsEndImageContext();

    CGContextClipToMask(ctx, self.bounds, mask);

    // 再填徑向漸層
    CGFloat components[8] = {
        1.000, 0.306, 0.490, 0.5,   // 起始色 r,g,b,alpha
        0.992, 0.937, 0.890, 0.5    // 結束色
    };

    CGColorSpaceRef space = CGColorSpaceCreateDeviceRGB();
    CGGradientRef gradient = CGGradientCreateWithColorComponents(space, components, NULL, 2);
    CGColorSpaceRelease(space);

    CGPoint start = center, end = center;
    CGContextDrawRadialGradient(ctx, gradient,
                                start, 0.0f,
                                end, _radius, 0);

    CGGradientRelease(gradient);
}

@end
如果不想要扇形的徑向漸層,把 drawRect: 裡的漸層部分拿掉,改用單純的 CGContextMoveToPoint 加 CGContextAddArc 填色即可,程式碼裡也留了對應的註解版本。