
iOS 10 適配完全指南:10 個必看重點整理
隨著 iOS 10 正式登場,旗下 App 都需要跟上這波適配浪潮。以下是我在實戰中歸納的 iOS 10 適配要點,涵蓋系統判斷、隱私權限、色彩顯示到通知機制等常見坑位,若內容有疏漏,也歡迎大家一起討論指正。
一、系統版本判斷方式失效
判斷系統版本時,請避免使用下面這種取首位字符的老寫法:
#define isiOS10 ([[[[UIDevice currentDevice] systemVersion] substringToIndex:1] intValue]>=10)
這種寫法在 iOS 10 上永遠返回 NO,因為 substringToIndex:1 會把「10」截成「1」,被誤判為 iOS 1。
Objective-C 中建議改用下列宏定義進行版本比較:
#define SYSTEM_VERSION_EQUAL_TO(v) ([[[UIDevice currentDevice] systemVersion] compare:v options:NSNumericSearch] == NSOrderedSame)
#define SYSTEM_VERSION_GREATER_THAN(v) ([[[UIDevice currentDevice] systemVersion] compare:v options:NSNumericSearch] == NSOrderedDescending)
#define SYSTEM_VERSION_GREATER_THAN_OR_EQUAL_TO(v) ([[[UIDevice currentDevice] systemVersion] compare:v options:NSNumericSearch] != NSOrderedAscending)
#define SYSTEM_VERSION_LESS_THAN(v) ([[[UIDevice currentDevice] systemVersion] compare:v options:NSNumericSearch] == NSOrderedAscending)
#define SYSTEM_VERSION_LESS_THAN_OR_EQUAL_TO(v) ([[[UIDevice currentDevice] systemVersion] compare:v options:NSNumericSearch] != NSOrderedDescending)
也可以直接呼叫 NSProcessInfo 的 API:
if ([[NSProcessInfo processInfo] isOperatingSystemAtLeastVersion:(NSOperatingSystemVersion){.majorVersion = 9, .minorVersion = 1, .patchVersion = 0}]) { NSLog(@"Hello from > iOS 9.1");}
if ([NSProcessInfo.processInfo isOperatingSystemAtLeastVersion:(NSOperatingSystemVersion){9,3,0}]) { NSLog(@"Hello from > iOS 9.3");}
或者比對 Foundation 版本常數:
if (NSFoundationVersionNumber > NSFoundationVersionNumber_iOS_9_0) { // do stuff for iOS 9 and newer} else { // do stuff for older versions than iOS 9}
有時會缺少部分常數。NSFoundationVersionNumber 定義在 NSObjCRuntime.h 中,早期版本(如 Xcode 7.3.1)只涵蓋到 iPhone OS 2 至 NSFoundationVersionNumber_iOS_8_4 1144.17。到了 iOS 10(Xcode 8),蘋果補齊了後續的數字,並為未來版本預留空間。
#define NSFoundationVersionNumber_iOS_9_0 1240.1
#define NSFoundationVersionNumber_iOS_9_1 1241.14
#define NSFoundationVersionNumber_iOS_9_2 1242.12
#define NSFoundationVersionNumber_iOS_9_3 1242.12
#define NSFoundationVersionNumber_iOS_9_4 1280.25
#define NSFoundationVersionNumber_iOS_9_x_Max 1299
Swift 中則可以這樣寫:
if NSProcessInfo().isOperatingSystemAtLeastVersion(NSOperatingSystemVersion(majorVersion: 10, minorVersion: 0, patchVersion: 0)) { // 代碼塊 }
或使用可用性判斷:
if #available(iOS 10.0, *) { // 代碼塊 } else { // 代碼塊 }
二、隱私數據訪問崩潰
若專案訪問了相機、相簿、通訊錄等隱私數據,用 Xcode 8 編譯後執行時會直接 crash,控制台會印出類似下面的訊息:

這是因為 iOS 加強了對用戶安全與隱私的保護,在申請多數私有權限時都必須補上用途說明;而 Xcode 8 之前的版本仍沿用系統的權限提示框。
解法很簡單:在 info.plist 中補上對應的 UsageDescription 鍵值即可,value 內容可自訂。以下列出常見的鍵(Source Code 模式):
<!-- 相簿 -->
<key>NSPhotoLibraryUsageDescription</key>
<string>App需要您的同意,才能訪問相冊</string>
<!-- 相機 -->
<key>NSCameraUsageDescription</key>
<string>App需要您的同意,才能訪問相機</string>
<!-- 麥克風 -->
<key>NSMicrophoneUsageDescription</key>
<string>App需要您的同意,才能訪問麥克風</string>
<!-- 位置 -->
<key>NSLocationUsageDescription</key>
<string>App需要您的同意,才能訪問位置</string>
<!-- 在使用期間訪問位置 -->
<key>NSLocationWhenInUseUsageDescription</key>
<string>App需要您的同意,才能在使用期間訪問位置</string>
<!-- 始終訪問位置 -->
<key>NSLocationAlwaysUsageDescription</key>
<string>App需要您的同意,才能始終訪問位置</string>
<!-- 日歷 -->
<key>NSCalendarsUsageDescription</key>
<string>App需要您的同意,才能訪問日歷</string>
<!-- 提醒事項 -->
<key>NSRemindersUsageDescription</key>
<string>App需要您的同意,才能訪問提醒事項</string>
<!-- 運動與健身 -->
<key>NSMotionUsageDescription</key>
<string>App需要您的同意,才能訪問運動與健身</string>
<!-- 健康更新 -->
<key>NSHealthUpdateUsageDescription</key>
<string>App需要您的同意,才能訪問健康更新</string>
<!-- 健康分享 -->
<key>NSHealthShareUsageDescription</key>
<string>App需要您的同意,才能訪問健康分享</string>
<!-- 藍牙 -->
<key>NSBluetoothPeripheralUsageDescription</key>
<string>App需要您的同意,才能訪問藍牙</string>
<!-- 媒體資料庫 -->
<key>NSAppleMusicUsageDescription</key>
<string>App需要您的同意,才能訪問媒體資料庫</string>
若上述方式不生效,還需要申請後台權限,寫法如下:
<key>UIBackgroundModes</key>
<array>
<!-- 在這裡寫上你在後台模式下要使用權限對應的key -->
<string>location</string>
...
</array>
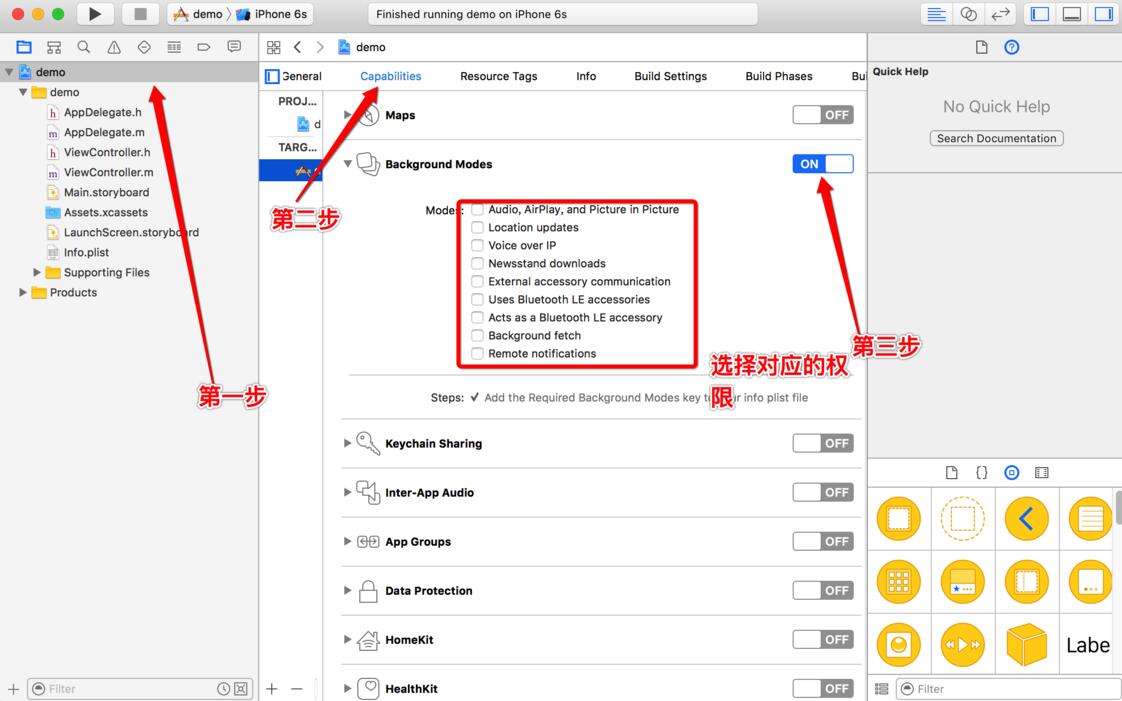
也可以在 Xcode 中選取目前的 target,進入 Capabilities 找到 Background Modes 並開啟,再勾選對應權限。
三、UIColor 的色彩問題
官方文件指出,多數以 Core 開頭的圖形框架與 AVFoundation 都提升了對擴展像素及廣色域色彩空間的支援。透過圖形堆疊擴展,現在比以往更容易支援廣色域顯示設備。UIKit 擴展後可在 sRGB 色彩空間下運行,效能更佳,也能在更廣的色域中搭配 sRGB 顏色。若你的專案透過低階 API 自行處理圖形,建議改用 sRGB,也就是把原本以 RGB 轉換顏色的地方改為 sRGB。為此 UIColor 新增了兩個 API:
- (UIColor *)initWithDisplayP3Red:(CGFloat)displayP3Red green:(CGFloat)green blue:(CGFloat)blue alpha:(CGFloat)alpha NS_AVAILABLE_IOS(10_0);
+ (UIColor *)colorWithDisplayP3Red:(CGFloat)displayP3Red green:(CGFloat)green blue:(CGFloat)blue alpha:(CGFloat)alpha NS_AVAILABLE_IOS(10_0);
四、真彩色顯示(True Tone)
真彩色顯示會依據光感應器自動調節,在特定環境下取得顯示效果與效能的平衡。若要啟用,可在 info.plist 中設定(Source Code 模式):
<key>UIWhitePointAdaptivityStyle</key>
它有五種取值:
<string>UIWhitePointAdaptivityStyleStandard</string> // 標准模式
<string>UIWhitePointAdaptivityStyleReading</string> // 閱讀模式
<string>UIWhitePointAdaptivityStylePhoto</string> // 圖片模式
<string>UIWhitePointAdaptivityStyleVideo</string> // 視頻模式
<string>UIWhitePointAdaptivityStyleStandard</string> // 游戲模式
也就是說,若你的專案屬於閱讀類,就選 UIWhitePointAdaptivityStyleReading。五種模式的顯示效果由上而下遞減,因此若是圖片處理類 App 卻選了閱讀模式,過高的效果反而會拖累效能。
五、ATS 網路安全問題
1. iOS 9 起,預設禁止非 HTTPS 的網路連線,我們可以在 info.plist 中加入 NSAppTransportSecurity 字典,將 NSAllowsArbitraryLoads 設為 YES 以關閉 ATS;
2. 自 2017 年 1 月 1 日起,所有新提交的 App 預設不允許再用 NSAllowsArbitraryLoads 繞過 ATS,預設只能訪問加密強度足夠(TLS V1.2 以上)的 HTTPS 內容;
3. 可改用 NSExceptionDomains 為特定域名設定白名單,對指定域名開放 HTTP 內容以通過審核。例如整合了第三方登入分享 SDK 時就能用這招,以下以新浪 SDK 為例(Source Code 模式):
<key>NSAppTransportSecurity</key>
<dict>
<key>NSExceptionDomains</key>
<dict>
<key>sina.cn</key>
<dict>
<key>NSThirdPartyExceptionMinimumTLSVersion</key>
<string>TLSv1.0</string>
<key>NSThirdPartyExceptionRequiresForwardSecrecy</key>
<false/>
<key>NSIncludesSubdomains</key>
<true/>
</dict>
<key>weibo.cn</key>
<dict>
<key>NSThirdPartyExceptionMinimumTLSVersion</key>
<string>TLSv1.0</string>
<key>NSThirdPartyExceptionRequiresForwardSecrecy</key>
<false/>
<key>NSIncludesSubdomains</key>
<true/>
</dict>
<key>weibo.com</key>
<dict>
<key>NSThirdPartyExceptionMinimumTLSVersion</key>
<string>TLSv1.0</string>
<key>NSThirdPartyExceptionRequiresForwardSecrecy</key>
<false/>
<key>NSIncludesSubdomains</key>
<true/>
</dict>
<key>sinaimg.cn</key>
<dict>
<key>NSThirdPartyExceptionMinimumTLSVersion</key>
<string>TLSv1.0</string>
<key>NSThirdPartyExceptionRequiresForwardSecrecy</key>
<false/>
<key>NSIncludesSubdomains</key>
<true/>
</dict>
<key>sinajs.cn</key>
<dict>
<key>NSThirdPartyExceptionMinimumTLSVersion</key>
<string>TLSv1.0</string>
<key>NSThirdPartyExceptionRequiresForwardSecrecy</key>
<false/>
<key>NSIncludesSubdomains</key>
<true/>
</dict>
<key>sina.com.cn</key>
<dict>
<key>NSThirdPartyExceptionMinimumTLSVersion</key>
<string>TLSv1.0</string>
<key>NSThirdPartyExceptionRequiresForwardSecrecy</key>
<false/>
<key>NSIncludesSubdomains</key>
<true/>
</dict>
</dict>
</dict>
4. iOS 10 的 info.plist 新增了 NSAllowsArbitraryLoadsInWebContent 鍵,允許任意網頁載入,同時蘋果仍會用 ATS 保護你的 App;
5. 安全傳輸不再支援 SSLv3,建議盡快停用 SHA1 與 3DES 演算法。
六、UIStatusBar 的問題
在 iOS 10 中,若仍沿用舊方式設定 UIStatusBar 的樣式或控制其隱藏顯示,會出現方法過期的警告,如下圖:

上述方法在 iOS 10 已不可用。要修改 UIStatusBar 的樣式或狀態,請改用下列屬性與方法:
@property(nonatomic, readonly) UIStatusBarStyle preferredStatusBarStyle NS_AVAILABLE_IOS(7_0) __TVOS_PROHIBITED; // Defaults to UIStatusBarStyleDefault
@property(nonatomic, readonly) BOOL prefersStatusBarHidden NS_AVAILABLE_IOS(7_0) __TVOS_PROHIBITED; // Defaults to NO
- (UIStatusBarStyle)preferredStatusBarStyle NS_AVAILABLE_IOS(7_0) __TVOS_PROHIBITED; // Defaults to UIStatusBarStyleDefault
- (BOOL)prefersStatusBarHidden NS_AVAILABLE_IOS(7_0) __TVOS_PROHIBITED; // Defaults to NO
// Override to return the type of animation that should be used for status bar changes for this view controller. This currently only affects changes to prefersStatusBarHidden.
- (UIStatusBarAnimation)preferredStatusBarUpdateAnimation NS_AVAILABLE_IOS(7_0) __TVOS_PROHIBITED; // Defaults to UIStatusBarAnimationFade
七、UITextField 的 textContentType
iOS 10 為 UITextField 新增了 textContentType 欄位,型別為 UITextContentType 列舉,用來指定輸入框的類型,讓系統能分析用戶語義:電話類型就建議電話號碼,地址類型就建議地址。可在 <UIKit/UITextInputTraits.h> 中查看,可選類型如下:
UIKIT_EXTERN UITextContentType const UITextContentTypeName NS_AVAILABLE_IOS(10_0);
UIKIT_EXTERN UITextContentType const UITextContentTypeNamePrefix NS_AVAILABLE_IOS(10_0);
UIKIT_EXTERN UITextContentType const UITextContentTypeGivenName NS_AVAILABLE_IOS(10_0);
UIKIT_EXTERN UITextContentType const UITextContentTypeMiddleName NS_AVAILABLE_IOS(10_0);
UIKIT_EXTERN UITextContentType const UITextContentTypeFamilyName NS_AVAILABLE_IOS(10_0);
UIKIT_EXTERN UITextContentType const UITextContentTypeNameSuffix NS_AVAILABLE_IOS(10_0);
UIKIT_EXTERN UITextContentType const UITextContentTypeNickname NS_AVAILABLE_IOS(10_0);
UIKIT_EXTERN UITextContentType const UITextContentTypeJobTitle NS_AVAILABLE_IOS(10_0);
UIKIT_EXTERN UITextContentType const UITextContentTypeOrganizationName NS_AVAILABLE_IOS(10_0);
UIKIT_EXTERN UITextContentType const UITextContentTypeLocation NS_AVAILABLE_IOS(10_0);
UIKIT_EXTERN UITextContentType const UITextContentTypeFullStreetAddress NS_AVAILABLE_IOS(10_0);
UIKIT_EXTERN UITextContentType const UITextContentTypeStreetAddressLine1 NS_AVAILABLE_IOS(10_0);
UIKIT_EXTERN UITextContentType const UITextContentTypeStreetAddressLine2 NS_AVAILABLE_IOS(10_0);
UIKIT_EXTERN UITextContentType const UITextContentTypeAddressCity NS_AVAILABLE_IOS(10_0);
UIKIT_EXTERN UITextContentType const UITextContentTypeAddressState NS_AVAILABLE_IOS(10_0);
UIKIT_EXTERN UITextContentType const UITextContentTypeAddressCityAndState NS_AVAILABLE_IOS(10_0);
UIKIT_EXTERN UITextContentType const UITextContentTypeSublocality NS_AVAILABLE_IOS(10_0);
UIKIT_EXTERN UITextContentType const UITextContentTypeCountryName NS_AVAILABLE_IOS(10_0);
UIKIT_EXTERN UITextContentType const UITextContentTypePostalCode NS_AVAILABLE_IOS(10_0);
UIKIT_EXTERN UITextContentType const UITextContentTypeTelephoneNumber NS_AVAILABLE_IOS(10_0);
UIKIT_EXTERN UITextContentType const UITextContentTypeEmailAddress NS_AVAILABLE_IOS(10_0);
UIKIT_EXTERN UITextContentType const UITextContentTypeURL NS_AVAILABLE_IOS(10_0);
UIKIT_EXTERN UITextContentType const UITextContentTypeCreditCardNumber NS_AVAILABLE_IOS(10_0);
八、UserNotifications(用戶通知)
iOS 10 把通知相關 API 全部統一,並在此基礎上開放更多自訂能力,還能捕捉各個通知狀態的回呼。以往的通知模式是:接收方先做好準備,然後一次發送,收不收得到都不管,也不關心發送者;而新的用戶通知則像網路請求般,先發 request 再拿 response,還封裝了 error,可在各狀態方法中做額外操作,也能取得發送者等資訊。此功能的標頭檔為:
#import <UserNotifications/UserNotifications.h>
主要包含以下檔案:
#import <UserNotifications/NSString+UserNotifications.h>
#import <UserNotifications/UNError.h>
#import <UserNotifications/UNNotification.h>
#import <UserNotifications/UNNotificationAction.h>
#import <UserNotifications/UNNotificationAttachment.h>
#import <UserNotifications/UNNotificationCategory.h>
#import <UserNotifications/UNNotificationContent.h>
#import <UserNotifications/UNNotificationRequest.h>
#import <UserNotifications/UNNotificationResponse.h>
#import <UserNotifications/UNNotificationSettings.h>
#import <UserNotifications/UNNotificationSound.h>
#import <UserNotifications/UNNotificationTrigger.h>
#import <UserNotifications/UNUserNotificationCenter.h>
#import <UserNotifications/UNNotificationServiceExtension.h>
九、UICollectionViewCell 的優化
在 iOS 10 之前,若 UICollectionView 上有大量 cell,當用戶快速滑動時,整個列表的卡頓會相當明顯。這與系統的重用機制有關:cell 準備載入螢幕時,整行 cell 都已載入完成並在螢幕外待命,正是造成卡頓的主因,專業術語稱為「掉幀」。要讓用戶感受不到卡頓,App 必須達到 60 幀/秒,也就是每幀約 16 毫秒刷新一次。
iOS 10 之前 UICollectionViewCell 的生命週期:
1. 用戶滑動螢幕,螢幕外有個 cell 準備載入,先從 reuse 佇列取出,呼叫 prepareForReuse 方法,在此重置狀態、載入新數據;
2. 繼續滑動時呼叫 cellForItemAtIndexPath 方法,為 cell 賦值模型並返回給系統;
3. 當 cell 即將進入螢幕時呼叫 willDisplayCell 方法,做最後的準備;
4. willDisplayCell 執行完畢後 cell 進入螢幕;當 cell 完全離開螢幕,則呼叫 didEndDisplayingCell 方法。
iOS 10 UICollectionViewCell 的生命週期:
1. 用戶滑動螢幕,螢幕外有 cell 準備載入,從 reuse 佇列取出後即呼叫 prepareForReuse。差別在於:以前是 cell 上緣即將進入螢幕時才呼叫,iOS 10 提前到 cell 還在螢幕外時就呼叫;
2. 在 cellForItemAtIndexPath 中建立 cell、填充數據、刷新狀態,同樣比以往提前;
3. 繼續滑動,當 cell 即將需要顯示時才呼叫 willDisplayCell,原則是「何時需要顯示,何時才呼叫 willDisplayCell」;
4. cell 完全離開螢幕後呼叫 didEndDisplayingCell,與以往相同,cell 進入重用佇列。
在 iOS 10 之前,cell 只能從重用佇列取出再走一遍生命週期,並由 cellForItemAtIndexPath 建立或生成。而在 iOS 10 中,系統會將 cell 保留一段時間,當用戶把 cell 滑出螢幕後又滑回來,cell 不必再走一遍生命週期,只需呼叫 willDisplayCell 就能重新出現。此外,iOS 10 是一個一個載入 cell,而以前是一行一行載入,這能有效提升效能。
iOS 10 新增的 Pre-Fetching 預加載:為降低 UICollectionViewCell 載入時的耗時,iOS 10 除了資料來源與代理協議外,新增了 UICollectionViewDataSourcePrefetching 協議,其中定義了兩個方法:
- (void)collectionView:(UICollectionView *)collectionView prefetchItemsAtIndexPaths:(NSArray<NSIndexPath *> *)indexPaths NS_AVAILABLE_IOS(10_0);
- (void)collectionView:(UICollectionView *)collectionView cancelPrefetchingForItemsAtIndexPaths:(NSArray<NSIndexPath *> *)indexPaths NS_AVAILABLE_IOS(10_0);
prefetchItemsAtIndexPaths 方法用於異步預加載數據,其中 indexPaths 陣列是有序的,代表 item 接收數據的順序;cancelPrefetchingForItemsAtIndexPaths 則是選用方法,可用來在滑動中取消或降低提前加載的優先級。注意:此協議並不能取代原本讀取數據的方法,僅作為輔助。Pre-Fetching 預加載同樣適用於 UITableViewCell。
十、UIRefreshControl 的使用
iOS 10 中,UIRefreshControl 可直接用於 UICollectionView 與 UITableView,並擺脫了 UITableViewController 的束縛。如今 RefreshControl 是 UIScrollView 的一個屬性。使用方式如下:
UIRefreshControl *refreshControl = [[UIRefreshControl alloc] init];
[refreshControl addTarget:self action:@selector(loadData) forControlEvents:UIControlEventValueChanged];
collectionView.refreshControl = refreshControl;
以上便是 iOS 10 適配的十個重點整理,希望對大家的開發有所幫助。
- 上一篇文章: iOS 10 適配常見坑:SDK、權限、狀態欄與字體
- 下一篇文章: iOS 10 適配踩坑實錄:六大常見問題整理