
iOS 10 新特性適配與 Xcode 8 新特性解析
iOS 10 新特性
SiriKit
SiriKit 功能非常強大,支援音訊、視訊、訊息收發、搜尋照片、預訂行程、管理鍛煉等等。使用時,Siri 會發送 Intent 物件,裡面包含用戶的請求與各種資料,我們可以對這個 intent 處理並選擇適當的響應。這個功能主要看這兩個頭檔(#import ...)。
Proactive Suggestions 系統預先建議
背景是 iOS 9 時系統給出的主動建議會透過 Spotlight 搜尋、Safari 搜尋、Handoff 或 Siri 建議呈現。iOS 10 之後新增了鍵盤 QuickType 建議、地圖、車載娛樂、應用切換、Siri 交互、鎖屏播放等。例如你正在某個 App 裡看一家酒店,可用 mapitem 屬性保存這個酒店的位置,接著切換到地圖 App 時這個位置就能自動提供使用。若要這樣利用系統共享位置,需指定經緯度、地名、電話等屬性,以便 Siri 直接調起。
User Notifications 用戶通知
整體意思是支援了很多用戶定義的通知,並能捕捉各個通知狀態的回呼。以往通知是「想接收的都提前準備好,一次全量分發,沒收到也不管」,現在用戶通知做成了類似網路請求的流程:先發 request 再得到 response,甚至封裝了 error,可以在各狀態方法中做額外操作,並能取到發送者等欄位。相關頭檔如下:
#import <UserNotifications/NSString+UserNotifications.h> #import <UserNotifications/UNError.h> #import <UserNotifications/UNNotification.h> #import <UserNotifications/UNNotificationAction.h> #import <UserNotifications/UNNotificationAttachment.h> #import <UserNotifications/UNNotificationCategory.h> #import <UserNotifications/UNNotificationContent.h> #import <UserNotifications/UNNotificationRequest.h> #import <UserNotifications/UNNotificationResponse.h> #import <UserNotifications/UNNotificationSettings.h> #import <UserNotifications/UNNotificationSound.h> #import <UserNotifications/UNNotificationTrigger.h> #import <UserNotifications/UNUserNotificationCenter.h> #import <UserNotifications/UNNotificationServiceExtension.h>
UITextField
iOS 10 中 UITextField 新增了 textContentType 欄位,型別為 UITextContentType,是一個枚舉,用來指定輸入框類型,以便系統分析用戶語義:是電話類型就建議電話,是地址類型就建議地址。可在對應頭檔中看到:
UIKIT_EXTERN UITextContentType const UITextContentTypeName NS_AVAILABLE_IOS(10_0); UIKIT_EXTERN UITextContentType const UITextContentTypeNamePrefix NS_AVAILABLE_IOS(10_0); UIKIT_EXTERN UITextContentType const UITextContentTypeGivenName NS_AVAILABLE_IOS(10_0); UIKIT_EXTERN UITextContentType const UITextContentTypeMiddleName NS_AVAILABLE_IOS(10_0); UIKIT_EXTERN UITextContentType const UITextContentTypeFamilyName NS_AVAILABLE_IOS(10_0); UIKIT_EXTERN UITextContentType const UITextContentTypeNameSuffix NS_AVAILABLE_IOS(10_0); UIKIT_EXTERN UITextContentType const UITextContentTypeNickname NS_AVAILABLE_IOS(10_0); UIKIT_EXTERN UITextContentType const UITextContentTypeJobTitle NS_AVAILABLE_IOS(10_0); UIKIT_EXTERN UITextContentType const UITextContentTypeOrganizationName NS_AVAILABLE_IOS(10_0); UIKIT_EXTERN UITextContentType const UITextContentTypeLocation NS_AVAILABLE_IOS(10_0); UIKIT_EXTERN UITextContentType const UITextContentTypeFullStreetAddress NS_AVAILABLE_IOS(10_0); UIKIT_EXTERN UITextContentType const UITextContentTypeStreetAddressLine1 NS_AVAILABLE_IOS(10_0); UIKIT_EXTERN UITextContentType const UITextContentTypeStreetAddressLine2 NS_AVAILABLE_IOS(10_0); UIKIT_EXTERN UITextContentType const UITextContentTypeAddressCity NS_AVAILABLE_IOS(10_0); UIKIT_EXTERN UITextContentType const UITextContentTypeAddressState NS_AVAILABLE_IOS(10_0); UIKIT_EXTERN UITextContentType const UITextContentTypeAddressCityAndState NS_AVAILABLE_IOS(10_0); UIKIT_EXTERN UITextContentType const UITextContentTypeSublocality NS_AVAILABLE_IOS(10_0); UIKIT_EXTERN UITextContentType const UITextContentTypeCountryName NS_AVAILABLE_IOS(10_0); UIKIT_EXTERN UITextContentType const UITextContentTypePostalCode NS_AVAILABLE_IOS(10_0); UIKIT_EXTERN UITextContentType const UITextContentTypeTelephoneNumber NS_AVAILABLE_IOS(10_0); UIKIT_EXTERN UITextContentType const UITextContentTypeEmailAddress NS_AVAILABLE_IOS(10_0); UIKIT_EXTERN UITextContentType const UITextContentTypeURL NS_AVAILABLE_IOS(10_0); UIKIT_EXTERN UITextContentType const UITextContentTypeCreditCardNumber
Integrating with the Messages App 與系統短信 App 交互
對訊息支援很大,可模擬發訊息、收訊息、發郵件等,並提供了 UI 介面,也提供一些額外擴展的 API,如表情貼圖區域。WWDC2016 上提到的各種訊息新操作,在頭檔中都能找到對應 API。
Speech Recognition 語音識別轉文字
這個類別的 API 與方法調用都非常清晰,使用起來很方便。對語音辨識領域來說是個不小的衝擊——Apple 已做到系統原生支援語音轉文字,確實厲害。
Wide Color 寬域顏色
官方原話是:大多數 core 開頭的圖形框架與 AVFoundation 都大幅提升了對擴展像素與寬色域色彩空間的支援,透過圖形堆疊擴展,比以往支援廣色域的顯示裝置更容易。現在對 UIKit 擴展可在 sRGB 色彩空間下工作,性能更好,也能在更廣泛的色域搭配 sRGB 顏色。對於依賴 UIKit clamp component values 的應用,或使用較低階 API 自行做圖像處理的,都建議用 sRGB。
看了下 UIColor 類,發現多了兩個 iOS 10 新增的 API:
+ (UIColor *)colorWithDisplayP3Red:(CGFloat)displayP3Red green:(CGFloat)green blue:(CGFloat)blue alpha:(CGFloat)alpha NS_AVAILABLE_IOS(10_0); - (UIColor *)initWithDisplayP3Red:(CGFloat)displayP3Red green:(CGFloat)green blue:(CGFloat)blue alpha:(CGFloat)alpha NS_AVAILABLE_IOS(10_0);
細節都一樣,只是一個類方法、一個實例方法。我的理解是:以前用 colorWithRGB 的地方現在都換成這個方法。大多數公司應該都抽成了 RGB(a,g,b,a) 這種巨集,那就改一下巨集定義即可。
Adapting to the True Tone Display 真彩色顯示
真彩色顯示會依光感應器自動調節,達到特定環境下顯示與效能的平衡。若需要這個功能,要在 info.plist 裡配置 UIWhitePointAdaptivityStyle,共有五種選擇:
1.UIWhitePointAdaptivityStyleStandard 標準
2.UIWhitePointAdaptivityStyleReading 閱讀
3.UIWhitePointAdaptivityStylePhoto 圖片
4.UIWhitePointAdaptivityStyleVideo 視訊
5.UIWhitePointAdaptivityStyleGame 遊戲
官方說得很清楚:圖片處理類 App 就直接配 stylePhoto,閱讀類就配 styleReading。這五種形式的顯示效果自上而下遞減,我理解是閱讀時給你最好的效果,但遊戲時若也給那麼好的效果會影響效能,就給你相對次一點的顯示效果讓效能更流暢。
App Search Enhancements 應用搜索增強
iOS 10 的搜尋功能做了增強:應用程式內搜尋、搜尋傳遞、考慮私人差異、結果可視化。使用 CSSearchQuery 類並呼叫 Core Spotlight 的 API,可以不必自己維護搜尋索引,關鍵字處理與不同類別差異導致的排序都由 Apple 幫你處理。搜尋結果還能往下傳遞,例如用 Core Spotlight 搜尋「火車站」,點進去後該地圖類 App 會接收到「火車站」欄位並在應用內也完成搜尋。支援此功能需配置 plist:key-value 設 CoreSpotlightContinuation-YES,並設置 CSQueryContinuationActionType(#import ...)。
Security and Privacy Enhancements 安全和保密性增強
安全方面 iOS 10 引入了更多修改與補充:
1. info.plist 新增一個 key:NSAllowsArbitraryLoadsInWebContent,允許任意 web 頁面加載,同時 Apple 會用 ATS 保護你的 App。
2. 使用改進後的 SecKey API 取代過時的 CDSA API。
3. 安全傳輸 API 中不再支援 SSLv3,建議盡快停用 SHA1 與 3DES 加密演算法。
4. 剪貼板的擴展,因為 WWDC2016 演示了可跨裝置複製貼上,所以要做一些限制。相關權限 key 如下:
NSBluetoothPeripheralUsageDescription NSCalendarsUsageDescription NSCameraUsageDescription NSContactsUsageDescription NSHealthShareUsageDescription NSHealthUpdateUsageDescription NSHomeKitUsageDescription NSLocationAlwaysUsageDescription NSLocationWhenInUseUsageDescription NSMicrophoneUsageDescription NSMotionUsageDescription NSPhotoLibraryUsageDescription NSRemindersUsageDescription NSSiriUsageDescription NSSpeechRecognitionUsageDescription NSVideoSubscriberAccountUsageDescription NSVoIPUsageDescription
其中 NSContactsUsageDescription 剛啟動時不會崩潰,但在喚起操作發生時會直接崩潰,於 info.plist 設定後即可正常使用。
字體變化
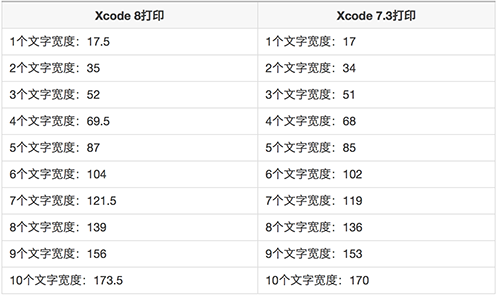
字體在 iOS 9 較 iOS 8 變粗變寬,iOS 10 較 iOS 9 又更粗更寬。
iOS 10 適配教程
ATS 的問題
iOS 9 中預設非 HTTPS 的網路被禁止,當然我們也能把 NSAllowsArbitraryLoads 設為 YES 來停用 ATS。不過 iOS 10 從 2017 年 1 月 1 日起不允許再用這個方法跳過 ATS,也就是強制使用 HTTPS,否則提交 App 可能會被拒。但我們可以透過 NSExceptionDomains 針對特定域名開放 HTTP,較容易通過審核。
NSExceptionDomains 方式可簡單理解為:把不支援 https 協議的介面設為 http 例外。具體方法:
1、在 info.plist 中新增一個 Key:App Transport Security Settings,型別為字典。
2、為它加上一個 Exception Domains,型別為字典。
3、把需要支援的域加到 Exception Domains,其中域作為 Key,型別為字典。
4、每個域下需設置 3 個屬性:NSIncludesSubdomains、NSExceptionRequiresForwardSecrecy、NSExceptionAllowsInsecureHTTPLoads。

細節提示:iOS 9 以後若用到網路圖片,也要注意圖片是否為 HTTP,若是也要把圖片的域設置進去。
以 iOS 10 SDK 編譯的專案會預設以 HTTPS 進行網路傳輸,若仍用 HTTP 請求會報系統異常並中斷。以下是部分由社群整理、經各平台測試的白名單,若有遺漏請自行加入:
<key>NSAppTransportSecurity</key> <dict> <key>NSExceptionDomains</key> <dict> <key>log.umsns.com</key> <dict> <key>NSIncludesSubdomains</key> <true/> <key>NSTemporaryExceptionAllowsInsecureHTTPLoads</key> <true/> <key>NSTemporaryExceptionMinimumTLSVersion</key> <string>TLSv1.1</string> </dict> <key>sns.whalecloud.com</key> <dict> <key>NSIncludesSubdomains</key> <true/> <key>NSTemporaryExceptionAllowsInsecureHTTPLoads</key> <true/> <key>NSTemporaryExceptionMinimumTLSVersion</key> <string>TLSv1.1</string> </dict> <!-- 集成新浪微博對應的HTTP白名單--> <key>sina.cn</key> <dict> <key>NSIncludesSubdomains</key> <true/> <key>NSThirdPartyExceptionRequiresForwardSecrecy</key> <false/> </dict> <key>sina.cn</key> <dict> <!-- 適配iOS10 --> <key>NSExceptionMinimumTLSVersion</key> <string>TLSv1.0</string> <key>NSIncludesSubdomains</key> <true/> <key>NSThirdPartyExceptionRequiresForwardSecrecy</key> <false/> </dict> <key>weibo.cn</key> <dict> <!-- 適配iOS10 --> <key>NSExceptionMinimumTLSVersion</key> <string>TLSv1.0</string> <key>NSIncludesSubdomains</key> <true/> <key>NSThirdPartyExceptionRequiresForwardSecrecy</key> <false/> </dict> <key>weibo.com</key> <dict> <!-- 適配iOS10 --> <key>NSExceptionMinimumTLSVersion</key> <string>TLSv1.0</string> <key>NSIncludesSubdomains</key> <true/> <key>NSThirdPartyExceptionAllowsInsecureHTTPLoads</key> <true/> <key>NSThirdPartyExceptionRequiresForwardSecrecy</key> <false/> </dict> <key>sinaimg.cn</key> <dict> <key>NSIncludesSubdomains</key> <true/> <key>NSThirdPartyExceptionAllowsInsecureHTTPLoads</key> <true/> <key>NSThirdPartyExceptionRequiresForwardSecrecy</key> <false/> </dict> <key>sinajs.cn</key> <dict> <key>NSIncludesSubdomains</key> <true/> <key>NSThirdPartyExceptionAllowsInsecureHTTPLoads</key> <true/> <key>NSThirdPartyExceptionRequiresForwardSecrecy</key> <false/> </dict> <key>sina.com.cn</key> <dict> <key>NSIncludesSubdomains</key> <true/> <key>NSThirdPartyExceptionAllowsInsecureHTTPLoads</key> <true/> <key>NSThirdPartyExceptionRequiresForwardSecrecy</key> <false/> </dict> <!-- 新浪微博--> <!-- 集成微信、QQ、Qzone、騰訊微博授權對應的HTTP白名單--> <key>qq.com</key> <dict> <key>NSIncludesSubdomains</key> <true/> <key>NSThirdPartyExceptionAllowsInsecureHTTPLoads</key> <true/> <key>NSThirdPartyExceptionRequiresForwardSecrecy</key> <false/> </dict> <!-- 騰訊授權--> <!-- 集成人人授權對應的HTTP白名單--> <key>renren.com</key> <dict> <key>NSIncludesSubdomains</key> <true/> <key>NSThirdPartyExceptionAllowsInsecureHTTPLoads</key> <true/> <key>NSThirdPartyExceptionRequiresForwardSecrecy</key> <false/> </dict> <!-- 人人授權--> <!-- 集成Facebook授權對應的HTTP白名單--> <key>facebook.com</key> <dict> <key>NSIncludesSubdomains</key> <true/> <key>NSExceptionRequiresForwardSecrecy</key> <false/> </dict> <key>fbcdn.net</key> <dict> <key>NSIncludesSubdomains</key> <true/> <key>NSExceptionRequiresForwardSecrecy</key> <false/> </dict> <key>akamaihd.net</key> <dict> <key>NSIncludesSubdomains</key> <true/> <key>NSExceptionRequiresForwardSecrecy</key> <false/> </dict> <!-- Facebook授權--> <!-- 集成Twitter授權對應的HTTP白名單--> <key>twitter.com</key> <dict> <key>NSIncludesSubdomains</key> <true/> <key>NSExceptionRequiresForwardSecrecy</key> <false/> </dict> <!-- Twitter授權--> </dict> </dict>
隱私權限設置
iOS 10 開始對隱私權限更加嚴格,不設置就會直接崩潰。一般解法都是在 info.plist 加上對應的 Key-Value:

<!-- 相冊 --> <key>NSPhotoLibraryUsageDescription</key> <string>App需要您的同意,才能訪問相冊</string> <!-- 相機 --> <key>NSCameraUsageDescription</key> <string>App需要您的同意,才能訪問相機</string> <!-- 麥克風 --> <key>NSMicrophoneUsageDescription</key> <string>App需要您的同意,才能訪問麥克風</string> <!-- 位置 --> <key>NSLocationUsageDescription</key> <string>App需要您的同意,才能訪問位置</string> <!-- 在使用期間訪問位置 --> <key>NSLocationWhenInUseUsageDescription</key> <string>App需要您的同意,才能在使用期間訪問位置</string> <!-- 始終訪問位置 --> <key>NSLocationAlwaysUsageDescription</key> <string>App需要您的同意,才能始終訪問位置</string> <!-- 日歷 --> <key>NSCalendarsUsageDescription</key> <string>App需要您的同意,才能訪問日歷</string> <!-- 提醒事項 --> <key>NSRemindersUsageDescription</key> <string>App需要您的同意,才能訪問提醒事項</string> <!-- 運動與健身 --> <key>NSMotionUsageDescription</key> <string>App需要您的同意,才能訪問運動與健身</string> <!-- 健康更新 --> <key>NSHealthUpdateUsageDescription</key> <string>App需要您的同意,才能訪問健康更新 </string> <!-- 健康分享 --> <key>NSHealthShareUsageDescription</key> <string>App需要您的同意,才能訪問健康分享</string> <!-- 藍牙 --> <key>NSBluetoothPeripheralUsageDescription</key> <string>App需要您的同意,才能訪問藍牙</string> <!-- 媒體資料庫 --> <key>NSAppleMusicUsageDescription</key> <string>App需要您的同意,才能訪問媒體資料庫</string>
出現許多自己沒添加的 log 日誌

若控制台輸出「[] tcp_connection_xxx」等內容,可在運行按鈕旁的 scheme 選項內,於 Edit Scheme - Run - Arguments - Environment variables 中增加 OS_ACTIVITY_MODE=disable,即可關閉相關日誌。
解法:打開專案,進入 Edit Scheme:

添加參數:Name 為 OS_ACTIVITY_MODE,Value 為 disable。
Notification
自從 Notification 被引入後,Apple 就不斷更新優化,但以往都只是小修小補,直到 iOS 10 才真正大改重構,讓開發者體會到 UserNotifications 的易用與強大。
iOS 9 以前通知的痛點:方法命名相似容易寫錯;App 運行與非運行時捕獲通知的路徑不一致;App 在前台時無法直接顯示遠程通知;已發出的通知無法更新、只有簡單文本、擴展性差。
iOS 10 開始的改進:所有相關通知統一到 UserNotifications.framework;增加了撤銷、更新、中途修改通知內容的能力;通知不再只是簡單文本,可加入視訊、圖片、自定義展示;整體更易於管理並大幅優化;權限申請也變簡單(本地與遠程通知整合在一個方法中)。
若使用了推送,修改如下圖:

註:開啟 Remote notifications 時可能會出現提示,說你實作了 application:didReceiveRemoteNotification:fetchCompletionHandler:,但仍需在 Info.plist 的 UIBackgroundModes 中加入「remote-notification」。解法是在 Xcode 修改應用的 Capabilities,開啟 Remote notifications,參考下圖:

判斷系統版本的正確方式
不要用這種寫法:
#define isiOS10 ([[[[UIDevice currentDevice] systemVersion] substringToIndex:1] intValue]>=10)
它會永遠回傳 NO,因為 substringToIndex:1 在 iOS 10 會被檢測成 iOS 1。應改用下列方式:
Objective-C 中這樣寫:
#define SYSTEM_VERSION_EQUAL_TO(v) ([[[UIDevice currentDevice] systemVersion] compare:v options:NSNumericSearch] == NSOrderedSame) #define SYSTEM_VERSION_GREATER_THAN(v) ([[[UIDevice currentDevice] systemVersion] compare:v options:NSNumericSearch] == NSOrderedDescending) #define SYSTEM_VERSION_GREATER_THAN_OR_EQUAL_TO(v) ([[[UIDevice currentDevice] systemVersion] compare:v options:NSNumericSearch] != NSOrderedAscending) #define SYSTEM_VERSION_LESS_THAN(v) ([[[UIDevice currentDevice] systemVersion] compare:v options:NSNumericSearch] == NSOrderedAscending) #define SYSTEM_VERSION_LESS_THAN_OR_EQUAL_TO(v) ([[[UIDevice currentDevice] systemVersion] compare:v options:NSNumericSearch] != NSOrderedDescending)
或者使用:
if ([[NSProcessInfo processInfo] isOperatingSystemAtLeastVersion:(NSOperatingSystemVersion){.majorVersion = 9, .minorVersion = 1, .patchVersion = 0}]) { NSLog(@"Hello from > iOS 9.1");} if ([NSProcessInfo.processInfo isOperatingSystemAtLeastVersion:(NSOperatingSystemVersion){9,3,0}]) { NSLog(@"Hello from > iOS 9.3"); }
或者使用:
if (NSFoundationVersionNumber > NSFoundationVersionNumber_iOS_9_0) { // do stuff for iOS 9 and newer} else { // do stuff for older versions than iOS 9}
有時會缺少一些常量,NSFoundationVersionNumber 定義在 NSObjCRuntime.h 中。在 iOS 10(Xcode 8)中,Apple 補充了缺少的數字:
#define NSFoundationVersionNumber_iOS_9_0 1240.1 #define NSFoundationVersionNumber_iOS_9_1 1241.14 #define NSFoundationVersionNumber_iOS_9_2 1242.12 #define NSFoundationVersionNumber_iOS_9_3 1242.12 #define NSFoundationVersionNumber_iOS_9_4 1280.25 #define NSFoundationVersionNumber_iOS_9_x_Max 1299
UIStatusBar 的問題
在 iOS 10 中,若還用以前設置 UIStatusBar 類型或控制隱藏/顯示的方法,會報警告說方法過期,如下圖:

上面方法到 iOS 10 已不能用,要修改 UIStatusBar 樣式或狀態,改用下列屬性或方法:
@property(nonatomic, readonly) UIStatusBarStyle preferredStatusBarStyle NS_AVAILABLE_IOS(7_0) __TVOS_PROHIBITED; // Defaults to UIStatusBarStyleDefault @property(nonatomic, readonly) BOOL prefersStatusBarHidden NS_AVAILABLE_IOS(7_0) __TVOS_PROHIBITED; // Defaults to NO - (UIStatusBarStyle)preferredStatusBarStyle NS_AVAILABLE_IOS(7_0) __TVOS_PROHIBITED; // Defaults to UIStatusBarStyleDefault - (BOOL)prefersStatusBarHidden NS_AVAILABLE_IOS(7_0) __TVOS_PROHIBITED; // Defaults to NO // Override to return the type of animation that should be used for status bar changes for this view controller. This currently only affects changes to prefersStatusBarHidden. - (UIStatusBarAnimation)preferredStatusBarUpdateAnimation NS_AVAILABLE_IOS(7_0) __TVOS_PROHIBITED; // Defaults to UIStatusBarAnimationFade
awakeFromNib 的警告問題
Xcode 8 之前用 Xib 初始化時 - (void)awakeFromNib {} 這麼寫沒問題,但 Xcode 8 會出現警告:

官方解釋:你必須呼叫父類別的 awakeFromNib 實作,讓父類有機會執行它們需要的額外初始化。雖然該方法的預設實作不做任何事,但許多 UIKit 類別提供了非空的實作,你可以在自己 awakeFromNib 的任何時機呼叫 super 實作。
Xcode 8 新特性
憑證管理
直接用 Xcode 8 打開專案後,你會發現 provisioning 配置出問題,這是因為 Xcode 8 對專案配置做了一些小改動。在 Xcode 8 的 general 頁籤中,用更詳細的 signing 選項取代了原有的 team 選項。
選中:project → target → general。Xcode 8 之前 provisioning 選項如下圖:


Xcode 8 之後,把 build setting 中 code signing 的配置項放到了 project → target → general 中。用 Xcode 8 打開後最明顯的就是下圖,這是 Apple 的新特性,可幫助我們自動管理憑證,建議勾選 Automatically manage signing。


讓 Xcode 8 支援 iOS 7 及之前版本

會出現「This iPhone 4 is running iOS 7.1.12 (11D257), which may not be supported by this version of Xcode.」的提示。
對 Xcode 8 的發布,Apple 來了個大跳躍,預設最低支援 iOS 8.0。當然並不是說 8.0 以下就直接放棄,畢竟使用 8.0 以下系統的仍大有人在,老專案要兼容 iOS 8 以下也可另闢蹊徑。
首先要找到 Xcode 是透過什麼來兼容 iOS 版本的,請打開:/Applications/Xcode.app/Contents/Developer/Platforms/iPhoneOS.platform/DeviceSupport,在這個資料夾中能看到 Xcode 支援的 iOS 版本,從 8.0 開始,唯獨沒有 8.0 以下的。所以第一步就是把需要支援的 iOS 版本配置包放進來(例如支援到 7.0、7.1、6.0……)。
接著還要配置 Xcode,打開:/Applications/Xcode.app/Contents/Developer/Platforms/iPhoneOS.platform/Developer/SDKs/iPhoneOS.sdk,這裡要改點東西。由於此資料夾內的檔案是鎖定的,先右鍵點空白處、顯示簡介、滑到最下面、點小鎖開啟權限並輸入管理員密碼,把所有權限改為讀寫;接著右鍵 SDKSettings.plist 做同樣操作開啟讀寫權限,雙擊打開,如下圖:

在其下添加 7.0 和 7.1,按從小到大的順序排好,接著重啟電腦即可。結束時別忘了把剛才改的權限改回去,以防不小心動到不該動的。看 Xcode 裡面:

已經能看到 7.0 和 7.1 了。若需要支援更低版本,用同樣方法加入對應的配置文件即可。
- 上一篇文章: iOS 10 推送機制完整剖析與注意事項
- 下一篇文章: Xcode 8 上傳 IPA 後遲遲無法構建版本的排查與修復