
仿美團/百度糯米的二級下拉菜單,封裝思路完整拆解
做商城類 App 幾乎都躲不過「一級分類 + 二級分類」的下拉篩選菜單:點一下頂部欄位,下方彈出兩欄清單,左欄選大類、右欄跟著換內容,選完標題文字變成選取值並收起面板。本文記錄這個控件的封裝過程。
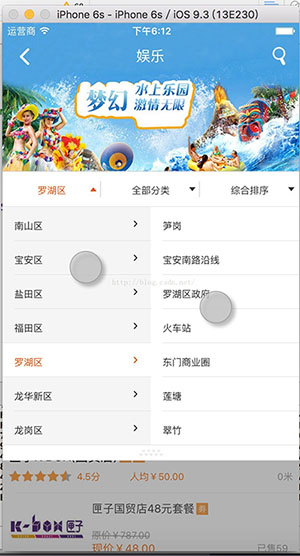
iOS 端完成之後接著要做 Android,翻遍網上的範例卻發現要嘛資料寫死、要嘛耦合在 Activity 裡,於是乾脆自己包一個可重複使用的版本。
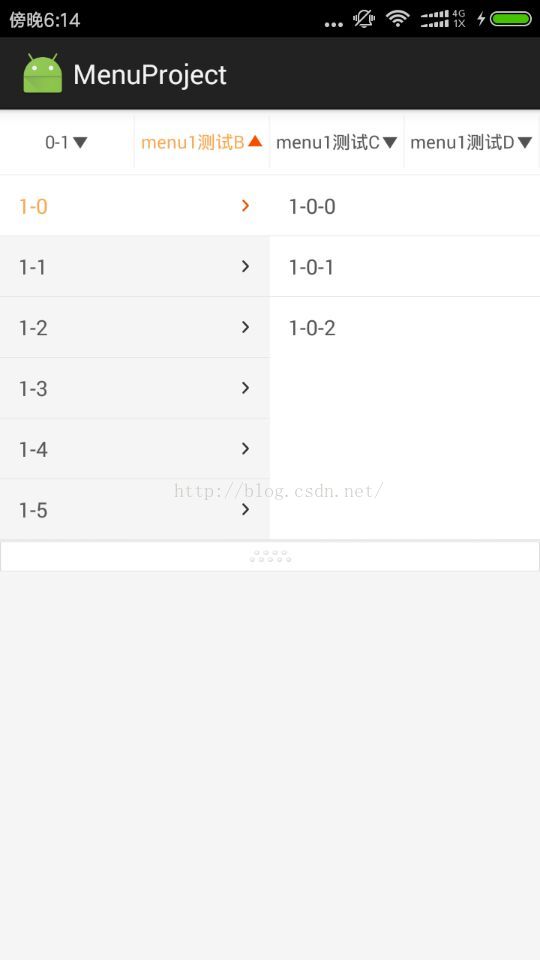
封裝的目標很明確:呼叫方只負責塞資料源與實作一個回呼,兩三行就能把菜單掛上去。
整體結構
拆成三個角色,各司其職:
- MenuModel:資料模型,用鏈式結構表達多層級關係。
- MenuView:頂部的一級菜單列,負責繪製標題、切換箭頭方向、控制彈窗顯示。
- MenuPopupWindow:彈出層,用兩個 ListView 分別承載左欄與右欄。
一、資料模型 MenuModel
public class MenuModel {
    public Object key;                    // 對外回傳的業務 key
    public String value;                  // 顯示文字
    public List<MenuModel> chindMenu;      // 子清單

    public MenuModel() { super(); }

    public MenuModel(Object key, String value, List<MenuModel> chindMenu) {
        super();
        this.key = key;
        this.value = value;
        this.chindMenu = chindMenu;
    }

    /** 是否還有下一層 */
    public boolean hasChind() {
        return chindMenu != null && chindMenu.size() > 0;
    }
}
之所以用鏈式而非多個平行陣列,是因為分類層數不固定,鏈式結構讓「有幾層就往下走幾層」變得自然。
二、頂部菜單列 MenuView
MenuView 直接繼承 LinearLayout,在 reloadData() 中依資料源數量動態產生標題 TextView,每個標題右側掛上向下箭頭,彼此之間插入分隔線。點擊時做三件事:把箭頭換成向上、文字換成高亮色、把對應欄位的資料交給 PopupWindow 顯示。
@Override
public void onClick(View v) {
    lastTv = (TextView) v;
    int column = v.getId();
    List<MenuModel> list = dataSource[column];

    // 箭頭翻轉 + 高亮
    lastTv.setCompoundDrawablesWithIntrinsicBounds(0, 0, R.mipmap.triangle_up, 0);
    lastTv.setTextColor(getResources().getColor(textColorSelected));

    // 把該欄資料與上次的選擇狀態交給彈窗
    menuPopupWindow.setLeftList(column, list);
    IndexPath indexPath = indexPaths[column];
    menuPopupWindow.setSelect(indexPath.row, indexPath.item);

    menuPopupWindow.showAsDropDown(lineView);
}
用 IndexPath 這個小類別把「第幾欄 / 左欄第幾列 / 右欄第幾列」打包記錄,重開菜單時就能還原上次的勾選位置:
public static class IndexPath {
    public int column;  // 一級菜單欄位
    public int row;     // 左欄列
    public int item;    // 右欄列

    public IndexPath(int column, int row, int item) {
        this.column = column;
        this.row = row;
        this.item = item;
    }
}
三、彈出層 MenuPopupWindow
彈窗內放左右兩個 ListView,各自一個 MenuAdapter。左欄點選時,若該項還有子清單就刷新右欄,否則直接關閉並回呼;右欄點選則直接回呼並關閉。若整欄資料都沒有第二層,右欄直接隱藏。
@Override
public void onItemClick(AdapterView<?> parent, View view, int position, long id) {
    if (parent.getId() == leftLv.getId()) {
        MenuModel model = leftList.get(position);
        if (leftLv.getSelectedItemPosition() == position) {
            return;   // 重複點擊同一項,忽略
        }
        if (model.hasChind()) {
            menuLeftAdapter.setSelectPosition(position);
            setRightList(model.chindMenu);
        } else {
            dismiss();
        }
        onMenuClick(position, 0, model);
    } else {
        menuRightAdapter.setSelectPosition(position);
        MenuModel model = rightList.get(position);
        onMenuClick(menuLeftAdapter.getSelectPosition(), position, model);
        dismiss();
    }
}
面板關閉時記得通知外層復原箭頭與文字顏色,這個回呼掛在 OnDismissListener 上:
setOnDismissListener(new PopupWindow.OnDismissListener() {
    @Override
    public void onDismiss() {
        leftLv.setSelection(0);
        rightLv.setSelection(0);
        if (onMenuListener != null) {
            onMenuListener.onMenuDismiss();
        }
    }
});
呼叫方要多寫幾行?不用
封裝完成後,使用端只需要準備 String[] 的標題陣列與 List[] 的資料源,設定 hint 文字、掛上監聽器即可:
menuView.setHintTexts(new String[]{"城市", "區域", "更多"});
menuView.setDataSource(dataSource);
menuView.setOnMenuListener(new MenuView.OnMenuListener() {
    @Override
    public void onMenu(MenuView.IndexPath indexPath, MenuModel menuModel) {
        // 這裡拿到 indexPath.column 與 menuModel.key 去篩選列表
    }
});
原始碼已放在 GitHub:https://github.com/skyfouk/AndroidMenuProject.git
小結一下這個控件的關鍵設計:資料用鏈式模型表達任意層級、狀態用 IndexPath 集中記錄、UI 拆成「標題列」與「彈出層」兩個獨立元件。只要這三點守住,之後要加第三層或換成 RecyclerView 實作都不難。
- 上一篇文章: iOS 延遲執行的四種寫法,該怎麼選?
- 下一篇文章: xib 入門實戰:從建立、載入到 IBOutlet 連線