
SQLCipher 詳解:為 iOS 的 SQLite 資料庫檔案加密
本來打算寫一篇 GAE + goAgent + SwitchySharp 的指南,翻資料時剛好挖出之前寫的 iOS 資料庫加密程式碼,那就先講這個吧。後續除了檔案加密,還會談到傳輸層加密,有興趣的可以留意。
為什麼需要 SQLCipher
SQLite 的資料庫檔本身就是一個純文字的結構,任何人只要把你的 .db 檔案拉出沙盒,用任意 SQLite 工具就能讀光裡面的內容。要解決這件事,SQLCipher 是最常用的方案:它在 SQLite 的頁面層做 AES-256 加密,對上層的 SQL 呼叫完全透明,也就是說你原本寫的 SQL 幾乎不用改。
它底層的加密功能全部來自 OpenSSL,包含 AES-256、亂數產生與 PBKDF2 金鑰推導。由於 OpenSSL 無法直接在 iPhone 上作為 framework 使用,我們需要把它當成靜態庫自行編譯並連結進來。官方教學:https://sqlcipher.net/ios-tutorial/(純英文,本文按步驟整理重點)。
一、準備三個原始碼
整個流程需要三個部分:sqlcipher、openssl-xcode、openssl-1.0.0e。
1. OpenSSL 原始碼
% cd ~/Documents/code/
% curl -o openssl-1.0.0e.tar.gz https://www.openssl.org/source/openssl-1.0.0e.tar.gz
% tar xzf openssl-1.0.0e.tar.gz
建議放到專案資料夾之外的共用位置,因為同一份 OpenSSL 原始碼可以跨多個專案共用。記下這個路徑,稍後會用到。
2. SQLCipher
% cd ~/Documents/code/SQLCipherApp
% git clone https://github.com/sqlcipher/sqlcipher.git
3. openssl-xcode
% cd ~/Documents/code/SQLCipherApp
% git clone https://github.com/sqlcipher/openssl-xcode.git
這個是我們需要動態編譯進專案的部分。三個都準備好之後,就可以開始配置專案了。
二、專案配置
1. 把下載的三個目錄複製進專案資料夾。
2. 開啟 Xcode 的設定頁,選擇 Locations → Source Trees,點「+」新增一筆:Setting Name 與 Display Name 都填 OPENSSL_SRC,Path 指向剛才 OpenSSL 原始碼所在的位置。
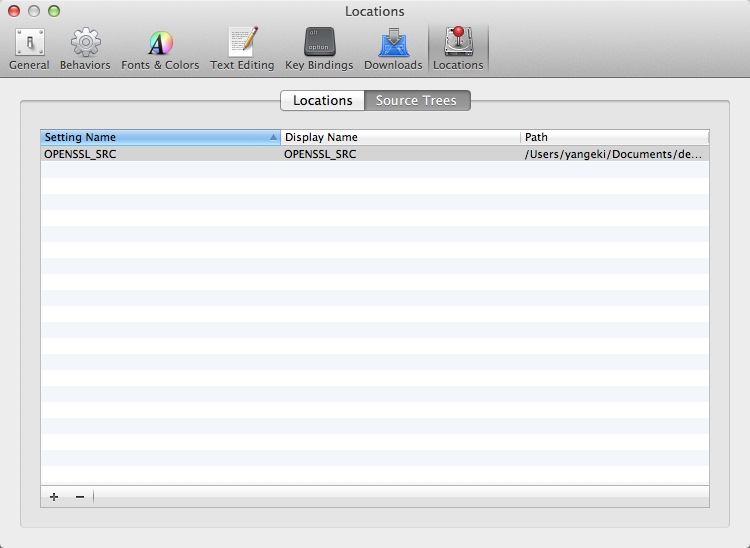
3. 加入子專案引用:把 openssl.xcodeproj(位於 openssl-xcode 資料夾)與 sqlcipher.xcodeproj(位於 sqlcipher 資料夾)拖進主專案。

4. 設定編譯相依。在 Target 的 Build Phases → Target Dependencies 中,把上面兩個專案加進去:

接著在同一頁的 Link Binary With Libraries 裡加入這兩個產出的庫:

5. 最後調整編譯設定。在 Build Settings 中搜尋 architectures 進行設定(Mac 與 iOS 的畫面略有不同):


然後搜尋 Other C Flags,加上 -DSQLITE_HAS_CODEC 這個關鍵旗標——少了它,SQLCipher 的加密能力根本不會被編譯進去:

到這裡整個建置就完成了。
三、使用方式
在需要的檔案中引入 <sqlite3.h>,然後在開啟資料庫之後多呼叫一行 sqlite3_key 即可:
-(BOOL)openDatabase {
    if (sqlite3_open([[self dataFilePath:DB_NAME] UTF8String], &_database) == SQLITE_OK) {
        const char *key = [@",66c9a^N" UTF8String];
        sqlite3_key(_database, key, (int)strlen(key));   // 加解密都在這一行裡
        NSLog(@"\n===資料庫開啟或建立成功===\n");
        return YES;
    }
    NSLog(@"\n===資料庫開啟失敗===\n");
    return NO;
}
其中 DB_NAME 是資料庫檔名的巨集,",66c9a^N" 就是你設定的金鑰。是不是相當簡單?
四、封裝範例
下面是一個把常用操作包起來的 SqliteHelp 類別:
#import <Foundation/Foundation.h>
#import <sqlite3.h>

#define DB_NAME @"xxxxxxx.db"

@interface SqliteHelp : NSObject

@property sqlite3 *database;        // 資料庫句柄
@property sqlite3_stmt *statement;  // SQL 陳述式
@property char *errmsg;

-(BOOL)openDatabase;                // 開啟(一般不直接呼叫)
-(void)closeDataBase;               // 關閉(一般不直接呼叫)
-(NSString *)dataFilePath:(NSString *)fileName;

/** 執行插入或更新
 *  插入:[insert into (表名) values(data1, data2, ...);]
 *  更新:[update (表名) set (欄位)=(新值) where (欄位)=(舊值);]
 */
-(BOOL)insertOrUpdateData:(NSString *)sql;

-(NSMutableArray *)getUsers;        // 取得所有使用者
-(int)getCountOfDatabase;           // 取得資料筆數

@end
#import "SqliteHelp.h"

@implementation SqliteHelp

@synthesize database = _database;
@synthesize statement = _statement;
@synthesize errmsg = _errmsg;

-(BOOL)openDatabase {
    if (sqlite3_open([[self dataFilePath:DB_NAME] UTF8String], &_database) == SQLITE_OK) {
        const char *key = [@",66c9a^N" UTF8String];
        sqlite3_key(_database, key, (int)strlen(key));
        NSLog(@"\n===資料庫開啟或建立成功===\n");
        return YES;
    }
    NSLog(@"\n===資料庫開啟失敗===\n");
    return NO;
}

-(void)closeDataBase {
    sqlite3_close(_database);
}

-(NSString *)dataFilePath:(NSString *)fileName {
    NSArray *paths = NSSearchPathForDirectoriesInDomains(NSDocumentDirectory, NSUserDomainMask, YES);
    NSString *documentsDirectory = [paths objectAtIndex:0];
    return [documentsDirectory stringByAppendingPathComponent:fileName];
}

-(BOOL)insertOrUpdateData:(NSString *)sql {
    if ([self openDatabase]) {
        if (sqlite3_exec(_database, [sql UTF8String], nil, &_statement, &_errmsg) != SQLITE_OK) {
            NSLog(@"\n===操作失敗===\n==sql Error:%s", _errmsg);
            sqlite3_close(_database);
            return NO;
        }
        NSLog(@"\n===操作成功===\n");
    }
    sqlite3_close(_database);
    return NO;
}

-(NSMutableArray *)seeDatabase {
    NSMutableArray *users = [[NSMutableArray alloc] init];
    NSString *sql = [NSString stringWithFormat:@"SELECT * FROM t_relive"];

    if ([self openDatabase]) {
        if (sqlite3_prepare_v2(_database, [sql UTF8String], -1, &_statement, nil) == SQLITE_OK) {
            while (sqlite3_step(_statement) == SQLITE_ROW) {
                int name  = sqlite3_column_int(_statement, 0);
                int index = sqlite3_column_int(_statement, 1);
                NSLog(@"%i=%i", name, index);
            }
            sqlite3_finalize(_statement);
        }
    }
    sqlite3_close(_database);
    return users;
}

-(int)getCountOfDatabase {
    int count = 0;
    NSString *sql = [NSString stringWithFormat:@"SELECT * FROM User"];

    if ([self openDatabase]) {
        if (sqlite3_prepare_v2(_database, [sql UTF8String], -1, &_statement, nil) == SQLITE_OK) {
            while (sqlite3_step(_statement) == SQLITE_ROW) { count++; }
            sqlite3_finalize(_statement);
        }
    }
    sqlite3_close(_database);
    return count;
}

@end
最後示範直接從 SQL 文字檔批次建立資料表並寫入資料:
#import "AppDelegate.h"
#import "SqliteHelp.h"

@implementation AppDelegate

- (void)applicationDidFinishLaunching:(NSNotification *)aNotification {
    [self buildDatabase];
    [self insertDatabase];
}

// 讀取 schema 檔,以分號切開逐句執行
- (void)buildDatabase {
    NSError *error;
    NSString *textFile = [NSString stringWithContentsOfFile:
        [[NSBundle mainBundle] pathForResource:@"schema.sqlite.tables.sql" ofType:nil]
                                             encoding:NSUTF8StringEncoding error:&error];
    if (textFile == nil) {
        NSLog(@"Error reading text file. %@", [error localizedFailureReason]);
        return;
    }

    NSArray *row = [textFile componentsSeparatedByString:@";"];
    NSInteger count = [row count];
    SqliteHelp *t = [SqliteHelp new];

    for (int i = 0; i < count; i++) {
        NSString *tempString = [NSString stringWithFormat:@"%@;", row[i]];
        [t insertOrUpdateData:tempString];
    }
}

// 讀取 data 檔,寫入初始資料
- (void)insertDatabase {
    NSError *error;
    NSString *textFile = [NSString stringWithContentsOfFile:
        [[NSBundle mainBundle] pathForResource:@"schema.sqlite.data.sql" ofType:nil]
                                             encoding:NSUTF8StringEncoding error:&error];
    if (textFile == nil) {
        NSLog(@"Error reading text file. %@", [error localizedFailureReason]);
        return;
    }

    NSArray *row = [textFile componentsSeparatedByString:@";"];
    NSInteger count = [row count];
    SqliteHelp *t = [SqliteHelp new];

    for (int i = 0; i < count; i++) {
        NSString *tempString = [NSString stringWithFormat:@"%@;", row[i]];
        [t insertOrUpdateData:tempString];
    }
}

@end
最後提醒兩件事:金鑰一旦遺失,資料就再也救不回來了,務必想清楚金鑰的存放與派發策略;另外,若你已經在使用 FMDB,也可以直接透過 FMDatabase 的 setKey: 方法套用同樣的加密,不必退回原生 C API。
以上就是本文的全部內容,希望能對大家有所幫助。
- 上一篇文章: iOS 銀行卡號識別:OpenCV 整合思路與常見連結錯誤解法
- 下一篇文章: iOS 接入 QQ 第三方登入實作