
iOS UITableView 重用機制與滾動載入優化深度解析
UITableView 可以說是 UIKit 中最重要的元件之一,用來展示資料列表,也能靈活地進行頁面佈局。它的使用遵循 MVC 模式,將資料模型(NSObject)、視圖(UIView)與控制器(UITableViewController)分離。UITableView 繼承自 UIScrollView,可上下滑動,既能作為根視圖,也能作為子視圖元件。
reuseIdentifier 顧名思義是一個「復用標識符」,是一個自訂且唯一的字串,用來標記某種重複樣式、可重複使用的 UITableViewCell。系統透過 reuseIdentifier 來確認是否已有建立好的同類 cell 可以重複使用。由於多數情況下表格中的 cell 樣式都是重複的,只是資料模型不同,因此系統能在保證 cell 數量足以鋪滿螢幕的前提下,透過保存並重複使用已建立的 cell 來提升載入效率、優化記憶體,避免不斷建立與銷毀 cell。
UITableViewCell 的復用原理其實很簡單,可用下面的例子理解。首先,在 UITableViewController 中寫 cell 復用的基本模板:
/** * 可復用cell制作 */ - (UITableViewCell *)tableView:(UITableView *)tableView cellForRowAtIndexPath:(NSIndexPath *)indexPath { // 定義cell重用的靜態標志符 static NSString *cell_id = @"cell_id_demo"; // 優先使用可復用的cell UITableViewCell *cell = [tableView dequeueReusableCellWithIdentifier:cell_id]; // 如果要復用的cell還沒有創建,則創建一個供之後復用 if (cell == nil) { // 新創建cell並使用cell_id復用符標記 cell = [[UITableViewCell alloc] initWithStyle:UITableViewCellStyleDefault reuseIdentifier:cell_id]; } // 配置cell數據 cell.textLabel.text = [NSString stringWithFormat:@"Cell%i", countNumber]; // 其他cell設置... return cell; }
這樣寫的原因是:透過呼叫 dequeueReusableCellWithIdentifier 檢查指定的 reuseIdentifier 是否有可重複使用的 cell,有的話就返回並更新資料;沒有的話返回 nil,進入 if 建立新的 cell 並標記 reuseIdentifier。注意,並不是只建立一個 cell 後就全部重複利用它,而是要先建立足夠鋪滿整個 tableView 的數量後,才會開始復用之前的 cell(UITableView 中有 visibleCells 陣列保存當前可見 cell,還有 reusableTableCells 陣列保存可復用的 cell)。
我們用一個測試來驗證:建立最基本的文字 cell,並用一個計數器,每次新建 cell 就加 1 並顯示,復用的 cell 則顯示它是復用哪一個:
/** * 分區個數設置為1 */ - (NSInteger)numberOfSectionsInTableView:(UITableView *)tableView { return 1; } /** * 創建20個cell,保證覆蓋並超出整個tableView */ - (NSInteger)tableView:(UITableView *)tableView numberOfRowsInSection:(NSInteger)section { return 20; } /** * cell復用機制測試 */ - (UITableViewCell *)tableView:(UITableView *)tableView cellForRowAtIndexPath:(NSIndexPath *)indexPath { // 定義cell重用的靜態標志符 static NSString *cell_id = @"cell_id_demo"; // 計數用 static int countNumber = 1; // 優先使用可復用的cell UITableViewCell *cell = [tableView dequeueReusableCellWithIdentifier:cell_id]; // 如果要復用的cell還沒有創建,則創建一個供之後復用 if (cell == nil) { // 新創建cell並使用cell_id復用符標記 cell = [[UITableViewCell alloc] initWithStyle:UITableViewCellStyleDefault reuseIdentifier:cell_id]; // 計數器標記新創建的cell cell.textLabel.text = [NSString stringWithFormat:@"Cell%i", countNumber]; // 計數器遞增 countNumber++; } return cell; }
在 iPhone 5S 上(UITableViewController 作為根控制器、tableView 覆蓋整個螢幕),20 個 cell 的顯示結果依次為:Cell1~Cell14,然後 Cell1~Cell6。
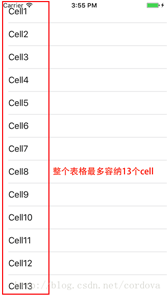
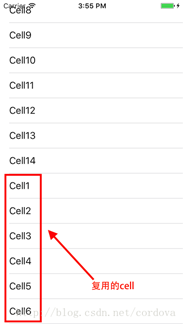
可見一共建立了 14 個 cell,其中整個螢幕可顯示 13 個,系統多建一個是為了在滑動顯示半個 cell 時仍能覆蓋整個 tableView。之後的 6 個 cell 就是復用了最初建立的那 6 個。這樣復用機制就很清楚了。此外還有 reloadData、reloadRowsAtIndex 等刷新情況,可能伴隨新的 cell 建立與復用 cell 更新,但也建立在基本復用機制之上。
能否在一個視圖控制器中嵌入兩個 tableview 控制器?
可以,相當於視圖與視圖控制器的嵌套。視圖可加子視圖,視圖控制器也可加子控制器。這種情況很重要,因為容易忽略:把子視圖加到了父視圖,卻忘了把對應控制器作為子控制器加入父控制器,導致子視圖能顯示卻無法響應。例如在 UIViewController 上加一個 UITableViewController 子控制器及其 view:
// 假設有三個視圖控制器,一個作為父控制器,兩個作為子控制器 UIViewController *superVC = [[UIViewController alloc]init]; UITableViewController *subVC1 = [[UITableViewController alloc]init]; UITableViewController *subVC2 = [[UITableViewController alloc]init]; // 將子視圖控制器添加到父視圖控制器(要注意調整子視圖的尺寸和位置合理顯示,這裡忽略) [superVC.view addSubview:subVC1.view]; [superVC addChildViewController:subVC1]; [superVC.view addSubview:subVC2.view]; [superVC addChildViewController:subVC2]; // 子視圖控制器的移除有對稱的方法,但只能是子視圖控制器主動從父視圖控制器中移除 [subVC1.view removeFromSuperview]; [subVC1 removeFromParentViewController]; [subVC2.view removeFromSuperview]; [subVC2 removeFromParentViewController];
此外要注意與 presentViewController 的差別:手動加子視圖控制器可自由調整子視圖的 frame(位置與尺寸),而 presentViewController 用於頁面切換,切換後的子頁面會覆蓋整個螢幕、無法自由調整,對稱的移除方法為 dismissViewControllerAnimated:
// 顯示子視圖控制器,completion後的代碼塊如果不為空添加結束後會觸發 [[parentVC presentViewController:childVC animated:NO completion:nil]; // 移除子視圖控制器,completion後的代碼塊如果不為空添加結束後會觸發 [childVC dismissViewControllerAnimated:NO completion:nil];
一個 tableView 能否關聯兩個不同的 datasource?如何處理?
多個資料源完全可以,關鍵是如何關聯與處理,因為將資料源(Model)與 tableview(View)對接的工作是由工程師完成的。處理上可分開依次對接,也可先用集合操作把資料整理合併成一個資料源再對接。
例如:每個 cell 顯示一個人的基本資訊(頭像與姓名),假設有兩個資料源,一個是頭像 url 陣列,一個是姓名陣列,對接時可分別對接,也可先合併再對接。
合併用的資料模型:
@interface Model : NSObject @property (nonatomic,copy) NSString *name; // 姓名 @property (nonatomic,copy) NSString *url; // 圖片 @end
資料源緩衝器:
// 數據源 @property (nonatomic, strong)NSArray *name_datasource; @property (nonatomic, strong)NSArray *url_datasource; @property (nonatomic, strong)NSMutableArray *datasource;
處理多資料源:
/** * 請求數據 */ - (void)request { // 姓名數據源 _name_datasource = @[@"張三", @"李四", @"小明", @"小李"]; _url_datasource = @[@"male", @"male", @"male", @"male"]; // 合並數據源 for (int i; i<_name_datasource.count; i++) { Model *model = [[Model alloc]init]; model.name = _name_datasource[i]; model.url = _url_datasource[i]; [_datasource addObject:model]; } }
資料對接:
/** * cell數據回調 */ - (UITableViewCell *)tableView:(UITableView *)tableView cellForRowAtIndexPath:(NSIndexPath *)indexPath { static NSString *identifier = @"identifier"; // 自制cell組件 AccountCell *cell = [[AccountCell alloc] initWithStyle:UITableViewCellStyleDefault reuseIdentifier:identifier]; /** 多數據源分開對接:**/ // 頭像 [cell.avatar setImage:[UIImage imageNamed:_url_datasource[indexPath.row]]]; // 姓名 cell.name.text = _name_datasource[indexPath.row]; // 或者: /** 數據源合並後對接**/ // 取出對應數據模型 Model *model = _datasource[indexPath.row]; // 頭像 [cell.avatar setImage:[UIImage imageNamed:model.url]]; // 姓名 cell.name.text = model.name; return cell; }
如何優化 UITableView 滾動載入、防止卡頓?
滾動優化主要在兩方面:
- 減少 cellForRowAtIndexPath 中的計算量(cell 內容計算)
- 減少 heightForRowAtIndexPath 中的計算量(cell 高度計算)
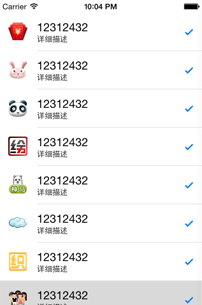
減少 cellForRowAtIndexPath 中的計算量:
- 提前計算每個 cell 需要的基本資料,代理呼叫時直接取出;
- 圖片要異步載入,載入完成後再依 cell 內 UIImageView 的參照設定圖片;
- 圖片數量多時,尺寸要依需要提前壓縮好,必要時準備預覽圖與高清圖;
- 圖片「懶載入」,滾動很快時避免頻繁請求伺服器;
- 盡量手動 Drawing 提升流暢性,繪製 cell 建議用 CALayer 而非 UIView。
減少 heightForRowAtIndexPath 中的計算量:
- 若所有 cell 高度固定,去掉 heightForRowAtIndexPath,直接設定 tableView 的 rowHeight;
- 若高度不固定,應提前算好並儲存 cell 高度,代理呼叫時直接取,將時間複雜度降到 O(1),例如異步請求時提前算好高度存進資料源。
以上就是本文的全部內容,希望對大家有所幫助。
- 上一篇文章: iOS 利用 MJRefresh 實作自訂下拉刷新動畫效果
- 下一篇文章: iOS 自訂日期選擇器實作示例