IOS完成簡略單純版的QQ下拉列表
編輯:IOS開發綜合
上面我們經由過程實例代碼來一步步看怎樣完成, 起首樹立了兩個模子類, 一個Friend, 一個FriendGroup類. 數據源用的當地的一個plist文件. plist文件中包括了FriendGroup的name,friends數組等屬性.
Friend.h 示例代碼
#import <Foundation/Foundation.h>

@interface Friend : NSObject
@property (nonatomic, copy) NSString *name;
@end
FriendGroup.h 示例代碼
#import <Foundation/Foundation.h>
@interface FriendGroup : NSObject
@property (nonatomic, copy) NSString *name;
// 數組中寄存的為Friend類的實例對象
@property (nonatomic, copy) NSMutableArray *friends;
// 用來斷定分組能否翻開(opened屬性恰是完成下拉列表的症結)
@property (nonatomic, assign, getter = isOpened) BOOL opened;
// 自界說辦法用來賦值
-(void)setFriendGroupDic:(NSMutableDictionary *)dic;
@end
FriendGroup.m 示例代碼
#import "FriendGroup.h"
#import "Friend.h"
@implementation FriendGroup

-(void)setFriendGroupDic:(NSMutableDictionary *)dic
{
// 經由過程字典給FriendGroup的屬性賦值
 [self setValuesForKeysWithDictionary:dic];
 NSMutableArray *tempArray = [NSMutableArray array];
// 遍歷friends屬性數組
 for (NSMutableDictionary *dic in self.friends) {
  Friend *friend = [[Friend alloc] init];
  [friend setValuesForKeysWithDictionary:dic];
  [tempArray addObject:friend];
 }
 //從新對friends屬性數組賦值,此時存的都是Friend對象
 self.friends = [NSMutableArray arrayWithArray:tempArray];
}
@end
在ViewController中創立一個tableView
#import "ViewController.h"
#import "SectionView.h"
#import "FriendGroup.h"
#import "Friend.h"
#define kTableViewReuse @"reuse"
@interface ViewController ()<UITableViewDelegate, UITableViewDataSource, SectionViewDelegate>
@property (nonatomic, strong) UITableView *tableView;
// 數組中寄存FriendGroup的實例對象
@property (nonatomic, strong) NSMutableArray *allArray;
@end

@implementation ViewController

- (void)viewDidLoad {
 [super viewDidLoad];
 self.allArray =[NSMutableArray array];
 [self creatTableView];
 [self getData];
}

- (void)creatTableView {
 self.tableView = [[UITableView alloc] initWithFrame:self.view.bounds style:UITableViewStylePlain];
 _tableView.delegate = self;
 _tableView.dataSource = self;
 [_tableView registerClass:[UITableViewCell class] forCellReuseIdentifier:kTableViewReuse];
 [self.view addSubview:_tableView];
}
// 獲得數據
- (void)getData {
 NSString *filePath = [[NSBundle mainBundle] pathForResource:@"friends.plist" ofType:nil];
 NSArray *tempArray = [NSArray arrayWithContentsOfFile:filePath];
 for (NSMutableDictionary *dic in tempArray) {
  FriendGroup *friendGroup = [[FriendGroup alloc] init];
  [friendGroup setFriendGroupDic:dic];
  [self.allArray addObject:friendGroup];
 }
 [self.tableView reloadData];
}

- (CGFloat)tableView:(UITableView *)tableView heightForHeaderInSection:(NSInteger)section {
 return 50;
}
// SectionView必需完成的協定辦法
- (void)touchAction:(SectionView *)sectionView {

}
#pragma mark - TableView Delegate
-(UIView *)tableView:(UITableView *)tableView viewForHeaderInSection:(NSInteger)section
{
 FriendGroup *friendGroup = [self.allArray objectAtIndex:section];
 //放一個封裝的view,view上有一個label和imageVIew,自帶touch事宜,點擊觸發協定辦法
 SectionView *sectionView = [[SectionView alloc] initWithFrame:CGRectMake(0, 0, 375, 50)];
 sectionView.delegate = self;
 sectionView.tag = section + 1000;
 sectionView.textLabel.text = friendGroup.name;
 sectionView.group = friendGroup;
 return sectionView;
}
#pragma mark - TableView DataSource
- (NSInteger)numberOfSectionsInTableView:(UITableView *)tableView {
 return _allArray.count;
}
- (NSInteger)tableView:(UITableView *)tableView numberOfRowsInSection:(NSInteger)section {
 return [_allArray[section] friends].count;
}
- (UITableViewCell *)tableView:(UITableView *)tableView cellForRowAtIndexPath:(NSIndexPath *)indexPath {
 UITableViewCell *cell = [tableView dequeueReusableCellWithIdentifier:kTableViewReuse];
 FriendGroup *friendGroup = _allArray[indexPath.section];
 Friend *friend = friendGroup.friends[indexPath.row];
 cell.textLabel.text = friend.name;
 return cell;
}
#pragma mark - Memory Waring
- (void)didReceiveMemoryWarning {
 [super didReceiveMemoryWarning];
 // Dispose of any resources that can be recreated.
}


@end
可以從下面代碼看到, 創立了一個tableView. 並依據數組個數給分區數目賦值, 然後在tableView: viewForHeaderInSection:辦法裡, 用一個自定的view給分區頭視圖賦值. 在tableView: cellForRowAtIndexPath:辦法裡給每一個分區對應的cell停止了賦值. 先看一下後果.
從上圖可以看到如今每一個分區中對應有分歧數目的row,然則還沒有完成我們想要的後果.所以再往下持續看.
SectionView.m
-(void)touchesBegan:(NSSet *)touches withEvent:(UIEvent *)event
{
 [self.delegate touchAction:self];
}
/*
 [self.delegate touchAction:self];
 協定辦法會刷新tableview,然後會刷新tableview的 viewForHeaderInSection:辦法
 就會從新結構SectionView所以會走layoutSubviews辦法
 */
-(void)layoutSubviews
{
 [super layoutSubviews];
// 轉變imageView的transform屬性 點擊時有開閉的後果
 [UIView animateWithDuration:0.3 animations:^{
  _imageView.transform = _group.opened ? CGAff.netransformMakeRotation(M_PI_2) : CGAff.netransformMakeRotation(0);
 }];
}
點擊SectionView時 就讓署理人去履行協定辦法,然則在VC的協定辦法中甚麼都沒寫, 所以須要完美一下
- (void)touchAction:(SectionView *)sectionView {
// 經由過程後面設置的tag值找到分區的index
 NSInteger index = sectionView.tag - 1000;
 FriendGroup *group = [self.allArray objectAtIndex:index];
// 每次點擊, 狀況變成與本來相反的值
 group.opened = !group.isOpened;
 [self.tableView reloadSections:[NSIndexSet indexSetWithIndex:index] withRowAnimation:UITableViewRowAnimationNone];
}
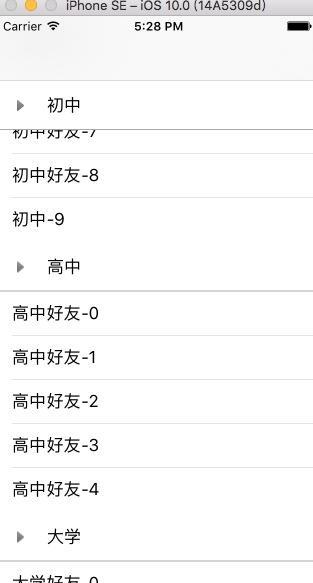
我們日常平凡用的QQ下拉列表, 未翻開時不顯示石友, 翻開後才展現石友列表. 所以應當在numberOfRowsInSection辦法中要停止設置.
- (NSInteger)tableView:(UITableView *)tableView numberOfRowsInSection:(NSInteger)section {
 FriendGroup *group = [self.allArray objectAtIndex:section];
// 假如未翻開 count為0 假如翻開 count為group的屬性數組對應的個數
 NSInteger count = group.isOpened ? group.friends.count : 0;
 return count;
}
後果以下圖

總結
以上就是IOS完成簡略單純版的QQ下拉列表的全體內容,後果固然很簡略,但還會願望對年夜家開辟IOS有所贊助。
【IOS完成簡略單純版的QQ下拉列表】的相關資料介紹到這裡,希望對您有所幫助! 提示:不會對讀者因本文所帶來的任何損失負責。如果您支持就請把本站添加至收藏夾哦!
- 上一頁:iOS完成程度偏向瀑布流
- 下一頁:iOS完成側滑欄後果
相關文章
+