總結iOS開辟中的斷點續傳與理論
媒介
斷點續傳概述
斷點續傳就是從文件前次中止的處所開端從新下載或上傳數據,而不是從文件開首。(本文的斷點續傳僅觸及下載,上傳不在評論辯論以內)當下載年夜文件的時刻,假如沒有完成斷點續傳功效,那末每次湧現異常或許用戶自動的暫停,都邑去重頭下載,如許很糟蹋時光。所以項目中要完成年夜文件下載,斷點續傳功效就必弗成少了。固然,斷點續傳有一種特別的情形,就是 IOS 運用被用戶 kill 失落或許運用 crash,要完成運用重啟以後的斷點續傳。這類特別情形是本文要處理的成績。
斷點續傳道理
要完成斷點續傳 , 辦事器必需支撐。今朝最多見的是兩種方法:FTP 和 HTTP。
上面來簡略引見 HTTP 斷點續傳的道理。
HTTP
經由過程 HTTP,可以異常便利的完成斷點續傳。斷點續傳重要依附於 HTTP 頭部界說的 Range 來完成。在要求某規模內的資本時,可以更有用地對年夜資本收回要求或從傳輸毛病中恢復下載。有了 Range,運用可以經由過程 HTTP 要求已經獲得掉敗的資本的某一個前往或許是部門,來恢復下載該資本。固然其實不是一切的辦事器都支撐 Range,但年夜多半辦事器是可以的。Range 是以字節盤算的,要求的時刻不用給出開頭字節數,由於要求方其實不必定曉得資本的年夜小。
Range 的界說如圖 1 所示:
圖 1. HTTP-Range
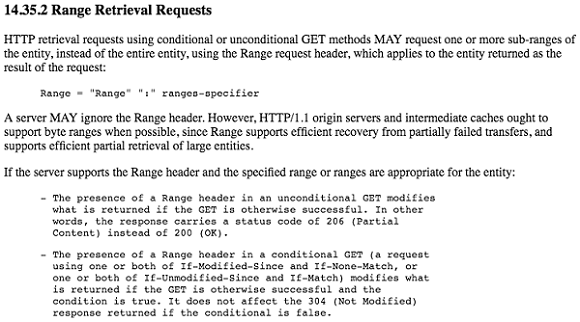
圖 2 展現了 HTTP request 的頭部信息:
圖 2. HTTP request 例子
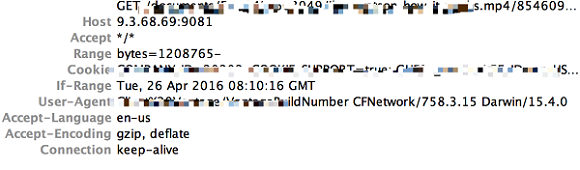
在下面的例子中的“Range: bytes=1208765-”表現要求資本開首 1208765 字節以後的部門。
圖 3 展現了 HTTP response 的頭部信息:
圖 3. HTTP response 例子

下面例子中的”Accept-Ranges: bytes”表現辦事器端接收要求資本的某一個規模,並許可對指定資本停止字節類型拜訪。”Content-Range: bytes 1208765-20489997/20489998”解釋了前往供給了要求資本地點的原始實體內的地位,還給出了全部資本的長度。這裡須要留意的是 HTTP return code 是 206 而不是 200。
斷點續傳剖析 -AFHTTPRequestOperation
懂得了斷點續傳的道理以後,我們便可以著手來完成 IOS 運用中的斷點續傳了。因為筆者項目標資本都是安排在 HTTP 辦事器上 , 所以斷點續傳功效也是基於 HTTP 完成的。起首來看下第三方收集框架 AFNetworking 中供給的完成。清單 1 示例代碼是用來完成斷點續傳部門的代碼:
清單 1. 應用 AFHTTPRequestOperation 完成斷點續傳的代碼
// 1 指定下載文件地址 URLString
 // 2 獲得保留的文件途徑 filePath
 // 3 創立 NSURLRequest
 NSURLRequest *request = [NSURLRequest requestWithURL:[NSURL URLWithString:URLString]];
 unsigned long long downloadedBytes = 0;

 if ([[NSFileManager defaultManager] fileExistsAtPath:filePath]) {
 // 3.1 若之前下載過 , 則在 HTTP 要求頭部參加 Range
  // 獲得已下載文件的 size
  downloadedBytes = [self fileSizeForPath:filePath];

  // 驗證能否下載過文件
  if (downloadedBytes > 0) {
    // 若下載過 , 斷點續傳的時刻修正 HTTP 頭部部門的 Range
    NSMutableURLRequest *mutableURLRequest = [request mutableCopy];
    NSString *requestRange =
    [NSString stringWithFormat:@"bytes=%llu-", downloadedBytes];
    [mutableURLRequest setValue:requestRange forHTTPHeaderField:@"Range"];
    request = mutableURLRequest;
  }
 }

 // 4 創立 AFHTTPRequestOperation
 AFHTTPRequestOperation *operation
 = [[AFHTTPRequestOperation alloc] initWithRequest:request];

 // 5 設置操作輸入流 , 保留在第 2 步的文件中
 operation.outputStream = [NSOutputStream
 outputStreamToFileAtPath:filePath append:YES];

 // 6 設置下載進度處置 block
 [operation setDownloadProgressBlock:^(NSUInteger bytesRead,
 long long totalBytesRead, long long totalBytesExpectedToRead) {
 // bytesRead 以後讀取的字節數
 // totalBytesRead 讀取的總字節數 , 包括斷點續傳之前的
 // totalBytesExpectedToRead 文件總年夜小
 }];

 // 7 設置 success 和 failure 處置 block
 [operation setCompletionBlockWithSuccess:^(AFHTTPRequestOperation
 *operation, id responSEObject) {

 } failure:^(AFHTTPRequestOperation *operation, NSError *error) {

 }];

 // 8 啟動 operation
 [operation start];
應用以上代碼 , 斷點續傳功效就完成了,運用從新啟動或許湧現異常情形下 , 都可以基於曾經下載的部門開端持續下載。症結的處所就是把曾經下載的數據耐久化。接上去簡略看下 AFHTTPRequestOperation 是怎樣完成的。經由過程檢查源碼 , 我們發明 AFHTTPRequestOperation 繼續自 AFURLConnectionOperation , 而 AFURLConnectionOperation 完成了 NSURLConnectionDataDelegate 協定。
處置流程如圖 4 所示:
圖 4. AFURLHTTPrequestOperation 處置流程

這裡 AFNetworking 為何采用子線程調異步接口的方法 , 是由於直接在主線程挪用異步接口 , 會有一個 Runloop 的成績。當主線程挪用 [[NSURLConnection alloc] initWithRequest:request delegate:self startImmediately:YES] 時 , 要求收回以後的監聽憑務會參加到主線程的 Runloop 中 ,RunloopMode 默許為 NSDefaultRunLoopMode, 這個表現只要以後線程的 Runloop 處置 NSDefaultRunLoopMode 時,這個義務才會被履行。而當用戶在轉動 TableView 和 ScrollView 的時刻,主線程的 Runloop 處於 NSEventTrackingRunLoop 形式下,就不會履行 NSDefaultRunLoopMode 的義務。
別的因為采用子線程挪用接口的方法 , 所以這邊的 DownloadProgressBlock,success 和 failure Block 都須要回到主線程來處置。
斷點續傳實戰
懂得了道理和 AFHTTPRequestOperation 的例子以後 , 來看下完成斷點續傳的三種方法:
NSURLConnection
基於 NSURLConnection 完成斷點續傳 , 症結是知足 NSURLConnectionDataDelegate 協定,重要完成了以下三個辦法:
清單 2. NSURLConnection 的完成
 // SWIFT
 // 要求掉敗處置
 func connection(connection: NSURLConnection,
 didFailWithError error: NSError) {
  self.failureHandler(error: error)
 }

 // 吸收到辦事器呼應是挪用
 func connection(connection: NSURLConnection,
 didReceiveResponse response: NSURLResponse) {
  if self.totalLength != 0 {
    return
  }

  self.writeHandle = NSFileHandle(forWritingAtPath:
  FileManager.instance.cacheFilePath(self.fileName!))

  self.totalLength = response.expectedContentLength + self.currentLength
 }

 // 當辦事器前往實體數據是挪用
 func connection(connection: NSURLConnection, didReceiveData data: NSData) {
  let length = data.length

  // move to the end of file
  self.writeHandle.seekToEndOfFile()

  // write data to sanbox
  self.writeHandle.writeData(data)

  // calculate data length
  self.currentLength = self.currentLength + length

  print("currentLength\(self.currentLength)-totalLength\(self.totalLength)")

  if (self.downloadProgressHandler != nil) {
    self.downloadProgressHandler(bytes: length, totalBytes:
    self.currentLength, totalBytesExpected: self.totalLength)
  }
 }

 // 下載終了後挪用
 func connectionDidFinishLoading(connection: NSURLConnection) {
  self.currentLength = 0
  self.totalLength = 0

  //close write handle
  self.writeHandle.closeFile()
  self.writeHandle = nil

  let cacheFilePath = FileManager.instance.cacheFilePath(self.fileName!)
  let documenFilePath = FileManager.instance.documentFilePath(self.fileName!)

  do {
    try FileManager.instance.moveItemAtPath(cacheFilePath, toPath: documenFilePath)
  } catch let e as NSError {
    print("Error occurred when to move file: \(e)")
  }

  self.successHandler(responSEObject:fileName!)
 }
如圖 5 所示 , 解釋了 NSURLConnection 的普通處置流程。
圖 5. NSURLConnection 流程

依據圖 5 的普通流程,在 didReceiveResponse 中初始化 fileHandler, 在 didReceiveData 中 , 將吸收到的數據耐久化的文件中 , 在 connectionDidFinishLoading 中,清空數據和封閉 fileHandler,並將文件保留到 Document 目次下。所以當要求湧現異常或運用被用戶殺失落,都可以經由過程耐久化的中央文件來斷點續傳。初始化 NSURLConnection 的時刻要留意設置 scheduleInRunLoop 為 NSRunLoopCommonModes,否則就會湧現進度條 UI 沒法更新的景象。
完成後果如圖 6 所示:
圖 6. NSURLConnection 演示

NSURLSessionDataTask
蘋果在 IOS7 開端,推出了一個新的類 NSURLSession, 它具有了 NSURLConnection 所具有的辦法,而且更壯大。因為經由過程 NSURLConnection 從 2015 年開端被棄用了,所以讀者推舉基於 NSURLSession 去完成續傳。NSURLConnection 和 NSURLSession delegate 辦法的映照關系 , 如圖 7 所示。所以症結是要知足 NSURLSessionDataDelegate 和 NSURLsessionTaskDelegate。
圖 7. 協定之間映照關系

代碼如清單 3 所示 , 根本和 NSURLConnection 完成的一樣。
清單 3. NSURLSessionDataTask 的完成
 // SWIFT
 // 吸收數據
 func URLSession(session: NSURLSession, dataTask: NSURLSessionDataTask,
 idReceiveData data: NSData) {
  //. . .
 }
 // 吸收辦事器呼應
 func URLSession(session: NSURLSession, dataTask: NSURLSessionDataTask,
 didReceiveResponse response: NSURLResponse, completionHandler:
 (NSURLSessionResponseDisposition) -> Void) {
  // . . .
  completionHandler(.Allow)
 }

 // 要求完成
 func URLSession(session: NSURLSession, task: NSURLSessionTask,
 didCompleteWithError error: NSError?) {
  if error == nil {
    // . . .
    self.successHandler(responSEObject:self.fileName!)
  } else {
    self.failureHandler(error:error!)
  }
 }
差別在與 didComleteWithError, 它將 NSURLConnection 中的 connection:didFailWithError:
和 connectionDidFinishLoading: 整合到了一路 , 所以這邊要依據 error 辨別履行勝利的 Block 和掉敗的 Block。
完成後果如圖 8 所示:
圖 8. NSURLSessionDataTask 演示

NSURLSessionDownTask
最初來看下 NSURLSession 頂用來下載的類 NSURLSessionDownloadTask,對應的協定是 NSURLSessionDownloadDelegate,如圖 9 所示:
圖 9. NSURLSessionDownloadDelegate 協定

個中在加入 didFinishDownloadingToURL 後,會主動刪除 temp 目次下對應的文件。所以有關文件操作必需要在這個辦法外面處置。之前筆者曾想找到這個 tmp 文件 , 基於這個文件做斷點續傳 , 無法一向找不到這個文件的途徑。等今後 SWIFT 頒布 NSURLSession 的源碼以後,也許會無方法找到。基於 NSURLSessionDownloadTask 來完成的話 , 須要在 cancelByProducingResumeData 中保留曾經下載的數據。進度告訴就異常簡略了,直接在 URLSession:downloadTask:didWriteData:totalBytesWritten:totalBytesWritten:totalBytesExpectedToWrite: 完成便可。
代碼如清單 4 所示:
清單 4. NSURLSessionDownloadTask 的完成
 //SWIFT

 //UI 觸發 pause
 func pause(){
  self.downloadTask?.cancelByProducingResumeData({data -> Void in
    if data != nil {
 data!.writeToFile(FileManager.instance.cacheFilePath(self.fileName!),
 atomically: false)
 }
    })
  self.downloadTask = nil
 }

 // MARK: - NSURLSessionDownloadDelegate
 func URLSession(session: NSURLSession, downloadTask:
 NSURLSessionDownloadTask, didWriteData bytesWritten: Int64,
 totalBytesWritten: Int64, totalBytesExpectedToWrite: Int64) {
  if (self.downloadProgressHandler != nil) {
    self.downloadProgressHandler(bytes: Int(bytesWritten),
     totalBytes: totalBytesWritten, totalBytesExpected: totalBytesExpectedToWrite)
  }
 }

 func URLSession(session: NSURLSession, task: NSURLSessionTask,
 didCompleteWithError error: NSError?) {
  if error != nil {//real error
    self.failureHandler(error:error!)
  }
 }

 func URLSession(session: NSURLSession, downloadTask: NSURLSessionDownloadTask,
 didFinishDownloadingToURL location: NSURL) {
  let cacheFilePath = FileManager.instance.cacheFilePath(self.fileName!)
  let documenFilePath = FileManager.instance.documentFilePath(self.fileName!)
  do {
    if FileManager.instance.fileExistsAtPath(cacheFilePath){
      try FileManager.instance.removeItemAtPath(cacheFilePath)
    }
    try FileManager.instance.moveItemAtPath(location.path!, toPath: documenFilePath)
  } catch let e as NSError {
    print("Error occurred when to move file: \(e)")
  }
  self.successHandler(responseObject:documenFilePath)
 }
完成後果如圖 10 所示:
圖 10. NSURLSessionDownloadTask 演示

總結
以上就是本文總結iOS開辟中的斷點續傳與理論的全體內容,其實,下載的完成遠不止這些內容,本文只引見了簡略的應用。願望在進一步的進修和運用中能持續與年夜家分享。願望本文能贊助到有須要的年夜家。
【總結iOS開辟中的斷點續傳與理論】的相關資料介紹到這裡,希望對您有所幫助! 提示:不會對讀者因本文所帶來的任何損失負責。如果您支持就請把本站添加至收藏夾哦!