iOS抽屜後果開辟案例分享
編輯:IOS開發綜合
本文實例為年夜家分享了IOS抽屜後果開辟實例,供年夜家參考,詳細內容以下
在顯示在窗口的掌握器上添加三個view(假如只須要往一邊滑動就只加2個view)
先聲明三個view
#import "ViewController.h"

@interface ViewController ()
@property(nonatomic, weak) UIView *mainV;
@property(nonatomic, weak) UIView *leftV;
@property(nonatomic, weak) UIView *rightV;
@end
添加view到掌握器view上
#pragma mark - 添加子控件
- (void)setUpChildViews {

  UIView *leftV = [[UIView alloc]initWithFrame:self.view.bounds];

  leftV.backgroundColor = [UIColor orangeColor];

  [self.view addSubview:leftV];

  _leftV = leftV;

  UIView *rightV = [[UIView alloc]initWithFrame:self.view.bounds];

  rightV.backgroundColor = [UIColor groupTableViewBackgroundColor];

  [self.view addSubview:rightV];

  _rightV = rightV;

  UIView *mainV = [[UIView alloc]initWithFrame:self.view.bounds];

  mainV.backgroundColor = [UIColor yellowColor];

  [self.view addSubview:mainV];

  _mainV = mainV;
}

- (void)viewDidLoad {
  [super viewDidLoad];

  //添加子控件
  [self setUpChildViews];

  //添加Pan手勢
  UIPanGestureRecognizer *pan = [[UIPanGestureRecognizer alloc]initWithtarget:self action:@selector(pan:)];

  [self.view addGestureRecognizer:pan];

  //添加點按手勢,在主視圖上隨意率性地位點擊回到屏幕開端地位
  UITapGestureRecognizer *tap = [[UITapGestureRecognizer alloc]initWithtarget:self action:@selector(tap)];

  [self.view addGestureRecognizer:tap];

}
#pragma mark - 手勢辨認辦法
#define targetL -230
#define targetR 200
#define screenW [UIScreen mainScreen].bounds.size.width
- (void)pan:(UIPanGestureRecognizer *)pan {

  //獲得手勢挪動的地位
  CGPoint tranP = [pan translationInView:self.view];

  //獲得x的偏移量
  CGFloat offsetX = tranP.x;

  //修正mainV的frame
  _mainV.frame = [self frameWithOffsetX:offsetX];

  //斷定mainV的x能否年夜於0
  [self observeValueForKeyPath:nil ofObject:nil change:nil context:nil];

  //復位
  [pan setTranslation:CGPointZero inView:self.view];

  //斷定當手勢停止的時刻,定位
  if (pan.state == UIGestureRecognizerStateEnded) {

    CGFloat target = 0;

    if (_mainV.frame.origin.x > screenW * 0.5) {
      //定位到左邊
      target = targetR;
    }else if(CGRectGetMaxX(_mainV.frame) < screenW * 0.5) {
      //定位到右邊
      target = targetL;
    }

    //獲得X軸須要挪動的偏移量
    CGFloat offsetX = target - _mainV.frame.origin.x;

    [UIView animateWithDuration:0.25 animations:^{

      _mainV.frame = target == 0 ? self.view.bounds : [self frameWithOffsetX:offsetX];

    }];

  }

}
- (void)tap {

  [UIView animateWithDuration:0.25 animations:^{
    _mainV.frame = self.view.bounds;
  }];

}

#define kMaxY 80
#pragma mark - 依據offsetX盤算mainV的frame
- (CGRect)frameWithOffsetX:(CGFloat)offsetX {

  //獲得上一次的frame
  CGRect frame = _mainV.frame;

  //獲得屏幕的高度
  CGFloat screenH = [UIScreen mainScreen].bounds.size.height;

  //獲得屏幕的寬度
  //CGFloat screenW = [UIScreen mainScreen].bounds.size.width;

  //X軸平移一點對應Y軸須要平移的間隔
  CGFloat offsetY = offsetX * kMaxY / screenW;

  //獲得上一次的高度
  CGFloat preH = frame.size.height;

  //獲得上一次的寬度
  CGFloat preW = frame.size.width;

  //獲得以後高度
  CGFloat curH = preH - 2 * offsetY;
  //假如是向左滑動
  if(frame.origin.x < 0) {
    curH = preH + 2 * offsetY;
  }

  //獲得尺寸的縮放比例
  CGFloat scale = curH / preH;

  //獲得以後寬度
  CGFloat curW = preW * scale;

  //獲得以後x
  frame.origin.x += offsetX;

  //獲得以後y
  CGFloat y = (screenH - curH) / 2;
  frame.origin.y = y;

  frame.size.width = curW;
  frame.size.height = curH;

  return frame;

}
- (void)observeValueForKeyPath:(NSString *)keyPath ofObject:(id)object change:(NSDictionary<NSString *,id> *)change context:(void *)context {

  if(_mainV.frame.origin.x > 0) {//往左邊滑動
    _rightV.hidden = YES;
  }else if(_mainV.frame.origin.x < 0) {//往右邊滑動
    _rightV.hidden = NO;
  }

}
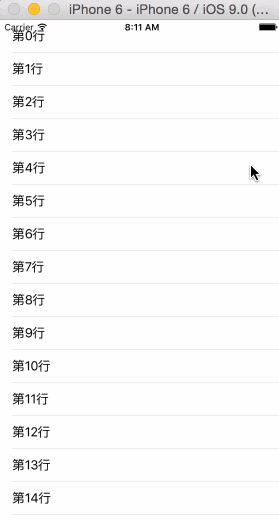
假如想要在mainV主視圖中顯示tableView,就新創立一個TableViewController,在這外面顯示tableView的數據,
- (NSInteger)tableView:(UITableView *)tableView numberOfRowsInSection:(NSInteger)section {

  return 30;
}

- (UITableViewCell *)tableView:(UITableView *)tableView cellForRowAtIndexPath:(NSIndexPath *)indexPath {


  static NSString *ID = @"cell";

  UITableViewCell *cell = [tableView dequeueReusableCellWithIdentifier:ID];

  if(cell == nil) {
    cell = [[UITableViewCell alloc]initWithStyle:UITableViewCellStyleDefault reuseIdentifier:ID];
  }

  cell.textLabel.text = [NSString stringWithFormat:@"第%ld行", indexPath.row];

  return cell;
}
再創立一個在storyboard中顯示的掌握器XXMainViewController,繼續自完成了抽屜後果的ViewController,而且在storyboard中將class改成這個掌握的類名,還要將顯示tableView的掌握成為他的子掌握器
- (void)viewDidLoad {
  [super viewDidLoad];

  XXViewController *vc = [[XXViewController alloc]init];
  vc.view.frame = self.view.bounds;

  //讓vc成為主視圖掌握器的子掌握器
  [self addChildViewController:vc];

  //主視圖展現tableView
  [self.mainV addSubview:vc.view];

}
為了在XXMainViewController中只能拜訪mainV而不克不及修正他的值,所以將子控件的view裸露在ViewController.h中,並添加read-only
#import <UIKit/UIKit.h>

@interface ViewController : UIViewController
@property(nonatomic, weak, readonly) UIView *mainV;
@property(nonatomic, weak, readonly) UIView *leftV;
@property(nonatomic, weak, readonly) UIView *rightV;
@end
運轉後果圖:
以上就是本文的全體內容,願望對年夜家進修IOS法式設計有所贊助。
【iOS抽屜後果開辟案例分享】的相關資料介紹到這裡,希望對您有所幫助! 提示:不會對讀者因本文所帶來的任何損失負責。如果您支持就請把本站添加至收藏夾哦!


相關文章
+