iOS模糊效果的完成辦法
編輯:IOS開發綜合
本文實例為大家分享了IOS模糊效果的3種辦法,供大家參考,詳細內容如下
方案一:應用零碎的CoreImage(濾鏡)
重點了解CIImage,CIFilter,CIContext,CGImageRef
濾鏡處置的進程比擬慢,會形成加載圖片遲緩的景象(等一會才看到圖片),盡量放到子線程執行
- (void)viewDidLoad {
 [super viewDidLoad];

 // 加載一張圖片
 UIImage *image = [UIImage imageNamed:@"che"];

 /**************CoreImage局部**************/

 // 1.創立CIImage
 CIImage *ciImage = [[CIImage alloc] initWithImage:image];

 // 2.創立濾鏡CIFilter
 CIFilter *blurFilter = [CIFilter filterWithName:@"CIGaussianBlur"];

 // 2.1.將CIImage輸出到濾鏡中
 [blurFilter setValue:ciImage forKey:kCIInputImageKey];

 // 可以經過該辦法檢查我們可以設置的值(如模糊度等)
 NSLog(@"%@", [blurFilter attributes]);

 // 2.2設置模糊度
 [blurFilter setValue:@(2) forKey:@"inputRadius"];

 // 2.3將處置好的圖片輸入
 CIImage *outCiImage = [blurFilter valueForKey:kCIOutputImageKey];

 // 3.CIContext(option參數為nil代表用CPU渲染,若想用GPU渲染請檢查此參數)
 CIContext *context = [CIContext contextWithOptions:nil];

 // 4.獲取CGImage句柄
 CGImageRef outCGImage = [context createCGImage:outCiImage fromRect:[outCiImage extent]];

 // 5.獲取最終的圖片
 UIImage *blurImage = [UIImage imageWithCGImage:outCGImage];

 // 6.釋放CGImage
 CGImageRelease(outCGImage);
 /*****************************************/

 UIImageView *imageV = [[UIImageView alloc] initWithFrame:CGRectMake(0, 0, 750 / 2, 1334 / 2)];
 imageV.image = blurImage;
 imageV.center = self.view.center;
 [self.view addSubview:imageV];

}
方案二:應用UIImage+ImageEffects分類
將UIImage+ImageEffects.h和UIImage+ImageEffects.m文件加載進工程
包括UIImage+ImageEffects.h
UIImage+ImageEffects文件途徑
#import "ViewController.h"

#import "UIImage+ImageEffects.h"
- (void)viewDidLoad {
 [super viewDidLoad];

 // 原始圖片
 UIImage *sourceImage = [UIImage imageNamed:@"che"];

 // 對圖片停止模糊處置
 UIImage *blurImage = [sourceImage blurImageWithRadius:10];

 // 加載模糊處置後的圖片
 UIImageView *imageV = [[UIImageView alloc] initWithImage:blurImage];
 [self.view addSubview:imageV];

}
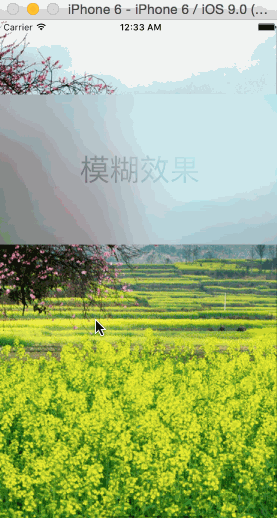
方案三:應用UIVisualEffectView(IOS8)
#import "ViewController.h"

@interface ViewController ()

/** 背景 */
@property (nonatomic, strong) UIScrollView *scrollView;

@end

@implementation ViewController

- (void)viewDidLoad {
 [super viewDidLoad];

 // 添加展現的背景,用於顯示靜態模糊(背景可以滾動,便於檢查靜態的模糊)
 self.scrollView = [[UIScrollView alloc] initWithFrame:self.view.bounds];
 UIImageView *imageV = [[UIImageView alloc] initWithImage:[UIImage imageNamed:@"fengjing"]];
 self.scrollView.contentSize = imageV.image.size;
 self.scrollView.bounces = NO;
 [self.scrollView addSubview:imageV];
 [self.view addSubview:self.scrollView];

 /***************添加模糊效果***************/
 // 1.創立模糊view
 UIVisualEffectView *effectView = [[UIVisualEffectView alloc] initWithEffect:[UIBlurEffect effectWithStyle:UIBlurEffectStyleLight]];

 // 2.設定模糊View的尺寸
 effectView.frame = CGRectMake(0, 100, 375, 200);

 // 3.添加到view當中
 [self.view addSubview:effectView];


 /******************添加顯示文本******************/
 UILabel *label = [[UILabel alloc] initWithFrame:effectView.bounds];
 label.text = @"模糊效果";
 label.font = [UIFont systemFontOfSize:40];
 label.textAlignment = NSTextAlignmentCenter;

 /****************添加模糊效果的子view****************/
 // 1.創立出子模糊view
 UIVisualEffectView *subEffectView = [[UIVisualEffectView alloc] initWithEffect:[UIVibrancyEffect effectForBlurEffect:(UIBlurEffect *)effectView.effect]];

 // 2.設置子模糊view的尺寸
 subEffectView.frame = effectView.bounds;

 // 3.將子模糊view添加到effectView的contentView上才干顯示
 [effectView.contentView addSubview:subEffectView];

 // 4.添加要顯示的view來到達特殊效果
 [subEffectView.contentView addSubview:label];

}

@end
效果圖:
以上就是本文的全部內容,希望對大家的學習有所協助,也希望大家多多支持本站。
【iOS模糊效果的完成辦法】的相關資料介紹到這裡,希望對您有所幫助! 提示:不會對讀者因本文所帶來的任何損失負責。如果您支持就請把本站添加至收藏夾哦!

相關文章
+