iOS9新特性 - Search APIs
在IOS9之前,你只能用spotlight通過app的名字找到對應的app。但隨著iOS9 Search APIs 的發布,開發者可以通過在app內部的內容中建立索引,通過搜索關鍵字來進入到app指定的內容區域。
The 3 APIs
NSUserActivity
The NSUserActivity 在iOS8的 Handoff 使用中有介紹到。到了iOS9中,你可以利用NSUserActivity搜索相關的“活躍信息”。你可以提供一些關鍵詞給這些“活躍信息”, 意味著spotlight可以檢索它們。這個操作相當於你在浏覽網頁的時候,有歷史記錄的作用一樣。用戶可以通過spotlight快速的打開最近的“活躍信息”。
Web Markup
Web Markup 允許 apps 映射它們的內容到網頁上面,然後方便spotlight在網頁中快速檢索內容。Apple的索引器將會扮演爬蟲的角色,在網頁上面檢索那些被Markup的內容。這些信息在Safari和Spotlight都可以檢索。
Core Spotlight
Core Spotlight是iOS9中的一個新框架,它允許檢索在app中的內容。NSUserActivity在保存用戶的歷史記錄是很有用的;而Core Spotlight可以檢索任何你想要的數據。
使用Core Spotlight APIs
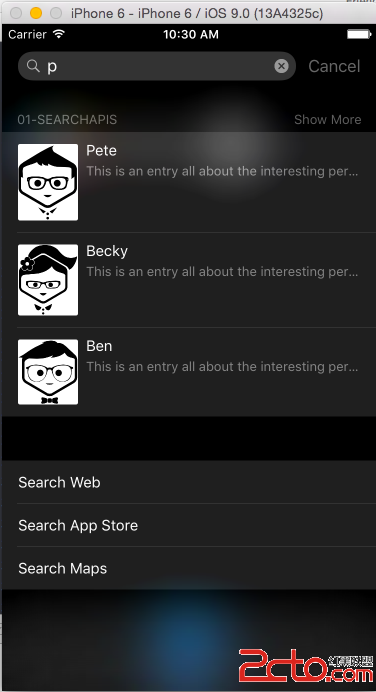
NSUserActivity 和 Web Markup APIs 相對而言是很容易使用的,而 Core Spotlight 是有一點復雜的。為了演示Core Spotlight是怎樣工作的,我們創建一個比較簡單的Demo用來展示朋友列表。然後你點擊任意一個朋友的名字,你可以看到朋友的頭像的具體信息。在演示具體的流程之前,我們先看看最終效果圖。
在演示效果中可以看到,我在spotlight中檢索相關朋友信息,可以看到他們的大致信息,然後點擊一條信息,便可以跳轉到自己app中的具體的朋友詳情。
代碼分析:
1. Demo的結構很簡單,就是一個導航控制器,根控制器是一個UITableViewController,用來展示朋友名稱列表。我們定義為FriendTableViewController。
2. 當點擊列表中的一個朋友名稱後,就會跳轉到詳情頁面,我們定義為FriendViewController。
3. 所有的朋友數據信息,我們用一個管理類來管理。我們定義為DataSource。這個管理類的職責:
1)存儲所有的朋友數據信息。
2)保存用戶信息到Core Spotlight的索引器中。
當然,每一條用戶信息對應一個模型,定義如下:
Person.h
@interface Person : NSObject
@property (nonatomic, copy) NSString *name;
@property (nonatomic, copy) NSString *identifer;
@property (nonatomic, copy) NSString *icon;
- (instancetype)initWithName:(NSString *)name identifer:(NSString *)identifer icon:(NSString *)icon;
@end
Person.m
@implementation Person
- (instancetype)initWithName:(NSString *)name identifer:(NSString *)identifer icon:(NSString *)icon {
    if (self = [super init]) {
        self.name = name;
        self.identifer = identifer;
        self.icon = icon;
    }
    return self;
}
@end
DataSource.h的方法列表如下:
@interface Datasource : NSObject
- (NSArray *)dataList;
- (Person *)findFriendWithId:(NSString *)identifer;
- (void)savePeopleToIndex;
@end
1)dataList方法就是獲取所有的用戶列表數據信息。
2)findFriendWithId: 方法就是根據用戶Id獲取模型數據。
3)savePeopleToIndex就是保存所有用戶數據信息到Core Spotlight的索引器中。
DataSource.m 文件中的代碼
@implementation Datasource

- (NSArray *)dataList {
    Person *becky = [[Person alloc] initWithName:@Becky identifer:@1 icon:@becky];

    Person *ben = [[Person alloc] initWithName:@Ben identifer:@2 icon:@ben];

    Person *jane = [[Person alloc] initWithName:@Jane identifer:@3 icon:@jane];

    Person *pete = [[Person alloc] initWithName:@Pete identifer:@4 icon:@pete];

    Person *ray = [[Person alloc] initWithName:@Ray identifer:@5 icon:@ray];

    Person *tom = [[Person alloc] initWithName:@Tom identifer:@6 icon:@tom];

    return @[becky, ben, jane, pete, ray, tom];
}

- (Person *)findFriendWithId:(NSString *)identifer {
    for (Person *p in self.dataList) {
        if ([p.identifer isEqualToString:identifer]) {
            return p;
        }
    }
    return nil;
}

- (void)savePeopleToIndex {
    // prepare
    NSMutableArray *searchableItems = [NSMutableArray array];
    for (Person *p in self.dataList) {
        // Create an attribute set for an item that represents an image.
        CSSearchableItemAttributeSet *attributeSet = [[CSSearchableItemAttributeSet alloc] initWithItemContentType:@image];
        attributeSet.title = p.name;
        attributeSet.contentDescription = [NSString stringWithFormat:@This is an entry all about the interesting person called %@, p.name];
        attributeSet.thumbnailData = UIImagePNGRepresentation([UIImage imageNamed:p.icon]);

        CSSearchableItem *item = [[CSSearchableItem alloc] initWithUniqueIdentifier:p.identifer domainIdentifier:@com.ios9daybyday.SearchAPIs.people attributeSet:attributeSet];
        [searchableItems addObject:item];
    }

    // save
    [[CSSearchableIndex defaultSearchableIndex] indexSearchableItems:searchableItems completionHandler:^(NSError * _Nullable error) {
        if (error) {
            NSLog(@error message:%@, error.localizedDescription);
        }
    }];
}

@end
代碼的關鍵部分就是savePeopleToIndex方法,定義的searchableItems就是用來存儲相關的可檢索的信息;而代碼中的CSSearchableIndex的單例方法indexSearchableItems是真正的將searchableItems中的內容存儲到Core Spotlight中的操作。
然後我們看看FriendTableViewController的列表展示頁面的主要代碼
- (void)viewDidLoad {
    [super viewDidLoad];
    Datasource *dataSource = [Datasource alloc];
    self.dataList = [dataSource dataList];

    [dataSource savePeopleToIndex];
}
這裡的savePeopleIndex就將內容存儲到Core Spotlight中了。
現在你運行程序,這些數據將會被存儲起來了。當你在spotlight中搜索你的朋友,他們將會出現,效果圖如下:
此時嘗試點擊一項,但是它不會跳轉到app的指定區域,只會跳轉到對應的app,因為我們還沒有指定要跳轉的指定區域。
我們可以在調用continueUserActivity代理方法的時候指定app的行為。代碼如下:
- (BOOL)application:(UIApplication *)application continueUserActivity:(NSUserActivity *)userActivity restorationHandler:(void(^)(NSArray * __nullable restorableObjects))restorationHandler NS_AVAILABLE_IOS(8_0) {

    NSString *friendID = userActivity.userInfo[@kCSSearchableItemActivityIdentifier];
    UINavigationController *navigationController = (UINavigationController *)self.window.rootViewController;
    [navigationController popToRootViewControllerAnimated:NO];

    FriendTableViewController *friendVC = (FriendTableViewController *)navigationController.viewControllers.firstObject;
    [friendVC showFriendWithId:friendID];

    return YES;
}
第1句代碼: 獲取你在spotlight中點擊的朋友的id。
第2、3句代碼: 獲取到根的導航控制,並且pop掉棧中所有的控制器。
第4句代碼: 跳轉到app的指定位置。
這裡的代碼可以可以發現,之前我們保存到Core SpotLight索引器中的內容現在可以使用userActivity.userInfo字典進行獲取了。我們所關心的就是friend Id,它是被保存到索引器中作為Person這個對象的kCSSearchableItemActivityIdentifier.
正如你所見的,左上角有一個 Back to search選項,用戶可以點擊這裡返回用戶列表。
這篇文章中,並沒有涉及到索引器的刪除操作,想要了解刪除的具體操作,可以參照以下的幾個方法:
deleteSearchableItemsWithIdentifiers
deleteSearchableItemsWithDomainIdentifiers
deleteAllSearchableItemsWithCompletionHandler