iOS旋鈕動畫-CircleKnob
前段時間和群裡的一個設計師配合,根據網上的一個旋鈕gif為原型,用代碼做出來了。先來看下原型的效果
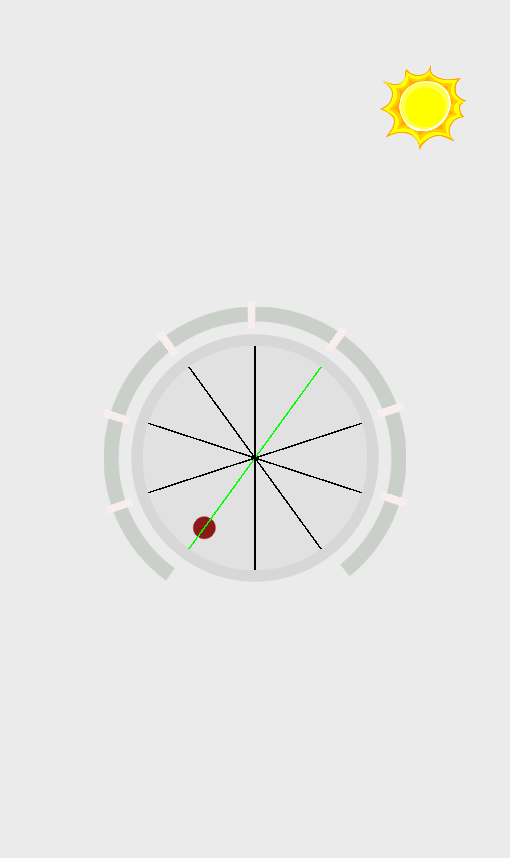
在看下下面是我做完後成品的效果,加了一個通過移動光源來對陰影控制的效果,這樣看起來更立體點。(那個太陽有點不協調。。。)
同時附上代碼鏈接https://git.oschina.net/BearXR/CircleKnob
還有單獨的下載包http://download.csdn.net/detail/xiongbaoxr/9419655

下面開始簡單的講解下構思步驟和部分代碼片段
1,構建底盤
首先我們要構造兩個圓盤和旋鈕上的紅點
用view畫兩個圓盤,和一個小的紅色控制點。
注意:紅色的控制點我又單獨新建了一個view,這樣方便待會做手勢控制,從而不會影響到後面的view。而且所有view的圓心都要設置好。後面和角度相關的處理會很多的。最好能准確和self.view或者window能有直接的關聯。
2,底盤增加點擊和拖動的手勢
在這裡我們要增加手勢,還有起始點,終點的角度。我畫了輔助線,便於調試。手勢和過渡效果都寫好了。所以效果我就直接放上來了。
3,增加外圍的扇環
由於後面要做陰影,所以除了扇環的底色和效果是用了一個view,其余的每個小格子我都是新開了一個view,並且將旋鈕的圓心位置設置為錨點進行旋轉。
#pragma mark - 設置外圍的扇環形

- (void)initSetFanView

{

CGFloat delta_distance = 26;

fanView = [[FanView alloc] initWithFrame:CGRectMake(0, 0, knob_width + delta_distance * 2, knob_width + delta_distance * 2)];

fanView.center = knob.center;

fanView.backgroundColor = [UIColor clearColor];

fanView.userInteractionEnabled = NO;

[self.view addSubview:fanView];

fanView.knobValue = -startAngleValue;//設置起始點

fanView.lightSource_InWindow = lightSource;

}

- (void)drawRect:(CGRect)rect

{

contextBack = UIGraphicsGetCurrentContext();

contextFore = UIGraphicsGetCurrentContext();

[self drawFan:contextBack

bezierPath:bezierPathBack

knobAngle:180 + endAngleValue

strokeColor:[UIColor colorWithRed:202/255.0 green:207/255.0 blue:202/255.0 alpha:1.0f]];

[self drawFan:contextFore

bezierPath:bezierPathFore

knobAngle:_knobValue

strokeColor:[UIColor colorWithRed:174/255.0 green:0/255.0 blue:0/255.0 alpha:1.0f]];

}

// 繪制扇形

- (void)drawFan:(CGContextRef)context bezierPath:(UIBezierPath *)bezierPath knobAngle:(CGFloat)knobAngle strokeColor:(UIColor *)strokeColor

{

CGRect frame = self.frame;

CGFloat radius = (CGRectGetWidth(frame) - lineWidth) / 2;

CGFloat angleForOne = M_PI / 180.0f;

CGFloat circleLength = radius * 2 * M_PI;

int gapCount = fanShowCount - 1; //間隙個數

CGFloat gapWidth = 5; //間隙距離

// 計算需要繪制的角度(角度制)

knobAngle = knobAngle < -startAngleValue ? -startAngleValue : knobAngle;

knobAngle = knobAngle > 180 + endAngleValue ? 180 + endAngleValue : knobAngle;

// 設置弧線路徑

bezierPath = [UIBezierPath bezierPathWithArcCenter:CGPointMake(CGRectGetWidth(frame)/2, CGRectGetHeight(frame)/2) radius:(CGRectGetWidth(frame) - lineWidth)/2.0 startAngle:angleForOne * (180 - startAngleValue) endAngle:angleForOne * (180 + knobAngle) clockwise:YES];

CGContextAddPath(context, bezierPath.CGPath);

// 設置線的顏色,線寬,接頭樣式

CGContextSetStrokeColorWithColor(context, strokeColor.CGColor);

CGContextSetFillColorWithColor(context, [UIColor clearColor].CGColor);

CGContextSetLineWidth(context, lineWidth);

CGContextSetLineCap(context, kCGLineCapButt);

// 繪制虛線

CGFloat drawLineLength = circleLength * (1- (startAngleValue + endAngleValue)/fullAngleValue);

CGFloat showLineLengthPer = (drawLineLength - gapWidth * gapCount)/(fanShowCount - 1);

CGFloat lengths[2] = {showLineLengthPer,gapWidth};

CGContextSetLineDash(context, 0, lengths, 2);

CGContextDrawPath(context, kCGPathFillStroke);//最後一個參數是填充類型

if (!self.blockViewArray) {

self.blockViewArray = [[NSMutableArray alloc] init];

}

// 繪制小方格view(並且只繪制一次)

static BOOL drawBlock = NO;

if (!drawBlock) {

drawBlock = YES;

for (int i = 1; i < fanShowCount; i++) {

CGFloat blockWidth = lineWidth + 8;

CGFloat blockHeight = 5;

CGFloat block_x = CGRectGetWidth(frame) / 2 - radius - blockWidth/2;

CGFloat block_y = CGRectGetHeight(frame) / 2;

// 角度修正

if (blockHeight > gapWidth) {

block_y = block_y - blockHeight/2;

}else{

block_y = block_y + (gapWidth - blockHeight)/2;

}

// 方格view 可輔助繪制垂直平分線

ViewWithAutoShadow *viewBlock = [[ViewWithAutoShadow alloc] initWithFrame:CGRectMake(block_x, block_y, blockWidth, blockHeight)];

viewBlock.showAssistPoint = NO;

viewBlock.backgroundColor = [UIColor colorWithRed:248/255.0 green:238/255.0 blue:237/255.0 alpha:1.0f];

[self addSubview:viewBlock];

// 根據錨點旋轉

CGFloat blockAngle = (180 + startAngleValue + endAngleValue)/fanShowCount*i - startAngleValue;

CGAffineTransform rotate = GetCGAffineTransformRotateAroundPoint1(viewBlock.center.x, viewBlock.center.y, CGRectGetWidth(frame)/2, CGRectGetHeight(frame)/2, blockAngle/180.0 * M_PI);

[viewBlock setTransform:rotate];

AppDelegate *myDelegate = [[UIApplication sharedApplication] delegate];

[viewBlock drawShadowEffectWithSourcePoint:_lightSource_InWindow assistInView:myDelegate.window];

[self.blockViewArray addObject:viewBlock];

}

}

}
4,增加動畫效果
給底盤和扇環都增加動效,裡面用了定時器。關於定時器可以看參考這篇博客http://blog.csdn.net/xiongbaoxr/article/details/50580701
動效的代碼片段
// 執行動畫

- (void)changeRadiusWithAnimation:(CGFloat)radius lastRadius:(CGFloat)lastRadius duration:(CGFloat)duration

{

CGFloat countAll = ABS(radius - lastRadius);

double delaySeconds = 0.001f;

CGFloat animateCount = duration/delaySeconds;

__block int i = 0;

dispatch_queue_t queue = dispatch_get_global_queue(DISPATCH_QUEUE_PRIORITY_DEFAULT, 0);

dispatch_source_t timer = dispatch_source_create(DISPATCH_SOURCE_TYPE_TIMER, 0, 0, queue);

dispatch_source_set_timer(timer, DISPATCH_TIME_NOW, delaySeconds * NSEC_PER_SEC, 0);

dispatch_source_set_event_handler(timer, ^{

dispatch_async(dispatch_get_global_queue(DISPATCH_QUEUE_PRIORITY_DEFAULT, 0), ^{

if (i >= animateCount) {

dispatch_source_cancel(timer);

}else{

i ++;

dispatch_sync(dispatch_get_main_queue(), ^{

// 扇環進度條動畫

CGFloat anglePer = countAll/animateCount * i;

int k = radius > lastRadius ? anglePer : -anglePer;

CGFloat needValue = lastRadius + k;

fanView.knobValue = needValue;

// 該方法會重新調用drawRect方法

[fanView setNeedsDisplay];

// 旋鈕轉動

knob.transform = CGAffineTransformMakeRotation((needValue/180.0 - 0) * M_PI);

});

}

});

});

dispatch_resume(timer);

}
5,最後一步是處理陰影效果,裡面涉及的東西比較多。不詳細解釋代碼,說一下思路。關於陰影處理的主要是這個類 ViewWithAutoShadow.h
5.1,首先我們設置一個光源點,這個小太陽就是我們的光源所在的位置
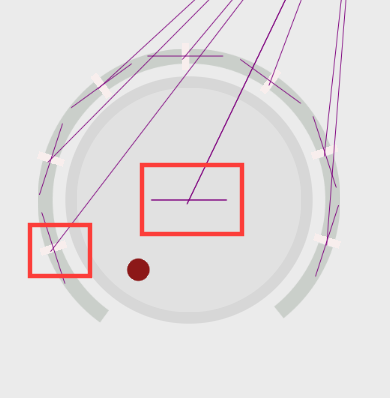
5.2,為了便於調試和理解,我對所有需要做投影效果的view畫出了其與光源的連線,view的垂直平分線。並且進行了相應的延長。
同時也把view的四個頂點和中心點也描出來了

5.3,注意看,每個夾腳處都有一個小的出頭部分,這就是陰影的偏移量。按照這個偏移量來設置陰影就會有一種仿真的效果。
5.4,我們把陰影效果設置上去看下最終的效果,是不是開始有點感覺了?
5.5最後把所有的輔助線都關掉,再看看效果