
CoreLocation 定位入門:三個步驟拿到經緯度與移動距離
編輯:iOS 開發綜合
寫過 Android 定位再回頭看 iOS,會發現 Apple 把這塊封裝得相当完整——只要幾個步驟,就能拿到座標、精度與移動距離等資訊。
步驟一:建立專案
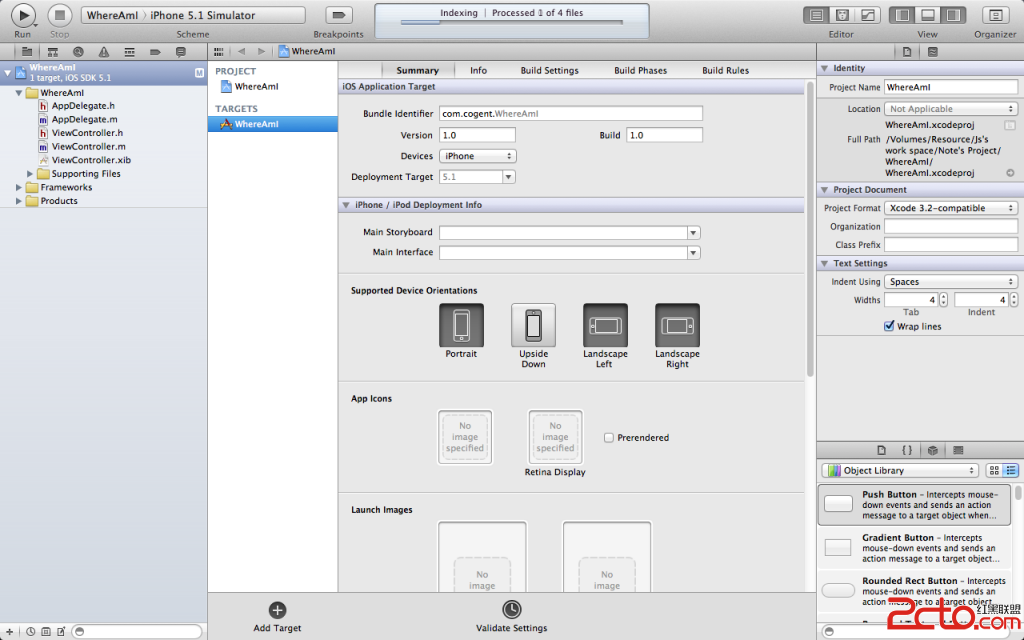
開啟 Xcode 4.3.2,選擇 File → New → Project…,以 Single View Application 範本建立專案,命名為 WhereAmI。
步驟二:引入 CoreLocation 並宣告 delegate
CoreLocation 不屬於 UIKit,必須另外 import,同時讓控制器採用 CLLocationManagerDelegate 協定:
#import <UIKit/UIKit.h>
#import <CoreLocation/CoreLocation.h>

@interface ViewController : UIViewController <CLLocationManagerDelegate>
{
    CLLocationManager *locationManager;
    CLLocation *startPoint;
    UILabel *latLabel;
    UILabel *lonLabel;
    UILabel *distance;
}

@property (retain, nonatomic) CLLocationManager *locationManager;
@property (retain, nonatomic) CLLocation *startPoint;

@property (retain, nonatomic) IBOutlet UILabel *latLabel;
@property (retain, nonatomic) IBOutlet UILabel *lonLabel;
@property (retain, nonatomic) IBOutlet UILabel *distance;
@end
步驟三:啟動定位與處理回呼
@implementation ViewController
@synthesize startPoint, locationManager, latLabel, lonLabel, distance;

- (void)viewDidLoad
{
    [super viewDidLoad];
    self.locationManager = [[CLLocationManager alloc] init];
    self.locationManager.delegate = self;
    self.locationManager.desiredAccuracy = kCLLocationAccuracyBest;
    [locationManager startUpdatingLocation];
}

#pragma mark - CLLocationManagerDelegate

- (void)locationManager:(CLLocationManager *)manager
    didUpdateToLocation:(CLLocation *)newLocation
           fromLocation:(CLLocation *)oldLocation
{
    if (startPoint == nil)
        startPoint = newLocation;

    // 經度
    NSString *lon = [[NSString alloc] initWithFormat:@"%g", newLocation.coordinate.longitude];
    self.lonLabel.text = lon;
    [lon release];

    // 緯度
    NSString *lat = [[NSString alloc] initWithFormat:@"%g", newLocation.coordinate.latitude];
    self.latLabel.text = lat;
    [lat release];

    // 與起點的移動距離(公尺)
    CLLocationDistance ld = [newLocation distanceFromLocation:startPoint];
    NSString *distanceString = [[NSString alloc] initWithFormat:@"%gm", ld];
    self.distance.text = distanceString;
    [distanceString release];
}

- (void)locationManager:(CLLocationManager *)manager didFailWithError:(NSError *)error
{
    NSString *errorType = (error.code == kCLErrorDenied) ? @"Access Denied" : @"Unkown Error";
    UIAlertView *alert = [[UIAlertView alloc] initWithTitle:@"Error getting location"
                                                    message:errorType
                                                   delegate:self
                                          cancelButtonTitle:@"OK"
                                          otherButtonTitles:nil];
    [alert show];
    [alert release];
}
@end
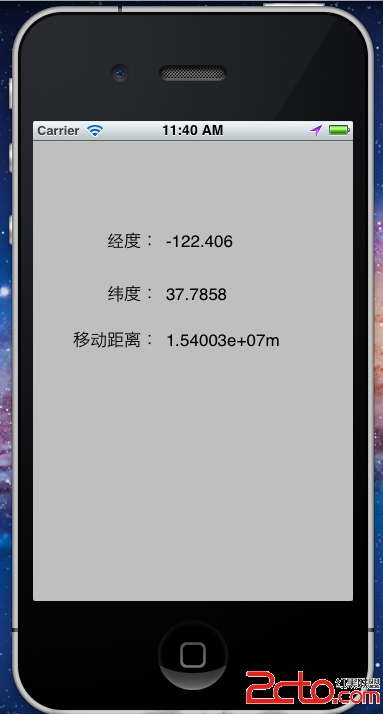
執行結果
幾個容易忽略的細節
首先,startPoint 只在第一次回呼時設定,之後每筆新位置都拿它來算距離,這樣顯示的就是「相對於啟動定位時的累計位移」。若想要即時速度,可以直接讀 newLocation.speed。
其次,desiredAccuracy 設為 kCLLocationAccuracyBest 雖然最精準,但也最耗電;靜態應用改成 kCLLocationAccuracyNearestTenMeters 之類會省很多。定位完記得呼叫 stopUpdatingLocation,否則電池會被默默吃掉。
最後,使用者可能拒絕授權,也可能在室內拿不到訊號,因此 didFailWithError: 的錯誤處理不是裝飾,而是必要防線;同時也別忘了在 Info.plist 補上定位用途說明字串,否則系統會直接讓 App 當掉。