
iOS 動態調整 UITableViewCell 高度的實作
編輯:iOS 開發綜合
TableView 的 cell 高度若依內容而定(例如多行文字),需要在程式碼中動態計算。以下是一個完整可執行的範例。
類別擴充與資料準備
#import "ViewController.h"

@interface ViewController () {
    UITableView *_table;
    NSMutableArray *_dataList;
    UIView *footView;
}
@end

@implementation ViewController

- (void)viewDidLoad {
    [super viewDidLoad];

    _table = [[UITableView alloc] initWithFrame:CGRectMake(0, 0,
                                    self.view.frame.size.width,
                                    self.view.frame.size.height)];
    _table.delegate = self;
    _table.dataSource = self;
    [self.view addSubview:_table];

    _dataList = [[NSMutableArray alloc] initWithObjects:
        @"1111\n111\n111\n111\n", @"222", @"333", @"444",
        @"555", @"666", @"777", nil];

    footView = [[UIView alloc] initWithFrame:CGRectMake(0, 0, 320, 80)];
    footView.backgroundColor = [UIColor yellowColor];
    _table.tableFooterView = footView;
}
資料來源方法
#pragma mark - UITableView

-(NSInteger)numberOfSectionsInTableView:(UITableView *)tableView {
    return 1;
}

-(NSInteger)tableView:(UITableView *)tableView numberOfRowsInSection:(NSInteger)section {
    return [_dataList count];
}

- (UITableViewCell *)tableView:(UITableView *)tableView
         cellForRowAtIndexPath:(NSIndexPath *)indexPath {

    static NSString *CellIdentifier = @"Cell";
    UITableViewCell *cell = [tableView dequeueReusableCellWithIdentifier:CellIdentifier];

    if (cell == nil) {
        cell = [[UITableViewCell alloc] initWithStyle:UITableViewCellStyleDefault
                                    reuseIdentifier:CellIdentifier];

        UILabel *label = [[UILabel alloc] initWithFrame:CGRectZero];
        label.tag = 1;
        label.lineBreakMode = NSLineBreakByCharWrapping;
        label.numberOfLines = 0;          // 0 代表不限行數
        label.opaque = NO;
        label.backgroundColor = [UIColor clearColor];
        [cell.contentView addSubview:label];
    }

    UILabel *label = (UILabel *)[cell viewWithTag:1];
    label.text = [_dataList objectAtIndex:indexPath.row];

    CGRect cellFrame = [cell frame];
    cellFrame.origin = CGPointMake(0, 0);

    CGRect rect = CGRectInset(cellFrame, 2, 2);   // 四周留 2pt 間距
    label.frame = rect;
    [label sizeToFit];

    if (label.frame.size.height > 46) {
        cellFrame.size.height = 50 + label.frame.size.height - 46;
    } else {
        cellFrame.size.height = 50;
    }
    [cell setFrame:cellFrame];

    return cell;
}

- (CGFloat)tableView:(UITableView *)tableView
  heightForRowAtIndexPath:(NSIndexPath *)indexPath {
    UITableViewCell *cell = [self tableView:tableView cellForRowAtIndexPath:indexPath];
    return cell.frame.size.height;
}

@end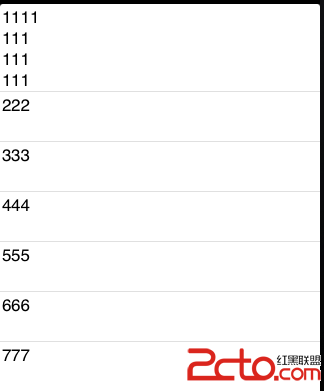
關鍵邏輯拆解
整個做法的核心是三個設定:numberOfLines = 0 讓 label 不限制行數、lineBreakMode 設為換行,然後呼叫 sizeToFit 讓 label 依內容算出真實高度。最後以「單行基準 46pt,超出部分補回 50pt 基準」的算法決定 cell 高度。
heightForRowAtIndexPath: 中直接呼叫 cellForRowAtIndexPath: 取得 cell 再讀 frame,是個取巧但直觀的寫法。
這個寫法的效能問題
heightForRowAtIndexPath: 每次都重新建立或取出 cell 並呼叫 sizeToFit,代表每次捲動都要重算全部可見列的高度,內容一多就會明顯卡頓。實務上應該:
- 把高度計算抽出來獨立進行,並用 dictionary 以 indexPath 為鍵快取結果。
- 使用 iOS 7 之後提供的
UITableViewAutomaticDimension搭配 Auto Layout,讓系統自動計算。
// 現代寫法:cell 內部用 Auto Layout 約束,並且在 viewDidLoad 中設定
_table.rowHeight = UITableViewAutomaticDimension;
_table.estimatedRowHeight = 60;   // 加上預估值可大幅改善捲動效能
另外,範例中透過 tag 取得 cell 內的 label 是早期常見做法;現在更清楚的方式是為 UITableViewCell 建立子類別,把 label 定義為 IBOutlet 屬性直接存取。
- 上一篇文章: 如何讓 UILabel 的文字尺寸隨按鈕點擊而改變
- 下一篇文章: OCUnit 單元測試入門:邏輯測試方法的撰寫與斷言宏