
iOS 開發實戰:用 UIScrollView 實現圖片縮放與滾動瀏覽
一、先認識 UIScrollView
行動裝置的螢幕尺寸天生受限,一次能塞進使用者眼前的資訊其實非常有限。當內容高度超過一個螢幕時,使用者就得靠滑動手勢把畫面外的部分拉進視線裡。普通的 UIView 並不具備滾動能力,硬要放進超 sized 的內容只會被裁掉,因此 Apple 提供了 UIScrollView 這個可滾動的容器視圖。
最直觀的例子就是 iOS 系統內建的「設定」App:頁面拉不到底、用手指往上一推,還有更多項目冒出來,背後就是 UIScrollView 在運作。
最基本的三步用法
- 把要顯示的內容(例如 UIImageView)加入 UIScrollView 的視圖階層。
- 設定
contentSize,告訴它內容整體有多大,也就是滾動的邊界在哪裡。 - 需要時再調整 offset、inset 等參數,控制初始位置與留白。
常用屬性速查
三個最核心的屬性:
@property(nonatomic) CGPoint contentOffset;   // 目前滾動到的位置
@property(nonatomic) CGSize  contentSize;     // 內容總尺寸,決定可滾動範圍
@property(nonatomic) UIEdgeInsets contentInset; // 在四周額外增加可滾動區域
其他常見設定:
@property(nonatomic) BOOL bounces;         // 是否啟用彈簧回彈效果
@property(nonatomic, getter=isScrollEnabled) BOOL scrollEnabled; // 是否允許滾動
@property(nonatomic) BOOL showsHorizontalScrollIndicator; // 是否顯示水平滾動條
@property(nonatomic) BOOL showsVerticalScrollIndicator;   // 是否顯示垂直滾動條
滾不動?先檢查這四件事
- 忘了設定
contentSize,內容尺寸等於可視尺寸,自然推不動。 scrollEnabled = NO。userInteractionEnabled = NO,根本收不到觸摸事件。- 沒有關閉 Auto Layout。若用 frame 定位子視圖,必須先取消 autolayout 的約束干擾。
二、屬性觀念拆解
下面這段程式示範如何建立 scrollView、放入圖片,並設定各項屬性:
#import "MJViewController.h"

@interface MJViewController ()
{
    // 在私有擴展中宣告一個屬性
    UIScrollView *_scrollView;
}
@end
@implementation MJViewController

- (void)viewDidLoad
{
    [super viewDidLoad];

    // 1. 建立 UIScrollView
    UIScrollView *scrollView = [[UIScrollView alloc] init];
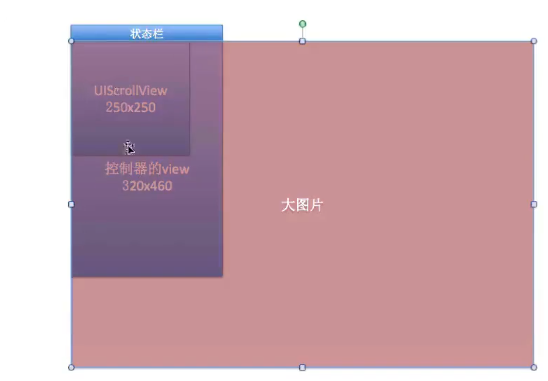
    scrollView.frame = CGRectMake(0, 0, 250, 250); // frame 的 size 代表可視範圍
    scrollView.backgroundColor = [UIColor grayColor];
    [self.view addSubview:scrollView];

    // 2. 建立 UIImageView(圖片)
    UIImageView *imageView = [[UIImageView alloc] init];
    imageView.image = [UIImage imageNamed:@"big.jpg"];
    CGFloat imgW = imageView.image.size.width;  // 圖片寬度
    CGFloat imgH = imageView.image.size.height; // 圖片高度
    imageView.frame = CGRectMake(0, 0, imgW, imgH);
    [scrollView addSubview:imageView];

    // 3. 設定 scrollView 各項屬性

    // 滾動範圍(內容尺寸)
    scrollView.contentSize = imageView.image.size;

    // 隱藏水平與垂直滾動條
    scrollView.showsHorizontalScrollIndicator = NO;
    scrollView.showsVerticalScrollIndicator = NO;

    // 用來記錄 scrollView 滾動的位置
    // scrollView.contentOffset = CGPointZero;

    // 取消彈簧效果
    // scrollView.bounces = NO;

    // 增加額外滾動區域(順序為 上、左、下、右)
    scrollView.contentInset = UIEdgeInsetsMake(20, 20, 20, 20);

    _scrollView = scrollView;
}

- (IBAction)down:(UIButton *)sender {
    [UIView animateWithDuration:1.0 animations:^{
        // 修改結構體屬性成員的三個步驟
        CGPoint offset = _scrollView.contentOffset;
        offset.y += 150;
        _scrollView.contentOffset = offset;

        // 也可以直接重置
        // _scrollView.contentOffset = CGPointMake(0, 0);
    }];
}
@end
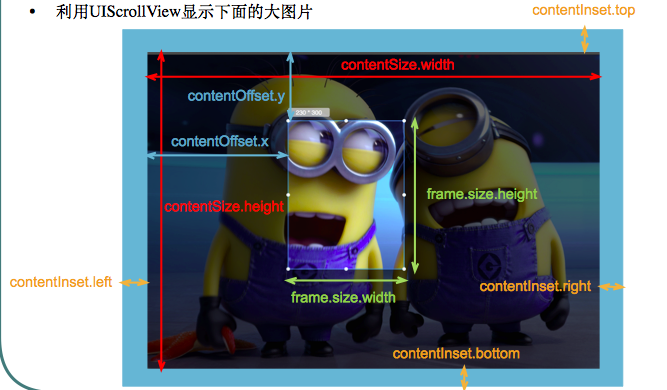
幾個屬性之間的位置關係可以參考下圖:
容易混淆的重點整理
frame 與 contentSize 的分工。frame 描述的是 scrollView 這扇「窗」本身有多大,也就是使用者真正看得見的區域;contentSize 描述的是窗後面的「畫布」有多大,決定了最多能滾多遠。
contentInset 的作用。它會在原本的內容四周加上一圈額外的可滾動空間,參數順序是上、左、下、右(逆時針)。這個屬性可以用程式碼設定,也可以在 storyboard/xib 上調整,但兩者的行為並不完全一致,實作時要留意差異。
contentSize 只能用程式碼設定。介面建置工具裡沒有對應欄位。
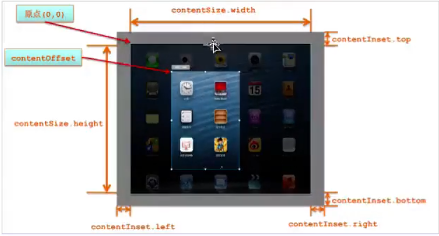
contentOffset 是什麼。它是 CGPoint 結構,記錄「窗」目前跑到畫布的哪個位置。讀取它能知道目前的捲動狀態,寫入它則能主動控制畫面移動。
結構體屬性成員不能直接改。Objective-C 不允許寫 scrollView.contentOffset.y = 150; 這種寫法,必須照「取值 → 改值 → 回寫」三步驟進行,如上面的 down: 方法所示。
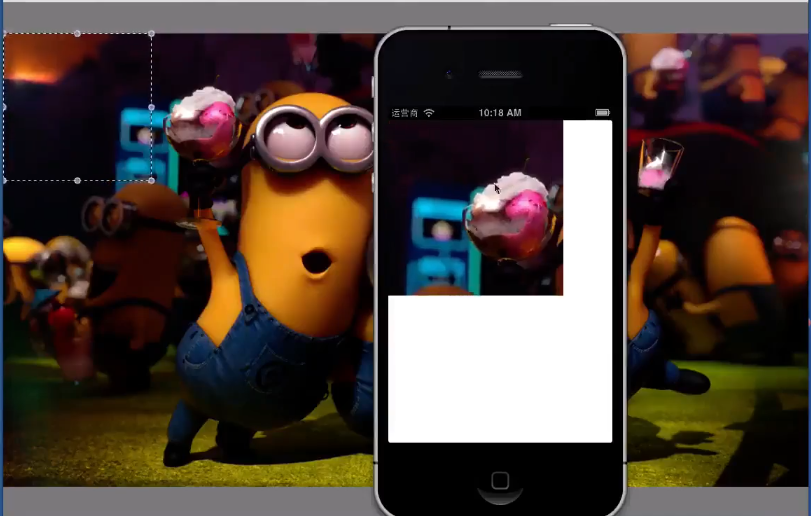
另外還有一個常被問到的問題:加了 contentInset 之後,contentOffset 的原點還在左上角嗎?可以搭配下面的示意圖一起理解。
模型圖:
對比圖:
座標圖:
三、加上手勢縮放
除了滾動,UIScrollView 還能對內容做縮放。使用方式很直覺:把需要縮放的視圖放進 scrollView,然後透過代理告訴它「要縮放的是哪一個子視圖」。
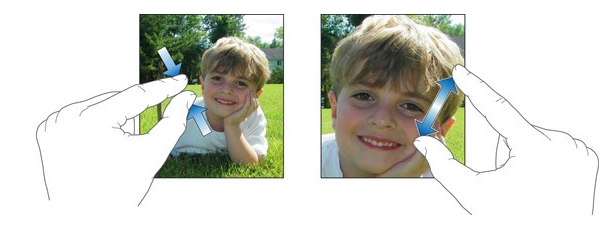
縮放原理
當使用者在 scrollView 上做捏合(pinch)手勢時,scrollView 會回頭問代理:我裡面哪一個子控件要參與縮放?接著它就會呼叫代理的 viewForZoomingInScrollView: 方法,方法回傳的視圖即為縮放目標。
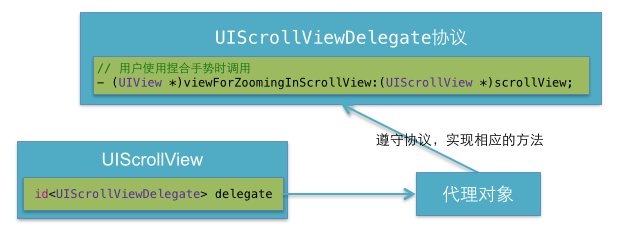
完整程式碼
#import "YYViewController.h"

@interface YYViewController () <UIScrollViewDelegate>
{
    UIScrollView *_scrollview;
    UIImageView *_imageview;
}
@end
@implementation YYViewController

- (void)viewDidLoad
{
    [super viewDidLoad];

    // 1. 加入 UIScrollView,位置與大小與整個畫面相同
    _scrollview = [[UIScrollView alloc] initWithFrame:self.view.bounds];
    [self.view addSubview:_scrollview];

    // 2. 加入圖片
    // 寫法一:一般方式
    // UIImageView *imageview = [[UIImageView alloc] init];
    // UIImage *image = [UIImage imageNamed:@"minion"];
    // imageview.image = image;
    // imageview.frame = CGRectMake(0, 0, image.size.width, image.size.height);

    // 寫法二:使用便利建構子
    UIImage *image = [UIImage imageNamed:@"minion"];
    _imageview = [[UIImageView alloc] initWithImage:image];
    // initWithImage: 產生的 imageView 寬高會自動等於圖片尺寸
    [_scrollview addSubview:_imageview];

    // 讓滾動範圍與圖片真實尺寸一致
    _scrollview.contentSize = image.size;

    // 3. 設定縮放相關
    _scrollview.delegate = self;          // 設定代理
    _scrollview.maximumZoomScale = 2.0;   // 最大放大倍率
    _scrollview.minimumZoomScale = 0.5;   // 最小縮小倍率
}

// 告訴 scrollView 要縮放哪一個子控件
- (UIView *)viewForZoomingInScrollView:(UIScrollView *)scrollView
{
    return _imageview;
}

@end
四個步驟,一句話總結
- 為 scrollView 設定代理(通常就是 self)。
- 讓控制器遵循
UIScrollViewDelegate協議。 - 實作代理方法,回傳需要縮放的子視圖。
- 設定縮放上下限:
minimumZoomScale與maximumZoomScale。
線索很單純:scrollView 自己不知道該放大誰,這件事交由代理決定,而代理透過 viewForZoomingInScrollView: 給出答案。
補充:兩種建立 UIImageView 的寫法
// 寫法一
UIImageView *imageview = [[UIImageView alloc] init];
UIImage *image = [UIImage imageNamed:@"minion"];
imageview.image = image;
imageview.frame = CGRectMake(0, 0, image.size.width, image.size.height);

// 寫法二
UIImage *image = [UIImage imageNamed:@"minion"];
_imageview = [[UIImageView alloc] initWithImage:image];
// initWithImage: 建立出來的 imageView 寬高會自動對齊圖片尺寸

[_scrollview addSubview:_imageview];
另外還有兩個與縮放流程相關的代理方法,可以在需要精細控制時派上用場:
// 即將開始縮放時呼叫
- (void)scrollViewWillBeginZooming:(UIScrollView *)scrollView withView:(UIView *)view

// 縮放進行中呼叫
- (void)scrollViewDidZoom:(UIScrollView *)scrollView