
iOS 開發(10)之 UIBarButtonItem 為導航欄添加按鈕
編輯:iOS 開發綜合
1 前言
UIBarButtonItem 是專門放在導航欄(或工具列)上的按鈕元件,可以擺在左側或右側。它不只支援純文字與系統圖示,還能把任何自訂視圖塞進去,因此變化相當豐富。本文分兩個層次來看:先用最直覺的方式加上左右兩個按鈕並綁定事件,再進一步把一個 UISwitch 開關放進導航欄。
2 代碼講解
ZYViewController.m —— 在右側放文字按鈕,在左側放系統內建的「加號」樣式按鈕,兩者共用同一個事件方法。
- (void)viewDidLoad
{
    [super viewDidLoad];
    self.view.backgroundColor = [UIColor whiteColor];
    self.title = @"First";

    // 右側:以文字建立 UIBarButtonItem
    self.navigationItem.rightBarButtonItem =
        [[UIBarButtonItem alloc] initWithTitle:@"Add"
                                        style:UIBarButtonItemStylePlain
                                       target:self
                                       action:@selector(perFormAdd:)];

    // 左側:使用系統內建的「新增」樣式
    self.navigationItem.leftBarButtonItem =
        [[UIBarButtonItem alloc] initWithBarButtonSystemItem:UIBarButtonSystemItemAdd
                                                      target:self
                                                      action:@selector(perFormAdd:)];
}

-(void)perFormAdd:(id)paramSender{
    NSLog(@"Action method got called.");
}
點擊左右任一按鈕,控制台都會印出對應訊息:
2013-04-23 21:40:58.982 UIBarButtonItemTest[660:c07] Action method got called.
2013-04-23 21:41:02.598 UIBarButtonItemTest[660:c07] Action method got called.
如果需要更複雜的互動,可以改用 initWithCustomView: 把自訂控件放進導航欄。以下範例用一個 UISwitch 取代右側按鈕:
ZYUIBarButtonViewController.m:
- (void)viewDidLoad
{
    [super viewDidLoad];
    self.view.backgroundColor = [UIColor whiteColor];
    self.title = @"Second";

    UISwitch *simpleSwitch = [[UISwitch alloc] init];   // 建立一個選擇開關
    simpleSwitch.on = YES;                              // 預設為開啟狀態
    [simpleSwitch addTarget:self
                     action:@selector(switchChanged:)
           forControlEvents:UIControlEventValueChanged];

    // 把開關本身作為導航欄右側的內容
    self.navigationItem.rightBarButtonItem =
        [[UIBarButtonItem alloc] initWithCustomView:simpleSwitch];
}

-(void)switchChanged:(UISwitch *)paramSender{
    if ([paramSender isOn]) {
        NSLog(@"Switch is on.");
    }else{
        NSLog(@"Switch is off.");
    }
}
運行結果
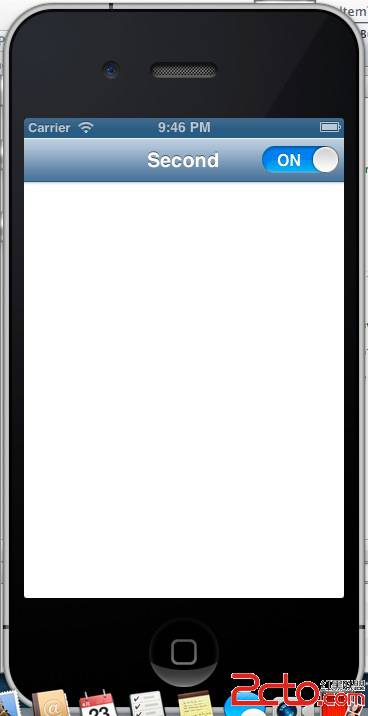
撥動開關時,控制台會即時反映狀態變化:
2013-04-23 21:46:46.692 UIBarButtonItemTest[727:c07] Switch is off.
2013-04-23 21:46:47.493 UIBarButtonItemTest[727:c07] Switch is on.
由此可見,導航欄的「按鈕」只是一個容器,裡面放文字、系統圖示或任意控件都可以,掌握 initWithCustomView: 之後,導航欄的互動設計空間會大得多。