
屬性列表序列化(一):建立 plist 並寫入資料
編輯:iOS 開發綜合
除了從 bundle 讀取既有 plist,我們也可以在執行期動態建立 plist 並寫入資料。plist 能承載的型別是有限的:NSString、NSArray、NSDictionary、NSNumber、NSData、NSDate,以及它們的可變版本與巢狀組合。自訂類別無法直接存,必須先拆解成這些基本型別。
一、定義 student 類別
@property (copy, nonatomic) NSString *studentName;
@property (assign, nonatomic) int studentID;
@property (copy, nonatomic) NSString *studentSex;
@property (copy, nonatomic) NSString *studentImagePath;   // 照片檔案路徑

- (id)initWithName:(NSString *)name ID:(int)studentID Sex:(NSString *)sex Photo:(NSString *)imagePath;
- (NSString *)description;
-(id)initWithName:(NSString *)name ID:(int)studentID Sex:(NSString *)sex Photo:(NSString *)imagePath {
    if ((self = [super init])) {
        self.studentName = name;
        self.studentID = studentID;
        self.studentSex = sex;
        self.studentImagePath = imagePath;
    }
    return self;
}

-(NSString *)description {
    return [NSString stringWithFormat:@"name:%@,id:%d,sex:%@,imagepath:%@",
            self.studentName, self.studentID, self.studentSex, self.studentImagePath];
}

-(void)dealloc {
    self.studentName = nil;
    self.studentSex = nil;
    self.studentImagePath = nil;
}
二、準備測試資料
-(NSArray *)createStudentArray {
    Students *seal = [[Students alloc] initWithName:@"seal" ID:110401 Sex:@"girl" Photo:@"seal.png"];
    Students *willing = [[Students alloc] initWithName:@"willing" ID:110402 Sex:@"boy" Photo:@"willing.png"];
    Students *lisa = [[Students alloc] initWithName:@"lisa" ID:110403 Sex:@"girl" Photo:@"lisa.png"];
    NSArray *studentArray = @[seal, willing, lisa];
    return studentArray;
}
三、決定檔案位置並寫入
- (void)viewDidLoad
{
    [super viewDidLoad];

    NSLog(@"AppHome:\n%s\n", [NSHomeDirectory() UTF8String]);

    // 取得 Documents 目錄路徑
    // NSDocumentDirectory 表示搜尋 Documents;NSUserDomainMask 表示範圍限於 App 沙盒;
    // 最後的 YES 表示把 ~ 展開成實際路徑
    NSArray *paths = NSSearchPathForDirectoriesInDomains(NSDocumentDirectory, NSUserDomainMask, YES);
    NSString *documentsDirPath = [paths objectAtIndex:0];
    NSString *studentFilePath = [documentsDirPath stringByAppendingPathComponent:@"student.plist"];

    NSFileManager *fileManager = [NSFileManager defaultManager];
    BOOL isDirectory;

    if ([fileManager fileExistsAtPath:studentFilePath isDirectory:&isDirectory] && !isDirectory) {
        NSLog(@"存在 student.plist !!");
    } else {
        NSLog(@"不存在 student.plist");
        NSArray *studentArray = [self createStudentArray];

        // 寫入方式一:直接存檔案物件(會失敗,因為 Students 不是 plist 支援的型別)
        // [studentArray writeToFile:studentFilePath atomically:YES];

        // 寫入方式二:用 KVC 把各欄位抽成陣列,組成 plist 可接受的結構
        NSArray *studentIDArray = [studentArray valueForKey:@"studentID"];
        NSArray *studentNameArray = [studentArray valueForKey:@"studentName"];
        NSArray *studentSexArray = [studentArray valueForKey:@"studentSex"];
        NSArray *studentImagePathArray = [studentArray valueForKey:@"studentImagePath"];

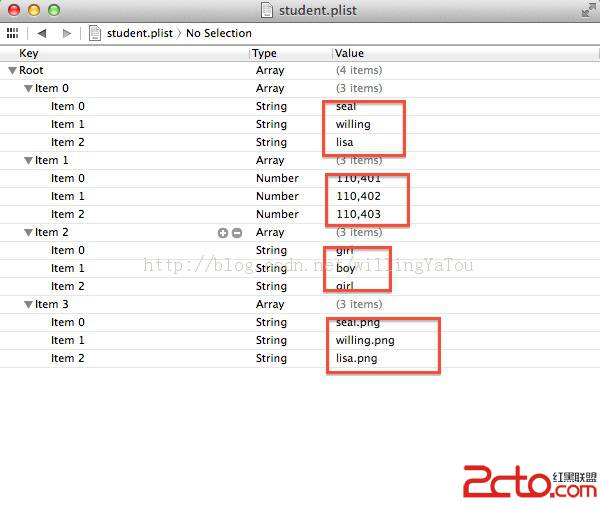
        NSArray *studentList = @[studentNameArray, studentIDArray, studentSexArray, studentImagePathArray];

        if ([studentList writeToFile:studentFilePath atomically:YES]) {
            NSLog(@"將 student 陣列保存為屬性列表檔案成功!!");
        } else {
            NSLog(@"將 student 陣列保存為屬性列表檔案不成功");
        }
    }
}
關鍵觀念:用 KVC 做「反序列化前的攤平」
valueForKey: 作用在陣列上時,會對每個元素各取一次該 key 的值,最後回傳一個由所有結果組成的陣列。這正好把「物件陣列」攤平成「四個欄位陣列」,全部由 plist 支援的型別構成,因此能順利寫入。
而 writeToFile:atomically: 的 atomically 設為 YES 時,會先寫入暫存檔再取代目標檔,避免寫到一半斷電導致 plist 損毀,建議養成習慣一律開啟。
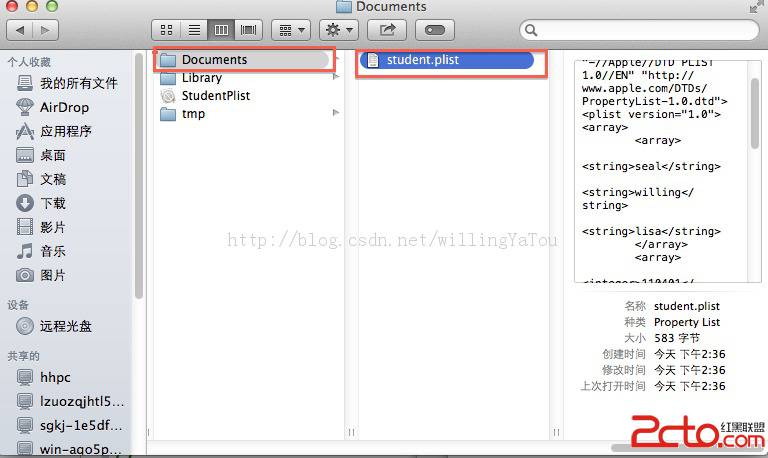
寫入後可以直接到 App 的 Documents 目錄查看檔案內容:
-
- 上一篇文章: NSNumber、NSValue 與 NSData:把 C 資料包裝成物件
- 下一篇文章: 屬性列表序列化(二):從 plist 還原物件