
iOS 專案開發布局(三):以側邊欄為例的框架實作
編輯:iOS 開發綜合
上一篇談到了專案資料夾的模板,這次就以側邊欄為例,把框架真正搭起來。
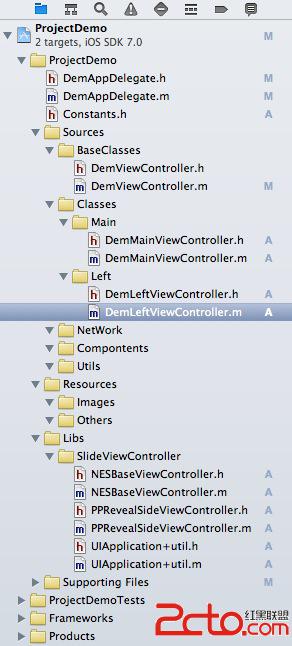
先看整體的檔案結構:
一、在 AppDelegate 中掛上側邊欄
關鍵觀念是:側邊欄控制器(PPRevealSideViewController)才是 window 的 rootViewController,一般的主畫面則被包在它裡面作為 root。
- (BOOL)application:(UIApplication *)application
        didFinishLaunchingWithOptions:(NSDictionary *)launchOptions {
    self.window = [[[UIWindow alloc] initWithFrame:[[UIScreen mainScreen] bounds]] autorelease];

    SLVMainViewController *mainViewController = [[SLVMainViewController alloc] init];
    mainViewController.view.backgroundColor = [UIColor greenColor];

    self.sideViewController = [[PPRevealSideViewController alloc]
                                    initWithRootViewController:mainViewController];
    self.sideViewController.delegate = self;
    [mainViewController release];

    self.window.rootViewController = self.sideViewController;
    [self.window makeKeyAndVisible];
    return YES;
}
二、在 Constants 中集中管理全域巨集
把常數、通知名稱、字型與顏色這類會到處用到的定義收攏到一個檔案,後續維護成本會差很多。
三、建立所有 ViewController 的共同基底類別
BaseViewController(此處命名為 DemViewController)是所有畫面的父類,用來放共用邏輯。其中一段初始化程式碼值得特別說明:
- (id)init {
    if (self = [super init]) {
        if ([self respondsToSelector:@selector(setAutomaticallyAdjustsScrollViewInsets:)]) {
            [self setAutomaticallyAdjustsScrollViewInsets:NO];
        }
        if ([self respondsToSelector:@selector(setEdgesForExtendedLayout:)]) {
            [self setEdgesForExtendedLayout:UIRectEdgeNone];
        }
    }
    return self;
}
這兩行的用意是同時相容 iOS 7 與更早版本。iOS 7 的視圖會延伸到狀態列下方,若不處理,畫面內容會被狀態列壓住;而 respondsToSelector 的檢查則保證在舊系統上不會因為呼叫不存在的 API 而崩潰。
四、組裝主畫面與導覽控制器
- (void)addMainController {
    UIViewController *viewController = [[UIViewController alloc] init];
    viewController.view.backgroundColor = [UIColor blueColor];
    viewController.title = @"主頁面";

    viewController.navigationItem.leftBarButtonItem =
        [[UIBarButtonItem alloc] initWithBarButtonSystemItem:UIBarButtonSystemItemReply
                                                      target:self
                                                      action:@selector(showLeftController)];

    UILabel *contentLabel = [[UILabel alloc] initWithFrame:CGRectMake(0, 0, 100, 40)];
    contentLabel.center = CGPointMake(viewController.view.bounds.size.width / 2,
                                      (viewController.view.bounds.size.height - 64) / 2);
    contentLabel.text = @"主視圖";
    contentLabel.textColor = [UIColor redColor];
    contentLabel.backgroundColor = [UIColor clearColor];
    contentLabel.font = [UIFont systemFontOfSize:30.f];
    [viewController.view addSubview:contentLabel];
    [contentLabel release];

    _mainNavController = [[UINavigationController alloc] initWithRootViewController:viewController];
    [_mainNavController.view setFrame:self.view.bounds];  // 這行不能省
    [viewController release];
    [self.view addSubview:_mainNavController.view];
}
要注意的是標註的那一行 setFrame:self.view.bounds。少了它,導覽列底下的視圖會往下位移約 20 個像素,畫面看起來就是歪的。
五、執行結果
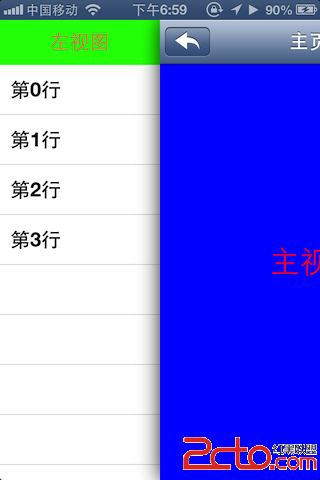
iOS 6 上的呈現:
iOS 7 上的呈現:
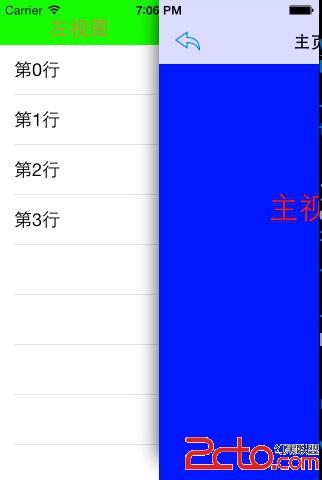
兩個版本都能正常顯示,也印證了基底類別中那組相容性程式碼的必要性。
- 上一篇文章: iOS 安全攻防(二十):越獄檢測的攻與防
- 下一篇文章: iOS 專案開發布局(二):專案模板與目錄結構規劃