
iOS 自製可旋轉餅圖:PieChartView 的完整實作
編輯:iOS 開發綜合
先來看效果:
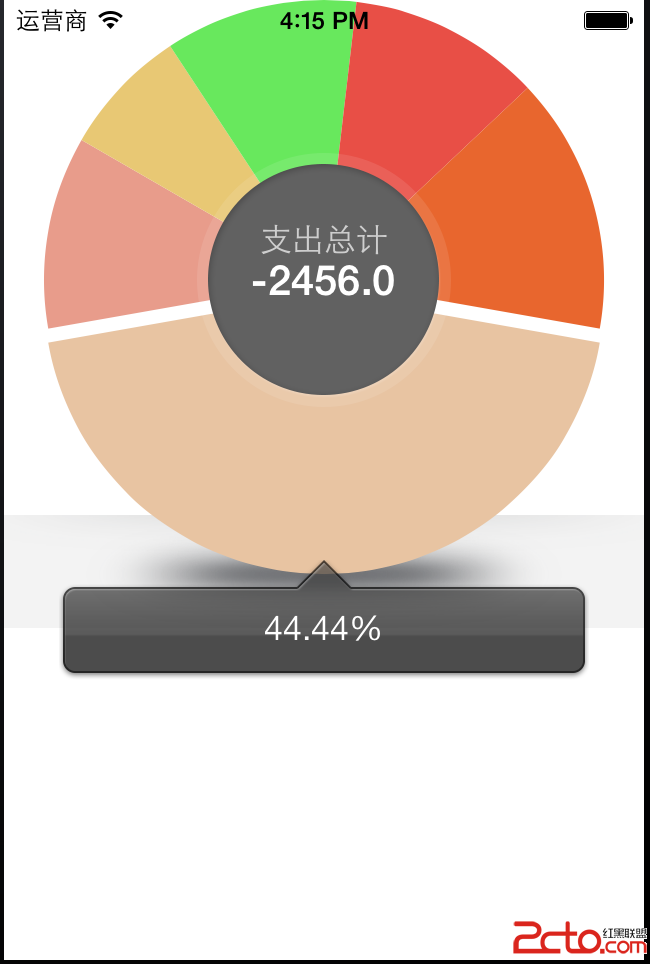
這個餅圖支援手指拖曳旋轉、點擊扇形回報百分比、點擊圓心切換資料集(支出 / 收入),並在選取時於下方標籤顯示對應比例。
ViewController.h
#import <UIKit/UIKit.h>
#import "PieChartView.h"

@interface ViewController : UIViewController <PieChartDelegate>

@property (nonatomic, strong) NSMutableArray *m_valueArray;   // 第一組資料
@property (nonatomic, strong) NSMutableArray *m_colorArray;   // 第一組顏色
@property (nonatomic, strong) NSMutableArray *m_valueArray2;  // 第二組資料
@property (nonatomic, strong) NSMutableArray *m_colorArray2;  // 第二組顏色

@property (nonatomic, strong) PieChartView *m_pieChartView;   // 餅圖本體
@property (nonatomic, strong) UIView *m_pieContainer;         // 餅圖容器

@property (nonatomic) BOOL inOut;                             // 中心點擊切換開關
@property (nonatomic, strong) UILabel *m_selLabel;            // 顯示百分比的標籤
@end
ViewController.m
#import "ViewController.h"

#define PIE_HEIGHT 280

@implementation ViewController

- (void)viewDidLoad {
    self.inOut = YES;
    [super viewDidLoad];

    // 支出資料
    self.m_valueArray = [[NSMutableArray alloc] initWithObjects:
        [NSNumber numberWithInt:12], [NSNumber numberWithInt:3],
        [NSNumber numberWithInt:2],  [NSNumber numberWithInt:3],
        [NSNumber numberWithInt:3],  [NSNumber numberWithInt:4], nil];

    // 收入資料
    self.m_valueArray2 = [[NSMutableArray alloc] initWithObjects:
        [NSNumber numberWithInt:3], [NSNumber numberWithInt:2],
        [NSNumber numberWithInt:2], nil];

    // 支出配色:以 HSB 推算,讓相鄰扇形色相拉開
    self.m_colorArray = [NSMutableArray arrayWithObjects:
        [UIColor colorWithHue:((0/8)%20)/20.0+0.08 saturation:(0%8+3)/10.0 brightness:91/100.0 alpha:1],
        [UIColor colorWithHue:((1/8)%20)/20.0+0.03 saturation:(1%8+3)/10.0 brightness:91/100.0 alpha:1],
        [UIColor colorWithHue:((2/8)%20)/20.0+0.12 saturation:(2%8+3)/10.0 brightness:91/100.0 alpha:1],
        [UIColor colorWithHue:((3/8)%20)/20.0+0.32 saturation:(3%8+3)/10.0 brightness:91/100.0 alpha:1],
        [UIColor colorWithHue:((4/8)%20)/20.0+0.01 saturation:(4%8+3)/10.0 brightness:91/100.0 alpha:1],
        [UIColor colorWithHue:((5/8)%20)/20.0+0.05 saturation:(5%8+3)/10.0 brightness:91/100.0 alpha:1], nil];

    // 收入配色
    self.m_colorArray2 = [[NSMutableArray alloc] initWithObjects:
        [UIColor purpleColor], [UIColor orangeColor], [UIColor magentaColor], nil];

    // 底部陰影
    CGRect pieFrame = CGRectMake((self.view.frame.size.width - PIE_HEIGHT) / 2, 0, PIE_HEIGHT, PIE_HEIGHT);
    UIImage *shadowImg = [UIImage imageNamed:@"shadow.png"];
    UIImageView *shadowImgView = [[UIImageView alloc] initWithImage:shadowImg];
    shadowImgView.frame = CGRectMake(0, pieFrame.origin.y + PIE_HEIGHT * 0.92,
                                     shadowImg.size.width / 2, shadowImg.size.height / 2);
    [self.view addSubview:shadowImgView];

    // 建立餅圖
    self.m_pieContainer = [[UIView alloc] initWithFrame:pieFrame];
    self.m_pieChartView = [[PieChartView alloc] initWithFrame:self.m_pieContainer.bounds
                                                   withValue:self.m_valueArray
                                                  withColor:self.m_colorArray];
    self.m_pieChartView.delegate = self;
    [self.m_pieContainer addSubview:self.m_pieChartView];
    [self.m_pieChartView setAmountText:@"-2456.0"];
    [self.view addSubview:self.m_pieContainer];

    // 選取指示標籤
    UIImageView *selView = [[UIImageView alloc] init];
    selView.image = [UIImage imageNamed:@"select.png"];
    selView.frame = CGRectMake((self.view.frame.size.width - selView.image.size.width / 2) / 2,
                               self.m_pieContainer.frame.origin.y + self.m_pieContainer.frame.size.height,
                               selView.image.size.width / 2, selView.image.size.height / 2);
    [self.view addSubview:selView];

    self.m_selLabel = [[UILabel alloc] initWithFrame:
        CGRectMake(0, 24, selView.image.size.width / 2, 21)];
    self.m_selLabel.backgroundColor = [UIColor clearColor];
    self.m_selLabel.textAlignment = NSTextAlignmentCenter;
    self.m_selLabel.font = [UIFont systemFontOfSize:17];
    self.m_selLabel.textColor = [UIColor whiteColor];
    [selView addSubview:self.m_selLabel];

    [self.m_pieChartView setTitleText:@"支出總計"];
    self.title = @"對賬單";
}

// 選取扇形結束時回報百分比
- (void)selectedFinish:(PieChartView *)pieChartView
                 index:(NSInteger)index
               percent:(float)per {
    self.m_selLabel.text = [NSString stringWithFormat:@"%2.2f%%", per * 100];
}

// 點擊圓心:切換支出 / 收入兩組資料
- (void)onCenterClick:(PieChartView *)pieChartView {
    self.inOut = !self.inOut;

    self.m_pieChartView.delegate = nil;
    [self.m_pieChartView removeFromSuperview];

    self.m_pieChartView = [[PieChartView alloc] initWithFrame:self.m_pieContainer.bounds
        withValue:self.inOut ? self.m_valueArray : self.m_valueArray2
        withColor:self.inOut ? self.m_colorArray : self.m_colorArray2];
    self.m_pieChartView.delegate = self;
    [self.m_pieContainer addSubview:self.m_pieChartView];
    [self.m_pieChartView reloadChart];

    if (self.inOut) {
        [self.m_pieChartView setTitleText:@"支出總計"];
        [self.m_pieChartView setAmountText:@"-2456.0"];
    } else {
        [self.m_pieChartView setTitleText:@"收入總計"];
        [self.m_pieChartView setAmountText:@"+567.23"];
    }
}

- (void)viewDidAppear:(BOOL)animated {
    [super viewDidAppear:animated];
    [self.m_pieChartView reloadChart];
}
@end
幾個值得借鏡的設計細節
1、資料與繪製分離。PieChartView 只接收 value 與 color 兩個陣列,關於百分比、扇形角度的計算全在 view 內部完成,外部不必關心。
2、delegate 回報選取結果。使用者在拖曳停止後才觸發 selectedFinish:index:percent:,避免拖動過程中大量無效回呼。
3、切換資料集時重建 view。這裡選擇拆掉重建而非更新資料,代價是短暫的效能損耗,但實作單純。若追求流暢,更好的做法是保留同一個 PieChartView 實例,只呼叫 reloadChart 並換掉內部資料陣列。
4、記得先中斷 delegate。在 removeFromSuperview 之前把 delegate 設為 nil,可以避免釋放過程中被延遲回呼觸及已釋放物件。