
iOS 畫筆範例:實作雙筆同時作畫效果
編輯:iOS 開發綜合
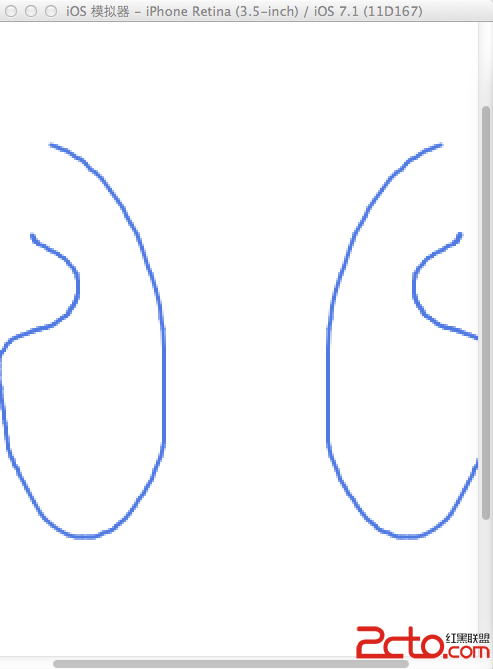
本文示範如何實作一個可手寫作畫的畫筆,並加入「雙筆」效果——手指移動時,會在左右兩側對稱地同時描繪線條。做法是在一個 UIView 中放入 UIImageView,所有作畫都在該 UIImageView 上進行。
一、定義 UIView 與屬性
@property(nonatomic) CGPoint prePoint;      // 手指進入 move 事件前的那個點
@property(nonatomic) CGPoint oppsitePoint;  // 對稱位置的點
@property(nonatomic, retain) UIImageView* drawImage;

- (id)initWithFrame:(CGRect)frame {
    self = [super initWithFrame:frame];
    if (self) {
        self.drawImage = [[UIImageView alloc] initWithImage:nil];
        self.drawImage.frame = self.frame;
        [self addSubview:_drawImage];
    }
    return self;
}
二、處理手指事件
#pragma mark - deal touch

- (void) touchesBegan:(NSSet *)touches withEvent:(UIEvent *)event{
    UITouch* touch = [touches anyObject];
    CGPoint point = [touch locationInView:self];
    if (touch) {
        self.prePoint = point;
        _oppsitePoint = point;
        _oppsitePoint.x = 320.0f - point.x;   // 對稱點
    }
}

- (void) touchesMoved:(NSSet *)touches withEvent:(UIEvent *)event{
    UITouch* touch = [touches anyObject];
    if (touch) {
        CGPoint point = [touch locationInView:self];
        UIGraphicsBeginImageContext(self.frame.size);
        [_drawImage.image drawInRect:CGRectMake(0, 0,
            _drawImage.frame.size.width, _drawImage.frame.size.height)];
        CGContextSetLineCap(UIGraphicsGetCurrentContext(), kCGLineCapRound);
        CGContextSetLineWidth(UIGraphicsGetCurrentContext(), 2.0f);
        CGContextSetRGBStrokeColor(UIGraphicsGetCurrentContext(), 0.314, 0.486, 0.859, 1.0);
        CGContextBeginPath(UIGraphicsGetCurrentContext());
        // 左筆
        CGContextMoveToPoint(UIGraphicsGetCurrentContext(), _prePoint.x, _prePoint.y);
        CGContextAddQuadCurveToPoint(UIGraphicsGetCurrentContext(),
            _prePoint.x, _prePoint.y, point.x, point.y);
        // 右筆(對稱)
        CGContextMoveToPoint(UIGraphicsGetCurrentContext(), _oppsitePoint.x, _oppsitePoint.y);
        CGContextAddQuadCurveToPoint(UIGraphicsGetCurrentContext(),
            _oppsitePoint.x, _oppsitePoint.y, 320.0f - point.x, point.y);
        CGContextStrokePath(UIGraphicsGetCurrentContext());
        _drawImage.image = UIGraphicsGetImageFromCurrentImageContext();
        UIGraphicsEndImageContext();
        _prePoint = point;
        _oppsitePoint = point;
        _oppsitePoint.x = 320.0f - point.x;
    }
}

- (void)touchesEnded:(NSSet *)touches withEvent:(UIEvent *)event{
    // 若只是點擊(未移動),也能畫出一個點
    UIGraphicsBeginImageContext(self.frame.size);
    [_drawImage.image drawInRect:CGRectMake(0, 0,
        _drawImage.frame.size.width, _drawImage.frame.size.height)];
    CGContextSetLineCap(UIGraphicsGetCurrentContext(), kCGLineCapRound);
    CGContextSetLineWidth(UIGraphicsGetCurrentContext(), 3.0f);
    CGContextSetRGBStrokeColor(UIGraphicsGetCurrentContext(), 0.314, 0.486, 0.859, 1.0);
    CGContextBeginPath(UIGraphicsGetCurrentContext());
    CGContextMoveToPoint(UIGraphicsGetCurrentContext(), _prePoint.x, _prePoint.y);
    CGContextAddLineToPoint(UIGraphicsGetCurrentContext(), _prePoint.x, _prePoint.y);
    CGContextStrokePath(UIGraphicsGetCurrentContext());
    _drawImage.image = UIGraphicsGetImageFromCurrentImageContext();
    UIGraphicsEndImageContext();
    self.isTouch = NO;
}
關鍵概念:手指移動時同時維護「目前點」與「對稱點」(x 座標用 320 減目前 x 得到),在 touchesMoved 中對兩者各描一條曲線,即可達到左右對稱的雙筆作畫效果;touchesEnded 則負責在單純點擊時補上一個點。效果圖如下:
- 上一篇文章: iOS App 的生命週期與各狀態代理回呼
- 下一篇文章: iOS 中的 KVC 與 KVO 详解