
iOS 自訂頁面切換動畫與手勢交互動畫完整解析
iOS 7 以前,想自訂 Navigation Controller 的 Push/Pop 動畫只有兩條路:繼承 UINavigationController,或用假的動畫硬蓋上去。iOS 7 帶來的 UIViewControllerAnimatedTransitioning 把這件事徹底解鎖——切換動畫的內容完全交給你,而系統仍然負責它原本擅長的部分。
自訂 Navigation 的 Push/Pop 動畫
先建立一個簡單結構:root 是 UINavigationController,它的 root 是主頁面,主頁面上有個按鈕可 push 到詳情頁。在主頁面的 ViewController 實作兩個協議:UINavigationControllerDelegate 與 UIViewControllerAnimatedTransitioning,然後在 viewDidLoad 把 navigationController 的 delegate 設為自己。
func navigationController(navigationController: UINavigationController!,
             animationControllerForOperation operation: UINavigationControllerOperation,
                          fromViewController fromVC: UIViewController!,
                            toViewController toVC: UIViewController!)
    -> UIViewControllerAnimatedTransitioning! {
    navigationOperation = operation
    return self
}
這個方法要求你回傳一個 UIViewControllerAnimatedTransitioning。它是 iOS 7 新增的協議,目的很單純:讓你專注在「切換時應該發生什麼事」,而不必去動 view 的其他屬性。任何實作這個協議的物件都被稱為動畫控制器。因為協議可以被任何類別實作,你可以把各種動效封裝到不同類別裡各自管理。這裡我讓主頁面兼任,因為它是導覽列的 root,生命週期最長。
// 動畫持續時間
func transitionDuration(transitionContext: UIViewControllerContextTransitioning!) -> NSTimeInterval {
    return 0.4
}

func animateTransition(transitionContext: UIViewControllerContextTransitioning!) {
    let containerView = transitionContext.containerView()
    let toViewController = transitionContext.viewControllerForKey(UITransitionContextToViewControllerKey)
    let fromViewController = transitionContext.viewControllerForKey(UITransitionContextFromViewControllerKey)

    var destView: UIView!
    var destTransform: CGAffineTransform!

    if navigationOperation == UINavigationControllerOperation.Push {
        containerView.insertSubview(toViewController.view, aboveSubview: fromViewController.view)
        destView = toViewController.view
        destView.transform = CGAffineTransformMakeScale(0.1, 0.1)
        destTransform = CGAffineTransformMakeScale(1, 1)
    } else if navigationOperation == UINavigationControllerOperation.Pop {
        containerView.insertSubview(toViewController.view, belowSubview: fromViewController.view)
        destView = fromViewController.view
        destTransform = CGAffineTransformMakeScale(0.1, 0.1)
    }

    UIView.animateWithDuration(transitionDuration(transitionContext),
        animations: { destView.transform = destTransform },
        completion: { completed in transitionContext.completeTransition(true) })
}
兩個方法裡最重要的是參數 transitionContext,它是切換的上下文:
containerView():所有動畫都在這個特殊容器裡進行。UITransitionContextFromViewControllerKey/ToViewControllerKey:從哪個 VC 到哪個 VC。- 還有直接取 view 的
FromViewKey/ToViewKey。
動畫結束時一定要呼叫 completeTransition(true),否則系統會一直卡在轉場狀態,畫面不再接受任何操作。至於清掉 fromViewController 的 view,交給系統即可,不必自己處理。
要注意一個副作用:這樣一來系統預設的側滑返回手勢就失效了。若還想保留它,在返回動畫控制器時回傳 nil:
if operation == UINavigationControllerOperation.Push {
    navigationOperation = operation
    return self
}
return nil
Swift 中除了設定 navigationController.interactivePopGestureRecognizer.delegate = self,還必須宣告實作 UIGestureRecognizerDelegate。
自訂 Modal 的 Present/Dismiss 動畫
做法類似,差別在於要實作的協議換成 UIViewControllerTransitioningDelegate。這裡用詳情頁兼任動畫控制器:
func transitionDuration(transitionContext: UIViewControllerContextTransitioning!) -> NSTimeInterval {
    return 0.6
}

func animateTransition(transitionContext: UIViewControllerContextTransitioning!) {
    let containerView = transitionContext.containerView()
    let toViewController = transitionContext.viewControllerForKey(UITransitionContextToViewControllerKey)
    let fromViewController = transitionContext.viewControllerForKey(UITransitionContextFromViewControllerKey)

    var destView: UIView!
    var destTransfrom = CGAffineTransformIdentity
    let screenHeight = UIScreen.mainScreen().bounds.size.height

    if modalPresentingType == ModalPresentingType.Present {
        destView = toViewController.view
        destView.transform = CGAffineTransformMakeTranslation(0, screenHeight)
        containerView.addSubview(toViewController.view)
    } else if modalPresentingType == ModalPresentingType.Dismiss {
        destView = fromViewController.view
        destTransfrom = CGAffineTransformMakeTranslation(0, screenHeight)
        containerView.insertSubview(toViewController.view, belowSubview: fromViewController.view)
    }

    UIView.animateWithDuration(transitionDuration(transitionContext),
        delay: 0,
        usingSpringWithDamping: 0.6,
        initialSpringVelocity: 0,
        options: UIViewAnimationOptions.CurveLinear,
        animations: { destView.transform = destTransfrom },
        completion: { completed in transitionContext.completeTransition(true) })
}
這裡用了 iOS 7 的彈簧動畫,usingSpringWithDamping 數值越小彈得越明顯。接著實作兩個方法回傳自己:
func animationControllerForPresentedController(presented: UIViewController!,
                              presentingController presenting: UIViewController!,
                                  sourceController source: UIViewController!)
    -> UIViewControllerAnimatedTransitioning! {
    modalPresentingType = ModalPresentingType.Present
    return self
}

func animationControllerForDismissedController(dismissed: UIViewController!)
    -> UIViewControllerAnimatedTransitioning! {
    modalPresentingType = ModalPresentingType.Dismiss
    return self
}
用 Storyboard 的話要在 prepareForSegue 設定 transitioningDelegate:
override func prepareForSegue(segue: UIStoryboardSegue!, sender: AnyObject!) {
    let modal = segue.destinationViewController as UIViewController
    modal.transitioningDelegate = self
}
記得同時把 modalPresentationStyle 設為 .Custom,否則自訂動畫不會被採用——這是最常見的「寫了卻沒生效」原因。
交互式動畫:讓使用者用手勢控制轉場
實作 UIViewControllerInteractiveTransitioning 的物件稱為交互控制器。最實用的場合就是把側滑返回接到自訂動畫上。實作方式有兩種:自己寫一個交互控制器,或使用系統提供的 UIPercentDrivenInteractiveTransition。
方案一:使用 UIPercentDrivenInteractiveTransition
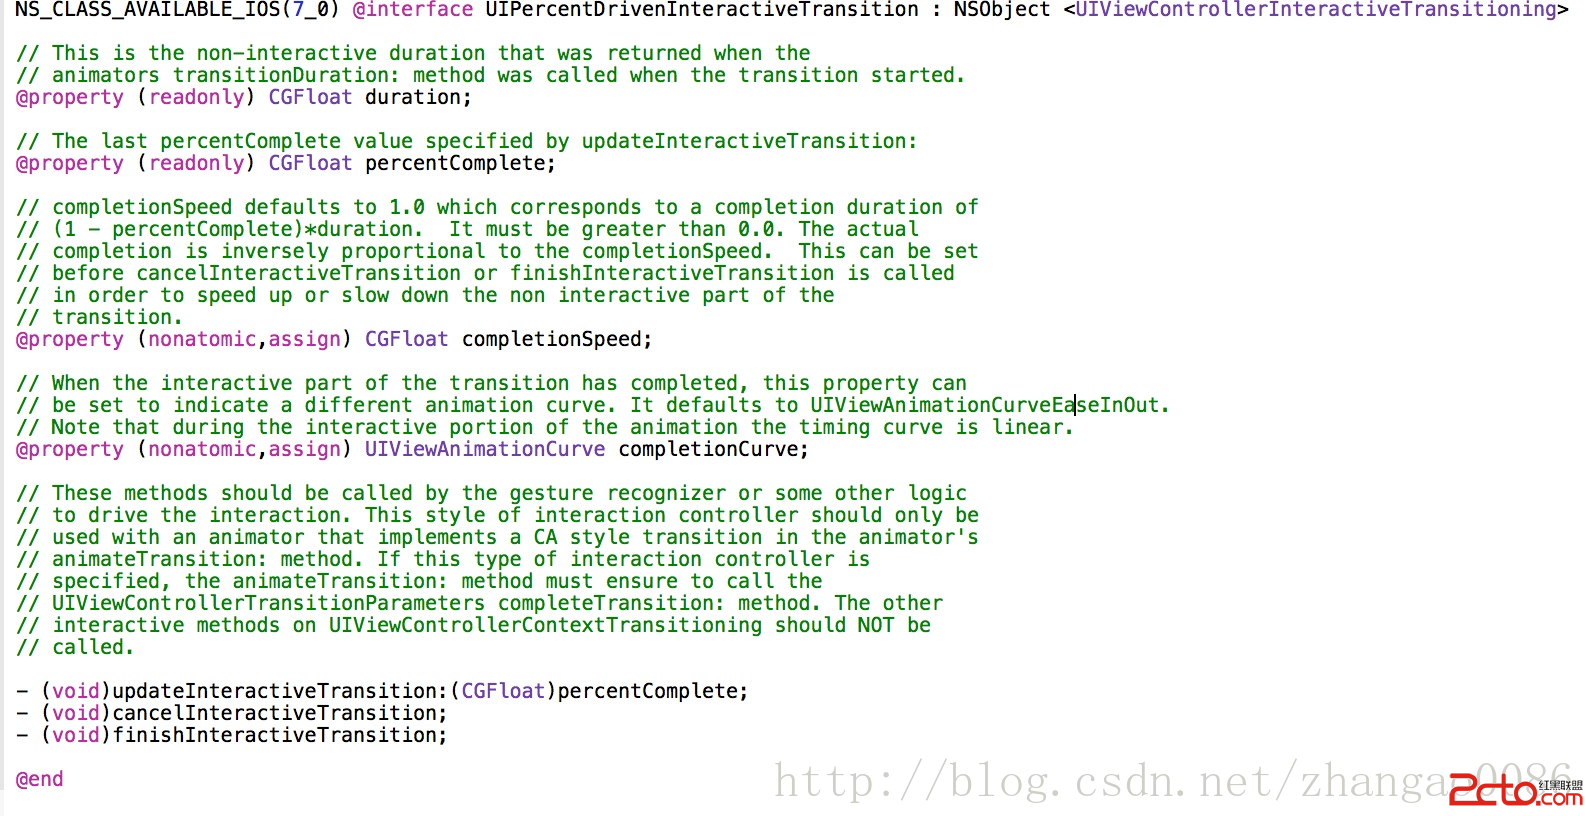
它本質上就是一個現成的交互控制器,三個關鍵方法:
updateInteractiveTransition(progress):更新完成百分比。cancelInteractiveTransition():取消,回到切換前的狀態。finishInteractiveTransition():完成交互,接著才會走 completeTransition。
先掛上手勢辨識器:
let popRecognizer = UIScreenEdgePanGestureRecognizer(target: self,
                                                   action: Selector("handlePopRecognizer:"))
popRecognizer.edges = UIRectEdge.Left
self.navigationController.view.addGestureRecognizer(popRecognizer)
UIScreenEdgePanGestureRecognizer 繼承自 UIPanGestureRecognizer,專門偵測從螢幕邊緣起手的手勢。
func handlePopRecognizer(popRecognizer: UIScreenEdgePanGestureRecognizer) {
    var progress = popRecognizer.translationInView(navigationController.view).x
                 / navigationController.view.bounds.size.width
    progress = min(1.0, max(0.0, progress))

    if popRecognizer.state == UIGestureRecognizerState.Began {
        self.interactivePopTransition = UIPercentDrivenInteractiveTransition()
        self.navigationController.popViewControllerAnimated(true)
    } else if popRecognizer.state == UIGestureRecognizerState.Changed {
        self.interactivePopTransition?.updateInteractiveTransition(progress)
    } else if popRecognizer.state == UIGestureRecognizerState.Ended
           || popRecognizer.state == UIGestureRecognizerState.Cancelled {
        if progress > 0.5 {
            self.interactivePopTransition?.finishInteractiveTransition()
        } else {
            self.interactivePopTransition?.cancelInteractiveTransition()
        }
        self.interactivePopTransition = nil
    }
}
用實例變數持有交互控制器、只在需要時才建立,是為了避免「只是點擊返回鈕」這種不該有交互動畫的情況也被拖進轉場。最後補上 delegate 方法把它交給系統:
func navigationController(navigationController: UINavigationController!,
     interactionControllerForAnimationController animationController: UIViewControllerAnimatedTransitioning!)
    -> UIViewControllerInteractiveTransitioning! {
    return self.interactivePopTransition
}
方案二:自己實作交互控制器
想更精確控制,就直接實作 UIViewControllerInteractiveTransitioning。三個方法中 startInteractiveTransition: 是必須的,在裡面初始化狀態:
func startInteractiveTransition(transitionContext: UIViewControllerContextTransitioning!) {
    self.transitionContext = transitionContext
    let containerView = transitionContext.containerView()
    let toViewController = transitionContext.viewControllerForKey(UITransitionContextToViewControllerKey)
    let fromViewController = transitionContext.viewControllerForKey(UITransitionContextFromViewControllerKey)
    containerView.insertSubview(toViewController.view, belowSubview: fromViewController.view)
    self.transitingView = fromViewController.view
}
這裡不做動畫,只把要切換的 view 放進上下文。動畫邏輯則與前面保持一致介面:
func updateWithPercent(percent: CGFloat) {
    let scale = CGFloat(fabsf(Float(percent - CGFloat(1.0))))
    transitingView?.transform = CGAffineTransformMakeScale(scale, scale)
    transitionContext?.updateInteractiveTransition(percent)
}

func finishBy(cancelled: Bool) {
    if cancelled {
        UIView.animateWithDuration(0.4, animations: {
            self.transitingView!.transform = CGAffineTransformIdentity
        }, completion: { completed in
            self.transitionContext!.cancelInteractiveTransition()
            self.transitionContext!.completeTransition(false)
        })
    } else {
        UIView.animateWithDuration(0.4, animations: {
            self.transitingView!.transform = CGAffineTransformMakeScale(0, 0)
        }, completion: { completed in
            self.transitionContext!.finishInteractiveTransition()
            self.transitionContext!.completeTransition(true)
        })
    }
}
手勢處理改為呼叫自己的方法,並用一個 isTransiting 旗標避免在不恰當的時機回傳交互控制器:
func handlePopRecognizer(popRecognizer: UIScreenEdgePanGestureRecognizer) {
    var progress = popRecognizer.translationInView(navigationController.view).x
                 / navigationController.view.bounds.size.width
    progress = min(1.0, max(0.0, progress))

    if popRecognizer.state == UIGestureRecognizerState.Began {
        isTransiting = true
        self.navigationController.popViewControllerAnimated(true)
    } else if popRecognizer.state == UIGestureRecognizerState.Changed {
        updateWithPercent(progress)
    } else if popRecognizer.state == UIGestureRecognizerState.Ended
           || popRecognizer.state == UIGestureRecognizerState.Cancelled {
        finishBy(progress < 0.5)
        isTransiting = false
    }
}

func navigationController(navigationController: UINavigationController!,
     interactionControllerForAnimationController animationController: UIViewControllerAnimatedTransitioning!)
    -> UIViewControllerInteractiveTransitioning! {
    if !self.isTransiting { return nil }
    return self
}
可以發現兩種方案的流程一致,UIPercentDrivenInteractiveTransition 只是幫你把 transitionContext 的初始化與呼叫封裝起來,動畫本身仍要自己寫。
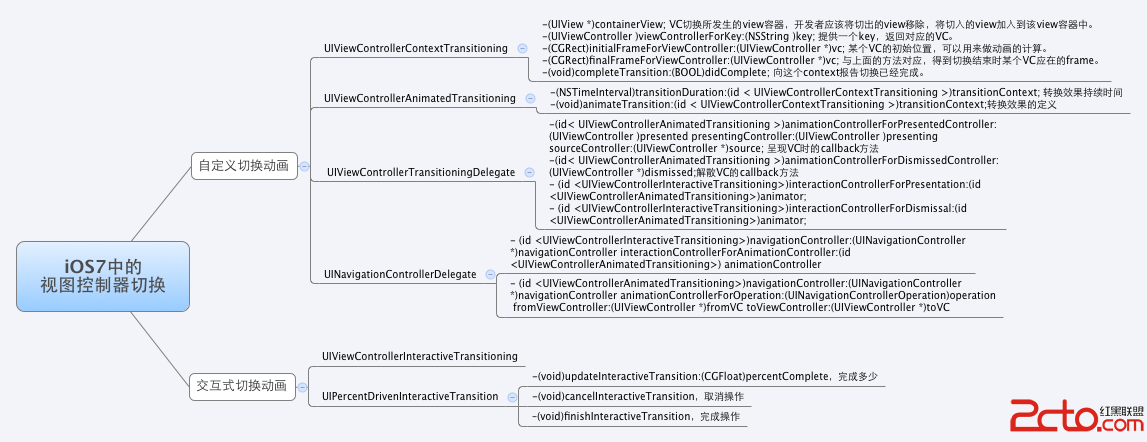
最後一張圖可以幫助區分這幾個名稱相似但職責不同的協議:
寫成 Swift 4 以後
上面的程式碼是 Swift 1.x 語法,直接跑現在的 Xcode 會整片紅。遷移時要注意幾點:UIViewControllerAnimatedTransitioning 的方法簽名已改為 func animateTransition(using transitionContext: UIViewControllerContextTransitioning),transitionDuration(using:) 亦然;viewController(forKey:) 取代 viewControllerForKey;containerView 從方法變成同名屬性;UIGestureRecognizerState 改寫為 UIGestureRecognizer.State。另外别再使用 UIView.animateWithDuration,現行寫法是 UIView.animate(withDuration:animations:completion:)。
而在全新專案中,若目标平台允許,直接用 UINavigationControllerDelegate 搭配 UIViewControllerTransitioningDelegate 的 class-based 版本,或考慮 iOS 18 起提供的 zoom transition API,會比手刻 transform 少很多邊界條件要處理。