
iOS 表格視圖動態插入與刪除列的完整實作
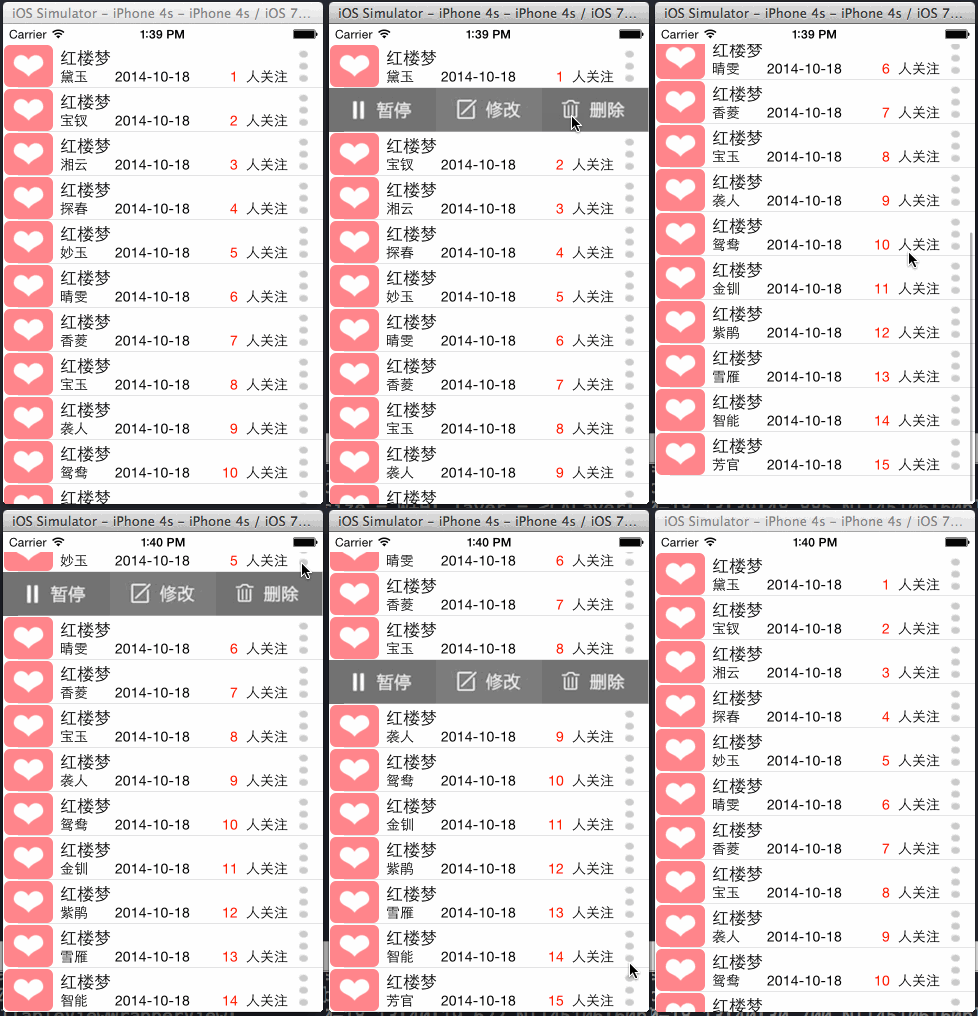
本文示範如何在 UITableView 中做到「點擊某一列右側按鈕,就在該列下方動態展開一列操作選單;再點一次則收起」的效果。
最終效果圖:
整體架構
採用 MVC 分層設計,自訂 Cell 有兩種:
主 Cell(MainCell)由 ModelArr 提供資料來源;插入的附加 Cell 則由程式碼動態建立,並由另一個負責記錄狀態的陣列來管理其存在與否。
資料模型
// MyProjectCellModel.h
@interface MyProjectCellModel : NSObject
@property (nonatomic, copy) NSString *icon;          // 圖示
@property (nonatomic, copy) NSString *title;         // 標題
@property (nonatomic, copy) NSString *publishStatus; // 發布狀態
@property (nonatomic, copy) NSString *date;          // 日期
@property (nonatomic, copy) NSString *num;           // 關注人數

// 類別方法:字典轉物件,一次填充(類似 JavaBean)
+ (MyProjectCellModel *)modelWithDict:(NSDictionary *)dict;
// 物件方法:設定屬性後回傳自身
- (MyProjectCellModel *)initWithDict:(NSDictionary *)dict;
@end

// MyProjectCellModel.m
@implementation MyProjectCellModel

+ (MyProjectCellModel *)modelWithDict:(NSDictionary *)dict {
    // 用 self 而非類別名稱,是為了對子類保持相容
    return [[self alloc] initWithDict:dict];
}

- (MyProjectCellModel *)initWithDict:(NSDictionary *)dict {
    // 必須先呼叫父類的 init
    if (self = [super init]) {
        [self setValuesForKeysWithDictionary:dict];
    }
    return self;
}
@end
主 Cell
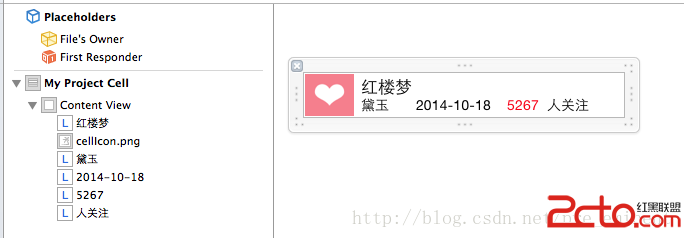
由 xib 加上類別宣告、類別實作組成。這裡用一個 block 把「右側按鈕被點擊」的事件連同列號回傳給控制器。
// MyProjectCell.h
typedef void (^cellRightBtnBlock)(int);

@interface MyProjectCell : UITableViewCell
@property (nonatomic, weak) IBOutlet UIImageView *iconView;
@property (nonatomic, weak) IBOutlet UILabel *titleLabel;
@property (nonatomic, weak) IBOutlet UILabel *publishStatusLabel;
@property (nonatomic, weak) IBOutlet UILabel *dateLabel;
@property (nonatomic, weak) IBOutlet UILabel *numLabel;
@property (nonatomic, weak) IBOutlet UILabel *constLabel;

// 右側按鈕被點擊時呼叫,供外部控制器彈出修改狀態的 view
@property (nonatomic, copy) cellRightBtnBlock wannaChangeStatusBlock;

+ (MyProjectCell *)myProjectCell;                        // 從 xib 載入
- (MyProjectCell *)cellWithCellModel:(MyProjectCellModel *)cellModel; // 填充資料
@end

// MyProjectCell.m
@implementation MyProjectCell

+ (MyProjectCell *)myProjectCell {
    // mainBundle 載入 xib,副檔名不用寫
    return [[NSBundle mainBundle] loadNibNamed:@"MyProjectCell" owner:nil options:nil][0];
}

- (MyProjectCell *)cellWithCellModel:(MyProjectCellModel *)cellModel {
    _iconView.layer.cornerRadius = 6;
    _iconView.layer.masksToBounds = YES;
    _iconView.image = [UIImage imageNamed:cellModel.icon];
    _titleLabel.text = cellModel.title;
    _publishStatusLabel.text = cellModel.publishStatus;
    _dateLabel.text = cellModel.date;

    if ([_numLabel.text intValue]) {
        _constLabel.hidden = YES;
    } else {
        _numLabel.text = cellModel.num;
        _constLabel.hidden = NO;
    }

    UIButton *rightBtn = [UIButton buttonWithType:UIButtonTypeCustom];
    [rightBtn setBackgroundImage:[UIImage imageNamed:@"MyProjectCellRightBtn"] forState:UIControlStateNormal];
    rightBtn.frame = CGRectMake(286, 0, 34, 44);
    rightBtn.tag = 5267;
    [rightBtn addTarget:self action:@selector(rightBtnClicked:) forControlEvents:UIControlEventTouchUpInside];
    [self.contentView addSubview:rightBtn];

    return self;
}

#define iOS7 ([[[UIDevice currentDevice] systemVersion] floatValue] >= 7.0)

- (void)rightBtnClicked:(UIButton *)sender {
    MyProjectCell *cell;
    UITableView *tableView;

    if (iOS7) {
        // iOS 7 之後 Cell 的父層多包了一層
        cell = (MyProjectCell *)[[[sender superview] superview] superview];
        tableView = (UITableView *)[[cell superview] superview];
    } else {
        cell = (MyProjectCell *)[sender superview];
        tableView = (UITableView *)[cell superview];
    }

    NSIndexPath *path = [tableView indexPathForCell:cell];
    int row = (int)path.row;
    NSLog(@"點擊了第 %d 列右側的按鈕", row);

    // 把列號交給外部控制器處理
    _wannaChangeStatusBlock(row);
}
@end補充一句:[[[sender superview] superview] superview] 這種靠視圖階層往上找 table 的寫法很脆弱,系統一升級就可能失效。較穩健的做法是在 Cell 上保存一個 weak 的 tableView 屬性,或使用 convertPoint:toView: 反推,這裡保留原寫法只是為了示範 iOS 6/7 階層差異。
附加 Cell
點擊主 Cell 最右側按鈕時,動態加在主 Cell 下方的那一列。
// ChangeStatusCell.m
@implementation ChangeStatusCell

// 附加 Cell 沒有 xib,全由程式碼建立
- (id)initWithStyle:(UITableViewCellStyle)style reuseIdentifier:(NSString *)reuseIdentifier {
    self = [super initWithStyle:style reuseIdentifier:reuseIdentifier];
    if (self) {
        UIButton *b1 = [self createButtonWithFrame:CGRectMake(0, 0, 106.5, 44)
                                           Target:self Selector:@selector(btnAction:)
                                            Image:@"StatusPause_gray.png"
                                    ImagePressed:@"StatusPause_blue.png"];
        b1.tag = 1;

        UIButton *b2 = [self createButtonWithFrame:CGRectMake(106.5, 0, 106.5, 44)
                                           Target:self Selector:@selector(btnAction:)
                                            Image:@"StatusModify_gray.png"
                                    ImagePressed:@"StatusModify_blue.png"];
        b2.tag = 2;

        UIButton *b3 = [self createButtonWithFrame:CGRectMake(213, 0, 106.5, 44)
                                           Target:self Selector:@selector(btnAction:)
                                            Image:@"StatusTrash_gray.png"
                                    ImagePressed:@"StatusTrash_blue.png"];
        b3.tag = 3;

        // 必須加到 contentView,否則收不到事件:
        // 直接加到 tableView 上的控件,tableView 不會把事件往下傳遞
        [self.contentView addSubview:b1];
        [self.contentView addSubview:b2];
        [self.contentView addSubview:b3];
    }
    return self;
}

- (void)btnAction:(id)sender {
    UIButton *btn = (UIButton *)sender;
    switch (btn.tag) {
        case 1: NSLog(@">>>>>>>>>>B1"); break;
        case 2: NSLog(@">>>>>>>>>>B2"); break;
        case 3: NSLog(@">>>>>>>>>>B3"); break;
        default: break;
    }
}

#pragma mark - 工具方法
- (UIButton *)createButtonWithFrame:(CGRect)frame
                            Target:(id)target Selector:(SEL)selector
                             Image:(NSString *)image
                      ImagePressed:(NSString *)imagePressed {
    UIButton *button = [UIButton buttonWithType:UIButtonTypeCustom];
    [button setFrame:frame];
    [button setBackgroundImage:[UIImage imageNamed:image] forState:UIControlStateNormal];
    [button setBackgroundImage:[UIImage imageNamed:imagePressed] forState:UIControlStateHighlighted];
    [button addTarget:target action:selector forControlEvents:UIControlEventTouchUpInside];
    return button;
}
@end
控制器:核心所在
整個動態插入/刪除的關鍵,在於用兩個陣列保持同步:_modelArr 存放真正的資料模型,_statusDictArr 則逐列記錄「這一列是主 Cell 還是附加 Cell」。因為附加 Cell 也被計入 row,兩者長度永遠一致,cellForRowAtIndexPath: 就能依狀態決定要產生哪一種 Cell。
#define IsIOS7 ([[[[UIDevice currentDevice] systemVersion] substringToIndex:1] intValue] >= 7)
#define CGRECT_NO_NAV(x,y,w,h) CGRectMake((x), (y + (IsIOS7 ? 20 : 0)), (w), (h))

@interface MyProjectController () <UITableViewDataSource, UITableViewDelegate> {
    UITableView *_tableView;
    NSMutableArray *_modelArr;      // 資料來源
    NSMutableArray *_statusDictArr; // 狀態陣列,長度與 _modelArr 相同
    int _ExpandedMainCellRow;       // 記錄目前展開的主 Cell 行號,-1 代表無
}
@end

@implementation MyProjectController

- (void)viewDidLoad {
    [super viewDidLoad];

    if (IS_IOS7) {
        self.edgesForExtendedLayout = UIRectEdgeNone;
        self.extendedLayoutIncludesOpaqueBars = NO;
        self.modalPresentationCapturesStatusBarAppearance = NO;
    }

    UITableView *tableView = [[UITableView alloc] initWithFrame:CGRECT_NO_NAV(0, 0, 320, 460)
                                                        style:UITableViewStylePlain];
    tableView.dataSource = self;
    tableView.delegate = self;
    [self.view addSubview:tableView];
    _tableView = tableView;

    _ExpandedMainCellRow = -1;
    _modelArr = [NSMutableArray array];
    _statusDictArr = [NSMutableArray array];

    [self loadData];
}

#pragma mark - 初始化資料
- (void)loadData {
    NSString *filePath = [[NSBundle mainBundle] pathForResource:@"MyProjectList.plist" ofType:nil];
    NSArray *tempArr = [NSArray arrayWithContentsOfFile:filePath];

    // 這個字典是給狀態陣列用的模板
    NSDictionary *statusDict = @{ @"Cell": @"MyProjectCell", @"isAttached": @(NO) };

    for (NSDictionary *dict in tempArr) {
        MyProjectCellModel *model = [MyProjectCellModel modelWithDict:dict];
        [_modelArr addObject:model];
        [_statusDictArr addObject:statusDict];
    }
}

#pragma mark - TableView 委派
- (void)tableView:(UITableView *)tableView didSelectRowAtIndexPath:(NSIndexPath *)indexPath {
    [tableView deselectRowAtIndexPath:indexPath animated:YES];
}

- (CGFloat)tableView:(UITableView *)tableView heightForRowAtIndexPath:(NSIndexPath *)indexPath {
    return 44;
}

#pragma mark - TableView 資料來源
- (NSInteger)tableView:(UITableView *)tableView numberOfRowsInSection:(NSInteger)section {
    return _statusDictArr.count;
}

- (UITableViewCell *)tableView:(UITableView *)tableView cellForRowAtIndexPath:(NSIndexPath *)indexPath {
    if ([[_statusDictArr[indexPath.row] objectForKey:@"Cell"] isEqualToString:@"MyProjectCell"]) {
        static NSString *cellID_1 = @"MyProjectCell";
        MyProjectCell *cell = [tableView dequeueReusableCellWithIdentifier:cellID_1];
        if (cell == nil) {
            cell = [MyProjectCell myProjectCell];
            cell.selectionStyle = UITableViewCellSelectionStyleGray;

            __unsafe_unretained MyProjectController *blockCtroller = self;
            cell.wannaChangeStatusBlock = ^(int row) {
                NSLog(@"控制器拿到被點擊的 cell 行號: %d", row);
                [blockCtroller showHideChangeStatusView:row];
            };
        }

        // 因為展開的附加 Cell 也佔了一個 row,
        // 取資料模型時必須把這個偏移量扣回來
        int tempRow = indexPath.row;
        if (_ExpandedMainCellRow != -1 && indexPath.row > _ExpandedMainCellRow) {
            tempRow = indexPath.row - 1;
        }
        if (_ExpandedMainCellRow == -1) {
            tempRow = indexPath.row;
        }

        MyProjectCellModel *model = [_modelArr objectAtIndex:tempRow];
        cell = [cell cellWithCellModel:model];
        return cell;

    } else if ([[_statusDictArr[indexPath.row] objectForKey:@"Cell"] isEqualToString:@"ChangeStatusCell"]) {
        static NSString *cellID_2 = @"ChangeStatusCell";
        ChangeStatusCell *cell = [tableView dequeueReusableCellWithIdentifier:cellID_2];
        if (cell == nil) {
            cell = [[ChangeStatusCell alloc] initWithStyle:UITableViewCellStyleDefault
                                          reuseIdentifier:cellID_2];
            cell.selectionStyle = UITableViewCellSelectionStyleNone;
        }
        return cell;
    }
    return nil;
}

- (void)scrollViewWillBeginDragging:(UIScrollView *)scrollView {
    // 開始滾動前先收起已展開的附加列
}

#pragma mark - 展開/收合
- (void)showHideChangeStatusView:(int)row {
    if (row == _ExpandedMainCellRow) {
        // 點的是目前已展開的那一列,直接收起
        [self closeOneExpandedCell:_ExpandedMainCellRow];
    } else {
        if (_ExpandedMainCellRow == -1) {
            // 首次展開
            [self expandOneRow:row];
        } else {
            // 先收起舊的,再展開新的。
            // 注意:傳進來的 row 含附加 Cell,若展開位置在上方則需減 1
            if (_ExpandedMainCellRow < row) {
                row = row - 1;
            }
            [self closeOneExpandedCell:_ExpandedMainCellRow];
            [self expandOneRow:row];
        }
    }
}

- (void)closeOneExpandedCell:(int)row {
    // 本操作完成後就沒有展開的行了,必須先歸零;
    // 因為 reload 過程會呼叫 cellForRow,歸零後才不會取錯資料
    _ExpandedMainCellRow = -1;

    _statusDictArr[row] = @{ @"Cell": @"MyProjectCell", @"isAttached": @(NO) };

    // 刪掉下一個位置的附加 Cell
    [_statusDictArr removeObjectAtIndex:row + 1];

    [_tableView beginUpdates];
    NSIndexPath *path = [NSIndexPath indexPathForRow:row + 1 inSection:0];
    [_tableView deleteRowsAtIndexPaths:@[path] withRowAnimation:UITableViewRowAnimationMiddle];
    [_tableView endUpdates];
}

- (void)expandOneRow:(int)row {
    // 順序不能顛倒:先記錄展開行,再改狀態
    _ExpandedMainCellRow = row;

    _statusDictArr[row] = @{ @"Cell": @"MyProjectCell", @"isAttached": @(YES) };
    [_statusDictArr insertObject:@{ @"Cell": @"ChangeStatusCell", @"isAttached": @(YES) }
                        atIndex:row + 1];

    [_tableView beginUpdates];
    NSIndexPath *path = [NSIndexPath indexPathForRow:row + 1 inSection:0];
    [_tableView insertRowsAtIndexPaths:@[path] withRowAnimation:UITableViewRowAnimationMiddle];
    [_tableView endUpdates];

    if (row == (int)_modelArr.count - 1) {
        // 展開的是最後一列時,還要讓列表往上滾動,避免附加列被遮住
        [self showExpandedCellForLastRow];
    }
}

- (void)showExpandedCellForLastRow {
    NSIndexPath *path = [NSIndexPath indexPathForRow:_modelArr.count inSection:0];
    [_tableView scrollToRowAtIndexPath:path
                     atScrollPosition:UITableViewScrollPositionMiddle
                             animated:YES];
}
@end
重點回顧
動態插入刪除的三個關鍵:
第一,用「狀態陣列」與「資料陣列」雙軌並行,讓 Cell 的種類與順序可以隨時改變,而資料索引仍能正確對應。
第二,beginUpdates 與 endUpdates 必須成對出現,且務必先改完資料來源再呼叫,否則會觸發「資料來源與表格狀態不一致」的例外。
第三,同一時間只允許一列展開(用 _ExpandedMainCellRow 記錄),能大幅簡化狀態判斷;若需要多列同時展開,就得把這個單一整數改成 Set 來記錄。