
iOS:UITableView 三種版面示範
編輯:iOS 開發綜合
本章概要
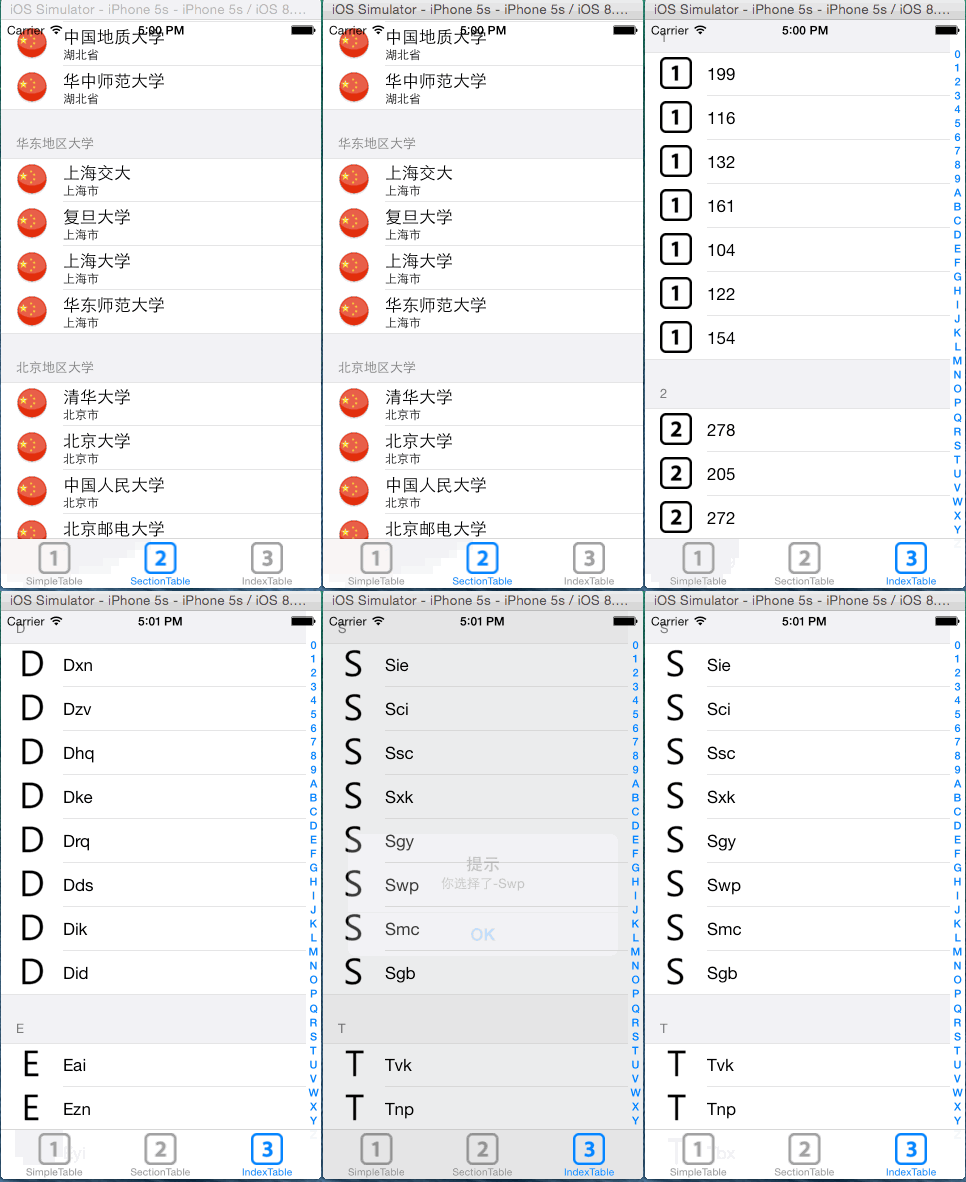
本文示範 UITableView 的三種典型用法,透過一個 UITabBarController 的三個分頁分別呈現:基本列表、帶副標題的風格化列表,以及附索引的列表。
執行結果如下:
工程建構要點
- UITabBarController 的用法可參考先前文章。
- 使用 UITableView 的控制類別必須實作它的 data source 與 delegate 方法,同時在 Interface Builder 中把 table view 的 dataSource 與 delegate 指向該控制類別。
- 需要實作的方法主要有:段數、每段的列數、每個 cell 的繪製方式、段標題文字;若要索引功能,還得實作索引標題列表,以及點擊索引後要跳到第幾段。
- 本專案未使用 ARC,一開始遇到記憶體管理問題,原因是成員變數賦值時寫成了淺拷貝。正確寫法是
self._value = value而非_value = value:前者會經過 setter 走 retain 流程,後者只是指標賦值,物件可能提早被釋放。
標頭檔
#import <UIKit/UIKit.h>

@interface IndexViewController : UIViewController
    <UITableViewDataSource, UITableViewDelegate> {
    NSMutableArray *_arraySection;
    NSMutableArray *_arrayMember;
    NSArray *_arrayIndex;
}

@property (nonatomic, retain) NSMutableArray *_arraySection;
@property (nonatomic, retain) NSMutableArray *_arrayMember;
@property (nonatomic, retain) NSArray *_arrayIndex;

@end
實作檔
#import "IndexViewController.h"

@implementation IndexViewController

@synthesize _arrayMember;
@synthesize _arraySection;
@synthesize _arrayIndex;

#pragma mark - UITableViewDataSource

// 對應某段的列數
- (NSInteger)tableView:(UITableView *)tableView numberOfRowsInSection:(NSInteger)section {
    return [[_arraySection objectAtIndex:section] count];
}

// 繪製 cell
- (UITableViewCell *)tableView:(UITableView *)tableView
         cellForRowAtIndexPath:(NSIndexPath *)indexPath {
    static NSString *CellIdentifier = @"Cell1";
    UITableViewCell *cell = [tableView dequeueReusableCellWithIdentifier:CellIdentifier];
    if (cell == nil) {
        cell = [[[UITableViewCell alloc] initWithStyle:UITableViewCellStyleSubtitle
                                      reuseIdentifier:CellIdentifier] autorelease];
    }
    cell.textLabel.text = [[_arraySection objectAtIndex:indexPath.section]
                           objectAtIndex:indexPath.row];
    cell.imageView.image = [UIImage imageNamed:
        [NSString stringWithFormat:@"%@.png", [_arrayIndex objectAtIndex:indexPath.section]]];
    return cell;
}

// 索引標題列表
- (NSArray *)sectionIndexTitlesForTableView:(UITableView *)tableView {
    NSMutableArray *index = [[NSMutableArray alloc] init];
    for (int i = '0'; i <= '9'; i++) {
        [index addObject:[NSString stringWithFormat:@"%c", i]];
    }
    for (int i = 'A'; i <= 'Z'; i++) {
        [index addObject:[NSString stringWithFormat:@"%c", i]];
    }
    self._arrayIndex = index;
    [index release];
    return _arrayIndex;
}

// 點擊索引標題時定位到哪一段
- (NSInteger)tableView:(UITableView *)tableView
sectionForSectionIndexTitle:(NSString *)title
               atIndex:(NSInteger)index {
    return index;
}

// 段數
- (NSInteger)numberOfSectionsInTableView:(UITableView *)tableView {
    return [_arraySection count];
}

// 段標題
- (NSString *)tableView:(UITableView *)tableView
titleForHeaderInSection:(NSInteger)section {
    return [_arrayIndex objectAtIndex:section];
}

#pragma mark - UITableViewDelegate

- (void)tableView:(UITableView *)tableView
didSelectRowAtIndexPath:(NSIndexPath *)indexPath {
    NSArray *array = [_arraySection objectAtIndex:indexPath.section];
    NSString *strRow = [array objectAtIndex:indexPath.row];
    NSString *msg = [[NSString alloc] initWithFormat:@"你選擇了 - %@", strRow];

    UIAlertView *alert = [[UIAlertView alloc] initWithTitle:@"提示"
                                                   message:msg
                                                  delegate:nil
                                         cancelButtonTitle:@"OK"
                                         otherButtonTitles:nil];
    [alert show];

    [tableView deselectRowAtIndexPath:indexPath animated:YES];
    [msg release];
    [alert release];
}

- (void)viewDidLoad {
    [super viewDidLoad];

    NSMutableArray *arrayIndex = [[NSMutableArray alloc] init];

    // 數字開頭的段
    for (char i = '0'; i <= '9'; i++) {
        int nMem = arc4random() % 7 + 4;
        NSMutableArray *arrayMem = [[NSMutableArray alloc] init];
        for (int j = 0; j < nMem; j++) {
            [arrayMem addObject:[NSString stringWithFormat:@"%c%c%c",
                                 i, arc4random() % 10 + '0', arc4random() % 10 + '0']];
        }
        [arrayIndex addObject:arrayMem];
    }

    // 字母開頭的段
    for (char i = 'A'; i <= 'Z'; i++) {
        int nMem = arc4random() % 7 + 4;
        NSMutableArray *arrayMem = [[NSMutableArray alloc] init];
        for (int j = 0; j < nMem; j++) {
            [arrayMem addObject:[NSString stringWithFormat:@"%c%c%c",
                                 i, arc4random() % 26 + 'a', arc4random() % 26 + 'a']];
        }
        [arrayIndex addObject:arrayMem];
    }

    self._arraySection = arrayIndex;
    self._arrayMember = [arrayIndex objectAtIndex:0];
    [arrayIndex release];
}

- (void)didReceiveMemoryWarning {
    [super didReceiveMemoryWarning];
}

- (void)dealloc {
    for (int i = 0; i < _arraySection.count; i++) {
        [[_arraySection objectAtIndex:i] release];
    }
    [_arraySection release];
    [_arrayMember release];
    [super dealloc];
}

@end
示範資料刻意用亂數產生:每段 4 到 10 筆不等,數字段用「數字 + 兩位數字」,字母段用「字母 + 兩個小寫字母」,這樣做出來的索引表看起來就像聯絡人清單。實務上只要把 viewDidLoad 中的資料來源換成真實資料即可,其餘邏輯完全不用動。