
iOS 藍牙開發實戰:CoreBluetooth 與藍牙小票機通訊
前言
公司新添了一台藍牙小票印表機,需要在 iOS 上與它溝通,於是又把 Apple 的 CoreBluetooth 官方文件翻出來讀了一遍。測試成功之後,把過程整理成筆記,方便日後查閱。
先說明一個前提:iOS 的藍牙框架(CoreBluetooth)走的是 Bluetooth Low Energy,也就是藍牙 4.0 以上的低功耗協定。
兩個核心角色:Central 與 Peripheral
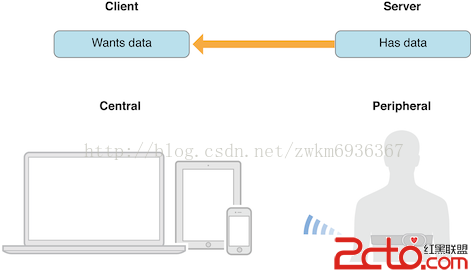
理解 CoreBluetooth,最關鍵的是分清楚 Central(中央裝置)與 Peripheral(周邊裝置)。這兩個概念可以類比傳統的 client/server 模型:Central 扮演主動查找、發號施令的一方,Peripheral 則是帶著資料等待被讀取的外設。
Apple 官網常用的例子是心跳帶:心跳帶是 Peripheral,手機是 Central。手機主動去心跳帶那邊把心率資料取回來,這時候心跳帶的角色比較接近 server,手機則像 client。
Peripheral 如何被發現?
Peripheral 會持續廣播自己的存在,並在廣播封包(advertising packet)中帶上自家提供的服務資訊。可以想像成有個裝置一直在喊:「我在這裡,我是心跳帶,我提供這些服務。」Central 收到喊聲後評估是否需要,接著就能取得對方提供的服務清單。

服務(Service)之下再細分為特徵(Characteristic),特徵才是真正承載資料、可讀可寫的最小單位。
實作流程
本文情境是:手機要對小票機做「寫入」動作,因此手機是 Central,小票機是 Peripheral。
1. 匯入框架並宣告 Central
#import <CoreBluetooth/CoreBluetooth.h>

@interface ViewController () <CBCentralManagerDelegate>
@property (nonatomic, retain) CBCentralManager *centralManager;
@end

@implementation ViewController

- (void)viewDidLoad {
    [super viewDidLoad];
    self.centralManager = [[CBCentralManager alloc] initWithDelegate:self queue:nil];
}
2. 等待藍牙狀態就緒
建立 CBCentralManager 之後,系統會透過代理回呼目前的藍牙狀態。務必等到狀態為可用時再啟動掃描,否則一點反應都沒有。
- (void)centralManagerDidUpdateState:(CBCentralManager *)central {
    NSString *state = nil;
    switch (central.state) {
        case CBCentralManagerStateUnsupported:
            state = @"此平台/硬體不支援 Bluetooth Low Energy.";
            break;
        case CBCentralManagerStateUnauthorized:
            state = @"App 未獲授權使用藍牙.";
            break;
        case CBCentralManagerStatePoweredOff:
            state = @"藍牙目前關閉中.";
            break;
        case CBCentralManagerStatePoweredOn:
            state = @"可用";
            break;
        case CBCentralManagerStateUnknown:
        default:
            break;
    }
    NSLog(@"Central manager state: %@", state);
}
3. 掃描週邊裝置
- (IBAction)scan:(id)sender {
    [self.centralManager scanForPeripheralsWithServices:nil options:nil];
}
參數傳 nil 代表掃描所有廣播中的裝置。若已經知道目標的服務 UUID,可以只掃特定服務,效率更好:
- (IBAction)scan:(id)sender {
    [self.centralManager scanForPeripheralsWithServices:
        @[[CBUUID UUIDWithString:@"FFE0"]] options:nil];
}
實務上通常先用 nil 掃一次,把目標服務 UUID 看清楚,之後就能直接寫死。除非廠商改版更換服務號,否則這個值幾乎不會變動。
- (void)centralManager:(CBCentralManager *)central
  didDiscoverPeripheral:(CBPeripheral *)peripheral
      advertisementData:(NSDictionary *)advertisementData
                   RSSI:(NSNumber *)RSSI {
    NSLog(@"發現裝置: %@  RSSI: %@  UUID: %@  廣播資料: %@",
          peripheral, RSSI, peripheral.UUID, advertisementData);
    [self.discoverdPeriparals addObject:peripheral];
}
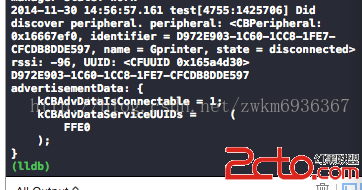
這個回呼裡,peripheral 是發現到的裝置,advertisementData 是廣播內容,RSSI 代表訊號強度。由於廣播封包本身有長度上限,能帶的資訊有限。
4. 建立連線並探索服務
- (IBAction)connect:(id)sender {
    [self.centralManager connectPeripheral:[self.discoverdPeriparals firstObject] options:nil];
}

- (void)centralManager:(CBCentralManager *)central
  didConnectPeripheral:(CBPeripheral *)peripheral {
    NSLog(@"已連線: %@", peripheral);
    peripheral.delegate = self;
    [central stopScan];
    [peripheral discoverServices:nil];
}
連線成功後,把 Peripheral 的代理指向自己,再呼叫 discoverServices: 取得服務列表;傳 nil 是全部探索,也可以指定特定服務 UUID。
- (void)peripheral:(CBPeripheral *)peripheral
didDiscoverServices:(NSError *)error {
    if (error) {
        NSLog(@"探索服務失敗: %@", [error localizedDescription]);
        return;
    }
    for (CBService *service in peripheral.services) {
        NSLog(@"找到服務 UUID: %@", service.UUID);
        if ([service.UUID isEqual:[CBUUID UUIDWithString:@"FFE0"]]) {
            [peripheral discoverCharacteristics:nil forService:service];
        }
    }
}
5. 取得特徵並寫入資料
- (void)peripheral:(CBPeripheral *)peripheral
didDiscoverCharacteristicsForService:(CBService *)service
             error:(NSError *)error {
    if (error) {
        NSLog(@"探索特徵失敗: %@", [error localizedDescription]);
        return;
    }
    for (CBCharacteristic *characteristic in service.characteristics) {
        if ([characteristic.UUID isEqual:[CBUUID UUIDWithString:@"FFE1"]]) {
            self.p = peripheral;
            self.c = characteristic;
        }
    }
}
拿到寫入用的特徵之後,就能把小票機指令寫進去。這裡示範送出一段初始化指令(GS、驚嘆號、退格等控制碼),再輸出中文內容;編碼使用 GB 18030 以符合多數熱感印表機模組的預期:
- (void)touchesBegan:(NSSet *)touches withEvent:(UIEvent *)event {
    NSMutableString *initCmd = [NSMutableString new];
    [initCmd appendFormat:@"%c", 28];
    [initCmd appendFormat:@"%c", 33];
    [initCmd appendFormat:@"%c", 8];

    CFStringEncoding gb = CFStringConvertEncodingToNSStringEncoding(kCFStringEncodingGB_18030_2000);

    [self.p writeValue:[initCmd dataUsingEncoding:gb]
       forCharacteristic:self.c
                    type:CBCharacteristicWriteWithResponse];

    NSString *text = @"測試列印內容\n\n\n\n\n";
    [self.p writeValue:[text dataUsingEncoding:gb]
       forCharacteristic:self.c
                    type:CBCharacteristicWriteWithResponse];
}
補充:訂閱可讀特徵
如果某個特徵支援通知,可以訂閱它,之後數值一有變化系統就會回呼:
[peripheral setNotifyValue:YES forCharacteristic:interestingCharacteristic];

// 資料更新時回呼
- (void)peripheral:(CBPeripheral *)peripheral
didUpdateValueForCharacteristic:(CBCharacteristic *)characteristic
             error:(NSError *)error;
想更深入的話,建議直接閱讀 Apple 的 CoreBluetooth Programming Guide。
- 上一篇文章: iOS 入門實作:按下按鈕顯示當前日期時間
- 下一篇文章: iOS 開發:GET 與 POST 的真相與實作