
iOS 數據持久化之 plist:讀寫、建目錄與自訂 Model 存檔
上一篇談過用 NSUserDefaults 保存使用者偏好,這次來看如何用 plist 與普通檔案保存結構化資料。實務上的分工是:不需要結構化查詢的資料交給 plist,需要條件查詢的則用 Core Data,畢竟建立在資料庫上的查詢要方便得多。
本文涵蓋:讀寫 plist、建立子目錄、Library 與 Document 目錄的差異,以及如何把自訂 Model 存進 plist。
Library 目錄與 Document 目錄
Document 存放的是暴露給使用者的資料檔案,使用者可見、可讀寫。
Library 則是 App 代替使用者管理的資料,對使用者透明,那些使用者不該直接看到的檔案就放在這裡,同樣可讀寫。
取得 Library 目錄:
NSFileManager *defaultManager = [NSFileManager defaultManager];
NSURL *applicationSupportPath =
    [[defaultManager URLsForDirectory:NSLibraryDirectory inDomains:NSUserDomainMask] firstObject];
取得 Document 目錄:
NSFileManager *defaultManager = [NSFileManager defaultManager];
NSURL *applicationSupportPath =
    [[defaultManager URLsForDirectory:NSDocumentDirectory inDomains:NSUserDomainMask] firstObject];
讀寫 plist
plist 是 iOS 用來存放結構化資料的檔案格式,讀取時會直接以 Array 或 Dictionary 的形式返回,非常方便。
寫入:
NSArray *array = @[@1, @2, @3, @4];
NSFileManager *defaultManager = [NSFileManager defaultManager];
NSURL *documentPath =
    [[defaultManager URLsForDirectory:NSDocumentDirectory inDomains:NSUserDomainMask] firstObject];
NSString *fileSavePath = [documentPath.path stringByAppendingPathComponent:@"file.plist"];
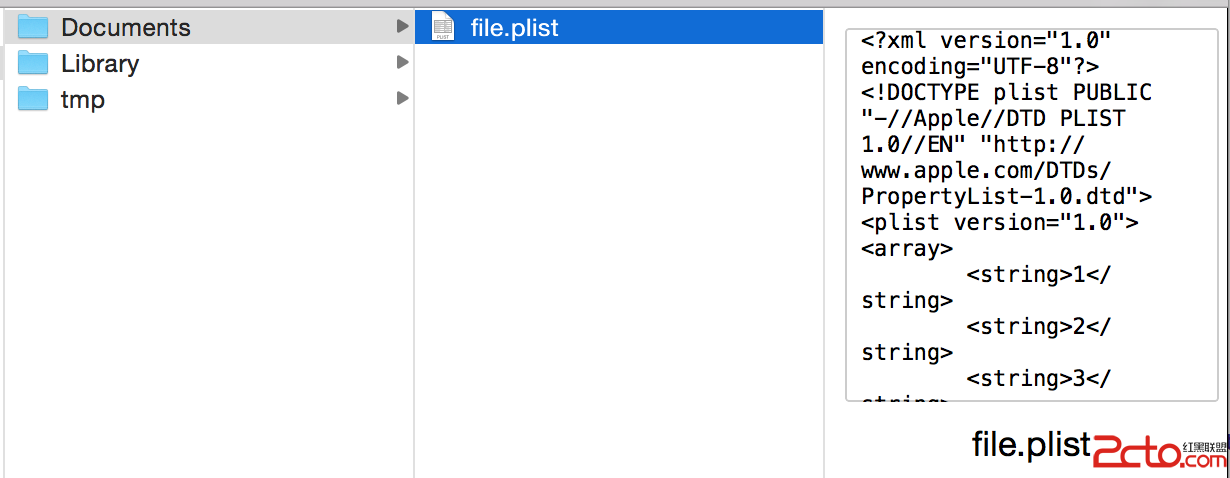
BOOL success = [array writeToFile:fileSavePath atomically:YES];
寫完之後可以打開模擬器沙盒確認檔案是否生成,success 的回傳值也能用來判斷寫入結果。
讀取:
NSFileManager *defaultManager = [NSFileManager defaultManager];
NSURL *documentPath =
    [[defaultManager URLsForDirectory:NSDocumentDirectory inDomains:NSUserDomainMask] firstObject];
NSString *fileSavePath = [documentPath.path stringByAppendingPathComponent:@"file.plist"];
NSArray *array = [NSArray arrayWithContentsOfFile:fileSavePath];
NSLog(@"%@", array);
要注意:若檔案不存在,讀取結果會是 nil,這裡不必額外判斷。
如何建立目錄
往自己新建的目錄裡寫檔案前,一定要先判斷目錄是否存在,否則程式會崩潰。
判斷是否存在:
- (BOOL)fileExistsAtPath:(NSString *)path isDirectory:(BOOL *)isDirectory
不存在時建立路徑:
- (BOOL)createDirectoryAtPath:(NSString *)path
      withIntermediateDirectories:(BOOL)createIntermediates
                       attributes:(NSDictionary *)attributes
                            error:(NSError **)error
其中 createIntermediates 決定是否連帶建立所有不存在的父目錄,例如 .../document/DicA/DicB/file.txt 可以一次建立多層;attributes 通常傳 nil,代表使用預設權限。
舉例:往 Application Support/Demo/ 寫入檔案,目錄不存在就順手建立。
NSDictionary *dic = @{@"name": @"Wenchenhuang", @"URL": @"blog.csdn.net/hello_hwc?viewmode=list"};
NSFileManager *defaultManager = [NSFileManager defaultManager];
NSURL *libraryPath =
    [[defaultManager URLsForDirectory:NSApplicationSupportDirectory inDomains:NSUserDomainMask] firstObject];
NSString *fileContainFloder = [libraryPath.path stringByAppendingPathComponent:@"DemoData"];

BOOL isDic = YES;
if (![defaultManager fileExistsAtPath:fileContainFloder isDirectory:&isDic]) {
    [defaultManager createDirectoryAtPath:fileContainFloder
              withIntermediateDirectories:YES
                               attributes:nil
                                    error:nil];
}

NSString *fileSavePath = [fileContainFloder stringByAppendingPathComponent:@"file.plist"];
BOOL success = [dic writeToFile:fileSavePath atomically:YES];
再看看沙盒結構:
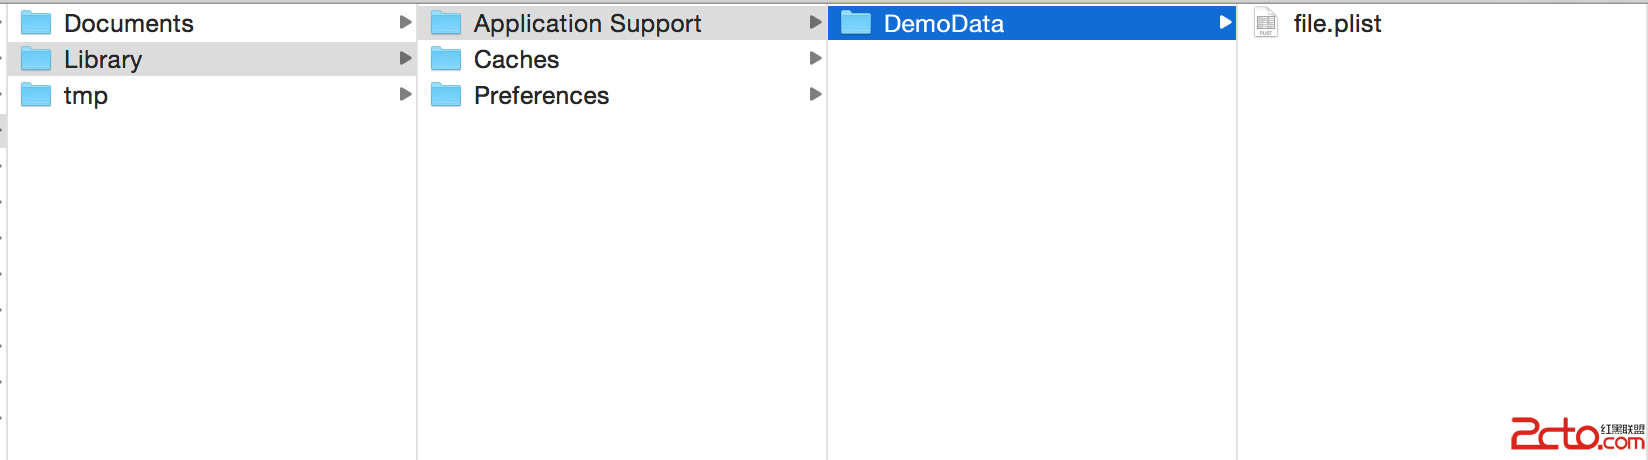
Application Support 是 Library 的子目錄,官方定位是用來存放對使用者透明的常見資料,Core Data 的存放位置也適合放在這裡。
如何保存自訂 Model
自訂的 Model 若想直接寫進 plist,必須遵循 NSCoding 協議,再用 NSKeyedArchiver 編碼成 NSData;讀出來時則用 NSKeyedUnarchiver 解碼。
定義一個 Model:
#import <Foundation/Foundation.h>

@interface DemoUser : NSObject <NSCoding>
@property (copy, nonatomic) NSString *name;
@property (copy, nonatomic) NSString *uniqueID;
-(instancetype)initWithName:(NSString *)name UnqiueID:(NSString *)uniqueID;
@end
實作 NSCoding 的兩個必要方法:
#import "DemoUser.h"

@implementation DemoUser

- (instancetype)initWithCoder:(NSCoder *)aDecoder {
    self = [super init];
    if (!self) {
        return nil;
    }
    _uniqueID = [aDecoder decodeObjectForKey:@"KUnqiueID"];
    _name = [aDecoder decodeObjectForKey:@"KName"];
    return self;
}

- (void)encodeWithCoder:(NSCoder *)aCoder {
    if (self.name != nil) {
        [aCoder encodeObject:self.name forKey:@"KName"];
    }
    if (self.uniqueID != nil) {
        [aCoder encodeObject:self.uniqueID forKey:@"KUnqiueID"];
    }
}

- (instancetype)initWithName:(NSString *)name UnqiueID:(NSString *)uniqueID {
    if (self = [super init]) {
        _name = name;
        _uniqueID = uniqueID;
    }
    return self;
}

@end
存入:
DemoUser *user = [[DemoUser alloc] initWithName:@"wenchenhuang" UnqiueID:@"123456"];
NSMutableDictionary *dic = [[NSMutableDictionary alloc] init];
[dic setObject:@1.0 forKey:@"version"];

NSData *data = [NSKeyedArchiver archivedDataWithRootObject:user];
[dic setObject:data forKey:@"user"];

// 取得路徑
NSFileManager *defaultManager = [NSFileManager defaultManager];
NSURL *applicationSupportPath =
    [[defaultManager URLsForDirectory:NSApplicationSupportDirectory inDomains:NSUserDomainMask] firstObject];
NSString *fileContainFloder = [applicationSupportPath.path stringByAppendingPathComponent:@"DemoData"];

BOOL isDic = YES;
if (![defaultManager fileExistsAtPath:fileContainFloder isDirectory:&isDic]) {
    [defaultManager createDirectoryAtPath:fileContainFloder
              withIntermediateDirectories:YES
                               attributes:nil
                                    error:nil];
}

NSString *fileSavePath = [fileContainFloder stringByAppendingPathComponent:@"user.plist"];
BOOL success = [dic writeToFile:fileSavePath atomically:YES];
讀出:
NSFileManager *defaultManager = [NSFileManager defaultManager];
NSURL *applicationSupportPath =
    [[defaultManager URLsForDirectory:NSApplicationSupportDirectory inDomains:NSUserDomainMask] firstObject];
NSString *filePath = [applicationSupportPath.path stringByAppendingPathComponent:@"DemoData/user.plist"];

NSDictionary *dic = [NSDictionary dictionaryWithContentsOfFile:filePath];
NSString *version = [dic objectForKey:@"version"];
NSData *data = [dic objectForKey:@"user"];
DemoUser *user = [NSKeyedUnarchiver unarchiveObjectWithData:data];
NSLog(@"%@ %@", user.name, user.uniqueID);
順帶一提,實作一個完善的 Model 類還牽涉 NSCopying、hash、isEqual 等方法,那已經超出本文範圍,留待後續再談。
- 上一篇文章: iOS 軟鍵盤遮擋 UITableView 輸入框的解法
- 下一篇文章: iOS 載入動態圖(GIF)的兩種實作方式