
iOS UITextField 詳解:屬性、委派方法與鍵盤控制
UITextField 是使用者輸入的第一道關卡,可設定的項目非常多。本文把常用屬性、委派方法與鍵盤相關設定系統整理一次。
一、建立與外觀
// 初始化並設定位置與大小
UITextField *text = [[UITextField alloc] initWithFrame:CGRectMake(20, 20, 130, 30)];

// 邊框樣式(只有設定了才會顯示邊框)
text.borderStyle = UITextBorderStyleRoundedRect;

typedef enum {
    UITextBorderStyleNone,
    UITextBorderStyleLine,
    UITextBorderStyleBezel,
    UITextBorderStyleRoundedRect
} UITextBorderStyle;

// 背景色;若改用自訂背景圖片,邊框會被忽略
text.backgroundColor = [UIColor whiteColor];

// 自訂背景圖(一般 / 禁用狀態)
text.background         = [UIImage imageNamed:@"dd.png"];
text.disabledBackground = [UIImage imageNamed:@"cc.png"];

// 佔位提示文字
text.placeholder = @"password";

// 字型與顏色
text.font      = [UIFont fontWithName:@"Arial" size:20.0f];
text.textColor = [UIColor redColor];

// 清除按鈕的顯示時機
text.clearButtonMode = UITextFieldViewModeAlways;

typedef enum {
    UITextFieldViewModeNever,            // 從不出現
    UITextFieldViewModeWhileEditing,     // 編輯時出現
    UITextFieldViewModeUnlessEditing,    // 除編輯外都出現
    UITextFieldViewModeAlways            // 一直出現
} UITextFieldViewMode;

// 初始文字
text.text = @"一開始就在輸入框的文字";

// 密碼輸入:每打一個字就變圓點
text.secureTextEntry = YES;

// 是否自動糾錯
text.autocorrectionType = UITextAutocorrectionTypeNo;

// 再次編輯時清空舊內容
text.clearsOnBeginEditing = YES;

// 對齊方式(水平由 textAlignment,垂直由 contentVerticalAlignment)
text.textAlignment = NSTextAlignmentLeft;
text.contentVerticalAlignment = UIControlContentVerticalAlignmentCenter;

// 文字過長時自動縮小字型以適應寬度
text.adjustsFontSizeToFitWidth = YES;
text.minimumFontSize = 20;
二、鍵盤相關設定
// 鍵盤類型
text.keyboardType = UIKeyboardTypeNumberPad;

typedef enum {
    UIKeyboardTypeDefault,                  // 預設,支援所有字符
    UIKeyboardTypeASCIICapable,             // 支援 ASCII
    UIKeyboardTypeNumbersAndPunctuation,    // 電話鍵盤,含 + * #
    UIKeyboardTypeURL,                      // 含 .com 快捷鍵
    UIKeyboardTypeNumberPad,                // 純數字
    UIKeyboardTypePhonePad,                 // 電話鍵盤
    UIKeyboardTypeNamePhonePad,             // 電話鍵盤,可輸入人名
    UIKeyboardTypeEmailAddress,             // 電子郵件
    UIKeyboardTypeDecimalPad,               // 數字含小數點
    UIKeyboardTypeTwitter                   // 方便輸入 @ 與 #
} UIKeyboardType;

// 首字母大寫策略
text.autocapitalizationType = UITextAutocapitalizationTypeNone;

typedef enum {
    UITextAutocapitalizationTypeNone,          // 不自動大寫
    UITextAutocapitalizationTypeWords,         // 每單詞首字母大寫
    UITextAutocapitalizationTypeSentences,     // 句首大寫
    UITextAutocapitalizationTypeAllCharacters  // 全部大寫
} UITextAutocapitalizationType;

// Return 鍵的樣式
text.returnKeyType = UIReturnKeyDone;

typedef enum {
    UIReturnKeyDefault, UIReturnKeyGo, UIReturnKeyGoogle, UIReturnKeyJoin,
    UIReturnKeyNext, UIReturnKeyRoute, UIReturnKeySearch, UIReturnKeySend,
    UIReturnKeyYahoo, UIReturnKeyEmergencyCall
} UIReturnKeyType;

// 鍵盤外觀(淺色 / 深色)
text.keyboardAppearance = UIKeyboardAppearanceDefault;
三、左右內嵌圖示與代理
text.delegate = self;
[self.window addSubview:text];

// 右側圖示,左側用 leftView 同理
UIImageView *image = [[UIImageView alloc] initWithImage:[UIImage imageNamed:@"right.png"]];
text.rightView = image;
text.rightViewMode = UITextFieldViewModeAlways;
四、點擊 Return 收起鍵盤
類別需遵循 UITextFieldDelegate,然後在委派方法中呼叫 resignFirstResponder:
- (BOOL)textFieldShouldReturn:(UITextField *)textField {
    [textField resignFirstResponder];
    return YES;
}
五、覆寫繪製行為
除了屬性設定,你還可以覆寫下列方法來完全自訂各區域的邊界與繪製方式。每個方法都回傳一個 CGRect。
- (CGRect)textRectForBounds:(CGRect)bounds;          // 文字區域
- (void)drawTextInRect:(CGRect)rect;                  // 文字繪製
- (CGRect)placeholderRectForBounds:(CGRect)bounds;    // 佔位符區域
- (void)drawPlaceholderInRect:(CGRect)rect;           // 佔位符繪製
- (CGRect)borderRectForBounds:(CGRect)bounds;         // 邊緣區域
- (CGRect)editingRectForBounds:(CGRect)bounds;        // 編輯區域
- (CGRect)clearButtonRectForBounds:(CGRect)bounds;    // 清除按鈕位置
- (CGRect)leftViewRectForBounds:(CGRect)bounds;
- (CGRect)rightViewRectForBounds:(CGRect)bounds;
覆寫 draw 系列方法時,呼叫 super 可保留系統預設樣式再疊加;若要完全自繪則不必呼叫。調整 clearButton 的 size 要小心,尺寸與原圖不符會導致圖示變形。
六、UITextFieldDelegate 委派方法
// 是否允許開始編輯
- (BOOL)textFieldShouldBeginEditing:(UITextField *)textField {
    return YES;
}

// 開始編輯(即將成為 first responder)
- (void)textFieldDidBeginEditing:(UITextField *)textField {
}

// 是否允許結束編輯;回傳 NO 可阻止其讓出 first responder,
// 對即時訊息這類必須持續輸入的欄位很有用
- (BOOL)textFieldShouldEndEditing:(UITextField *)textField {
    return YES;
}

// 內容即將變更。range 指出被改動的位置,回傳 NO 可攔下這次輸入
- (BOOL)textField:(UITextField *)textField
shouldChangeCharactersInRange:(NSRange)range
replacementString:(NSString *)string {
    return YES;
}

// 是否允許清除內容
- (BOOL)textFieldShouldClear:(UITextField *)textField {
    return YES;
}

// 是否允許按 Return 結束編輯
- (BOOL)textFieldShouldReturn:(UITextField *)textField {
    [textField resignFirstResponder];
    return YES;
}
七、通知
UITextField 衍生自 UIControl,因此除了標準事件外還有三個專屬通知:
UITextFieldTextDidBeginEditingNotification
UITextFieldTextDidChangeNotification
UITextFieldTextDidEndEditingNotification   // object 屬性存有最終文字
由於涉及鍵盤,下列通知也會一併送出:
UIKeyboardWillShowNotification   // 鍵盤顯示前
UIKeyboardDidShowNotification     // 鍵盤顯示後
UIKeyboardWillHideNotification    // 鍵盤隱藏前
UIKeyboardDidHideNotification     // 鍵盤隱藏後
八、限制輸入內容與長度
限制只能輸入特定字元:利用 NSCharacterSet 的反轉集過濾。
#define kAlphaNum @"ABCDEFGHIJKLMNOPQRSTUVWXYZabcdefghijklmnopqrstuvwxyz0123456789"

- (BOOL)textField:(UITextField *)textField
shouldChangeCharactersInRange:(NSRange)range
replacementString:(NSString *)string {
    NSCharacterSet *cs = [[NSCharacterSet characterSetWithCharactersInString:kAlphaNum] invertedSet];
    NSString *filtered = [[string componentsSeparatedByCharactersInSet:cs]
                          componentsJoinedByString:@""];
    return [string isEqualToString:filtered];
}
若限制純數字,可用 @"0123456789\n"。注意那個 \n 千萬別漏掉——少了它,Return 鍵的點擊事件不會觸發;用在 UISearchBar 上則會導致搜尋無法送出。
限制長度:
- (BOOL)textField:(UITextField *)textField
shouldChangeCharactersInRange:(NSRange)range
replacementString:(NSString *)string {
    if ([string isEqualToString:@"\n"]) return YES;   // 換行放行

    NSString *toBeString = [textField.text stringByReplacingCharactersInRange:range
                                                                  withString:string];
    if (textField == self.myTextField && toBeString.length > 20) {
        textField.text = [toBeString substringToIndex:20];
        UIAlertView *alert = [[UIAlertView alloc] initWithTitle:nil
                                                       message:@"超過最大字數不能輸入了"
                                                      delegate:nil
                                             cancelButtonTitle:@"Ok"
                                             otherButtonTitles:nil];
        [alert show];
        return NO;
    }
    return YES;
}
UITextView 沒有 shouldChange 委派,改用 textViewDidChange: 搭配 tag 判斷並自行截斷即可。
九、Interface Builder 欄位對照
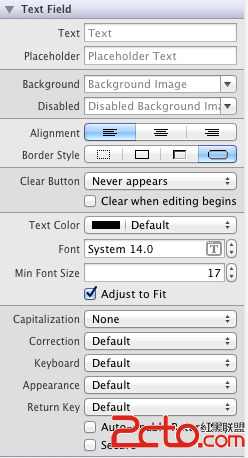
1. Text:預設文字。2. Placeholder:灰色提示文字,輸入後自動消失。3. Background:背景。4. Disabled:禁止編輯。5–6. 對齊方式與 Border Style。7. Clear Button 出現時機(Never / while editing / unless editing / always)。8. Clear when editing begins:開始編輯時清空舊內容。9–10. 文字顏色與字型。11. Min Font Size。12. Adjust To Fit:文字隨框縮小,需與 Min Font Size 搭配。
13. Capitalization:None / Words(單詞首字母)/ Sentences(句首)/ All Characters。14. Correction:拼寫檢查,預設開啟。15. Keyboard:鍵盤類型。16. Appearance:鍵盤外觀。17. Return Key:Search、Return、Done 等。18. Auto-enable Return Key:至少輸入一個字元後 Return 鍵才可用。19. Secure:密碼模式,字元顯示為星號。
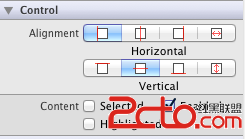
inspector 下方的 Alignment Horizontal / Vertical 對應水平與垂直對齊;Selected、Enabled、Highlighted 三個狀態則決定該欄位是否被選中、可用、高亮。