
iOS 設定頁實作:頭像、密碼、客服與關於我們的完整列表
編輯:iOS 開發綜合
頁面結構
典型的「設定與幫助」頁包含幾個區塊:修改頭像、修改密碼、聯絡客服、幫助中心、免責聲明、關於我們,底部再放一顆登出按鈕與版本號。這裡以 UITableView 搭配自訂的 item 模型來組織,讓每一列的樣式與點擊行為都能獨立設定。
頭檔
 @interface IndexSetting600ViewController : CYTableViewController
@end
實作檔:宣告各列模型
 @implementation IndexSetting600ViewController {
    UserFigureEditingItem *_figureItem;              // 修改頭像
    PortraitPickerViewController *_portraitPicker;   // 頭像選擇器
    Setting600Item *_changeSecret;                   // 修改密碼
    Setting600Item *_chunyuTel;                      // 移動客服
    Setting600Item *_helpItem;                       // 幫助
    Setting600Item *_shengMing;                      // 聲明
    Setting600Item *_aboutUs;                        // 關於我們
    Setting600SeparateItem *_separateItem;           // 空白間隔
    FilledColorButton *_logoutButton;                // 登出
    UIView *_logoutFooterView;
}
建立列表項目與點擊行為
每一列透過 attachToObject:tapBlock: 綁定點擊時要做的事,寫法相當直覺:
 // 修改密碼
_changeSecret = [[Setting600Item alloc] initWithTitle:@"修改登錄密碼"];
_changeSecret.type = kSetting600Top;
[self.tableViewActions attachToObject:_changeSecret tapBlock:^BOOL(id object, id target, NSIndexPath *indexPath) {
    ModifyPasswordViewController *controller = [ModifyPasswordViewController new];
    [_self cyPresentViewController:controller animated:YES];
    return NO;
}];

// 移動客服:直接撥號
_chunyuTel = [[Setting600Item alloc] initWithTitle:@"移動客服"];
[self.tableViewActions attachToObject:_chunyuTel tapBlock:^BOOL(id object, id target, NSIndexPath *indexPath) {
    NSString *phone = @"4001100866";
    [[UIApplication sharedApplication] openURL:
        [NSURL URLWithString:[NSString stringWithFormat:@"tel://%@", phone]]];
    return YES;
}];

// 幫助與聲明:載入本地 HTML
_helpItem = [[Setting600Item alloc] initWithTitle:@"幫助"];
[self.tableViewActions attachToObject:_helpItem tapBlock:^BOOL(id object, id target, NSIndexPath *indexPath) {
    CYWebFromLocalViewController *controller = [[CYWebFromLocalViewController alloc]
        initWithQuery:@{@"title": @"幫助", @"local_name": @"help"}];
    [self.navigationController pushViewController:controller animated:YES];
    return YES;
}];
依登入狀態切換列表內容
未登入時要隱藏頭像與改密碼,登出按鈕也要收起來,這些判斷集中在 createModel 中:
 - (void)createModel {
    NSArray *dataItems;
    if ([User hasLoggedIn]) {
        dataItems = @[_separateItem, _figureItem, _separateItem, _changeSecret,
                      _chunyuTel, _helpItem, _shengMing, _aboutUs, _separateItem];
    } else {
        _logoutButton.hidden = YES;
        _logoutFooterView.height = 40;
        dataItems = @[_separateItem, _chunyuTel, _helpItem, _shengMing, _aboutUs, _separateItem];
    }
    self.tableViewModel = [[NITableViewModel alloc] initWithListArray:dataItems
                                                            delegate:self.cellFactory];
}
登出流程
登出不只是清掉登入狀態,還要同步更新其他頁面。這裡用 NSNotification 廣播出去,讓 badge 等相關 UI 一併刷新:
 - (void)onLogOutBtnpressed:(UIButton *)sender {
    [[AutoLoginManager sharedInstance] logout];
    [self createModel];
    [self backToLastController:nil];
    [[NSNotificationCenter defaultCenter] postNotificationName:kNotificationUserLogout object:nil];
    [[NSNotificationCenter defaultCenter] postNotificationName:kNotificationCheckBadge object:nil];
}
效果預覽
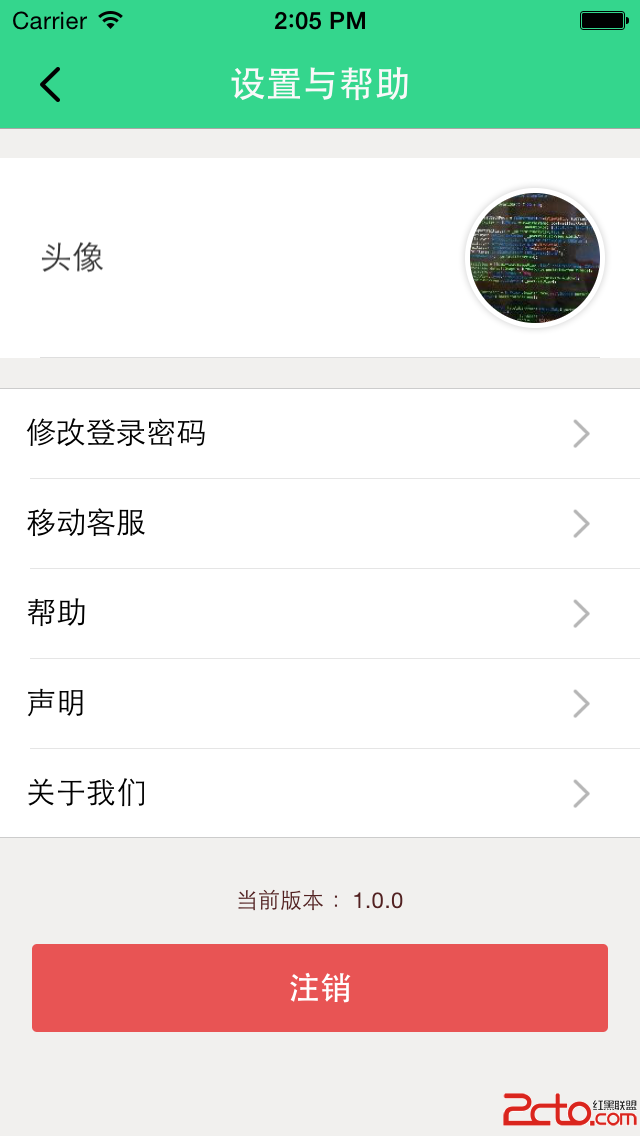
這個頁面的設計值得借鏡的地方是「資料驅動」:列的內容、順序、點擊行為全部集中在一個方法裡宣告,要增減功能只需改陣列,不必去動 tableView 的 dataSource 一堆 if-else。
- 上一篇文章: iOS 開發練習:猜數字遊戲與類別封裝
- 下一篇文章: iOS GET 網絡請求:同步與異步兩種寫法對照