
iOS 文字屬性字典:八個常用 NSAttributedString 參數實戰
編輯:iOS 開發綜合
需要同時控制字體、顏色、段落對齊、底線、陰影時,NSAttributedString 是唯一答案。但它的參數是一個字典,到底該放哪些 key、每個 key 吃什麼型別的值,第一次接觸時往往一頭霧水。這裡把最常用的八個整理成一份速查表。
起點:drawInRect:withAttributes:
先把最簡單的字體設定跑起來。這個 NSString 的方法可以直接把字串畫到 view 上:
- (void)drawRect:(CGRect)rect {
    self.backgroundColor = [UIColor whiteColor];

    NSString *attrString = @"hello word";

    NSDictionary *attrs = @{
        NSFontAttributeName: [UIFont fontWithName:@"AmericanTypewriter" size:30]
    };

    [attrString drawInRect:CGRectMake(20, 120, 320, 200) withAttributes:attrs];
}
一、NSForegroundColorAttributeName — 文字顏色
NSDictionary *attrs = @{
    NSFontAttributeName: [UIFont fontWithName:@"AmericanTypewriter" size:30],
    NSForegroundColorAttributeName: [UIColor redColor]
};
二、NSParagraphStyleAttributeName — 段落格式
這個 key 吃的是 NSParagraphStyle 物件(實務上用 NSMutableParagraphStyle 才能改),對齊、行距、段首縮排、斷行規則都靠它。
NSMutableParagraphStyle *paragraph = [[NSMutableParagraphStyle alloc] init];
paragraph.alignment = NSTextAlignmentCenter;   // 居中

NSDictionary *attrs = @{
    NSFontAttributeName: [UIFont fontWithName:@"AmericanTypewriter" size:30],
    NSForegroundColorAttributeName: [UIColor redColor],
    NSParagraphStyleAttributeName: paragraph
};

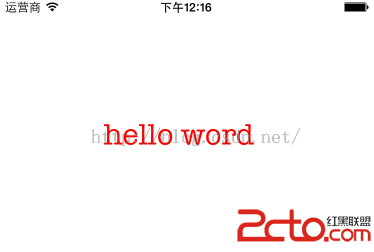
[attrString drawInRect:CGRectMake(20, 120, 320, 200) withAttributes:attrs];
效果(置中):
三、NSBackgroundColorAttributeName — 文字背景色
NSDictionary *attrs = @{
    NSFontAttributeName: [UIFont fontWithName:@"AmericanTypewriter" size:30],
    NSForegroundColorAttributeName: [UIColor redColor],
    NSParagraphStyleAttributeName: paragraph,
    NSBackgroundColorAttributeName: [UIColor blueColor]
};
效果:

四、NSStrokeWidthAttributeName + NSStrokeColorAttributeName — 描邊
這兩個必須成對使用:只給顏色沒有寬度是不會有描邊的。而且一旦啟用描邊,前景色就會失效——這是很多人踩過的坑。
NSDictionary *attrs = @{
    NSFontAttributeName: [UIFont fontWithName:@"AmericanTypewriter" size:30],
    NSForegroundColorAttributeName: [UIColor redColor],
    NSParagraphStyleAttributeName: paragraph,
    NSStrokeWidthAttributeName: @3,                    // 描邊寬度
    NSStrokeColorAttributeName: [UIColor greenColor]   // 設了這個,前景色就沒作用了
};
效果:

五、NSStrikethroughStyleAttributeName — 刪除線
值是一個整數,代表線條的粗細(1 為大約 1pt)。
NSDictionary *attrs = @{
    NSFontAttributeName: [UIFont fontWithName:@"AmericanTypewriter" size:30],
    NSForegroundColorAttributeName: [UIColor redColor],
    NSStrokeWidthAttributeName: @3,
    NSStrokeColorAttributeName: [UIColor greenColor],
    NSStrikethroughStyleAttributeName: @1
};
效果:

六、NSUnderlineStyleAttributeName — 底線
值是一個枚舉,可以單獨使用,也能用位移運算組合成雙線、粗線、虛線打點等樣式。
NSDictionary *attrs = @{
    NSFontAttributeName: [UIFont fontWithName:@"AmericanTypewriter" size:30],
    NSForegroundColorAttributeName: [UIColor redColor],
    NSStrokeWidthAttributeName: @3,
    NSStrokeColorAttributeName: [UIColor greenColor],
    NSUnderlineStyleAttributeName: @(NSUnderlineStyleSingle)
};
效果:

七、NSShadowAttributeName — 陰影
這個 key 吃的是 NSShadow 物件,可以分別控制模糊半徑、顏色與偏移。
NSShadow *shadow = [[NSShadow alloc] init];
shadow.shadowBlurRadius = 5;                       // 模糊程度
shadow.shadowColor = [UIColor blueColor];          // 陰影顏色
shadow.shadowOffset = CGSizeMake(6, 6);            // 相對原位置的偏移

NSDictionary *attrs = @{
    NSFontAttributeName: [UIFont fontWithName:@"AmericanTypewriter" size:30],
    NSForegroundColorAttributeName: [UIColor redColor],
    NSStrokeWidthAttributeName: @3,
    NSStrokeColorAttributeName: [UIColor greenColor],
    NSUnderlineStyleAttributeName: @(NSUnderlineStyleSingle),
    NSShadowAttributeName: shadow
};
效果:

八、NSObliquenessAttributeName — 文字傾斜
值為浮點數,代表傾斜的量。
NSDictionary *attrs = @{
    NSFontAttributeName: [UIFont fontWithName:@"AmericanTypewriter" size:30],
    NSForegroundColorAttributeName: [UIColor redColor],
    NSStrokeWidthAttributeName: @3,
    NSStrokeColorAttributeName: [UIColor greenColor],
    NSUnderlineStyleAttributeName: @(NSUnderlineStyleSingle),
    NSShadowAttributeName: shadow,
    NSObliquenessAttributeName: @1
};
效果:

速查總表
NSFontAttributeName→ UIFontNSForegroundColorAttributeName→ UIColor(文字色)NSParagraphStyleAttributeName→ NSParagraphStyle(對齊、行距)NSBackgroundColorAttributeName→ UIColor(文字底色)NSStrokeWidthAttributeName+NSStrokeColorAttributeName→ NSNumber + UIColorNSStrikethroughStyleAttributeName→ NSNumber(刪除線)NSUnderlineStyleAttributeName→ NSNumber 枚舉(底線)NSShadowAttributeName→ NSShadowNSObliquenessAttributeName→ NSNumber(傾斜)
實務提醒
- 不同範圍用不同樣式:想要「同一段文字裡只有幾個字變色」,要用
NSMutableAttributedString搭配addAttribute:value:range:,而不是整段共用一個字典。 - 描邊會吃掉前景色:若兩者都想要,通常靠
NSStrokeColorAttributeName搭配負數寬度(描在內側)來繞,或直接改用陰影模擬。 - 顯示元件:
UILabel用attributedText屬性,UITextView一樣,drawInRect:withAttributes:則是用在自繪的drawRect:裡。 - 還有
NSKernAttributeName(字距)、NSLigatureAttributeName(連字)、NSTextEffectAttributeName(輪廓效果)等較少用的 key,有興趣可以再往下研究。