
iOS 學習筆記:打造圓角效果的 UITableView 分組單元格
編輯:iOS 開發綜合
自 iOS 7 起,UITableView 的邊角風格從早期的圓角改為直角,這與扁平化設計的潮流相呼應。不過在某些場景下,如果列表寬度沒有拉伸到與父視圖等寬,直角看起來就會略顯生硬。這時候,讓分組列表(Group TableView)的每個 cell 帶上圓角,視覺上就柔和多了。
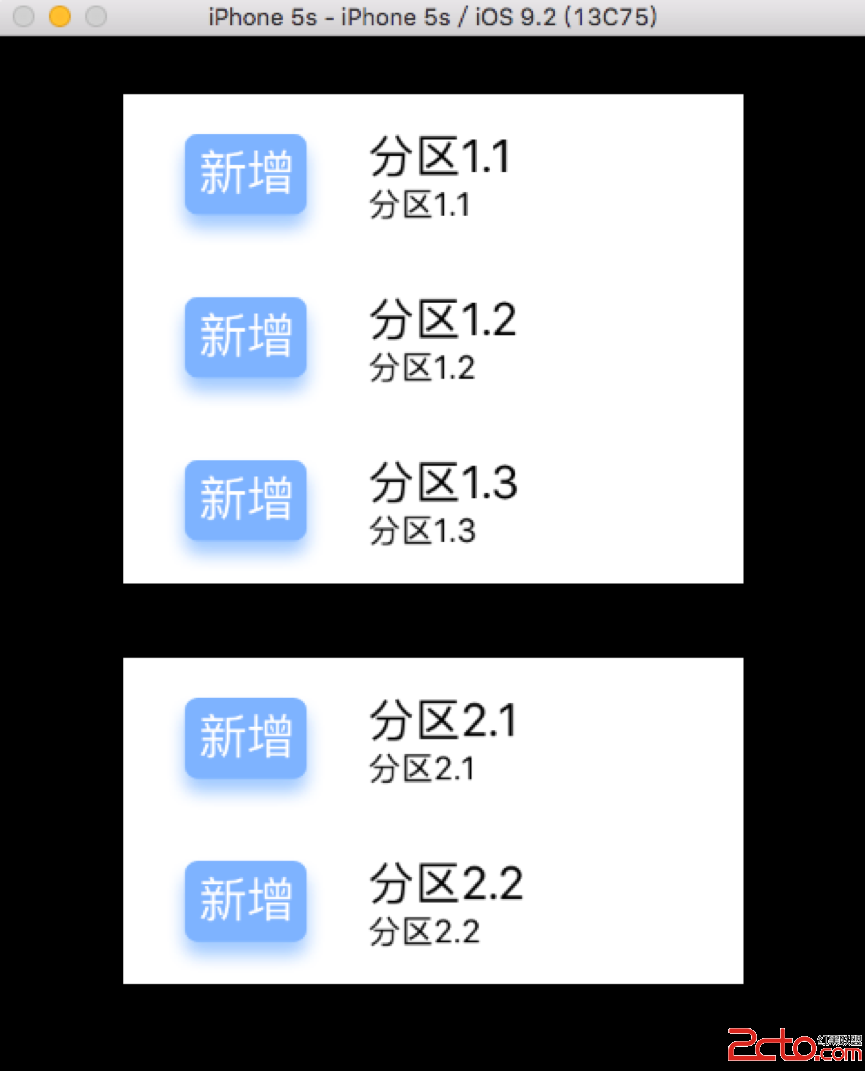 vcfQp7n7tcS7sKOs1PK74c/Uyr7UssjzzsK6zaOs08O7p7vhvvW1w7rDv7SjrMzl0em63LrDoaPI58/CzbzL+cq+oaM8L3A+DQo8cD48aW1nIGFsdD0="圓角矩形單元格" src="/uploadfile/Collfiles/20160401/20160401094625478.png" title="\" />
要達到這個效果,主要是透過 Core Graphics API 進行圖層重繪。實作時,我們在 UITableViewDelegate 的 willDisplayCell 方法裡對 cell 做自定義處理。
核心思路
整體流程可以濃縮成一句話:把 cell 背景設為透明 → 建立一個圖層 → 繪製圓角矩形路徑 → 將圖層塞給一個 UIView → 最後把這個 UIView 設為 cell 的 backgroundView。千言萬語不如一段程式碼,下面附上帶詳細註解的核心實作。
/**
 * 即將為每一列 row 繪製 cell,可自定義顯示樣式
 */
- (void)tableView:(UITableView *)tableView willDisplayCell:(UITableViewCell *)cell forRowAtIndexPath:(NSIndexPath *)indexPath {
    if ([cell respondsToSelector:@selector(tintColor)]) {
        if (tableView == self.mainTableView) {
            // 圓角弧度半徑
            CGFloat cornerRadius = 5.f;
            // 將 cell 背景設為透明,否則原本的背景色不會被覆蓋
            cell.backgroundColor = UIColor.clearColor;
            // 建立 shapeLayer
            CAShapeLayer *layer = [[CAShapeLayer alloc] init];
            // 建立可變的路徑句柄,用於保存繪圖資訊
            CGMutablePathRef pathRef = CGPathCreateMutable();
            // 取得 cell 的尺寸
            CGRect bounds = CGRectInset(cell.bounds, 0, 0);
            // 判斷是否為分組中的第一行、最後一行或中間行
            BOOL addLine = NO;
            if (indexPath.row == 0) {
                // 第一行:從左下角出發,繪製左上角與右上角的圓角
                CGPathMoveToPoint(pathRef, nil, CGRectGetMinX(bounds), CGRectGetMaxY(bounds));
                CGPathAddArcToPoint(pathRef, nil, CGRectGetMinX(bounds), CGRectGetMinY(bounds), CGRectGetMidX(bounds), CGRectGetMinY(bounds), cornerRadius);
                CGPathAddArcToPoint(pathRef, nil, CGRectGetMaxX(bounds), CGRectGetMinY(bounds), CGRectGetMaxX(bounds), CGRectGetMidY(bounds), cornerRadius);
                CGPathAddLineToPoint(pathRef, nil, CGRectGetMaxX(bounds), CGRectGetMaxY(bounds));
                addLine = YES;
            } else if (indexPath.row == [tableView numberOfRowsInSection:indexPath.section] - 1) {
                // 最後一行:繪製左下角與右下角的圓角
                CGPathMoveToPoint(pathRef, nil, CGRectGetMinX(bounds), CGRectGetMinY(bounds));
                CGPathAddArcToPoint(pathRef, nil, CGRectGetMinX(bounds), CGRectGetMaxY(bounds), CGRectGetMidX(bounds), CGRectGetMaxY(bounds), cornerRadius);
                CGPathAddArcToPoint(pathRef, nil, CGRectGetMaxX(bounds), CGRectGetMaxY(bounds), CGRectGetMaxX(bounds), CGRectGetMidY(bounds), cornerRadius);
                CGPathAddLineToPoint(pathRef, nil, CGRectGetMaxX(bounds), CGRectGetMinY(bounds));
            } else {
                // 中間行:直接畫矩形,不帶圓角
                CGPathAddRect(pathRef, nil, bounds);
                addLine = YES;
            }
            // 把繪製好的路徑賦值給圖層
            layer.path = pathRef;
            // 凡是透過 Quartz2D 中 create/copy/retain 建立的值都要手動釋放
            CFRelease(pathRef);
            // 依路徑填充顏色
            layer.fillColor = [UIColor colorWithWhite:1.f alpha:0.8f].CGColor;
            // 加上分隔線圖層
            if (addLine == YES) {
                CALayer *lineLayer = [[CALayer alloc] init];
                CGFloat lineHeight = (1.f / [UIScreen mainScreen].scale);
                lineLayer.frame = CGRectMake(CGRectGetMinX(bounds), bounds.size.height - lineHeight, bounds.size.width, lineHeight);
                lineLayer.backgroundColor = tableView.separatorColor.CGColor;
                [layer addSublayer:lineLayer];
            }
            // 建立與 cell 同尺寸的 view
            UIView *roundView = [[UIView alloc] initWithFrame:bounds];
            [roundView.layer insertSublayer:layer atIndex:0];
            roundView.backgroundColor = UIColor.clearColor;
            cell.backgroundView = roundView;
        }
    }
}
關鍵函式解析
CGPathAddArcToPoint(pathRef, nil, x1, y1, x2, y2, r);
// 把起點到終點之間的直線與圓角一併寫入 path
上圖中標紅的邊線,就是被寫進 path 的部分。
繪製路徑的步驟拆解
以列表的第一行為例:
// 初始起點設為 cell 的左下角
CGPathMoveToPoint(pathRef, nil, CGRectGetMinX(bounds), CGRectGetMaxY(bounds));
// 從左下角連到左上角再連到頂部中點,於轉角處繪出半徑 r 的圓角
CGPathAddArcToPoint(pathRef, nil, CGRectGetMinX(bounds), CGRectGetMinY(bounds), CGRectGetMidX(bounds), CGRectGetMinY(bounds), cornerRadius);
// 繪出右上角圓角,包含頂端直線與右上角弧線
CGPathAddArcToPoint(pathRef, nil, CGRectGetMaxX(bounds), CGRectGetMinY(bounds), CGRectGetMaxX(bounds), CGRectGetMidY(bounds), cornerRadius);
// 補上右邊直線,形成「上兩角為圓角」的矩形
// 接著呼叫 layer.fillColor = ... 依路徑填色,相當於渲染
CGPathAddLineToPoint(pathRef, nil, CGRectGetMaxX(bounds), CGRectGetMaxY(bounds));
這樣一來,一個漂亮的圓角 cell 就完成了!完整專案可下載:CornerRadiusTableView。