
iOS 系統原生二維碼與條碼掃描實作
編輯:iOS 開發綜合
本文示範如何運用系統自帶的能力實現二維碼掃描:點擊頁面上的按鈕後建立掃描畫面。仔細看的話會發現標題被改了、返回鍵也被隱藏,這些自己寫即可,與本文無關。至於那條上下跑動的綠線,別擔心,屬正常現象。
實現效果如下:
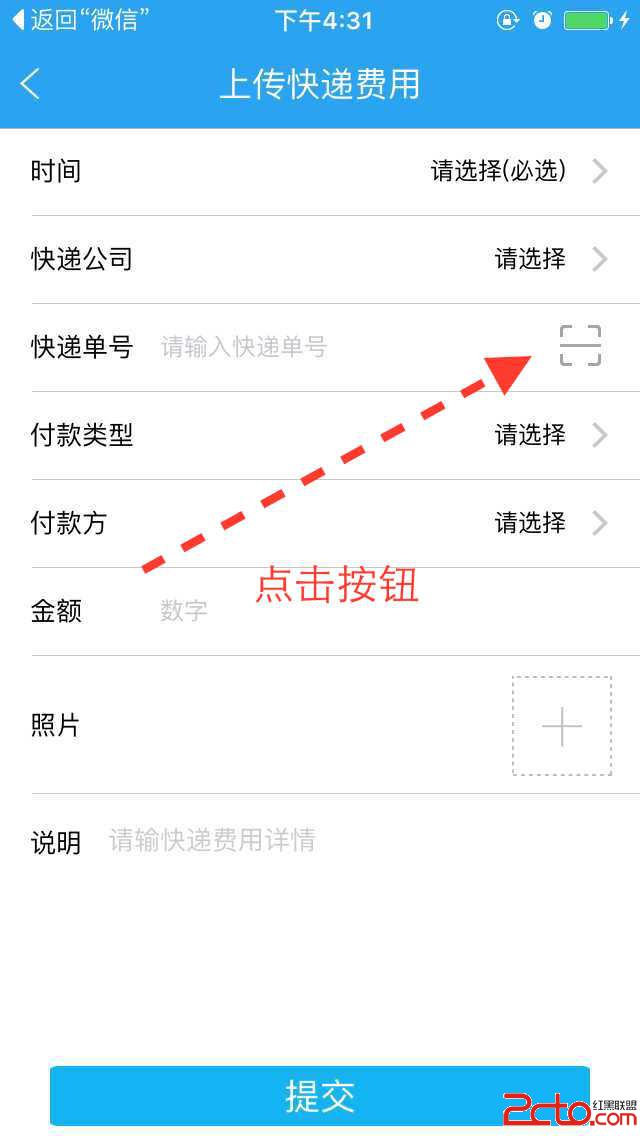
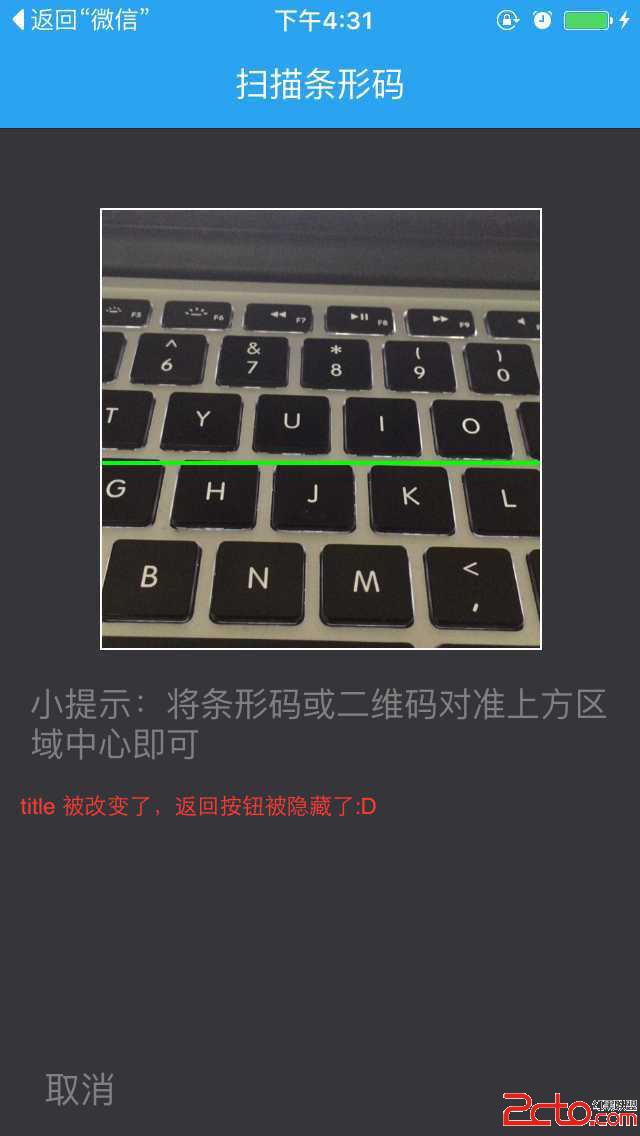
1. 在專案中加入 AVFoundation.framework 框架。
2. 宣告代理 AVCaptureMetadataOutputObjectsDelegate,並 define 幾個用來畫框、畫線的常數:
#define SCANVIEW_EdgeTop 40.0 #define SCANVIEW_EdgeLeft 50.0 #define TINTCOLOR_ALPHA 0.2 #define DARKCOLOR_ALPHA 0.5 #define VIEW_WIDTH [UIScreen mainScreen].bounds.size.width #define VIEW_HEIGHT [UIScreen mainScreen].bounds.size.height
3. 宣告以下屬性:
AVCaptureSession * session;//輸入輸出的中間橋梁 UIView *AVCapView;//放置掃描框、取消按鈕、說明 label UIView *_QrCodeline;//上下移動的綠色線條 NSTimer *_timer;
4. 在觸發方法中(此處為點擊掃描按鈕)建立掃描畫面並開始掃描:
UIView *tempView = [[UIView alloc]initWithFrame:CGRectMake(0, 0, 320, [UIScreen mainScreen].bounds.size.height )]; AVCapView = tempView; AVCapView.backgroundColor = [UIColor colorWithRed:54.f/255 green:53.f/255 blue:58.f/255 alpha:1]; UIButton *cancelBtn = [[UIButton alloc]initWithFrame:CGRectMake(15, [UIScreen mainScreen].bounds.size.height - 100, 50, 25)]; UILabel *label = [[UILabel alloc]initWithFrame:CGRectMake(15, 268, 290, 60)]; label.numberOfLines = 0; label.text = @"小提示:將條形碼或二維碼對准上方區域中心即可"; label.textColor = [UIColor grayColor]; [cancelBtn setTitle:@"取消" forState: UIControlStateNormal]; [cancelBtn setTitleColor:[UIColor grayColor] forState:UIControlStateNormal]; [cancelBtn addTarget:self action:@selector(touchAVCancelBtn) forControlEvents:UIControlEventTouchUpInside]; [AVCapView addSubview:label]; [AVCapView addSubview:cancelBtn]; [self.view addSubview:AVCapView]; UIView *topView = [[UIView alloc] initWithFrame:CGRectMake(SCANVIEW_EdgeLeft, SCANVIEW_EdgeTop, VIEW_WIDTH- 2 * SCANVIEW_EdgeLeft, 1)]; topView.backgroundColor = [UIColor whiteColor]; [AVCapView addSubview:topView]; UIView *leftView = [[UIView alloc] initWithFrame:CGRectMake(SCANVIEW_EdgeLeft, SCANVIEW_EdgeTop , 1,VIEW_WIDTH - 2 * SCANVIEW_EdgeLeft )]; leftView.backgroundColor = [UIColor whiteColor]; [AVCapView addSubview:leftView]; UIView *rightView = [[UIView alloc] initWithFrame:CGRectMake(SCANVIEW_EdgeLeft + VIEW_WIDTH- 2 * SCANVIEW_EdgeLeft, SCANVIEW_EdgeTop , 1,VIEW_WIDTH - 2 * SCANVIEW_EdgeLeft + 1)]; rightView.backgroundColor = [UIColor whiteColor]; [AVCapView addSubview:rightView]; UIView *downView = [[UIView alloc] initWithFrame:CGRectMake(SCANVIEW_EdgeLeft, SCANVIEW_EdgeTop + VIEW_WIDTH- 2 * SCANVIEW_EdgeLeft,VIEW_WIDTH - 2 * SCANVIEW_EdgeLeft ,1 )]; downView.backgroundColor = [UIColor whiteColor]; [AVCapView addSubview:downView]; _QrCodeline = [[UIView alloc] initWithFrame:CGRectMake(SCANVIEW_EdgeLeft + 1, SCANVIEW_EdgeTop, VIEW_WIDTH- 2 * SCANVIEW_EdgeLeft - 1, 2)]; _QrCodeline.backgroundColor = [UIColor greenColor]; [AVCapView addSubview:_QrCodeline]; [UIView animateWithDuration:1.2 animations:^{ _QrCodeline.frame = CGRectMake(SCANVIEW_EdgeLeft + 1, VIEW_WIDTH - 2 * SCANVIEW_EdgeLeft + SCANVIEW_EdgeTop , VIEW_WIDTH - 2 * SCANVIEW_EdgeLeft - 1, 2); }]; [self performSelector:@selector(createTimer) withObject:nil afterDelay:0.4]; AVCaptureDevice * device = [AVCaptureDevice defaultDeviceWithMediaType:AVMediaTypeVideo]; AVCaptureDeviceInput * input = [AVCaptureDeviceInput deviceInputWithDevice:device error:nil]; AVCaptureMetadataOutput * output = [[AVCaptureMetadataOutput alloc]init]; [output setMetadataObjectsDelegate:self queue:dispatch_get_main_queue()]; session = [[AVCaptureSession alloc]init]; [session setSessionPreset:AVCaptureSessionPresetHigh]; [session addInput:input]; [session addOutput:output]; output.metadataObjectTypes=@[AVMetadataObjectTypeQRCode,AVMetadataObjectTypeEAN13Code, AVMetadataObjectTypeEAN8Code, AVMetadataObjectTypeCode128Code]; AVCaptureVideoPreviewLayer * layer = [AVCaptureVideoPreviewLayer layerWithSession:session]; layer.videoGravity=AVLayerVideoGravityResizeAspectFill; layer.frame = CGRectMake(SCANVIEW_EdgeLeft, SCANVIEW_EdgeTop, VIEW_WIDTH- 2 * SCANVIEW_EdgeLeft, 220); [AVCapView.layer insertSublayer:layer atIndex:0]; [session startRunning];
5. 實作定時器與基準線的滾動動畫:
- (void)createTimer { _timer=[NSTimer scheduledTimerWithTimeInterval:1.1 target:self selector:@selector(moveUpAndDownLine) userInfo:nil repeats:YES]; } - (void)stopTimer { if ([_timer isValid] == YES) { [_timer invalidate]; _timer = nil; } } - (void)moveUpAndDownLine { CGFloat YY = _QrCodeline.frame.origin.y; if (YY != VIEW_WIDTH - 2 * SCANVIEW_EdgeLeft + SCANVIEW_EdgeTop ) { [UIView animateWithDuration:1.2 animations:^{ _QrCodeline.frame = CGRectMake(SCANVIEW_EdgeLeft + 1, VIEW_WIDTH - 2 * SCANVIEW_EdgeLeft + SCANVIEW_EdgeTop , VIEW_WIDTH - 2 * SCANVIEW_EdgeLeft - 1,2); }]; }else { [UIView animateWithDuration:1.2 animations:^{ _QrCodeline.frame = CGRectMake(SCANVIEW_EdgeLeft + 1, SCANVIEW_EdgeTop, VIEW_WIDTH - 2 * SCANVIEW_EdgeLeft - 1,2); }]; } }
6. 掃描成功後,在這個代理方法中處理結果:
-(void)captureOutput:(AVCaptureOutput *)captureOutput didOutputMetadataObjects:(NSArray *)metadataObjects fromConnection:(AVCaptureConnection *)connection{ if (metadataObjects.count>0) { AVMetadataMachineReadableCodeObject * metadataObject = [metadataObjects objectAtIndex : 0 ]; NSLog(@"%@",metadataObject.stringValue); [session stopRunning]; [self stopTimer]; [AVCapView removeFromSuperview]; } }
7. 若使用者不想掃描了,點擊取消按鈕:
- (void)touchAVCancelBtn{ [session stopRunning];[self stopTimer];[AVCapView removeFromSuperview]; }