
iOS 學習筆記 20 — MapKit 框架地圖開發(下)
一、地圖開發簡介
自 iOS 6.0 起,系統地圖不再採用谷歌數據,而是換上了蘋果自家的地圖方案;在中國大陸地區,其底圖數據主要由高德地圖提供。
在 iOS 平台上進行地圖開發,大致有三種思路:
一是使用 MapKit 框架,這種方式可以對地圖進行精細控制,並調用蘋果官方自帶的地圖應用;二是直接喚起系統地圖,適合場景簡單、無需精細控制的應用;三是接入第三方地圖 SDK。實際項目中用得最多的仍是 MapKit,因此本文重點講解它的用法。
二、MapKit 核心類
MapKit 的核心展示控件是 MKMapView。下面梳理它常用的屬性、對象方法與代理方法。
1. 常用屬性
/* 用戶位置跟蹤 */ @property (nonatomic) BOOL showsUserLocation;/*< 是否在地圖上標注用戶位置 */ @property (nonatomic, readonly) MKUserLocation *userLocation;/*< 用戶位置 */ @property (nonatomic) MKUserTrackingMode userTrackingMode;/*< 用戶跟蹤類型 */ typedef NS_ENUM(NSInteger, MKUserTrackingMode) { MKUserTrackingModeNone = 0, /*< 不跟蹤 */ MKUserTrackingModeFollow, /*< 跟蹤 */ MKUserTrackingModeFollowWithHeading, /*< 導航跟蹤 */ }; /* 設置地圖配置項 */ @property (nonatomic) MKMapType mapType;/*< 地圖類型 */ @property (nonatomic, readonly) NSArray *annotations;/*< 大頭針數組 */ typedef NS_ENUM(NSUInteger, MKMapType) { MKMapTypeStandard = 0,/*< 標准地圖 */ MKMapTypeSatellite,/*< 衛星地圖 */ MKMapTypeHybrid,/*< 混合模式(標准+衛星) */ MKMapTypeSatelliteFlyover,/*< 3D立體衛星(iOS9.0) */ MKMapTypeHybridFlyover,/*< 3D立體混合(iOS9.0) */ } /* 設置地圖控制項 */ @property (nonatomic) BOOL zoomEnabled;/*< 是否可以縮放 */ @property (nonatomic) BOOL scrollEnabled;/*< 是否可以滾動 */ @property (nonatomic) BOOL rotateEnabled;/*< 是否可以旋轉 */ @property (nonatomic) BOOL pitchEnabled;/*< 是否顯示3D視角 */ /* 設置地圖顯示項 */ @property (nonatomic) BOOL showsBuildings;/*< 是否顯示建築物,只影響標准地圖 */ @property (nonatomic) BOOL showsTraffic;/*< 是否顯示交通,iOS9 */ @property (nonatomic) BOOL showsCompass;/*< 是否顯示指南針,iOS9 */ @property (nonatomic) BOOL showsScale;/*< 是否顯示比例尺,iOS9 */所謂「大頭針」,就是地圖上的一個個標注:

2. 對象方法
/* 添加大頭針 */ - (void)addAnnotation:(id )annotation; - (void)addAnnotations:(NSArray> *)annotations; /* 刪除大頭針 */ - (void)removeAnnotation:(id )annotation; - (void)removeAnnotations:(NSArray> *)annotations; /* 選中大頭針與取消選中大頭針 */ - (void)selectAnnotation:(id )annotation animated:(BOOL)animated; - (void)deselectAnnotation:(id )annotation animated:(BOOL)animated; /* 獲取大頭針視圖 */ - (MKAnnotationView *)viewForAnnotation:(id )annotation; /* 從緩沖池中取出大頭針視圖控件 */ - (MKAnnotationView *)dequeueReusableAnnotationViewWithIdentifier:(NSString *)identifier; /* 設置顯示區域以及地圖中心坐標 */ - (void)setRegion:(MKCoordinateRegion)region animated:(BOOL)animated; - (void)setCenterCoordinate:(CLLocationCoordinate2D)coordinate animated:(BOOL)animated; /* 經緯度坐標轉UIKit坐標,UIKit坐標轉經緯度坐標 */ - (CGPoint)convertCoordinate:(CLLocationCoordinate2D)coordinate toPointToView:(UIView *)view; - (CLLocationCoordinate2D)convertPoint:(CGPoint)point toCoordinateFromView:(UIView *)view; 3. 常用代理方法 MKMapViewDelegate
/* 地圖加載完成會調用 */ - (void)mapViewDidFinishLoadingMap:(MKMapView *)mapView; /* 地圖加載失敗會調用 */ - (void)mapViewDidFailLoadingMap:(MKMapView *)mapView withError:(NSError *)error; /* 用戶位置發生改變會調用 */ - (void)mapView:(MKMapView *)mapView didUpdateUserLocation:(MKUserLocation *)userLocation; /* 顯示區域改變會調用 */ - (void)mapView:(MKMapView *)mapView regionDidChangeAnimated:(BOOL)animated; /* 點擊選中大頭針時會調用 */ - (void)mapView:(MKMapView *)mapView didSelectAnnotationView:(MKAnnotationView *)view; /* 取消選中大頭針時會調用 */ - (void)mapView:(MKMapView *)mapView didDeselectAnnotationView:(MKAnnotationView *)view; /* 顯示地圖上的大頭針,功能類似於UITableView的tableView:cellForRowAtIndexPath:方法 */ - (MKAnnotationView *)mapView:(MKMapView *)mapView viewForAnnotation:(id)annotation; 三、MapKit 的實際使用
1. 導入頭文件
#import 2. 初始化 MKMapView
- (void)initMapView{ CGFloat x = 0; CGFloat y = 20; CGFloat width = self.view.frame.size.width; CGFloat height = self.view.frame.size.height; //創建MKMapView,設置控件視圖大小 MKMapView *mapView = [[MKMapView alloc] initWithFrame:CGRectMake(x, y, width, height)]; //設置地圖類型 mapView.mapType = MKMapTypeStandard; //設置代理 mapView.delegate = self; [self.view addSubview:mapView]; self.mapView = mapView; }3. 用戶位置跟蹤
在 iOS 8 之前,實現用戶位置跟蹤只需要兩步:設置用戶跟蹤模式,並在 mapView:didUpdateUserLocation: 代理方法中設置地圖中心與顯示範圍。
到了 iOS 8 之後,用法有所變化:必須先按照定位章節的方式,向系統申請前台或前後台的定位授權(可參考 iOS 學習筆記 19 — 定位 CoreLocation)。此後無需手動指定中心點,系統會默認把當前位置設為中心並自動顯示合適的範圍;只有定位成功後,mapView:didUpdateUserLocation: 才會被回調。
- (void)viewDidLoad { [super viewDidLoad]; //獲取定位服務授權 [self requestUserLocationAuthor]; //初始化MKMapView [self initMapView]; } - (void)requestUserLocationAuthor{ //如果沒有獲得定位授權,獲取定位授權請求 self.locationM = [[CLLocationManager alloc] init]; if ([CLLocationManager locationServicesEnabled]) { if ([CLLocationManager authorizationStatus] != kCLAuthorizationStatusAuthorizedWhenInUse) { [self.locationM requestWhenInUseAuthorization]; } } } - (void)initMapView{ CGFloat x = 0; CGFloat y = 20; CGFloat width = self.view.frame.size.width; CGFloat height = self.view.frame.size.height; //創建MKMapView對象 MKMapView *mapView = [[MKMapView alloc] initWithFrame:CGRectMake(x, y, width, height)]; //設置地圖類型 mapView.mapType = MKMapTypeStandard; //設置用戶跟蹤模式 mapView.userTrackingMode = MKUserTrackingModeFollow; mapView.delegate = self; [self.view addSubview:mapView]; self.mapView = mapView; } #pragma mark - MKMapViewDelegate /* 更新用戶位置會調用 */ - (void)mapView:(MKMapView *)mapView didUpdateUserLocation:(MKUserLocation *)userLocation{ CLLocation *location = userLocation.location; CLLocationCoordinate2D coordinate = location.coordinate; NSLog(@"經度:%f,緯度:%f",coordinate.latitude,coordinate.longitude); }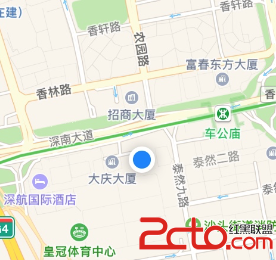
4. 添加大頭針
MapKit 並沒有內建具體的大頭針類,只提供了大頭針協議 MKAnnotation,因此我們需要自定義:
1. 創建一個繼承自 NSObject 的類;
2. 讓它實現 MKAnnotation 協議;
3. 必須提供一個用於存儲坐標的 coordinate 屬性。
@property (nonatomic) CLLocationCoordinate2D coordinate;下面是一個簡單的自定義大頭針類 LTAnnotation:
#import #import @interface LTAnnotation : NSObject /* 必須創建的屬性 */ @property (nonatomic) CLLocationCoordinate2D coordinate; /* 可選的屬性 */ @property (nonatomic, copy) NSString *title; @property (nonatomic, copy) NSString *subtitle; /* 自定義的屬性 */ @property (nonatomic, strong) UIImage *icon; @end @implementation LTAnnotation @end 實際使用時,只需創建大頭針對象並添加到地圖即可:
- (void)viewDidLoad { [super viewDidLoad]; //請求定位授權 [self requestUserLocationAuthor]; //初始化MKMapView [self initMapView]; //添加大頭針 [self addAnnotationsToMapView]; } - (void)addAnnotationsToMapView{ CLLocationCoordinate2D location1 = CLLocationCoordinate2DMake(22.54, 114.02); //創建大頭針 LTAnnotation *annotation = [[LTAnnotation alloc] init]; annotation.title = @"執著"; annotation.subtitle = @"執著哥開的店"; annotation.coordinate = location1; annotation.icon = [UIImage imageNamed:@"red"]; //添加大頭針 [self.mapView addAnnotation:annotation1]; }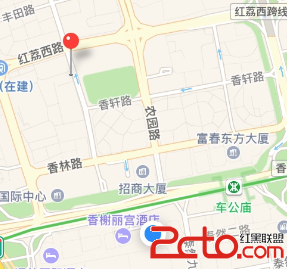
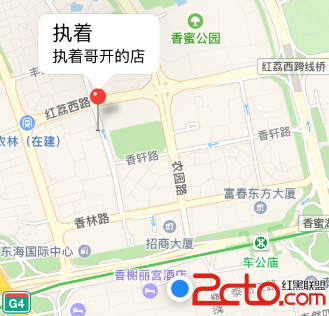
5. 自定義大頭針視圖
上面默認樣式的大頭針是不是有點單調?它由大頭針視圖 MKAnnotationView 呈現。先來看看它的常用屬性:
@property (nonatomic, strong) id annotation;/*< 大頭針數據 */ @property (nonatomic, strong) UIImage *image;/*< 大頭針的圖標 */ @property (nonatomic, readonly) NSString *reuseIdentifier;/*< 大頭針的唯一標示 */ @property (nonatomic) CGPoint calloutOffset;/*< 彈出視圖的偏移 */ @property (nonatomic) BOOL selected;/*< 是否選中 */ @property (nonatomic) BOOL canShowCallout;/*< 是否能點擊彈出視圖 */ @property (nonatomic, strong) UIView *leftCalloutAccessoryView;/*< 彈出視圖左邊的視圖 */ @property (nonatomic, strong) UIView *rightCalloutAccessoryView;/*< 彈出視圖右邊的視圖 */ 通過配置這些屬性,就能自定義大頭針的外觀與彈出內容:
/* 每當大頭針顯示在可視界面上時,就會調用該方法,用戶位置的藍色點也是個大頭針,也會調用 */ - (MKAnnotationView *)mapView:(MKMapView *)mapView viewForAnnotation:(id)annotation { if ([annotation isKindOfClass:[LTAnnotation class]]) { LTAnnotation *annotationLT = (LTAnnotation *)annotation; //類似於UITableViewCell的重用機制,大頭針視圖也有重用機制 static NSString *key = @"AnnotationIdentifier"; MKAnnotationView *view = [self.mapView dequeueReusableAnnotationViewWithIdentifier:key]; if (!view) { view = [[MKAnnotationView alloc] initWithAnnotation:annotation reuseIdentifier:key]; } //設置大頭針數據 view.annotation = annotation; //自定義大頭針默認是NO,表示不能彈出視圖,這裡讓大頭針可以點擊彈出視圖 view.canShowCallout = YES; //設置大頭針圖標 view.image = annotationLT.icon; //設置彈出視圖的左邊視圖 UIImage *leftImage = [UIImage imageNamed:@"cafeIcon"]; UIImageView *leftView = [[UIImageView alloc] initWithImage: leftImage]; leftView.bounds = CGRectMake(0, 0, 50, 50); view.leftCalloutAccessoryView = leftView; //設置彈出視圖的右邊視圖 UIImage *rightImage = [UIImage imageNamed:@"cafeRight"]; UIImageView *rightView = [[UIImageView alloc] initWithImage: rightImage]; rightView.bounds = CGRectMake(0, 0, 50, 50); view.rightCalloutAccessoryView = rightView; return view; } //返回nil,表示顯示默認樣式 return nil; } 
四、擴展 — 自定義大頭針彈出詳情視圖
如果你仔細觀察一些地圖類應用,會發現它們的彈出效果與系統默認完全不同。那種精緻的詳情卡片是怎麼做的呢?
答案其實很簡單:那並不是系統的彈出視圖,而是一個被打扮得很像彈窗的大頭針。
實現思路可以概括為三步:
當點擊普通大頭針時,先移除地圖上已有的詳情大頭針,再為當前大頭針添加一個對應的詳情大頭針;當普通大頭針取消選中時,移除地圖上所有詳情大頭針;並在 mapView:viewForAnnotation: 方法中分別設置普通大頭針視圖與詳情大頭針視圖。
下面是部分實現代碼(樣式做得比較隨意,僅供參考):
#pragma mark - 地圖控件代理方法 /* 顯示大頭針時調用,注意方法中的annotation參數是即將顯示的大頭針對象 */ -(MKAnnotationView *)mapView:(MKMapView *)mapView viewForAnnotation:(id)annotation{ //由於當前位置的標注也是一個大頭針,所以此時需要判斷,此代理方法返回nil使用默認大頭針視圖 if ([annotation isKindOfClass:[LTAnnotation class]]) { static NSString *key1 = @"AnnotationKey1"; MKAnnotationView *annotationView = [_mapView dequeueReusableAnnotationViewWithIdentifier:key1]; //如果緩存池中不存在則新建 if (!annotationView) { annotationView = [[MKAnnotationView alloc] initWithAnnotation:annotation reuseIdentifier:key1]; annotationView.canShowCallout = NO;//不允許彈出視圖,但可以被選中 } //重新設置此類大頭針視圖的大頭針模型(因為有可能是從緩存池中取出來的,位置是放到緩存池時的位置) annotationView.annotation = annotation; annotationView.image = ((LTAnnotation *)annotation).icon;//設置大頭針視圖的圖片 return annotationView; }else if([annotation isKindOfClass:[LTCalloutAnnotation class]]){ static NSString *key2 = @"AnnotationCallOutKey2"; MKAnnotationView *calloutView = [_mapView dequeueReusableAnnotationViewWithIdentifier:key2]; //如果緩存池中不存在則新建 if (!calloutView) { calloutView = [[MKAnnotationView alloc] initWithAnnotation:annotation reuseIdentifier:key2]; calloutView.canShowCallout = NO;//不允許彈出視圖,但可以被選中 } //對於作為彈出詳情視圖的自定義大頭針視圖無彈出交互功能,在其中可以自由添加其他視圖 calloutView.annotation = annotation; //設置詳情大頭針的偏移位置 calloutView.centerOffset = CGPointMake(-50, -80); [self calloutAddSubView:calloutView]; return calloutView; } else { return nil; } } 這裡的 LTCalloutAnnotation 與 LTAnnotation 本質上沒有區別,只是類名不同,屬性完全一致。
#pragma mark 添加彈出視圖的子控件,這裡我就很隨便了,你可以搞得好看點 - (void)calloutAddSubView:(MKAnnotationView *)calloutView { //添加背景 UIView *background = [[UIView alloc] initWithFrame:CGRectMake(0, 0, 100, 60)]; background.backgroundColor = [UIColor whiteColor]; background.layer.borderWidth = 5; background.layer.borderColor = [UIColor blueColor].CGColor; [calloutView addSubview:background]; //添加圖片 UIImage *image = [UIImage imageNamed:@"cafeRight"]; UIImageView *imageView = [[UIImageView alloc] initWithImage:image]; imageView.frame = CGRectMake(5, 5, 50, 50); [calloutView addSubview:imageView]; //添加一個紅色方塊 UIView *subview = [[UIView alloc] initWithFrame:CGRectMake(60, 5, 35, 40)]; subview.backgroundColor = [UIColor redColor]; [calloutView addSubview:subview]; } #pragma mark 選中大頭針時觸發 //點擊一般的大頭針KCAnnotation時添加一個大頭針作為所點大頭針的彈出詳情視圖 -(void)mapView:(MKMapView *)mapView didSelectAnnotationView:(MKAnnotationView *)view{ if ([view.annotation isKindOfClass:[LTAnnotation class]]) { LTAnnotation *annotation = view.annotation; //點擊一個大頭針時移除其他彈出詳情視圖 [self removeCalloutAnnotation]; //添加詳情大頭針 LTCalloutAnnotation *callout = [[LTCalloutAnnotation alloc] init]; callout.icon = annotation.icon; callout.title = annotation.title; callout.subtitle = annotation.subtitle; callout.coordinate = annotation.coordinate; [self.mapView addAnnotation:callout]; } } #pragma mark 取消選中時觸發 -(void)mapView:(MKMapView *)mapView didDeselectAnnotationView:(MKAnnotationView *)view{ [self removeCalloutAnnotation]; } #pragma mark 移除所用詳情大頭針 -(void)removeCalloutAnnotation{ [self.mapView.annotations enumerateObjectsUsingBlock:^(id obj,NSUInteger idx,BOOL *stop){ if ([obj isKindOfClass:[LTCalloutAnnotation class]]) { [_mapView removeAnnotation:obj]; } }]; }- 上一篇文章: iOS 微信支付完整接入實戰指南
- 下一篇文章: 動畫變換透解 — CGAffineTransform 與 CATransform3D