
iOS 學習筆記 22:本地與遠程推送通知全解析
一、什麼是推送通知
推送通知就是主動送出一則訊息來提醒使用者某件事情。即使 App 退到背景甚至已經被關掉,使用者仍然能收到通知,常見用於版本更新、任務提醒、新消息提示等。
常見應用場景
任務管理類 App 在截止時間前提醒你動手;健身 App 定時催促你起身運動;買了電影票,開演前半小時提醒你入場;QQ、微信收到訊息時即使退到背景也能彈出通知;電商 App 推送新品上架資訊。
常見展示樣式
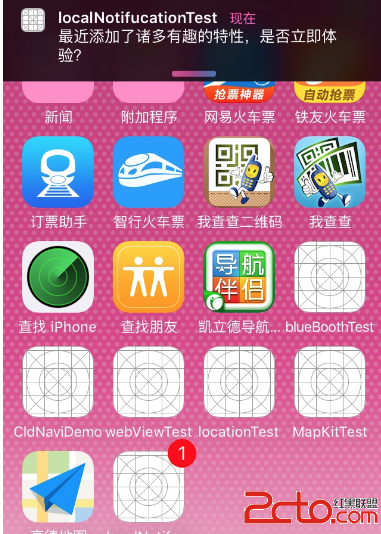
螢幕頂部橫幅、鎖屏界面橫幅、App 圖示上的數字角標、提示音效、螢幕中央彈出 UIAlertView。
本地推送 vs 遠程推送
本地推送通知:不需联网,由 App 內部代碼觸發,適合「已經確定未來某個時間點要提醒什麼」的情況。
遠程推送通知:需要联网,由伺服器推送,適合「無法事先確定何時要提醒什麼」的情況。
判斷原則一句話講完:誰能確定通知的時間與內容,就由誰來發送。
二、本地推送通知
iOS 8 之後使用本地推送必須先取得使用者授權,然後建立 UILocalNotification 物件並設定各項屬性。
開始推送
第一種,延時推送,依 fireDate 的設定排程:
[[UIApplication sharedApplication] scheduleLocalNotification:notification];第二種,立即推送,忽略 fireDate:
[[UIApplication sharedApplication] presentLocalNotificationNow:notification];監聽使用者點擊
App 處於前台時不會彈出橫幅,但仍會呼叫:
- (void)application:(UIApplication *)application
didReceiveLocalNotification:(UILocalNotification *)notification;
App 在背景時會顯示橫幅,點擊後回到前台並呼叫上述方法。App 已關閉時,點擊橫幅會啟動 App 並進入:
- (BOOL)application:(UIApplication *)application
didFinishLaunchingWithOptions:(NSDictionary *)launchOptions {
    // 從 launchOptions 取出通知內容
    UILocalNotification *local = launchOptions[UIApplicationLaunchOptionsLocalNotificationKey];
    return YES;
}
取消通知
// 取消指定的本地通知
- (void)cancelLocalNotification:(UILocalNotification *)notification;
// 取消全部本地通知
- (void)cancelAllLocalNotifications;
實例代碼
註冊通知與顯示通知:
- (BOOL)application:(UIApplication *)application
didFinishLaunchingWithOptions:(NSDictionary *)launchOptions {
    // iOS 8.0 之後,使用推送前必須先取得使用者授權
    if (application.currentUserNotificationSettings.types == UIUserNotificationTypeNone) {
        UIUserNotificationSettings *setting =
        [UIUserNotificationSettings settingsForTypes:
             UIUserNotificationTypeAlert |
             UIUserNotificationTypeBadge |
             UIUserNotificationTypeSound
                                          categories:nil];
        [application registerUserNotificationSettings:setting];
    } else {
        // App 關閉時收到通知,啟動時在此取出通知物件
        UILocalNotification *notification =
            launchOptions[UIApplicationLaunchOptionsLocalNotificationKey];
        [self showLocalNotification:notification];
    }
    return YES;
}

- (void)showLocalNotification:(UILocalNotification *)notification {
    NSString *msg = notification.userInfo[@"msg"];
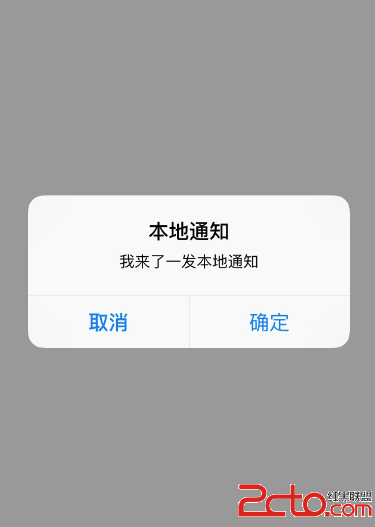
    UIAlertView *alert = [[UIAlertView alloc] initWithTitle:@"本地通知"
                                                   message:msg
                                                  delegate:nil
                                         cancelButtonTitle:@"取消"
                                         otherButtonTitles:@"確定", nil];
    [alert show];
    // 用完記得移除,避免重複提示
    [[UIApplication sharedApplication] cancelLocalNotification:notification];
}
建立本地通知:
- (UILocalNotification *)makeLocalNotification {
    UILocalNotification *notification = [[UILocalNotification alloc] init];
    notification.fireDate = [NSDate dateWithTimeIntervalSinceNow:10.0]; // 10 秒後觸發
    notification.repeatInterval = NSCalendarUnitMinute;                 // 重複週期
    notification.alertBody = @"最近新增了諸多有趣的功能,是否立即體驗?";
    notification.applicationIconBadgeNumber = 1;   // 圖示右上角數字
    notification.alertAction = @"打開應用";         // 鎖屏界面的滑動提示文字
    notification.alertLaunchImage = @"Default";    // 由通知進入時的啟動圖
    notification.soundName = UILocalNotificationDefaultSoundName;
    notification.userInfo = @{@"id": @1,
                              @"user": @"Kenshin Cui",
                              @"msg": @"我來了一發本地通知"};
    return notification;
}
如果想每天中午 12 點準時提醒,只要改寫 fireDate 與 repeatInterval:
NSDateFormatter *formatter = [[NSDateFormatter alloc] init];
formatter.dateFormat = @"yyyy-MM-dd HH-mm-ss";
NSDate *resDate = [formatter dateFromString:@"2016-04-09 12-00-00"];

notification.fireDate = resDate;                       // 設定為次日中午 12 點
notification.timeZone = [NSTimeZone defaultTimeZone];  // 務必設定時區,否則時間會不準
notification.repeatInterval = NSCalendarUnitDay;       // 每隔一天觸發
註冊完成與接收通知的處理:
// 使用者按下「確定」授權後呼叫
- (void)application:(UIApplication *)application
didRegisterUserNotificationSettings:(UIUserNotificationSettings *)notificationSettings {
    if (notificationSettings.types != UIUserNotificationTypeNone) {
        UILocalNotification *notification = [self makeLocalNotification];
        [application scheduleLocalNotification:notification];
    }
}

// 不論前台或背景都會呼叫
- (void)application:(UIApplication *)application
didReceiveLocalNotification:(UILocalNotification *)notification {
    if (notification) {
        [self showLocalNotification:notification];
    }
}

// 回到前台時清掉角標數字
- (void)applicationWillEnterForeground:(UIApplication *)application {
    [application setApplicationIconBadgeNumber:0];
}
三、遠程推送通知
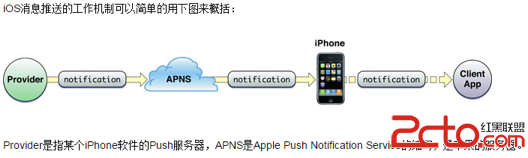
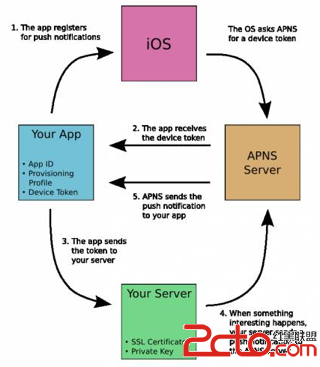
整體流程是:應用服務提供商把訊息與裝置令牌(device token)送給蘋果推送服務 APNs;APNs 依 device token 在已註冊的裝置中找到對應設備並轉發;裝置收到後把訊息交給對應的 App,App 依使用者設定彈出通知。
所有蘋果裝置在联网狀態下都會與 APNs 維持一條長連線。
- 長連線:伺服器能主動推送訊息,即時性高,但比較佔用資源。
- 短連線:伺服器無法主動推播,會話結束即釋放資源,較省資源。
遠程推送正是借用裝置與 APNs 之間的長連線,由 APNs 代為把訊息送到客戶端。
實現條件
必須有真機——只有真機具備 UDID 才能產生 deviceToken;同時需要開發者後台申請推送用的憑證(相關申請步驟請參考前一篇筆記)。
deviceToken的產生演算法由 Apple 掌握,為了在演算法變動後仍能正常收訊,每次 App 啟動時都應該重新取得 deviceToken。
實作步驟
iOS 8 之後,使用遠程通知需先請求出使用者授權;註冊成功後會呼叫以下方法取得 device token:
- (void)application:(UIApplication *)application
didRegisterForRemoteNotificationsWithDeviceToken:(NSData *)deviceToken;
把 deviceToken 交到伺服器,並隨時保持它是最新的。接收通知則實作:
- (void)application:(UIApplication *)application
didReceiveRemoteNotification:(NSDictionary *)userInfo;
註冊遠程通知:
- (BOOL)application:(UIApplication *)application
didFinishLaunchingWithOptions:(NSDictionary *)launchOptions {
    if (![application isRegisteredForRemoteNotifications]) {
        UIUserNotificationSettings *setting =
        [UIUserNotificationSettings settingsForTypes:
             UIUserNotificationTypeAlert |
             UIUserNotificationTypeBadge |
             UIUserNotificationTypeSound
                                          categories:nil];
        [application registerUserNotificationSettings:setting];
        [application registerForRemoteNotifications];
    }
    return YES;
}
註冊成功後保存並同步 deviceToken:
- (void)application:(UIApplication *)application
didRegisterForRemoteNotificationsWithDeviceToken:(NSData *)deviceToken {
    [self addDeviceToken:deviceToken];
}

- (void)addDeviceToken:(NSData *)deviceToken {
    NSString *key = @"DeviceToken";
    NSUserDefaults *defaults = [NSUserDefaults standardUserDefaults];
    NSData *oldToken = [defaults objectForKey:key];
    if (![oldToken isEqualToData:deviceToken]) {
        [defaults setObject:deviceToken forKey:key];
        [defaults synchronize];
        [self sendDeviceTokenWithOldDeviceToken:oldToken newDeviceToken:deviceToken];
    }
}

- (void)sendDeviceTokenWithOldDeviceToken:(NSData *)oldToken
                             newDeviceToken:(NSData *)newToken {
    NSString *urlStr = @"https://192.168.1.101/RegisterDeviceToken.aspx";
    NSURL *url = [NSURL URLWithString:urlStr];
    NSMutableURLRequest *request = [NSMutableURLRequest requestWithURL:url];
    request.HTTPMethod = @"POST";
    NSString *bodyStr = [NSString stringWithFormat:@"oldToken=%@&newToken=%@",
                         oldToken, newToken];
    request.HTTPBody = [bodyStr dataUsingEncoding:NSUTF8StringEncoding];

    NSURLSessionDataTask *task =
    [[NSURLSession sharedSession] dataTaskWithRequest:request
                                    completionHandler:^(NSData *data,
                                                        NSURLResponse *response,
                                                        NSError *error) {
        NSLog(error ? @"Send Failure: %@", error.localizedDescription : @"Send Success!");
    }];
    [task resume];
}
接收遠程通知:
- (void)application:(UIApplication *)application
didReceiveRemoteNotification:(NSDictionary *)userInfo {
    UIAlertView *alert = [[UIAlertView alloc] initWithTitle:@"遠程推送通知"
                                                   message:userInfo[@"msg"]
                                                  delegate:nil
                                         cancelButtonTitle:@"取消"
                                         otherButtonTitles:@"確定", nil];
    [alert show];
}
四、第三方推送服務
如果自建 APNs 服務太麻煩,可以直接接第三方平台,例如極光推送(JPush)、個推、騰訊信鴿等。它們通常還額外提供統計後台、定額免費方案與多平台支援。具體的整合步驟請查閱各自的官方文件,寫得都很詳細。
補充一點現實狀況:本文使用的是 UILocalNotification 與 UIAlertView 這套舊 API。在 iOS 10 之後,蘋果已推出 UserNotifications 框架與 UNUserNotificationCenter,能更精細地控制通知的呈現方式、附件與內嵌動作;新專案建議直接採用新框架,舊 API 僅供維護既有代碼時參考。