
iOS 開發常用知識點彙總(Swift 與 OC 對照)
編輯:iOS 開發綜合
以下整理了日常 iOS 開發中經常會用到的各類技巧,涵蓋導航欄、tableView、協議、倒計時、相機等常見場景,並盡量附上 Swift 與 OC 兩種寫法。
1. 隱藏導航欄上的返回文字
//Swift UIBarButtonItem.appearance().setBackButtonTitlePositionAdjustment(UIOffsetMake(0, -60), forBarMetrics: .Default) //OC [[UIBarButtonItem appearance] setBackButtonTitlePositionAdjustment:UIOffsetMake(0, -60) forBarMetrics:UIBarMetricsDefault];
2. 去掉 tableView 多餘的線條
//Swift self.tableView?.tableFooterView = UIView() //OC self.tableView.tableFooterView = [UIView new];
3. 去掉 tableView 的分割線
//Swift self.tableView?.separatorStyle = .None //OC self.tableView.separatorStyle = UITableViewCellSeparatorStyleNone;
4. 去掉 cell 的選中效果
//Swift cell.selectionStyle = .None //OC cell.selectionStyle = UITableViewCellSelectionStyleNone;
5. 解決 tableview 分割線短一截的問題
-(void)viewDidLayoutSubviews { if ([self.tableView respondsToSelector:@selector(setSeparatorInset:)]) { [self.tableView setSeparatorInset:UIEdgeInsetsMake(0,0,0,0)]; } if ([self.tableView respondsToSelector:@selector(setLayoutMargins:)]) { [self.tableView setLayoutMargins:UIEdgeInsetsMake(0,0,0,0)]; } } -(void)tableView:(UITableView *)tableView willDisplayCell:(UITableViewCell *)cell forRowAtIndexPath:(NSIndexPath *)indexPath { if ([cell respondsToSelector:@selector(setSeparatorInset:)]) { [cell setSeparatorInset:UIEdgeInsetsZero]; } if ([cell respondsToSelector:@selector(setLayoutMargins:)]) { [cell setLayoutMargins:UIEdgeInsetsZero]; } }
6. Swift 中定義協議時,若使用 @objc 標記,聲明代理需用 weak 修飾以防止循環引用
@objc protocol BookTabBarDelegate{ func commet() func commetnController() func likeBook() func shareAction() } weak var delegate:BookTabBarDelegate?
7. 若使用純 Swift 語法聲明協議,則不能用 weak 修飾,否則會報錯
protocol BookTabBarDelegate{ func commet() func commetnController() func likeBook() func shareAction() } var delegate:BookTabBarDelegate?
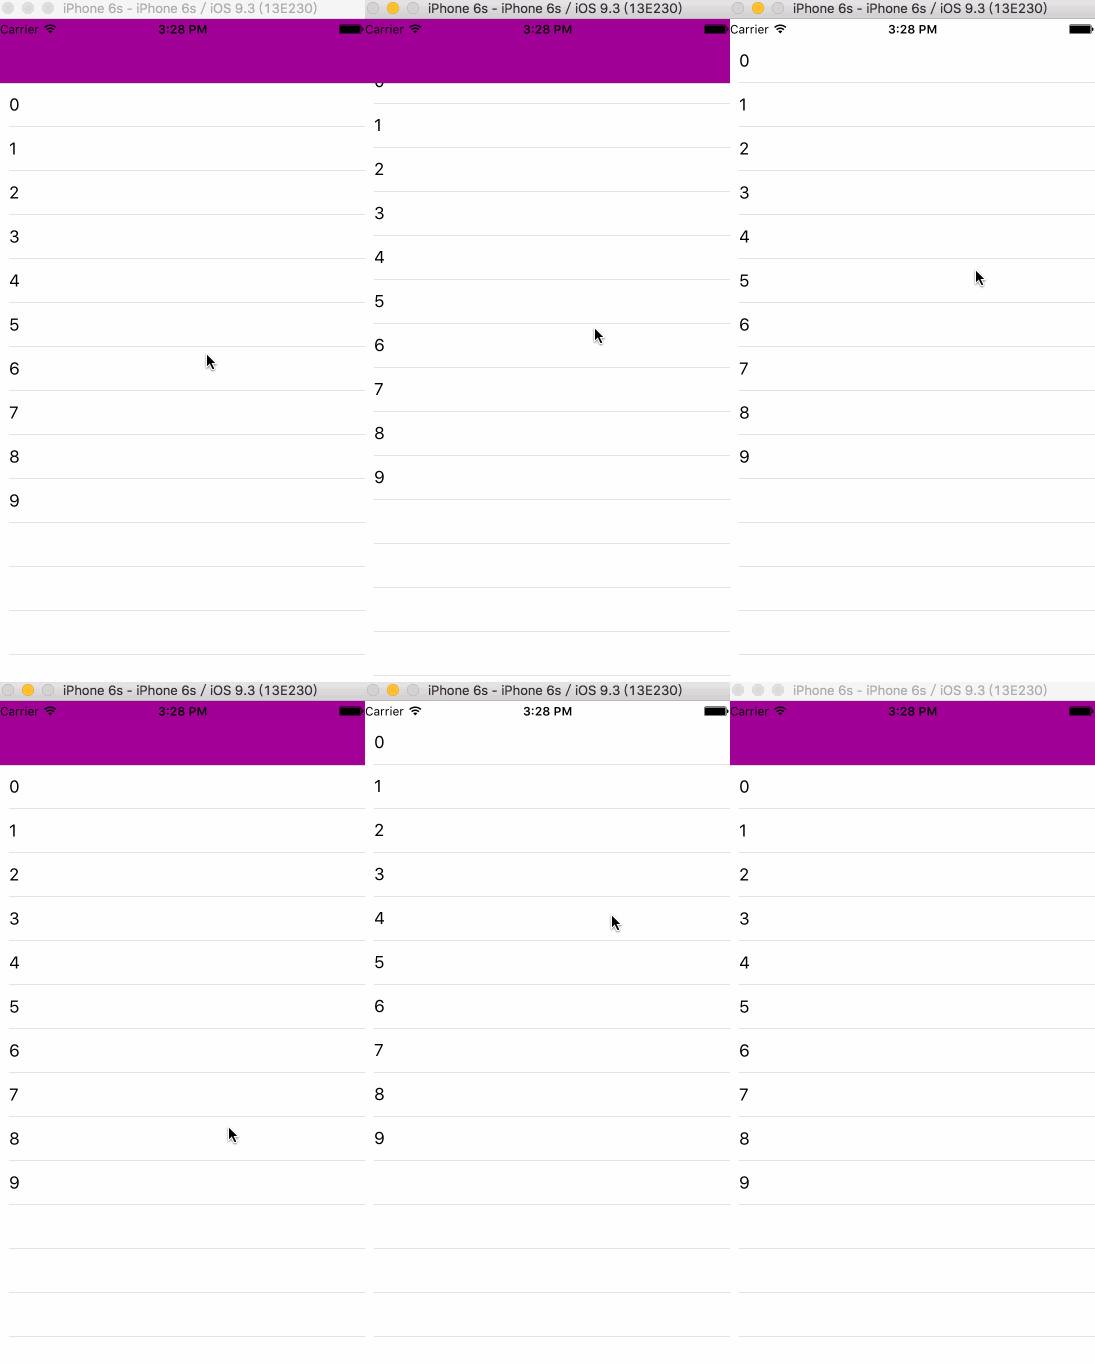
8. 動態隱藏 NavigationBar
//1.當我們的手離開屏幕時候隱藏 - (void)scrollViewWillEndDragging:(UIScrollView *)scrollView withVelocity:(CGPoint)velocity targetContentOffset:(inout CGPoint *)targetContentOffset{ NSLog(@"======== %lf", velocity.y); if(velocity.y > 0) { [self.navigationController setNavigationBarHidden:YES animated:YES]; } else { [self.navigationController setNavigationBarHidden:NO animated:YES]; } } // velocity.y 這個量,在上滑和下滑時變化極小(小數),但因為方向不同,有正負之分,很好處理。
效果圖:
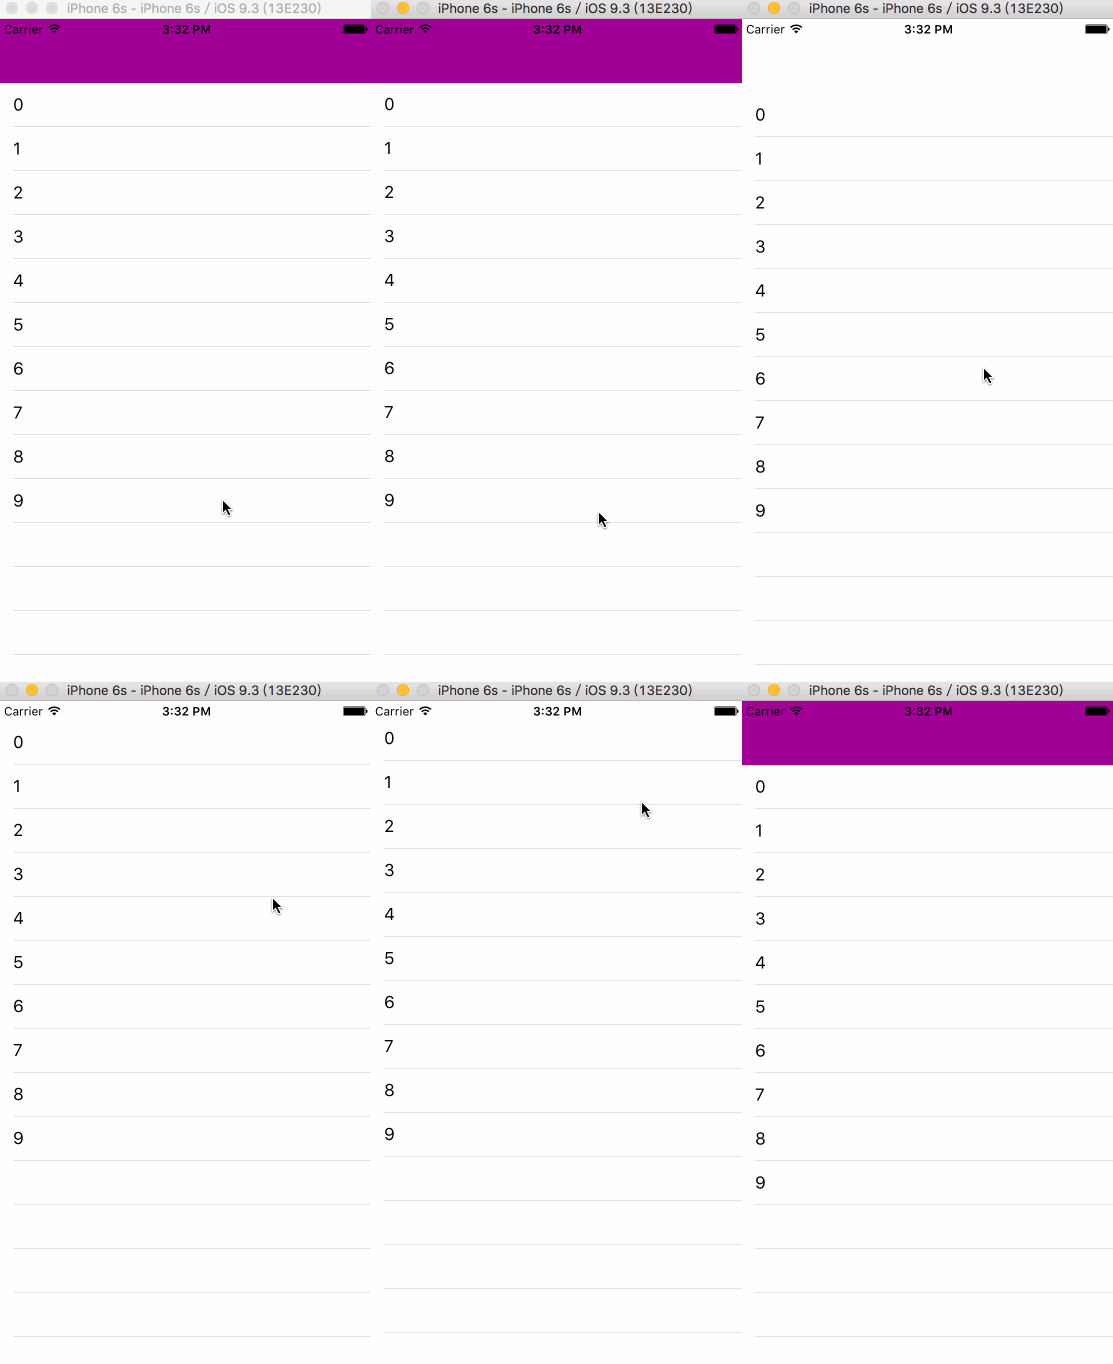
//2.在滑動過程中隱藏,像 Safari 那樣 (1) self.navigationController.hidesBarsOnSwipe = YES; (2)- (void)scrollViewDidScroll:(UIScrollView *)scrollView { CGFloat offsetY = scrollView.contentOffset.y + _familyTableView.contentInset.top; CGFloat panTranslationY = [scrollView.panGestureRecognizer translationInView:self.familyTableView].y; if (offsetY > 64) { if (panTranslationY > 0) { //下滑趨勢,顯示 [self.navigationController setNavigationBarHidden:NO animated:YES]; } else { //上滑趨勢,隱藏 [self.navigationController setNavigationBarHidden:YES animated:YES]; } } else { [self.navigationController setNavigationBarHidden:NO animated:YES]; } } // 這裡的 offsetY > 64 只是為了在視圖滑過 navigationBar 高度之後才開始處理,防止影響展示效果。// panTranslationY 是 scrollView 的 pan 手勢手指位置的 y 值,在較小幅度上下滑動時可能都為正或都為負,這一方式不太靈敏。
效果圖:
9. 設置導航欄透明
//方法一:設置透明度 [[[self.navigationController.navigationBar subviews]objectAtIndex:0] setAlpha:0.1]; //方法二:設置背景圖片 /** * 設置導航欄,使其透明 */ - (void)setNavigationBarColor:(UIColor *)color targetController:(UIViewController *)targetViewController { targetViewController.navigationController.navigationBar.shadowImage = [[UIImage alloc]init]; CGRect rect=CGRectMake(0.0f, 0.0f, 1.0f, 1.0f); UIGraphicsBeginImageContext(rect.size); CGContextRef context = UIGraphicsGetCurrentContext(); CGContextSetFillColorWithColor(context, [color CGColor]); CGContextFillRect(context, rect); UIImage *theImage = UIGraphicsGetImageFromCurrentImageContext(); UIGraphicsEndImageContext(); [targetViewController.navigationController.navigationBar setBackgroundImage:theImage forBarMetrics:UIBarMetricsDefault]; }
10. 設置字體與行間距
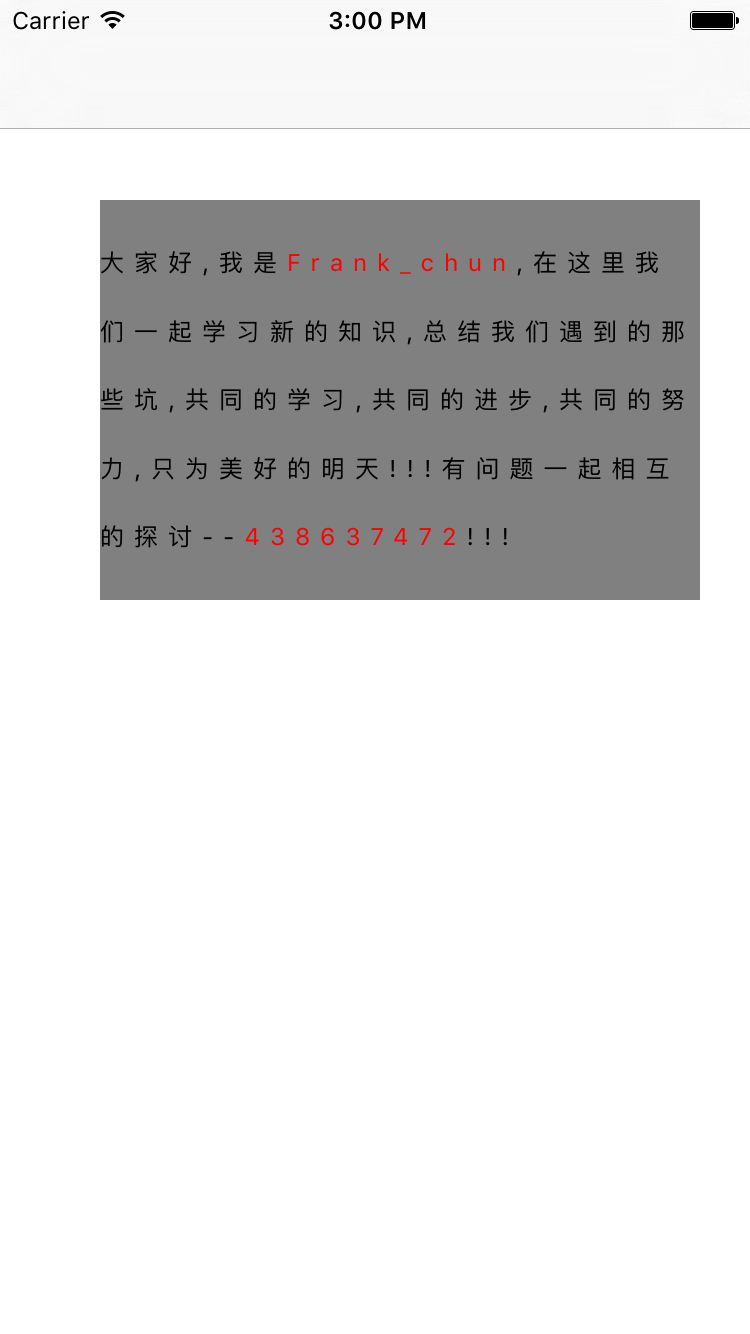
UILabel * lable = [[UILabel alloc]initWithFrame:CGRectMake(50, 100, 300, 200)]; lable.text = @"大家好,我是Frank_chun..."; lable.numberOfLines = 0; lable.font = [UIFont systemFontOfSize:12]; lable.backgroundColor = [UIColor grayColor]; [self.view addSubview:lable]; //設置每個字體之間的間距 NSKernAttributeName 對應一個 NSNumber 對象(含小數),作用是調整默認字距,值為 0 表示禁用字距調整; NSMutableAttributedString * str = [[NSMutableAttributedString alloc]initWithString:lable.text attributes:@{NSKernAttributeName:@(5.0)}]; //設置某些字體的顏色 NSForegroundColorAttributeName 設置字體顏色 NSRange blueRange = NSMakeRange([[str string] rangeOfString:@"Frank_chun"].location, [[str string] rangeOfString:@"Frank_chun"].length); [str addAttribute:NSForegroundColorAttributeName value:[UIColor redColor] range:blueRange]; NSRange blueRange1 = NSMakeRange([[str string] rangeOfString:@"438637472"].location, [[str string] rangeOfString:@"438637472"].length); [str addAttribute:NSForegroundColorAttributeName value:[UIColor redColor] range:blueRange1]; //設置每行之間的間距 NSParagraphStyleAttributeName 設置段落樣式 NSMutableParagraphStyle * par = [[NSMutableParagraphStyle alloc]init]; [par setLineSpacing:20]; [str addAttribute:NSParagraphStyleAttributeName value:par range:NSMakeRange(0, lable.text.length)]; [lable setAttributedText:str];
效果圖:
11. 點擊 button 倒計時
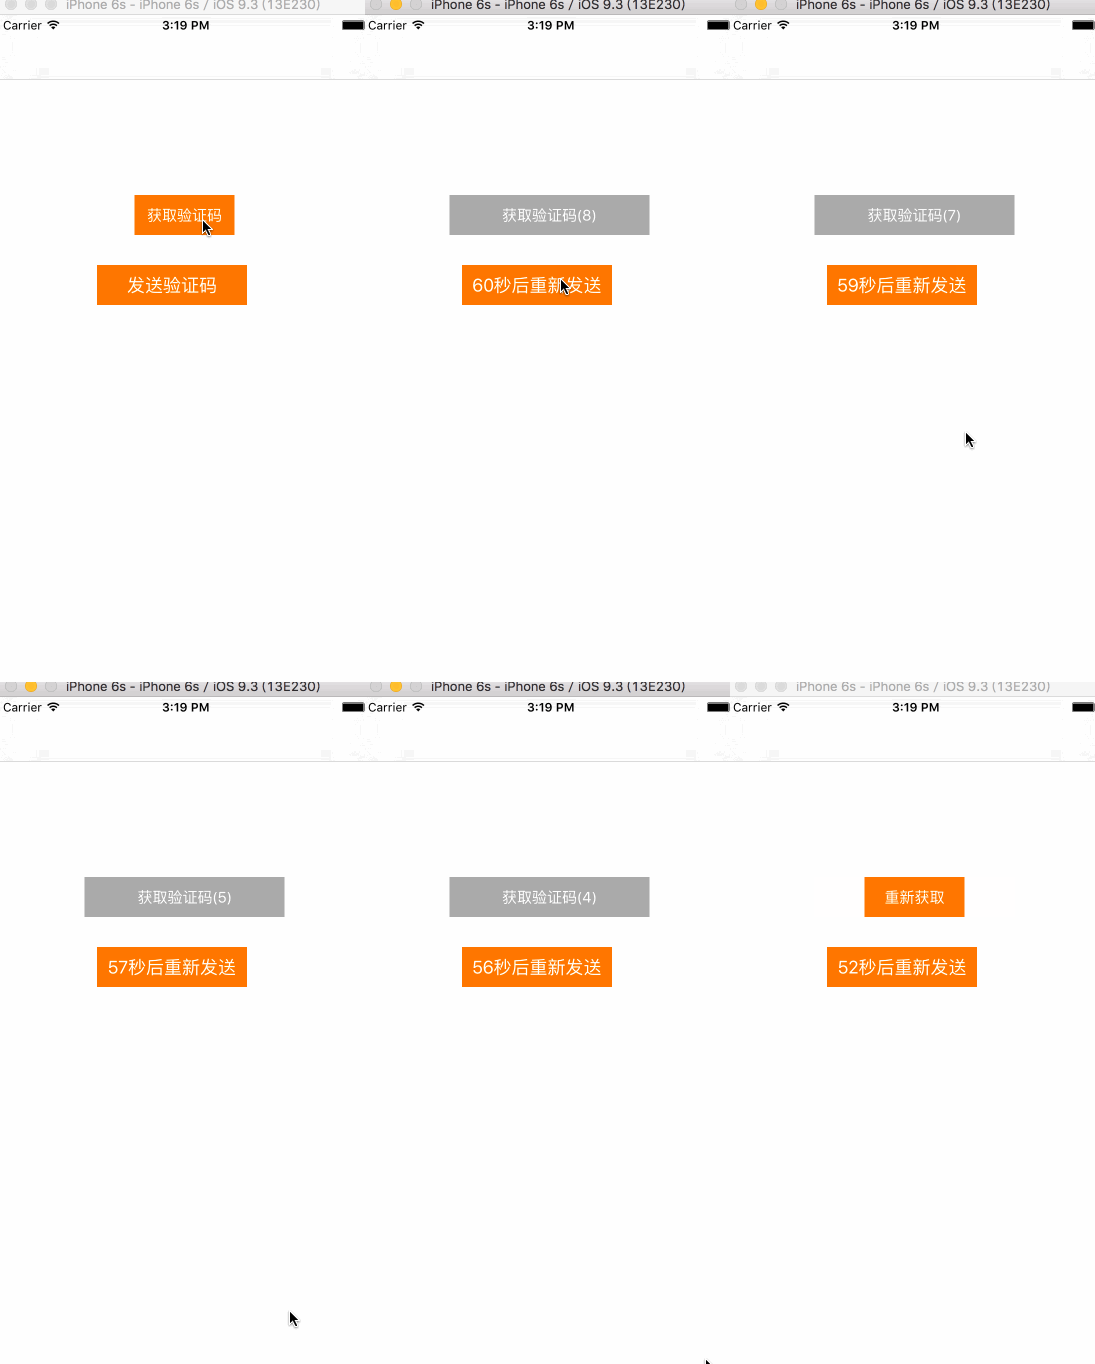
//第一種方法:基於 NSTimer - (void)btnAction:(UIButton *)sender { sender.enabled = NO; [self refreshButtonWidth]; [sender setTitle:[NSString stringWithFormat:@"獲取驗證碼(%zi)", _time] forState:UIControlStateNormal]; _timer = [NSTimer scheduledTimerWithTimeInterval:0.1 target:self selector:@selector(timeDown) userInfo:nil repeats:YES]; } - (void)timeDown { _time --; if (_time == 0) { [_btn setTitle:@"重新獲取" forState:UIControlStateNormal]; _btn.enabled = YES; [self refreshButtonWidth]; [_timer invalidate]; _timer = nil; _time = 5 ; return; } [_btn setTitle:[NSString stringWithFormat:@"獲取驗證碼(%zi)", _time] forState:UIControlStateNormal]; }
//第二種方法:基於 GCD dispatch_source_t - (void)sendMessage:(UIButton *)btn { if (self.phoneField.text.length == 0) { [self remindMessage:@"請輸入正確的手機號"]; }else{ __block int timeout=60; dispatch_queue_t queue = dispatch_get_global_queue(DISPATCH_QUEUE_PRIORITY_DEFAULT, 0); dispatch_source_t _timer = dispatch_source_create(DISPATCH_SOURCE_TYPE_TIMER, 0, 0,queue); dispatch_source_set_timer(_timer,dispatch_walltime(NULL, 0),1.0*NSEC_PER_SEC, 0); dispatch_source_set_event_handler(_timer, ^{ if(timeout<=0){ dispatch_source_cancel(_timer); dispatch_async(dispatch_get_main_queue(), ^{ [btn setTitle:@"發送驗證碼" forState:UIControlStateNormal]; btn.userInteractionEnabled = YES; }); }else{ int seconds = timeout % 60; NSString *strTime = [NSString stringWithFormat:@"%d", seconds]; if ([strTime isEqualToString:@"0"]) { strTime = [NSString stringWithFormat:@"%d",60]; } dispatch_async(dispatch_get_main_queue(), ^{ [UIView beginAnimations:nil context:nil]; [UIView setAnimationDuration:1]; [btn setTitle:[NSString stringWithFormat:@"%@秒後重新發送",strTime] forState:UIControlStateNormal]; [UIView commitAnimations]; btn.userInteractionEnabled = NO; }); timeout--; } }); dispatch_resume(_timer); }
效果圖:
12. 讓 UITextField 的默認占位符居上顯示
textField.contentVerticalAlignment = UIControlContentVerticalAlignmentTop;
13. 拍照、獲取相冊並自定義相機界面
#import "ViewController.h" @interface ViewController () @property (nonatomic, strong)UIImagePickerController * picker; @property (nonatomic, strong)UIImageView * imageView; @end @implementation ViewController - (void)viewDidLoad { [super viewDidLoad]; self.imageView = [[UIImageView alloc]initWithFrame:CGRectMake(50, 50, 250, 250)]; _imageView.backgroundColor = [UIColor grayColor]; [self.view addSubview:self.imageView]; UIButton * btn = [UIButton buttonWithType:UIButtonTypeCustom]; btn.frame = CGRectMake(100, 350, 100, 50); btn.backgroundColor = [UIColor greenColor]; [btn setTitle:@"保存圖片" forState:UIControlStateNormal]; [btn addTarget:self action:@selector(doClick:) forControlEvents:UIControlEventTouchUpInside]; [self.view addSubview:btn]; } - (void)doClick:(UIButton *)sender { self.picker = [[UIImagePickerController alloc]init]; _picker.delegate = self; // UIImagePickerControllerSourceTypePhotoLibrary 相冊 / Camera 拍照 / SavedPhotosAlbum 保存的列表 UIImagePickerControllerSourceType type = UIImagePickerControllerSourceTypeCamera; _picker.sourceType = type; _picker.allowsEditing = YES; [self presentViewController:self.picker animated:YES completion:^{ }]; //自定義相機界面 _picker.showsCameraControls = NO; UIToolbar * tool = [[UIToolbar alloc]initWithFrame:CGRectMake(0, self.view.frame.size.height - 40, self.view.frame.size.width, 40)]; tool.barStyle = UIBarStyleBlackTranslucent; tool.barTintColor = [UIColor greenColor]; UIBarButtonItem * cancel = [[UIBarButtonItem alloc]initWithTitle:@"取消" style:UIBarButtonItemStylePlain target:self action:@selector(touchCancel)]; cancel.width = self.view.frame.size.width/2; UIBarButtonItem * ok = [[UIBarButtonItem alloc]initWithTitle:@"確定" style:UIBarButtonItemStylePlain target:self action:@selector(touchOk)]; ok.width = self.view.frame.size.width/2; [tool setItems:@[cancel,ok]]; _picker.cameraOverlayView = tool; } #pragma mark - UIImagePickerControllerDelegate - (void)imagePickerController:(UIImagePickerController *)picker didFinishPickingMediaWithInfo:(NSDictionary *)info { // UIImagePickerControllerEditedImage 編輯後 / OriginalImage 原圖 UIImage * image = [info objectForKey:UIImagePickerControllerOriginalImage]; self.imageView.image = image; [self dismissViewControllerAnimated:YES completion:^{ }]; } - (void)touchCancel { [self.picker dismissViewControllerAnimated:YES completion:^{ }]; } - (void)touchOk { [self.picker takePicture]; }