
iOS 動畫實戰:從 CALayer 到 Core Animation 的完整地圖
概覽
iOS 裡隨處可見絢麗的動畫效果,但實現它們的過程其實並不複雜。這篇文章會帶你看清 iOS 動畫的全貌:如何用圖層(CALayer)承接非互動式的繪圖、如何用 Core Animation 產出基礎動畫、關鍵幀動畫、動畫組與轉場動畫,以及如何用 UIView 的裝飾方法把這些操作簡化。看完你會發現,很多原本「想做卻沒頭緒」的效果,在 iOS 上其實非常好寫。
一、CALayer 入門
CALayer 是什麼
談動畫之前,必須先認識 CALayer。它位於 QuartzCore 框架中,是一個跨平台框架,iOS 與 Mac OS X 都能用。使用 Core Animation 做動畫,本質就是把 CALayer 的內容轉為位圖交給硬體合成,因此想玩轉動畫,得先熟悉 CALayer。
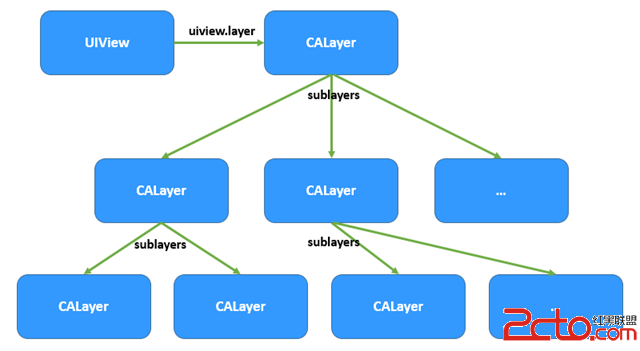
其實前面談 Quartz 2D 繪圖時就已經用到它了——drawRect: 方法所畫的東西,本質上是畫進 UIView 的 layer 屬性裡,只是當時不太感受得到。而在 Core Animation 中,我們操作的對象不再主要是 UIView,而是直接面對 CALayer。下圖呈現了兩者的關係:UIView 有一個 layer 屬性作為根圖層,根圖層上可以放子圖層,UIView 中所有看得到的內容都包含在 layer 裡。
常用屬性
CALayer 不在 UIKit 中,它不能響應事件,設計目標就是內容呈現與動畫操作。由於動畫能力是一開始就規劃進去的,CALayer 的許多屬性一改就會產生動畫效果,這類屬性被稱為「隱式動畫屬性」。不過對 UIView 的根圖層而言,屬性變更並不會形成動畫——因為根圖層多半扮演容器角色,若它一動就帶動畫,會直接波及所有子圖層。另外,根圖層由 iOS 負責建立,你無法重新創建它,但可以往裡頭加子圖層或移除子圖層。
下表列出 CALayer 的常用屬性:

幾個實務上要留意的點:
1. 隱式屬性動畫的本質,是這些屬性的變更預設隱含了一個 CABasicAnimation 實作,細節可查 Xcode 文件的「Animatable Properties」。
2. CALayer 中很少用 frame,因為 frame 本身不支援動畫,通常用 bounds 與 position 取代。
3. CALayer 的透明度用 opacity 而非 alpha;中心點用 position 而非 center。
4. anchorPoint 是圖層的錨點,取值範圍是 (0~1, 0~1),代表 x、y 軸上的比例位置。這個點永遠會與 position(中心點)重合,因此當中心點固定時,改動 anchorPoint 就能改變圖層顯示的位置。
具體說明一下 anchorPoint:假設有個 100×100 的圖層,中心點在 (50,50),對應 frame 為 (0,0,100,100)。anchorPoint 預設 (0.5,0.5),與中心點重合(圖 1);把 anchorPoint 改成 (0,0),錨點跑到左上角,但 position 不變,於是整個圖層往右下移動(圖 2);再改成 (1,1),position 依舊不動,錨點落在右下角(圖 3)。

下面用一個小例子把這些屬性串起來:初始化時畫一個正方形,把圓角半徑設為邊長的一半讓它看起來是圓形;點擊螢幕時修改圖層屬性產生動畫。注意程式碼中並沒有去改 UIView 的 layer 屬性,因為根圖層無法形成動畫。
#define WIDTH 50

- (void)viewDidLoad {
    [super viewDidLoad];
    [self drawMyLayer];
}

#pragma mark 繪製圖層
- (void)drawMyLayer {
    CGSize size = [UIScreen mainScreen].bounds.size;
    CALayer *layer = [[CALayer alloc] init];
    // QuartzCore 是跨平台框架,無法直接用 UIColor,需轉成 CGColor
    layer.backgroundColor = [UIColor colorWithRed:0 green:146/255.0 blue:1.0 alpha:1.0].CGColor;
    layer.position = CGPointMake(size.width / 2, size.height / 2);
    layer.bounds = CGRectMake(0, 0, WIDTH, WIDTH);
    // 圓角半徑等於邊長一半時,看起來就是圓形
    layer.cornerRadius = WIDTH / 2;
    layer.shadowColor = [UIColor grayColor].CGColor;
    layer.shadowOffset = CGSizeMake(2, 2);
    layer.shadowOpacity = .9;
    [self.view.layer addSublayer:layer];
}

#pragma mark 點擊放大
- (void)touchesEnded:(NSSet *)touches withEvent:(UIEvent *)event {
    UITouch *touch = [touches anyObject];
    CALayer *layer = self.view.layer.sublayers[0];
    CGFloat width = layer.bounds.size.width;
    width = (width == WIDTH) ? WIDTH * 4 : WIDTH;
    layer.bounds = CGRectMake(0, 0, width, width);
    layer.position = [touch locationInView:self.view];
    layer.cornerRadius = width / 2;
}

二、在 CALayer 上繪圖
前面用 Quartz 2D 繪圖時,是呼叫 UIView 的 drawRect:,本質仍是畫進圖層;這裡要談的是直接對圖層繪圖。做法幾乎一樣,差別在於 drawRect: 由 UIKit 主動呼叫,裡頭可以用 UIKit 封裝的方法;而直接畫進圖層時並非 UIKit 呼叫,只能用原生的 Core Graphics API。
圖層繪圖有兩種途徑,但無論哪一種,畫完都必須呼叫圖層的 setNeedsDisplay 方法(注意是圖層的方法,不是 UIView 的):
· 透過圖層代理的 drawLayer:inContext: 繪製
· 透過自訂圖層的 drawInContext: 繪製
使用代理方法繪圖
只要指定圖層的 delegate,並在代理物件中實作 -(void)drawLayer:(CALayer *)layer inContext:(CGContextRef)ctx 即可。要注意的是,這個方法雖是代理方法,卻不用手動宣告遵循 CALayerDelegate——CALayer 為 NSObject 做了分類擴充,所有 NSObject 都帶有這個方法。另外,設好代理後一定要呼叫 setNeedsDisplay,否則畫不出東西。
下面的例子示範在自訂圖層上畫一張圖並裁成圓形,這種效果在 App 裡很常見(例如新版手機 QQ 的頭像):
#define PHOTO_HEIGHT 150

- (void)viewDidLoad {
    [super viewDidLoad];
    CALayer *layer = [[CALayer alloc] init];
    layer.bounds = CGRectMake(0, 0, PHOTO_HEIGHT, PHOTO_HEIGHT);
    layer.position = CGPointMake(160, 200);
    layer.backgroundColor = [UIColor redColor].CGColor;
    layer.cornerRadius = PHOTO_HEIGHT / 2;
    // 只設圓角對純色有效,圖片無法正確裁切,必須加上 masksToBounds
    layer.masksToBounds = YES;
    // 陰影與 masksToBounds 互斥,因為陰影繪製在外邊框之外
    layer.borderColor = [UIColor whiteColor].CGColor;
    layer.borderWidth = 2;
    layer.delegate = self;
    [self.view.layer addSublayer:layer];
    // 不呼叫這個方法,代理方法不會被觸發
    [layer setNeedsDisplay];
}

#pragma mark 繪製圖形、圖像到圖層
// ctx 是圖層的圖形上下文,繪圖座標相對於圖層而非螢幕
- (void)drawLayer:(CALayer *)layer inContext:(CGContextRef)ctx {
    CGContextSaveGState(ctx);
    // 上下翻轉,修正圖片倒立的問題
    CGContextScaleCTM(ctx, 1, -1);
    CGContextTranslateCTM(ctx, 0, -PHOTO_HEIGHT);
    UIImage *image = [UIImage imageNamed:@"photo.png"];
    CGContextDrawImage(ctx, CGRectMake(0, 0, PHOTO_HEIGHT, PHOTO_HEIGHT), image.CGImage);
    CGContextRestoreGState(ctx);
}

在 drawLayer:inContext: 中,你可以透過參數拿到要繪製的圖層與對應的圖形上下文,所有座標都是相對於該圖層而言的。
為什麼圓形裁切一定要設 masksToBounds?因為把圖片畫進圖層時,系統會另外建立一個子圖層來承載它。此時底圖層雖有圓角,子圖層卻仍是矩形,只有 masksToBounds = YES 讓子圖層依底圖層裁切,圓角才會生效。網上常見的「UIImageView 的 layer 設了 cornerRadius 卻沒效果」也是同一個原因。
擴充:同時要圓形裁切與陰影
masksToBounds = YES 能給你圓角,但代價是陰影消失——因為裁切的意思就是外框不可見,而陰影正好畫在外框之外。解法是換個思路:用兩個同尺寸的圖層,下層負責陰影,上層負責顯示圖片。
#define PHOTO_HEIGHT 150

- (void)viewDidLoad {
    [super viewDidLoad];
    CGPoint position = CGPointMake(160, 200);
    CGRect bounds = CGRectMake(0, 0, PHOTO_HEIGHT, PHOTO_HEIGHT);
    CGFloat cornerRadius = PHOTO_HEIGHT / 2;
    CGFloat borderWidth = 2;

    // 陰影圖層
    CALayer *layerShadow = [[CALayer alloc] init];
    layerShadow.bounds = bounds;
    layerShadow.position = position;
    layerShadow.cornerRadius = cornerRadius;
    layerShadow.shadowColor = [UIColor grayColor].CGColor;
    layerShadow.shadowOffset = CGSizeMake(2, 1);
    layerShadow.shadowOpacity = 1;
    layerShadow.borderColor = [UIColor whiteColor].CGColor;
    layerShadow.borderWidth = borderWidth;
    [self.view.layer addSublayer:layerShadow];

    // 容器圖層
    CALayer *layer = [[CALayer alloc] init];
    layer.bounds = bounds;
    layer.position = position;
    layer.backgroundColor = [UIColor redColor].CGColor;
    layer.cornerRadius = cornerRadius;
    layer.masksToBounds = YES;
    layer.borderColor = [UIColor whiteColor].CGColor;
    layer.borderWidth = borderWidth;
    layer.delegate = self;
    [self.view.layer addSublayer:layer];
    [layer setNeedsDisplay];
}

- (void)drawLayer:(CALayer *)layer inContext:(CGContextRef)ctx {
    CGContextSaveGState(ctx);
    CGContextScaleCTM(ctx, 1, -1);
    CGContextTranslateCTM(ctx, 0, -PHOTO_HEIGHT);
    UIImage *image = [UIImage imageNamed:@"photo.jpg"];
    CGContextDrawImage(ctx, CGRectMake(0, 0, PHOTO_HEIGHT, PHOTO_HEIGHT), image.CGImage);
    CGContextRestoreGState(ctx);
}

擴充:圖層形變
用 Core Graphics 畫圖會上下顛倒,前面是靠圖形上下文反轉解決的。其實也可以讓圖像繞 x 軸旋轉 180 度達到同樣效果,只是當時用圖形上下文做不到繞軸旋轉。學會圖層之後,直接操作圖層的 transform 就好,而且更直觀。transform 是 CATransform3D 型別,可在三個維度上變形,用法和二維版本類似,也有對應的便捷方法(CATransform3DMakeTranslation、CATransform3DMakeScale、CATransform3DMakeRotation):
- (void)viewDidLoad {
    [super viewDidLoad];
    // ...(前面建立陰影圖層與容器圖層的程式碼相同)

    // 用圖層形變修正圖像倒立
    layer.transform = CATransform3DMakeRotation(M_PI, 1, 0, 0);

    layer.delegate = self;
    [self.view.layer addSublayer:layer];
    [layer setNeedsDisplay];
}

- (void)drawLayer:(CALayer *)layer inContext:(CGContextRef)ctx {
    UIImage *image = [UIImage imageNamed:@"photo.jpg"];
    CGContextDrawImage(ctx, CGRectMake(0, 0, PHOTO_HEIGHT, PHOTO_HEIGHT), image.CGImage);
}
說實話,如果只是單純顯示一張圖,根本不必繞這麼大一圈——直接設 layer.contents 就好,不牽涉繪圖也就沒有顛倒問題:
- (void)viewDidLoad {
    [super viewDidLoad];
    // ...(建立陰影圖層與容器圖層的程式碼相同)

    // 注意這裡一定要轉為 CGImage
    UIImage *image = [UIImage imageNamed:@"photo.jpg"];
    [layer setContents:(id)image.CGImage];

    [self.view.layer addSublayer:layer];
}
那為什麼還要花篇幅談形變?因為它在動畫中意義重大。動畫開發裡,形變往往不是直接設 transform,而是透過 keyPath 設定。兩者本質相同,只是用了 KVC 動態改值;這種寫法在動畫中非常常用,因為它能輕鬆把多種形變組在一個 key path 上。要解決前面提到的旋轉問題,只要把設定改成:
[layer setValue:@M_PI forKeyPath:@"transform.rotation.x"];
可用的 key path 清單可查 Xcode 文件的「CATransform3D Key Paths」一節。
使用自訂圖層繪圖
自訂圖層繪圖,只要寫一個繼承自 CALayer 的類別,在 drawInContext: 中繪製即可。同樣地,要讓內容顯示出來,也得呼叫 setNeedsDisplay,否則 drawInContext: 不會被觸發。
前面說過「在 UIView 中繪圖的本質也是畫進圖層」,下面就用自訂圖層來證明這件事:我們把自訂圖層加進一個 UIView 的根圖層(這個 UIView 本身跟自訂圖層繪圖沒有直接關係)。你會看到:UIView 顯示時,它的根圖層會自動建立一個 CGContextRef(CALayer 本質用的是位圖上下文),接著呼叫圖層代理(UIView 建立圖層時會自動把代理設為自己)的 drawLayer:inContext:,把圖形上下文當參數傳進去;而 UIView 的 drawLayer:inContext: 裡又會呼叫 drawRect:,在 drawRect: 中用 UIGraphicsGetCurrentContext() 拿到的,正是前面建立的那個上下文。
KCLayer.m
@implementation KCLayer

- (void)drawInContext:(CGContextRef)ctx {
    NSLog(@"3-drawInContext:");
    NSLog(@"CGContext:%@", ctx);
    CGContextSetRGBFillColor(ctx, 135.0/255.0, 232.0/255.0, 84.0/255.0, 1);
    CGContextSetRGBStrokeColor(ctx, 135.0/255.0, 232.0/255.0, 84.0/255.0, 1);
    CGContextMoveToPoint(ctx, 94.5, 33.5);
    // 繪製星形
    CGContextAddLineToPoint(ctx, 104.02, 47.39);
    CGContextAddLineToPoint(ctx, 120.18, 52.16);
    CGContextAddLineToPoint(ctx, 109.91, 65.51);
    CGContextAddLineToPoint(ctx, 110.37, 82.34);
    CGContextAddLineToPoint(ctx, 94.5, 76.7);
    CGContextAddLineToPoint(ctx, 78.63, 82.34);
    CGContextAddLineToPoint(ctx, 79.09, 65.51);
    CGContextAddLineToPoint(ctx, 68.82, 52.16);
    CGContextAddLineToPoint(ctx, 84.98, 47.39);
    CGContextClosePath(ctx);
    CGContextDrawPath(ctx, kCGPathFillStroke);
}

@end
KCView.m
@implementation KCView

- (instancetype)initWithFrame:(CGRect)frame {
    NSLog(@"initWithFrame:");
    if (self = [super initWithFrame:frame]) {
        KCLayer *layer = [[KCLayer alloc] init];
        layer.bounds = CGRectMake(0, 0, 185, 185);
        layer.position = CGPointMake(160, 284);
        layer.backgroundColor = [UIColor colorWithRed:0 green:146/255.0 blue:1.0 alpha:1.0].CGColor;
        [layer setNeedsDisplay];
        [self.layer addSublayer:layer];
    }
    return self;
}

- (void)drawRect:(CGRect)rect {
    NSLog(@"2-drawRect:");
    NSLog(@"CGContext:%@", UIGraphicsGetCurrentContext());
    [super drawRect:rect];
}

- (void)drawLayer:(CALayer *)layer inContext:(CGContextRef)ctx {
    NSLog(@"1-drawLayer:inContext:");
    NSLog(@"CGContext:%@", ctx);
    [super drawLayer:layer inContext:ctx];
}

@end
KCMainViewController.m
- (void)viewDidLoad {
    [super viewDidLoad];
    KCView *view = [[KCView alloc] initWithFrame:[UIScreen mainScreen].bounds];
    view.backgroundColor = [UIColor colorWithRed:249.0/255.0 green:249.0/255.0 blue:249.0/255.0 alpha:1];
    [self.view addSubview:view];
}

三、Core Animation
在 iOS 中做一個動畫有多簡單?呼叫 UIView 的區塊方法就行——這在其他平台上幾乎不可想像。先看一個圖片放大的例子:
- (void)viewDidLoad {
    [super viewDidLoad];
    UIImage *image = [UIImage imageNamed:@"open2.png"];
    UIImageView *imageView = [[UIImageView alloc] init];
    imageView.image = image;
    imageView.frame = CGRectMake(120, 140, 80, 80);
    [self.view addSubview:imageView];

    // 延遲 2 秒開始,持續 1 秒的動畫
    [UIView animateWithDuration:1 delay:2 options:UIViewAnimationOptionBeginFromCurrentState animations:^{
        imageView.frame = CGRectMake(80, 100, 160, 160);
    } completion:nil];
}
方便歸方便,但動畫究竟怎麼跑我們不清楚,而且有幾件事它做不到:動畫能不能暫停?多個動畫能不能組合?這就需要認識 Core Animation(同樣在 QuartzCore 框架中)。iOS 的核心動畫分為四類:基礎動畫、關鍵幀動畫、動畫組、轉場動畫,類別關係大致如下:

CAAnimation:核心動畫的基礎類別,不可直接使用,負責動畫運行時間與速度控制,本身實作 CAMediaTiming 協議。
CAPropertyAnimation:屬性動畫的基類(透過可動畫屬性做動畫),不可直接使用。
CAAnimationGroup:動畫組,採組合模式設計,可統一控制所有動畫行為,組內動畫並發執行。
CATransition:轉場動畫,主要透過濾鏡設定效果。
CABasicAnimation:基礎動畫,透過屬性修改控制參數,只有初始與結束兩個狀態。
CAKeyframeAnimation:關鍵幀動畫,同樣靠屬性控制,但可有多個狀態。
基礎動畫與關鍵幀動畫都屬於屬性動畫——靠改屬性值產生動畫,開發者只需給出頭尾狀態,中間的「補間動畫」由系統自動補上。關鍵幀動畫可以設多組屬性值,每兩組之間的補間同樣交給系統;從這個角度看,基礎動畫其實就是只有兩個關鍵幀的關鍵幀動畫。
基礎動畫
很多需求用基礎動畫就能解決。前面 UIView 區塊的放大範例,本質上就是基礎動畫(iOS 7 之後 UIView 也封裝了關鍵幀動畫),只是裝飾方法把細節藏起來了。不用封裝方法的話,建立動畫一般分三步:
1. 初始化動畫並指定動畫屬性;
2. 設定屬性的初始值(可省略)、結束值與其他參數;
3. 把動畫加到圖層上。
下面做一個移動動畫:點螢幕哪裡,落花瓣就飄向哪裡。
@interface KCMainViewController () {
    CALayer *_layer;
}
@end

@implementation KCMainViewController

- (void)viewDidLoad {
    [super viewDidLoad];
    UIImage *backgroundImage = [UIImage imageNamed:@"background.jpg"];
    self.view.backgroundColor = [UIColor colorWithPatternImage:backgroundImage];

    _layer = [[CALayer alloc] init];
    _layer.bounds = CGRectMake(0, 0, 10, 20);
    _layer.position = CGPointMake(50, 150);
    _layer.contents = (id)[UIImage imageNamed:@"petal.png"].CGImage;
    [self.view.layer addSublayer:_layer];
}

#pragma mark 移動動畫
- (void)translatonAnimation:(CGPoint)location {
    // 1. 建立動畫並指定動畫屬性
    CABasicAnimation *basicAnimation = [CABasicAnimation animationWithKeyPath:@"position"];
    // 2. 設定初始值與結束值
    // 不設 fromValue 時預設為圖層當前狀態
    basicAnimation.toValue = [NSValue valueWithCGPoint:location];
    basicAnimation.duration = 5.0;
    // basicAnimation.repeatCount = HUGE_VALF;      // 無限循環
    // basicAnimation.removedOnCompletion = NO;     // 執行完不移除
    // 3. 加到圖層,key 等同替動畫命名
    [_layer addAnimation:basicAnimation forKey:@"KCBasicAnimation_Translation"];
}

#pragma mark 點擊事件
- (void)touchesBegan:(NSSet *)touches withEvent:(UIEvent *)event {
    UITouch *touch = touches.anyObject;
    CGPoint location = [touch locationInView:self.view];
    [self translatonAnimation:location];
}

@end

動畫跑完了,但有個問題:動畫結束後圖層回到了原位(用 UIView 封裝的方法不會有這毛病)。原因在於——圖層動畫只是把圖層內容轉成位圖交給硬體合成,圖層本身並沒有真的改變。上面這個動畫並沒有改動圖層的 position(縮放動畫同理,bounds 也沒變),所以動畫一結束,圖層還在原來的位置。如果這個圖層掛在 UIView 上,你會發現就算它視覺上移動了,點擊事件仍然只認原本的位置。
解法不少,這裡選擇在動畫結束後重新設定位置:
- (void)translatonAnimation:(CGPoint)location {
    CABasicAnimation *basicAnimation = [CABasicAnimation animationWithKeyPath:@"position"];
    basicAnimation.toValue = [NSValue valueWithCGPoint:location];
    basicAnimation.duration = 5.0;
    basicAnimation.delegate = self;
    // 把終點位置存進動畫,結束後取用
    [basicAnimation setValue:[NSValue valueWithCGPoint:location] forKey:@"KCBasicAnimationLocation"];
    [_layer addAnimation:basicAnimation forKey:@"KCBasicAnimation_Translation"];
}

#pragma mark - 動畫代理

- (void)animationDidStart:(CAAnimation *)anim {
    NSLog(@"animation(%@) start. _layer.frame=%@", anim, NSStringFromCGRect(_layer.frame));
    NSLog(@"%@", [_layer animationForKey:@"KCBasicAnimation_Translation"]);
}

- (void)animationDidStop:(CAAnimation *)anim finished:(BOOL)flag {
    NSLog(@"animation(%@) stop. _layer.frame=%@", anim, NSStringFromCGRect(_layer.frame));
    _layer.position = [[anim valueForKey:@"KCBasicAnimationLocation"] CGPointValue];
}
這裡透過動畫代理監聽開始與結束事件,開始前先掛一個自訂屬性保存終點,結束後把圖層位置設為終點。
跑一下你會發現新問題:動畫結束後,圖層又從起點跑回終點一次。原因還是前面提過的——對非根圖層設定可動畫屬性(這裡剛設了 position),會觸發隱式動畫。解法有兩個:關閉隱式動畫,或把動畫圖層設為根圖層。這裡根圖層已經被背景佔用,所以只能選前者,用 CATransaction 把隱式動畫關掉:
- (void)animationDidStop:(CAAnimation *)anim finished:(BOOL)flag {
    NSLog(@"animation(%@) stop. _layer.frame=%@", anim, NSStringFromCGRect(_layer.frame));
    [CATransaction begin];
    [CATransaction setDisableActions:YES];   // 關閉隱式動畫
    _layer.position = [[anim valueForKey:@"KCBasicAnimationLocation"] CGPointValue];
    [CATransaction commit];
}
補充:在 animationDidStop 中重設位置,主要是為了示範「關閉隱式動畫」與「動畫事件間傳值」這兩件事。實務上有朋友發現這種寫法偶爾會出現「瞬間從原點跳回終點」的閃跳,這其實不難解:必須明確設定 fromValue,並在動畫開始前就把 position 設為終點(同樣要關掉隱式動畫)。不過單純做平移動畫時,直接用隱式動畫就好,不必繞這麼遠。
再來,上面的落花顯得有點生硬——真實的落花不會是自由落體,空氣阻力與風會讓它旋轉搖擺。我們加一個旋轉動畫。要注意:圖層的形變一律以錨點為基準,旋轉圓心就是錨點位置。
- (void)viewDidLoad {
    [super viewDidLoad];
    // ...(建立背景與圖層的程式碼相同)
    _layer.anchorPoint = CGPointMake(0.5, 0.6);   // 設定錨點
    // ...
}

#pragma mark 旋轉動畫
- (void)rotationAnimation {
    CABasicAnimation *basicAnimation = [CABasicAnimation animationWithKeyPath:@"transform.rotation.z"];
    basicAnimation.toValue = [NSNumber numberWithFloat:M_PI_2 * 3];
    basicAnimation.duration = 6.0;
    basicAnimation.autoreverses = true;    // 轉過去再轉回來
    [_layer addAnimation:basicAnimation forKey:@"KCBasicAnimation_Rotation"];
}

#pragma mark 點擊事件
- (void)touchesBegan:(NSSet *)touches withEvent:(UIEvent *)event {
    UITouch *touch = touches.anyObject;
    CGPoint location = [touch locationInView:self.view];
    [self translatonAnimation:location];
    [self rotationAnimation];
}
注意:只給移動動畫設了 delegate,旋轉動畫沒設,否則代理方法會被呼叫兩次。另外旋轉設了無限循環,而兩個動畫時長無關聯,移動停下時旋轉可能還在跑。要讓移動結束時旋轉也跟著停,就得用上暫停與恢復。
核心動畫有「媒體時間」的概念。假設一個旋轉一圈需 60 秒的動畫,轉了 90 度時媒體時間就是 15 秒。此時要暫停,只要把圖層的 timeOffset 設為 15 秒,並把 speed 設為 0。恢復時(假設又過了 60 秒,媒體時間 75 秒),把 beginTime 設為「當前媒體時間 − 暫停時的偏移量」(75 − 15 = 60 秒),動畫就會從 60 秒處的狀態續跑;同時把 timeOffset 歸零、speed 設回 1。真正讓動畫停下與繼續的其實是 speed,而 timeOffset 與 beginTime 的設定是為了讓畫面銜接得順。
下面的程式碼示範:移動結束後暫停旋轉,再次點擊時恢復旋轉(移動途中點擊可暫停/恢復兩者;但移動結束後,由於移動動畫已結束而非暫停,再點擊只能恢復旋轉)。
- (void)touchesBegan:(NSSet *)touches withEvent:(UIEvent *)event {
    UITouch *touch = touches.anyObject;
    CGPoint location = [touch locationInView:self.view];

    CAAnimation *animation = [_layer animationForKey:@"KCBasicAnimation_Translation"];
    if (animation) {
        if (_layer.speed == 0) {
            [self animationResume];
        } else {
            [self animationPause];
        }
    } else {
        [self translatonAnimation:location];
        [self rotationAnimation];
    }
}

#pragma mark 動畫暫停
- (void)animationPause {
    // 取得圖層動畫的媒體時間;第二個參數用於指定子圖層,這裡不需要
    CFTimeInterval interval = [_layer convertTime:CACurrentMediaTime() fromLayer:nil];
    [_layer setTimeOffset:interval];   // 凍結在當前畫面
    _layer.speed = 0;                  // 速度歸零,暫停
}

#pragma mark 動畫恢復
- (void)animationResume {
    CFTimeInterval beginTime = CACurrentMediaTime() - _layer.timeOffset;
    _layer.timeOffset = 0;
    _layer.beginTime = beginTime;
    _layer.speed = 1.0;
}

- (void)animationDidStop:(CAAnimation *)anim finished:(BOOL)flag {
    [CATransaction begin];
    [CATransaction setDisableActions:YES];
    _layer.position = [[anim valueForKey:@"KCBasicAnimationLocation"] CGPointValue];
    [CATransaction commit];
    [self animationPause];
}
另外在旋轉動畫中要記得把 removedOnCompletion 設為 NO,否則跑一輪就被銷毀。

注意:暫停是針對整個圖層,而不是圖層上的某一個動畫。
關鍵幀動畫
熟悉 Flash 的朋友對關鍵幀動畫不陌生:開發者只指定幾個關鍵狀態,中間的動畫由系統自動補上(兩關鍵幀之間稱為「補間動畫」),不必逐幀控制。
關鍵幀動畫有兩種形式:用屬性值控制,或用路徑控制。後者優先級更高——設了 path,values 就不再生效。
前面的落花顯然不可能沿直線落下,我們用 values 屬性控制它的下落軌跡。假設路徑如下圖,需要四個關鍵幀:

#pragma mark 關鍵幀動畫(values 版本)
- (void)translationAnimation {
    CAKeyframeAnimation *keyframeAnimation = [CAKeyframeAnimation animationWithKeyPath:@"position"];
    // 關鍵幀動畫的初始值不能省略
    NSValue *key1 = [NSValue valueWithCGPoint:_layer.position];
    NSValue *key2 = [NSValue valueWithCGPoint:CGPointMake(80, 220)];
    NSValue *key3 = [NSValue valueWithCGPoint:CGPointMake(45, 300)];
    NSValue *key4 = [NSValue valueWithCGPoint:CGPointMake(55, 400)];
    keyframeAnimation.values = @[key1, key2, key3, key4];
    keyframeAnimation.duration = 8.0;
    keyframeAnimation.beginTime = CACurrentMediaTime() + 2;   // 延遲 2 秒
    [_layer addAnimation:keyframeAnimation forKey:@"KCKeyframeAnimation_Position"];
}

效果比基礎動畫好,但軌跡仍是直線(由四個關鍵幀自動串接而成)。想讓花瓣沿曲線飄落,就要用第二種形式——路徑。假設路徑如下圖:

這是一條貝茲曲線,實作如下:
#pragma mark 關鍵幀動畫(path 版本)
- (void)translationAnimation {
    CAKeyframeAnimation *keyframeAnimation = [CAKeyframeAnimation animationWithKeyPath:@"position"];

    CGPathRef path = CGPathCreateMutable();
    CGPathMoveToPoint(path, NULL, _layer.position.x, _layer.position.y);       // 起點
    CGPathAddCurveToPoint(path, NULL, 160, 280, -30, 300, 55, 400);           // 二次貝茲曲線
    keyframeAnimation.path = path;
    CGPathRelease(path);

    keyframeAnimation.duration = 8.0;
    keyframeAnimation.beginTime = CACurrentMediaTime() + 5;
    [_layer addAnimation:keyframeAnimation forKey:@"KCKeyframeAnimation_Position"];
}

自然多了。不過路徑類型的關鍵幀動畫有個規則:系統從路徑繪製的起點開始跑,直到終點。若路徑是矩形,會從左上角出發順時針跑一圈回到左上角;若是橢圓,則從橢圓右側(0 度)出發順時針一圈回到右側。
關鍵幀動畫的進階屬性
keyTimes:控制各關鍵幀的時間分配。前面設四個關鍵幀,預設每兩幀間隔為 8/(4−1) 秒。若希望第 1→2 幀佔 4 秒、第 2→3 幀佔 2 秒、第 3→4 幀佔 2 秒,可設 keyTimes 為 0.0、0.5、0.75、1.0(需轉為 NSNumber)——也就是第 1→2 幀跑到總時長的 50%,第 2→3 幀跑到 75%,第 3→4 幀在 8 秒時結束。
calculationMode:動畫計算模式。預設是 kCAAnimationLinear(線性連續),所以關鍵幀之間會有平滑過渡;若設為 kCAAnimationDiscrete(離散),動畫會在各幀之間直接跳變,沒有中間過程。其他模式還有 kCAAnimationPaced(均勻執行,會忽略 keyTimes)、kCAAnimationCubic(平滑執行,位置類關鍵幀的軌跡更順)、kCAAnimationCubicPaced(平滑且均勻)。下圖以橫軸為時間、縱軸為動畫屬性,呈現了幾種模式的差異:

動畫組
真實的運動往往是複合運動,但屬性動畫一次只能控制一個屬性(基礎動畫、關鍵幀動畫皆然)。一兩個動畫的組合還好處理,動畫一多就很痛苦——動畫組就是為此而生。它是多個動畫的集合,加入其中的動畫都受控於動畫組,公共行為可以統一設定,而且組內動畫並發執行,共同拼出複雜效果。
用法很簡單:先各自建立單一動畫(基礎或關鍵幀皆可),加入動畫組,再把動畫組掛到圖層上。下面把旋轉動畫與路徑關鍵幀動畫組合起來,讓落花飄落時也帶著轉動:
#pragma mark 基礎旋轉動畫
- (CABasicAnimation *)rotationAnimation {
    CABasicAnimation *basicAnimation = [CABasicAnimation animationWithKeyPath:@"transform.rotation.z"];
    CGFloat toValue = M_PI_2 * 3;
    basicAnimation.toValue = [NSNumber numberWithFloat:toValue];
    basicAnimation.autoreverses = true;
    basicAnimation.repeatCount = HUGE_VALF;
    basicAnimation.removedOnCompletion = NO;
    [basicAnimation setValue:[NSNumber numberWithFloat:toValue] forKey:@"KCBasicAnimationProperty_ToValue"];
    return basicAnimation;
}

#pragma mark 關鍵幀移動動畫
- (CAKeyframeAnimation *)translationAnimation {
    CAKeyframeAnimation *keyframeAnimation = [CAKeyframeAnimation animationWithKeyPath:@"position"];
    CGPoint endPoint = CGPointMake(55, 400);
    CGPathRef path = CGPathCreateMutable();
    CGPathMoveToPoint(path, NULL, _layer.position.x, _layer.position.y);
    CGPathAddCurveToPoint(path, NULL, 160, 280, -30, 300, endPoint.x, endPoint.y);
    keyframeAnimation.path = path;
    CGPathRelease(path);
    [keyframeAnimation setValue:[NSValue valueWithCGPoint:endPoint] forKey:@"KCKeyframeAnimationProperty_EndPosition"];
    return keyframeAnimation;
}

#pragma mark 建立動畫組
- (void)groupAnimation {
    CAAnimationGroup *animationGroup = [CAAnimationGroup animation];
    CABasicAnimation *basicAnimation = [self rotationAnimation];
    CAKeyframeAnimation *keyframeAnimation = [self translationAnimation];
    animationGroup.animations = @[basicAnimation, keyframeAnimation];
    animationGroup.delegate = self;
    animationGroup.duration = 10.0;                        // 組內動畫若已自設 duration,此處不生效
    animationGroup.beginTime = CACurrentMediaTime() + 5;   // 延遲 5 秒
    [_layer addAnimation:animationGroup forKey:nil];
}

#pragma mark - 代理方法
- (void)animationDidStop:(CAAnimation *)anim finished:(BOOL)flag {
    CAAnimationGroup *animationGroup = (CAAnimationGroup *)anim;
    CABasicAnimation *basicAnimation = animationGroup.animations[0];
    CAKeyframeAnimation *keyframeAnimation = animationGroup.animations[1];
    CGFloat toValue = [[basicAnimation valueForKey:@"KCBasicAnimationProperty_ToValue"] floatValue];
    CGPoint endPoint = [[keyframeAnimation valueForKey:@"KCKeyframeAnimationProperty_EndPosition"] CGPointValue];

    [CATransaction begin];
    [CATransaction setDisableActions:YES];
    _layer.position = endPoint;
    _layer.transform = CATransform3DMakeRotation(toValue, 0, 0, 1);
    [CATransaction commit];
}

轉場動畫
轉場動畫就是以一組動畫從一個場景過渡到另一個場景,使用步驟是:
1. 建立轉場動畫;
2. 設定轉場類型、子類型(可選)及其他屬性;
3. 設定轉場後的新視圖,把動畫加到圖層。
下表列出常用的轉場類型(注意:部分屬蘋果未公開的私有 API,目前仍可正常使用):

支援方向設定的類型還可搭配子類型:

前面為了用 UIScrollView 做無限循環相簿,得花不少力氣做效能優化;改用轉場動畫,一個 UIImageView 就能做出漂亮的循環相簿:
#define IMAGE_COUNT 5

@interface KCMainViewController () {
    UIImageView *_imageView;
    int _currentIndex;
}
@end

@implementation KCMainViewController

- (void)viewDidLoad {
    [super viewDidLoad];
    _imageView = [[UIImageView alloc] init];
    _imageView.frame = [UIScreen mainScreen].applicationFrame;
    _imageView.contentMode = UIViewContentModeScaleAspectFit;
    _imageView.image = [UIImage imageNamed:@"0.jpg"];
    [self.view addSubview:_imageView];

    UISwipeGestureRecognizer *leftSwipe = [[UISwipeGestureRecognizer alloc] initWithTarget:self action:@selector(leftSwipe:)];
    leftSwipe.direction = UISwipeGestureRecognizerDirectionLeft;
    [self.view addGestureRecognizer:leftSwipe];

    UISwipeGestureRecognizer *rightSwipe = [[UISwipeGestureRecognizer alloc] initWithTarget:self action:@selector(rightSwipe:)];
    rightSwipe.direction = UISwipeGestureRecognizerDirectionRight;
    [self.view addGestureRecognizer:rightSwipe];
}

- (void)leftSwipe:(UISwipeGestureRecognizer *)gesture  { [self transitionAnimation:YES]; }
- (void)rightSwipe:(UISwipeGestureRecognizer *)gesture { [self transitionAnimation:NO]; }

#pragma mark 轉場動畫
- (void)transitionAnimation:(BOOL)isNext {
    CATransition *transition = [[CATransition alloc] init];
    // 蘋果未公開的類型只能用字串,沒有對應常量
    transition.type = @"cube";
    transition.subtype = isNext ? kCATransitionFromRight : kCATransitionFromLeft;
    transition.duration = 1.0f;

    _imageView.image = [self getImage:isNext];
    [_imageView.layer addAnimation:transition forKey:@"KCTransitionAnimation"];
}

#pragma mark 取得當前圖片
- (UIImage *)getImage:(BOOL)isNext {
    _currentIndex = isNext ? (_currentIndex + 1) % IMAGE_COUNT
                           : (_currentIndex - 1 + IMAGE_COUNT) % IMAGE_COUNT;
    NSString *imageName = [NSString stringWithFormat:@"%i.jpg", _currentIndex];
    return [UIImage imageNamed:imageName];
}

@end

程式碼很短,效果和效能卻很驚人。其他轉場類型大家可以自己動手試試。
逐幀動畫
做過動畫的人都知道還有「逐幀動畫」這種類型。第一個想到的可能是 UIImageView:設定 animationImages,再呼叫 startAnimating 播放。某些場景確實堪用,但它有明顯的效能問題,而且一旦設定完成,中間過程就無法控制了。
也有人會想到用 NSTimer 定時換圖。這確實解決了一次性載入大量圖片的問題,播放過程也可控,缺點是——如果系統正在跑某個耗時任務,定時器的呼叫時機可能被延誤,動畫連貫性就出問題了。
Core Animation 沒有直接提供逐幀動畫類型,但給了我們 CADisplayLink。它也是一個計時器,差別在於它的刷新週期與螢幕完全一致。iOS 螢幕刷新約 60 次/秒,CADisplayLink 也是 60 次/秒,用它做出來的逐幀動畫(又稱「時鐘動畫」)幾乎感覺不到停頓。
iOS App 啟動後就進入一個主運行循環(main run loop),持續等待使用者輸入。把 CADisplayLink 加入主運行循環後,它的時鐘週期就與主循環一致,也就是螢幕刷新週期;之後它會循環呼叫目標方法,我們在方法裡更新視圖內容,逐幀動畫就成立了。
必須強調:逐幀動畫的效能成本勢必較高。但有些運動就是非它不可——比如人物動作,那是高度複雜的運動,基礎動畫與關鍵幀動畫都無法勝任。所以請務必在循環方法中壓低算法複雜度,並把記憶體峰值控制在低檔。下面用一條魚的游動來示範:
#define IMAGE_COUNT 10

@interface KCMainViewController () {
    CALayer *_layer;
    int _index;
    NSMutableArray *_images;
}
@end

@implementation KCMainViewController

- (void)viewDidLoad {
    [super viewDidLoad];
    self.view.layer.contents = (id)[UIImage imageNamed:@"bg.png"].CGImage;

    _layer = [[CALayer alloc] init];
    _layer.bounds = CGRectMake(0, 0, 87, 32);
    _layer.position = CGPointMake(160, 284);
    [self.view.layer addSublayer:_layer];

    // 10 張圖不大,與其每次循環都建立 UIImage,不如一次快取
    _images = [NSMutableArray array];
    for (int i = 0; i < IMAGE_COUNT; ++i) {
        NSString *imageName = [NSString stringWithFormat:@"fish%i.png", i];
        [_images addObject:[UIImage imageNamed:imageName]];
    }

    CADisplayLink *displayLink = [CADisplayLink displayLinkWithTarget:self selector:@selector(step)];
    [displayLink addToRunLoop:[NSRunLoop mainRunLoop] forMode:NSDefaultRunLoopMode];
}

#pragma mark 每次螢幕刷新執行一次(每秒約 60 次)
- (void)step {
    static int s = 0;
    if (++s == 10) {          // 每 10 次刷新換一張圖,約每秒 6 幀
        s = 0;
        UIImage *image = _images[_index];
        _layer.contents = (id)image.CGImage;
        _index = (_index + 1) % IMAGE_COUNT;
    }
}

@end

這裡只示範了逐幀播放的機制;若再結合其他動畫類型,就能讓整條魚真正游動起來。
四、UIView 的動畫封裝
有了核心動畫的底子,一般動畫應該難不倒你了。UIView 本身對基礎動畫、關鍵幀動畫與轉場動畫都有封裝,在對細節沒有特殊要求時用它們輕ymethyl得多——可以說日常開發中九成以上的場景,UIView 的封裝方法都能搞定。
基礎動畫
對應前面的基礎動畫範例:點螢幕讓落葉飄到點擊位置。由於前面提過「非根圖層直接改屬性就有動畫」,這裡把落花放進 UIImageView 而非圖層,順便避開那個陷阱。
@interface KCMainViewController () {
    UIImageView *_imageView;
}
@end

@implementation KCMainViewController

- (void)viewDidLoad {
    [super viewDidLoad];
    UIImage *backgroundImage = [UIImage imageNamed:@"background.jpg"];
    self.view.backgroundColor = [UIColor colorWithPatternImage:backgroundImage];

    _imageView = [[UIImageView alloc] initWithImage:[UIImage imageNamed:@"petal.png"]];
    _imageView.center = CGPointMake(50, 150);
    [self.view addSubview:_imageView];
}

- (void)touchesBegan:(NSSet *)touches withEvent:(UIEvent *)event {
    UITouch *touch = touches.anyObject;
    CGPoint location = [touch locationInView:self.view];

    // 方法一:block 寫法。動畫結束後視圖會停在終點,無需額外處理
    /*
    [UIView animateWithDuration:5.0 delay:0 options:UIViewAnimationOptionCurveLinear animations:^{
        _imageView.center = location;
    } completion:^(BOOL finished) {
        NSLog(@"Animation end.");
    }];
    */

    // 方法二:靜態方法寫法
    [UIView beginAnimations:@"KCBasicAnimation" context:nil];
    [UIView setAnimationDuration:5.0];
    // [UIView setAnimationDelay:1.0];              // 延遲
    // [UIView setAnimationRepeatCount:10];         // 重複次數
    // [UIView setAnimationDelegate:self];          // 代理
    // [UIView setAnimationWillStartSelector:(SEL)];    // 開始時呼叫
    // [UIView setAnimationDidStopSelector:(SEL)];      // 結束後呼叫
    _imageView.center = location;
    [UIView commitAnimations];
}

@end
補充:彈簧動畫
iOS 中彈性動畫太常用,所以 iOS 7 直接提供了現成方法:
- (void)touchesBegan:(NSSet *)touches withEvent:(UIEvent *)event {
    UITouch *touch = touches.anyObject;
    CGPoint location = [touch locationInView:self.view];
    // damping:阻尼 0~1,越接近 0 彈性越明顯
    // initialSpringVelocity:彈回初速度
    [UIView animateWithDuration:5.0 delay:0 usingSpringWithDamping:0.1 initialSpringVelocity:1.0
                        options:UIViewAnimationOptionCurveLinear animations:^{
        _imageView.center = location;
    } completion:nil];
}

補充:動畫參數(UIViewAnimationOptions)
動畫方法中的 option 參數是枚舉型別,可分三類,同類中選一個、跨類可組合:
1. 常規屬性(可多選)
UIViewAnimationOptionLayoutSubviews:動畫過程中保證子視圖跟隨運動。
UIViewAnimationOptionAllowUserInteraction:動畫過程中允許使用者互動。
UIViewAnimationOptionBeginFromCurrentState:所有視圖從當前狀態開始。
UIViewAnimationOptionRepeat:重複執行。
UIViewAnimationOptionAutoreverse:到終點後以動畫回到起點。
UIViewAnimationOptionOverrideInheritedDuration:忽略巢狀動畫的時間設定。
UIViewAnimationOptionOverrideInheritedCurve:忽略巢狀動畫的速度曲線。
UIViewAnimationOptionAllowAnimatedContent:動畫過程中重繪視圖(僅轉場動畫)。
UIViewAnimationOptionShowHideTransitionViews:切換時隱藏舊視圖、顯示新視圖,而非移除後再加回(僅轉場動畫)。
UIViewAnimationOptionOverrideInheritedOptions:不繼承父動畫的設定或類型。
2. 速度曲線(選一個)
UIViewAnimationOptionCurveEaseInOut:先慢後快再變慢。
UIViewAnimationOptionCurveEaseIn:由慢變快。
UIViewAnimationOptionCurveEaseOut:由快變慢。
UIViewAnimationOptionCurveLinear:等速,預設值。
3. 轉場類型(僅轉場動畫,選一個)
UIViewAnimationOptionTransitionNone:無轉場效果。
UIViewAnimationOptionTransitionFlipFromLeft / FromRight / FromTop / FromBottom:各方向翻轉。
UIViewAnimationOptionTransitionCurlUp:向後翻頁。
UIViewAnimationOptionTransitionCurlDown:向前翻頁。
UIViewAnimationOptionTransitionCrossDissolve:舊視圖溶解、新視圖浮現。
關鍵幀動畫
從 iOS 7 起,UIView 也封裝了關鍵幀動畫。下面重現前面落花的控制:
- (void)touchesBegan:(NSSet *)touches withEvent:(UIEvent *)event {
    [UIView animateKeyframesWithDuration:5.0 delay:0
        options:UIViewAnimationOptionCalculationModeLinear animations:^{
        // 第二個關鍵幀:從 0 秒開始,佔總時長 50%(5.0 * 0.5 = 2.5 秒)
        [UIView addKeyframeWithRelativeStartTime:0.0 relativeDuration:0.5 animations:^{
            _imageView.center = CGPointMake(80.0, 220.0);
        }];
        // 第三個關鍵幀:從 0.5 * 5.0 秒開始,持續 1.25 秒
        [UIView addKeyframeWithRelativeStartTime:0.5 relativeDuration:0.25 animations:^{
            _imageView.center = CGPointMake(45.0, 300.0);
        }];
        // 第四個關鍵幀:從 0.75 * 5.0 秒開始,持續 1.25 秒
        [UIView addKeyframeWithRelativeStartTime:0.75 relativeDuration:0.25 animations:^{
            _imageView.center = CGPointMake(55.0, 400.0);
        }];
    } completion:^(BOOL finished) {
        NSLog(@"Animation end.");
    }];
}
補充:關鍵幀動畫的 options(UIViewKeyframeAnimationOptions)分兩類,可組合:
1. 常規屬性(可多選)
UIViewAnimationOptionLayoutSubviews、UIViewAnimationOptionAllowUserInteraction、UIViewAnimationOptionBeginFromCurrentState、UIViewAnimationOptionRepeat、UIViewAnimationOptionAutoreverse、UIViewAnimationOptionOverrideInheritedDuration、UIViewAnimationOptionOverrideInheritedOptions(含義同前)。
2. 計算模式(選一個,與前面 calculationMode 一一對應)
UIViewKeyframeAnimationOptionCalculationModeLinear:線性連續。
UIViewKeyframeAnimationOptionCalculationModeDiscrete:離散。
UIViewKeyframeAnimationOptionCalculationModePaced:均勻執行。
UIViewKeyframeAnimationOptionCalculationModeCubic:平滑。
UIViewKeyframeAnimationOptionCalculationModeCubicPaced:平滑且均勻。
要注意:上面示範的是屬性值關鍵幀動畫,路徑類型的關鍵幀動畫目前 UIView 還不支援。
轉場動畫
從 iOS 4.0 起,UIView 直接封裝了轉場動畫,用法同樣簡單:
- (void)transitionAnimation:(BOOL)isNext {
    UIViewAnimationOptions option;
    if (isNext) {
        option = UIViewAnimationOptionCurveLinear | UIViewAnimationOptionTransitionFlipFromRight;
    } else {
        option = UIViewAnimationOptionCurveLinear | UIViewAnimationOptionTransitionFlipFromLeft;
    }
    [UIView transitionWithView:_imageView duration:1.0 options:option animations:^{
        _imageView.image = [self getImage:isNext];
    } completion:nil];
}
上面只有一個 UIImageView 參與轉場,每次只是換掉它的內容。若要在兩個布局完全不同的複雜視圖之間轉場,可以用下面這個方法:
+ (void)transitionFromView:(UIView *)fromView toView:(UIView *)toView
                  duration:(NSTimeInterval)duration
                   options:(UIViewAnimationOptions)options
                completion:(void (^)(BOOL finished))completion;
要注意預設行為:轉出的視圖會從父視圖移除,轉入後再加回。若加上 UIViewAnimationOptionShowHideTransitionViews,轉出的視圖會改為隱藏(不移除),轉入後再顯示。
最後提醒:轉場動畫的參數設定與基礎動畫完全相同;但用 UIView 裝飾方法做轉場時,可選效果比直接用 CATransition 少——因為這裡無法使用私有 API。
- 上一篇文章: iOS 9 官方文件重點整理:新特性與 API 變化全解析
- 下一篇文章: iOS Runtime 運行時詳解:從概念到實用場景