
iOS SQLite 實戰:從零封裝一套增刪改查工具類
折騰了好幾天資料庫,總算把這塊硬骨頭啃下來了。SQLite 是 iOS 上最常見的嵌入式資料庫,不論寫小工具還是做正式專案,都有必要把它摸熟。本文的骨架參考了一個網路上的範例,但原版不少地方寫得並不理想,我動手改了一輪,重點放在「為什麼要這樣寫」,希望讀者看完能真正理解原理,之後換個場景也能舉一反三。
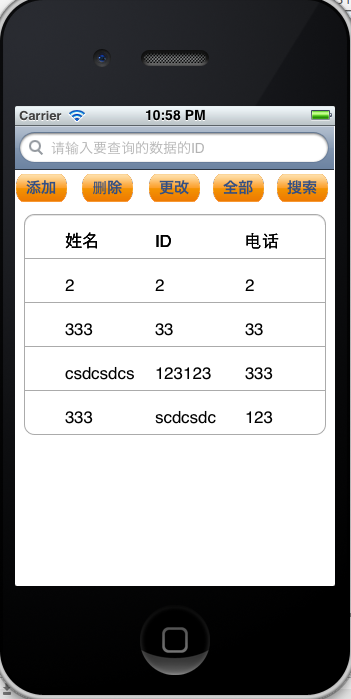
第一步:把資料庫操作全部收進一個類
我的做法是先設計一個服務類 sqlService,把建表、新增、修改、查詢、刪除五件事全部封裝進去。封裝是老工程師一再強調的習慣——這次寫好的類,下次換專案直接拖過去就能用,長期累積下來省下的工時非常可觀。另外我額外定義了一個 sqlTestList 類,專門負責承載一筆資料,避免到處傳一堆零散參數。
頭檔案 sqlService.h
#import <Foundation/Foundation.h>
#import <sqlite3.h>

#define kFilename @"testdb.db"

@class sqlTestList;

@interface sqlService : NSObject {
    sqlite3 *_database;
}
@property (nonatomic) sqlite3 *_database;

- (BOOL)createTestList:(sqlite3 *)db;              // 建表
- (BOOL)insertTestList:(sqlTestList *)insertList;  // 新增
- (BOOL)updateTestList:(sqlTestList *)updateList;  // 修改
- (NSMutableArray *)getTestList;                   // 取出全部資料
- (BOOL)deleteTestList:(sqlTestList *)deletList;   // 刪除
- (NSMutableArray *)searchTestList:(NSString *)searchString; // 模糊查詢
@end

@interface sqlTestList : NSObject
@property (nonatomic) int sqlID;
@property (nonatomic, retain) NSString *sqlText;
@property (nonatomic, retain) NSString *sqlname;
@end
資料庫擺在哪裡:dataFilePath
iOS 的 App 沙盒裡,Documents 目錄是最適合放使用者資料的地方。路徑透過 NSSearchPathForDirectoriesInDomains 取得,再拼上檔名即可。
- (NSString *)dataFilePath {
    NSArray *paths = NSSearchPathForDirectoriesInDomains(NSDocumentDirectory, NSUserDomainMask, YES);
    NSString *documentsDirectory = [paths objectAtIndex:0];
    return [documentsDirectory stringByAppendingPathComponent:@"data.db"];
}
這裡有個常被忽略的小技巧:副檔名完全不限。你叫它 .db、叫它 .sb 甚至不給副檔名,SQLite 都照樣運作,因為它認的是檔案內容的標頭而不是命名。想讓資料檔在一般使用者眼裡不那么顯眼,這是一個零成本的遮蔽手段(注意:這只是遮蔽,不是加密)。
打開或建立資料庫:openDB
關鍵觀念是:sqlite3_open 在檔案不存在時會自動幫你建一個新的。所以我們不需要嚴格區分「打開」和「建立」兩條路徑,只要判斷檔案在不在,用來決定要不要順手建表即可。另外別忘了 NSString 必須透過 UTF8String 轉成 C 字串,因為 SQLite 是用 C 寫的,它根本不認識 NSString。
- (BOOL)openDB {
    NSString *path = [self dataFilePath];
    NSFileManager *fileManager = [NSFileManager defaultManager];
    BOOL find = [fileManager fileExistsAtPath:path];

    if (sqlite3_open([path UTF8String], &_database) != SQLITE_OK) {
        sqlite3_close(self._database);
        NSLog(@"Error: open database file.");
        return NO;
    }
    if (find) {
        NSLog(@"Database file already existed.");
    }
    [self createTestList:self._database];   // 表若已存在不會重建
    return YES;
}
建表:createTestList:
這裡出現了 SQLite 的標準三步曲:sqlite3_prepare_v2 把 SQL 字串編譯成 statement、sqlite3_step 真正執行、sqlite3_finalize 釋放 statement。三個步驟缺一不可,少了最後一步就是記憶體洩漏。
- (BOOL)createTestList:(sqlite3 *)db {
    char *sql = "create table if not exists testTable(ID INTEGER PRIMARY KEY AUTOINCREMENT, testID int, testValue text, testName text)";
    sqlite3_stmt *statement;

    // prepare_v2 的四個常用參數:資料庫、SQL、SQL 長度(-1 代表自動計算)、statement 輸出
    if (sqlite3_prepare_v2(_database, sql, -1, &statement, nil) != SQLITE_OK) {
        NSLog(@"Error: failed to prepare statement: create test table");
        return NO;
    }
    if (sqlite3_step(statement) != SQLITE_DONE) {
        sqlite3_finalize(statement);
        NSLog(@"Error: failed to create table test");
        return NO;
    }
    sqlite3_finalize(statement);
    NSLog(@"Create table 'testTable' successed.");
    return YES;
}
新增資料:insertTestList:
寫入時務必使用 ? 佔位符搭配 sqlite3_bind_* 綁定,絕對不要用字串拼接組 SQL。佔位符編號從 1 開始,這點和查詢結果集的欄位索引(從 0 開始)剛好相反,是新手最常踩的坑。
- (BOOL)insertTestList:(sqlTestList *)insertList {
    if (![self openDB]) return NO;

    sqlite3_stmt *statement;
    static char *sql = "INSERT INTO testTable(testID, testValue, testName) VALUES(?, ?, ?)";
    if (sqlite3_prepare_v2(_database, sql, -1, &statement, NULL) != SQLITE_OK) {
        NSLog(@"Error: failed to insert: testTable");
        sqlite3_close(_database);
        return NO;
    }
    sqlite3_bind_int(statement, 1, insertList.sqlID);
    sqlite3_bind_text(statement, 2, [insertList.sqlText UTF8String], -1, SQLITE_TRANSIENT);
    sqlite3_bind_text(statement, 3, [insertList.sqlname UTF8String], -1, SQLITE_TRANSIENT);

    BOOL ok = (sqlite3_step(statement) == SQLITE_DONE);
    sqlite3_finalize(statement);
    sqlite3_close(_database);
    return ok;
}
讀取全部資料:getTestList
用 while (sqlite3_step(statement) == SQLITE_ROW) 逐列取值,sqlite3_column_int 與 sqlite3_column_text 的索引是 0 起算,和綁定參數的編號規則不同,兩邊千萬不要互相套用。
- (NSMutableArray *)getTestList {
    NSMutableArray *array = [NSMutableArray arrayWithCapacity:10];
    if ([self openDB]) {
        sqlite3_stmt *statement = nil;
        char *sql = "SELECT testID, testValue, testName FROM testTable";
        if (sqlite3_prepare_v2(_database, sql, -1, &statement, NULL) != SQLITE_OK) {
            NSLog(@"Error: failed to prepare statement: get testValue.");
            sqlite3_close(_database);
            return array;
        }
        while (sqlite3_step(statement) == SQLITE_ROW) {
            sqlTestList *sqlList = [[sqlTestList alloc] init];
            sqlList.sqlID = sqlite3_column_int(statement, 0);
            sqlList.sqlText = [NSString stringWithUTF8String:(char *)sqlite3_column_text(statement, 1)];
            sqlList.sqlname = [NSString stringWithUTF8String:(char *)sqlite3_column_text(statement, 2)];
            [array addObject:sqlList];
            [sqlList release];
        }
        sqlite3_finalize(statement);
        sqlite3_close(_database);
    }
    return array;   // 建議回傳局部自動釋放物件,而非 retain 後的暫存物件
}
原範例在這裡 return [array retain],等於把記憶體管理責任丟給呼叫方,很容易演變成洩漏。改成回傳一般的 autorelease 陣列,再由呼叫方自行持有,是比較乾淨的寫法。
修改與刪除
兩個方法的骨架一樣,只是 SQL 不同。這裡順手修掉原範例的兩個錯誤:更新多個欄位時,set 後面必須用逗號分隔而不是 and;查詢的 like 語句也應該改用佔位符綁定,避免 SQL 注入。
- (BOOL)updateTestList:(sqlTestList *)updateList {
    if (![self openDB]) return NO;
    sqlite3_stmt *statement;
    // 注意:多欄位赋值用逗號分隔
    char *sql = "update testTable set testValue = ?, testName = ? WHERE testID = ?";
    if (sqlite3_prepare_v2(_database, sql, -1, &statement, NULL) != SQLITE_OK) {
        sqlite3_close(_database);
        return NO;
    }
    sqlite3_bind_text(statement, 1, [updateList.sqlText UTF8String], -1, SQLITE_TRANSIENT);
    sqlite3_bind_text(statement, 2, [updateList.sqlname UTF8String], -1, SQLITE_TRANSIENT);
    sqlite3_bind_int(statement, 3, updateList.sqlID);

    BOOL ok = (sqlite3_step(statement) == SQLITE_DONE);
    sqlite3_finalize(statement);
    sqlite3_close(_database);
    return ok;
}

- (BOOL)deleteTestList:(sqlTestList *)deletList {
    if (![self openDB]) return NO;
    sqlite3_stmt *statement;
    static char *sql = "delete from testTable where testID = ?";
    if (sqlite3_prepare_v2(_database, sql, -1, &statement, NULL) != SQLITE_OK) {
        sqlite3_close(_database);
        return NO;
    }
    sqlite3_bind_int(statement, 1, deletList.sqlID);

    BOOL ok = (sqlite3_step(statement) == SQLITE_DONE);
    sqlite3_finalize(statement);
    sqlite3_close(_database);
    return ok;
}

- (NSMutableArray *)searchTestList:(NSString *)searchString {
    NSMutableArray *array = [NSMutableArray arrayWithCapacity:10];
    if ([self openDB]) {
        sqlite3_stmt *statement = nil;
        // like 用於模糊比對,% 由呼叫端決定要放在前面、後面還是兩側
        char *sql = "SELECT * FROM testTable WHERE testName like ?";
        if (sqlite3_prepare_v2(_database, sql, -1, &statement, NULL) != SQLITE_OK) {
            sqlite3_close(_database);
            return array;
        }
        NSString *pattern = [NSString stringWithFormat:@"%%%@%%", searchString];
        sqlite3_bind_text(statement, 1, [pattern UTF8String], -1, SQLITE_TRANSIENT);
        while (sqlite3_step(statement) == SQLITE_ROW) {
            sqlTestList *sqlList = [[sqlTestList alloc] init];
            sqlList.sqlID = sqlite3_column_int(statement, 0);
            sqlList.sqlText = [NSString stringWithUTF8String:(char *)sqlite3_column_text(statement, 1)];
            sqlList.sqlname = [NSString stringWithUTF8String:(char *)sqlite3_column_text(statement, 2)];
            [array addObject:sqlList];
            [sqlList release];
        }
        sqlite3_finalize(statement);
        sqlite3_close(_database);
    }
    return array;
}
到這裡,一個可重複使用的資料庫服務類就完成了。整個類的資料模型實作也很單純,就是三個屬性加上初始化與釋放:
@implementation sqlTestList
@synthesize sqlID, sqlText, sqlname;

- (id)init {
    sqlID = 0; sqlText = @""; sqlname = @"";
    return self;
}
- (void)dealloc {
    [sqlText release];
    [sqlname release];
    [super dealloc];
}
@end
操作介面:新增與修改共用一個頁面
新增和修改的表單其實長得一模一樣,差別只在標題、以及修改時要先把原值填回去。我用一個 oprateType 參數區分兩種模式,讓同一個 view controller 服務兩條流程。
@interface operateSqlViewController : UIViewController {
    UITextField *idValue;
    UITextField *textValue;
    UITextField *textName;
    int oprateType;          // 0 = 新增, 1 = 修改
    sqlTestList *sqlValue;
}
@property (nonatomic, retain) IBOutlet UITextField *idValue;
@property (nonatomic, retain) IBOutlet UITextField *textValue;
@property (nonatomic, retain) IBOutlet UITextField *textName;
@property (nonatomic, retain) sqlTestList *sqlValue;
@property (nonatomic) int oprateType;
@end
實作檔的重點在 viewDidLoad 與 saveValue::前者依模式決定標題並回填數值,後者負責輸入檢查與呼叫服務類。每個輸入欄位都做了空值判斷,並用 UIAlertView 即時提示,這類防禦性檢查能省掉大量「為什麼按下沒反應」的排查時間。
- (void)viewDidLoad {
    UIBarButtonItem *backButton = [[UIBarButtonItem alloc] initWithTitle:@"返回" style:UIBarButtonItemStyleBordered target:self action:@selector(dismiss:)];
    UIBarButtonItem *saveButton = [[UIBarButtonItem alloc] initWithTitle:@"保存" style:UIBarButtonItemStyleBordered target:self action:@selector(saveValue:)];
    [self.navigationItem setLeftBarButtonItem:backButton];
    [self.navigationItem setRightBarButtonItem:saveButton];
    [backButton release];
    [saveButton release];

    if (oprateType == 0) {
        [self.navigationItem setTitle:@"數據插入"];
    } else {
        [self.navigationItem setTitle:@"數據更新"];
        idValue.text = [NSString stringWithFormat:@"%d", sqlValue.sqlID];
        textValue.text = sqlValue.sqlText;
        textName.text = sqlValue.sqlname;
    }
}

- (void)saveValue:(id)sender {
    // 三個欄位逐一做空值檢查,任一為空就提示並 return
    if (idValue.text.length == 0)     { /* 提示「請輸入ID」 */   return; }
    if (textValue.text.length == 0)   { /* 提示「請輸入電話」 */ return; }
    if (textName.text.length == 0)    { /* 提示「請輸入姓名」 */ return; }

    sqlService *sqlSer = [[sqlService alloc] init];
    sqlTestList *value = [[sqlTestList alloc] init];
    value.sqlID = [idValue.text intValue];
    value.sqlText = textValue.text;
    value.sqlname = textName.text;

    BOOL ok = (oprateType == 0) ? [sqlSer insertTestList:value]
                                : [sqlSer updateTestList:value];
    // 依 ok 顯示「成功/失敗」提示
    [value release];
    [sqlSer release];
}
記得在 xib 裡擺上三個 UITextField 與對應的 UILabel,並且把 outlet 連線接好,否則執行時會拿到 nil。
主列表頁:UITableView 綁資料
主頁面用一個 UITableView 呈現資料,加上一個 UISearchBar 做查詢。這裡有兩個實作細節值得注意。
第一,viewDidAppear: 才是重新撈資料的正確時機。從新增/修改頁返回後,列表能立刻反映最新狀態;若只在 viewDidLoad 讀一次,資料就會停在畫面初次載入的那一刻。
第二,原範例刻意讓第 0 列當標題列(姓名/ID/電話),因此所有取值處都要 row - 1。這種做法能跑,但更乾淨的方式是使用 table header view,就不必在每個 index path 上做補償運算。
- (void)viewDidAppear:(BOOL)animated {
    sqlService *sqlSer = [[sqlService alloc] init];
    listData = [sqlSer getTestList];
    [sqlSer release];
    [utableView reloadData];
}

- (IBAction)insertValue {
    [searchBar resignFirstResponder];           // 順手收起鍵盤
    operateSqlViewController *operateController = [[operateSqlViewController alloc] init];
    // 必須包一層 UINavigationController,否則畫面上不會有導航欄
    UINavigationController *theNavController = [[UINavigationController alloc] initWithRootViewController:operateController];
    operateController.oprateType = 0;
    [operateController release];
    theNavController.navigationBar.tintColor = [UIColor blackColor];
    [self presentModalViewController:theNavController animated:YES];
    [theNavController release];
}

- (IBAction)updateValue {
    [searchBar resignFirstResponder];
    NSIndexPath *indexPath = [utableView indexPathForSelectedRow];
    if (indexPath == nil) { /* 提示「請選擇要更新的項」 */ return; }

    sqlTestList *sqlList = [listData objectAtIndex:([indexPath row] - 1)];
    operateSqlViewController *operateController = [[operateSqlViewController alloc] init];
    UINavigationController *theNavController = [[UINavigationController alloc] initWithRootViewController:operateController];
    operateController.oprateType = 1;
    operateController.sqlValue = sqlList;
    theNavController.navigationBar.tintColor = [UIColor blackColor];
    [self presentModalViewController:theNavController animated:YES];
    [operateController release];
    [theNavController release];
}

- (IBAction)deleteValue {
    [searchBar resignFirstResponder];
    NSIndexPath *indexPath = [utableView indexPathForSelectedRow];
    if (indexPath == nil) { /* 提示「請選擇要刪除的項」 */ return; }

    sqlTestList *sqlList = [listData objectAtIndex:([indexPath row] - 1)];
    sqlService *sqlSer = [[sqlService alloc] init];
    if ([sqlSer deleteTestList:sqlList]) {
        listData = [sqlSer getTestList];        // 刪成功後重新撈一次
        [utableView reloadData];
    }
    [sqlSer release];
}

- (IBAction)searchValue {
    if ([searchBar.text isEqualToString:@""]) { /* 提示請輸入查詢條件 */ return; }
    sqlService *sqlSer = [[sqlService alloc] init];
    listData = [sqlSer searchTestList:searchBar.text];
    [sqlSer release];
    [searchBar resignFirstResponder];
    [utableView reloadData];                    // count 為 0 時可另外提示「查無資料」
}

// 標題列 + 資料列,因此 +1
- (NSInteger)tableView:(UITableView *)tableView numberOfRowsInSection:(NSInteger)section {
    return [listData count] + 1;
}

// 第 0 列畫表頭,其餘列畫資料
- (UITableViewCell *)tableView:(UITableView *)tableView cellForRowAtIndexPath:(NSIndexPath *)indexPath {
    NSString *CustomIdentifier = [NSString stringWithFormat:@"cell%d", indexPath.row];
    UITableViewCell *cell = [tableView dequeueReusableCellWithIdentifier:CustomIdentifier];
    if (cell == nil) {
        cell = [[[UITableViewCell alloc] initWithStyle:UITableViewCellStyleValue1 reuseIdentifier:CustomIdentifier] autorelease];
        cell.backgroundColor = [UIColor clearColor];
    }
    if (indexPath.row == 0) {
        cell.selectionStyle = UITableViewCellSelectionStyleNone;   // 表頭不可點
        NSArray *titles = [NSArray arrayWithObjects:@"姓名", @"ID", @"電話", nil];
        for (int i = 0; i < 3; i++) {
            UILabel *label = [[UILabel alloc] initWithFrame:CGRectMake(90 * i + 40, 10, 70, 30)];
            label.text = [titles objectAtIndex:i];
            label.backgroundColor = [UIColor clearColor];
            [cell.contentView addSubview:label];
            [label release];
        }
    } else {
        sqlTestList *sqlList = [listData objectAtIndex:(indexPath.row - 1)];
        // 依序建立三個 UILabel 並帶入 sqlname / sqlText / sqlID
    }
    return cell;
}

- (NSIndexPath *)tableView:(UITableView *)tableView willSelectRowAtIndexPath:(NSIndexPath *)indexPath {
    [searchBar resignFirstResponder];
    return (indexPath.row == 0) ? nil : indexPath;   // 表頭不可選
}
以上就是完整流程。最後想強調的是封裝的價值:把重複的邏輯收在一個地方,當下多花半小時,之後每個專案都能省下好幾倍時間。若這套寫法在你的場景裡遇到問題,歡迎留言一起討論。