
OC iOS 動效設計:用 UITableView 實現滾動視差效果
編輯:iOS 開發綜合
前言
近來在使用「悅跑圈」這款 App 時,其「跑鞋展廳」功能的滾動視差效果令我印象深刻。在網上搜集大量資料後,本文將仿照該效果,簡單介紹它的實現思路。
效果演示
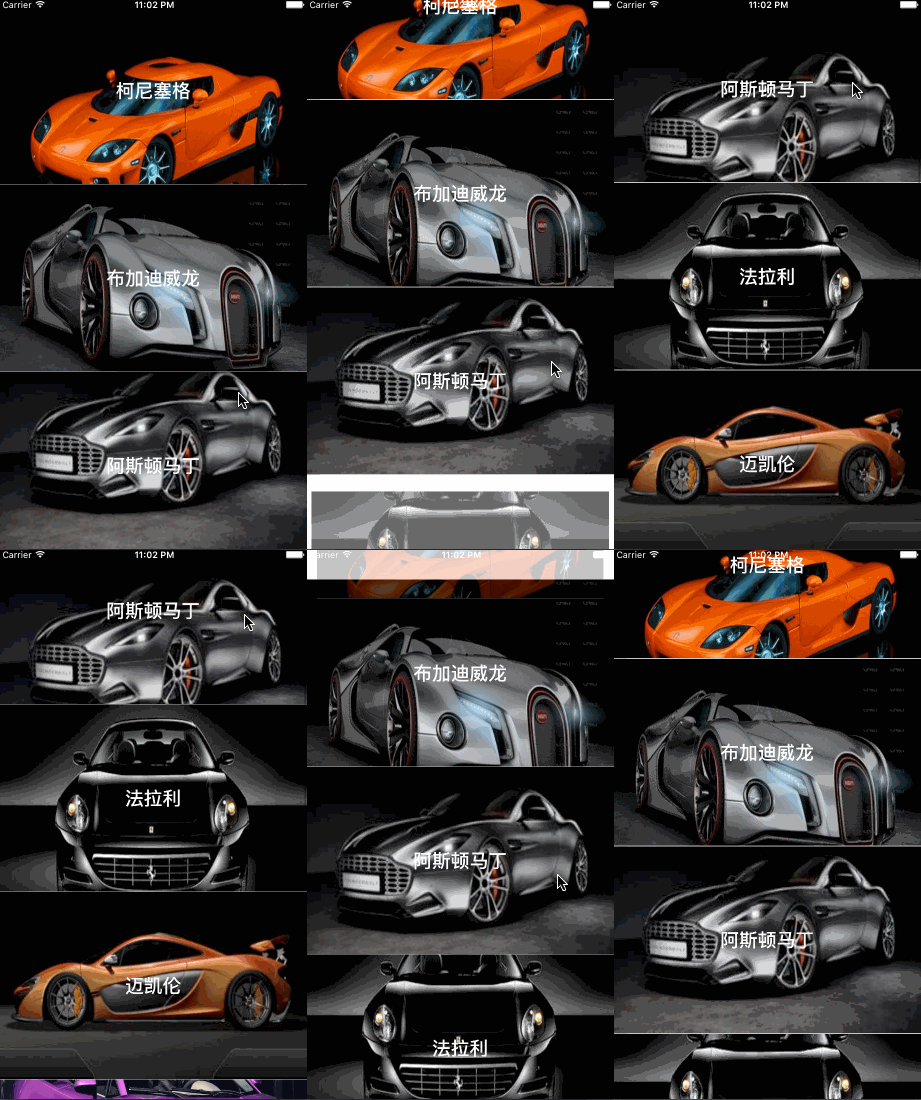
細節實現
視差的核心在於:隨著 cell 在螢幕中的位置變化,讓內部圖片產生位移,從而造成圖片移動速度慢於列表滾動的錯覺。
OffsetImageCell.m
- (void)cellOffset {
    // 1、取得 cell 在螢幕中的 rect
    CGRect centerToWindow = [self convertRect:self.bounds toView:self.window];
    // 2、取得 cell 中心點 y 軸坐標
    CGFloat centerY = CGRectGetMidY(centerToWindow);
    // 3、取得 cell 父視圖的中心點
    CGPoint windowCenter = self.superview.center;
    // 4、計算距離差
    CGFloat cellOffsetY = centerY - windowCenter.y;
    // 5、距離差 / 2 倍父視圖高度
    CGFloat offsetDig = cellOffsetY / self.superview.frame.size.height * 2;
    CGFloat offset = -offsetDig * (kScreenHeight * 0.5 - kCellHeight) / 2;
    CGAffineTransform transY = CGAffineTransformMakeTranslation(0, offset);
    self.pictureView.transform = transY;
}
ViewController.m
- (void)tableView:(UITableView *)tableView willDisplayCell:(OffsetImageCell *)cell forRowAtIndexPath:(NSIndexPath *)indexPath {
    // 1、cell 出現時的入場動畫,避免加載時滑動卡頓
    CATransform3D rotation;
    rotation = CATransform3DMakeTranslation(0, 50, 20);
    rotation = CATransform3DScale(rotation, 0.9, .9, 1);
    rotation.m34 = 1.0 / -600;
    cell.layer.shadowColor = [[UIColor blackColor] CGColor];
    cell.layer.shadowOffset = CGSizeMake(10, 10);
    cell.alpha = 0;
    cell.layer.transform = rotation;
    [UIView beginAnimations:@"rotation" context:NULL];
    [UIView setAnimationDuration:0.6];
    cell.layer.transform = CATransform3DIdentity;
    cell.alpha = 1;
    cell.layer.shadowOffset = CGSizeMake(0, 0);
    [UIView commitAnimations];
    // 2、滾動視差效果實現
    [cell cellOffset];
}

- (void)tableView:(UITableView *)tableView didEndDisplayingCell:(OffsetImageCell *)cell forRowAtIndexPath:(NSIndexPath *)indexPath {
    [cell cancelAnimation];
}
完整實現
Tips:圖片素材與描述資訊可自行設置;修改狀態列樣式可參考相關文章。
steps 1:自定義 cell
#define kScreenHeight [UIScreen mainScreen].bounds.size.height
#define kScreenWidth [UIScreen mainScreen].bounds.size.width
#define kCellHeight 250

@interface OffsetImageCell : UITableViewCell
@property (nonatomic, strong) UIImageView *pictureView; /**< 圖片視圖 */
@property (nonatomic, strong) UILabel *titleLabel; /**< 標題文本 */
- (void)cellOffset; /**< 偏移單元格 */
- (void)cancelAnimation; /**< 取消動畫 */
@end

@implementation OffsetImageCell
- (instancetype)initWithStyle:(UITableViewCellStyle)style reuseIdentifier:(NSString *)reuseIdentifier {
    if (self = [super initWithStyle:style reuseIdentifier:reuseIdentifier]) {
        self.selectionStyle = UITableViewCellSelectionStyleNone;
        self.clipsToBounds = YES;
        [self.contentView addSubview:self.pictureView];
        [self.contentView addSubview:self.titleLabel];
        UIView *line = [[UIView alloc] initWithFrame:CGRectMake(0, kCellHeight - 1, kScreenWidth, 1)];
        line.backgroundColor = [UIColor lightGrayColor];
        [self.contentView addSubview:line];
    }
    return self;
}

- (void)cancelAnimation {
    [self.pictureView.layer removeAllAnimations];
}

- (void)cellOffset {
    CGRect centerToWindow = [self convertRect:self.bounds toView:self.window];
    CGFloat centerY = CGRectGetMidY(centerToWindow);
    CGPoint windowCenter = self.superview.center;
    CGFloat cellOffsetY = centerY - windowCenter.y;
    CGFloat offsetDig = cellOffsetY / self.superview.frame.size.height * 2;
    CGFloat offset = -offsetDig * (kScreenHeight * 0.5 - kCellHeight) / 2;
    CGAffineTransform transY = CGAffineTransformMakeTranslation(0, offset);
    self.pictureView.transform = transY;
}

- (UIImageView *)pictureView {
    if (!_pictureView) {
        // 圖片視圖高度大於 cell,為位移預留空間
        _pictureView = [[UIImageView alloc] initWithFrame:CGRectMake(0, - (kScreenHeight * 0.5 - kCellHeight) / 2, kScreenWidth, kScreenHeight * 0.5)];
    }
    return _pictureView;
}

- (UILabel *)titleLabel {
    if (!_titleLabel) {
        _titleLabel = [[UILabel alloc] init];
        _titleLabel.bounds = CGRectMake(0, 0, kScreenWidth, 45);
        _titleLabel.center = CGPointMake(kScreenWidth * 0.5, kCellHeight * 0.5);
        _titleLabel.font = [UIFont boldSystemFontOfSize:25];
        _titleLabel.textColor = [UIColor whiteColor];
        _titleLabel.textAlignment = NSTextAlignmentCenter;
    }
    return _titleLabel;
}
@end
steps 2:ViewController 程式碼實現
@interface ViewController ()<UITableViewDataSource, UITableViewDelegate>{
    NSArray *_dataSource; /**< 數據源 */
}
@property (nonatomic, strong) UITableView *tableView;
@end

@implementation ViewController
- (void)viewDidLoad {
    [super viewDidLoad];
    [self initializeDataSource];
    [self initializeUserInterface];
}

- (void)initializeDataSource {
    _dataSource = @[@{@"imgName":@"0.jpg", @"description":@"柯尼塞格"},
                    @{@"imgName":@"1.jpg", @"description":@"布加迪威龍"},
                    @{@"imgName":@"2.jpg", @"description":@"阿斯頓馬丁"},
                    @{@"imgName":@"3.jpg", @"description":@"法拉利"},
                    @{@"imgName":@"4.jpg", @"description":@"邁凱倫"}];
}

- (void)initializeUserInterface {
    self.automaticallyAdjustsScrollViewInsets = NO;
    [self.view addSubview:self.tableView];
}

- (NSInteger)tableView:(UITableView *)tableView numberOfRowsInSection:(NSInteger)section {
    return _dataSource.count;
}

- (UITableViewCell *)tableView:(UITableView *)tableView cellForRowAtIndexPath:(NSIndexPath *)indexPath {
    OffsetImageCell *cell = [tableView dequeueReusableCellWithIdentifier:@"123" forIndexPath:indexPath];
    cell.pictureView.image = [UIImage imageNamed:_dataSource[indexPath.row][@"imgName"]];
    cell.titleLabel.text = _dataSource[indexPath.row][@"description"];
    return cell;
}

- (void)tableView:(UITableView *)tableView willDisplayCell:(OffsetImageCell *)cell forRowAtIndexPath:(NSIndexPath *)indexPath {
    CATransform3D rotation;
    rotation = CATransform3DMakeTranslation(0, 50, 20);
    rotation = CATransform3DScale(rotation, 0.9, .9, 1);
    rotation.m34 = 1.0 / -600;
    cell.layer.shadowColor = [[UIColor blackColor] CGColor];
    cell.layer.shadowOffset = CGSizeMake(10, 10);
    cell.alpha = 0;
    cell.layer.transform = rotation;
    [UIView beginAnimations:@"rotation" context:NULL];
    [UIView setAnimationDuration:0.6];
    cell.layer.transform = CATransform3DIdentity;
    cell.alpha = 1;
    cell.layer.shadowOffset = CGSizeMake(0, 0);
    [UIView commitAnimations];
    [cell cellOffset];
}

- (CGFloat)tableView:(UITableView *)tableView heightForRowAtIndexPath:(NSIndexPath *)indexPath {
    return 250;
}

#pragma mark - UIScrollViewDelegate
- (void)scrollViewDidScroll:(UIScrollView *)scrollView {
    // 讓可見 cell 的圖片隨位置變化而偏移
    NSArray<OffsetImageCell *> *array = [self.tableView visibleCells];
    [array enumerateObjectsUsingBlock:^(OffsetImageCell * _Nonnull obj, NSUInteger idx, BOOL * _Nonnull stop) {
        [obj cellOffset];
    }];
}
@end
關鍵思路是:在 scrollViewDidScroll: 中遍歷所有可見 cell,逐一調用 cellOffset 重新計算圖片位移;同時在 cell 即將顯示時加入 3D 入場動畫,讓滾動過程兼顧視差與動感。
- 上一篇文章: iOS 毛玻璃效果實作:UIVisualEffectView 詳解
- 下一篇文章: iOS 開發系列:網絡開發入門與核心概念整理