
iOS 開發系列:打造無限循環的圖片浏覽器
相關程式碼:https://github.com/wwpeter/WW-Rolling-cycle.git
概述
UIKit 框架提供了大量現成控件,開發者在 iOS 中既能直接使用,也能在其基礎上擴展出屬於自己的元件。逐一介紹每個控件並無必要,所謂「授人以魚不如授人以漁」,本篇希望透過幾個典型控件把原理講透,讓大家能觸類旁通。本文重點在於 UIScrollView,並會先補充其父類 UIView 的知識。
UIView 基礎
在深入 UIScrollView 之前,有必要先理清 UIView。由於 UIScrollView 繼承自 UIView,掌握好父類的屬性與方法,後續使用子類時才不會無從下手。在 Xcode 中,只要按住 Option 鍵點擊類名,即可跳轉到定義處查看,這是日常開發中查找 API 的常用技巧。
以下是 UIView 常用的屬性:
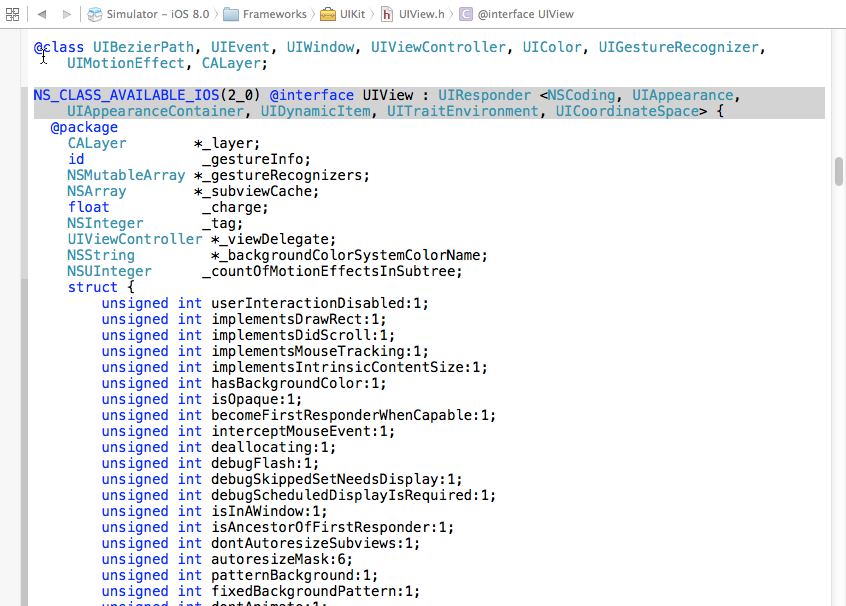
常用屬性
@property(nonatomic) CGRect frame; 控件的位置和大小,所有控件必須指定此屬性,否則無法顯示
@property(nonatomic) CGRect bounds; 當前控件的位置和大小,但與 frame 不同,其原點固定為 (0,0)
@property(nonatomic) CGPoint center; 控件的中心位置,常用於定位
@property(nonatomic) CGAffineTransform transform; 矩陣形變,包含平移、縮放、旋轉,預設為 CGAffineTransformIdentity
@property(nonatomic) UIViewAutoresizing autoresizingMask; 控件旋轉時大小自動伸縮
@property(nonatomic,readonly) UIView *superview; 當前控件的父控件
@property(nonatomic,readonly,copy) NSArray *subviews; 一級子控件集合
@property(nonatomic,getter=isHidden) BOOL hidden; 是否隱藏,預設為 NO
@property(nonatomic) NSInteger tag; 控件標識,可存儲整數資訊,預設為 0
常用方法
- (void)addSubview:(UIView *)view; 添加子控件
- (void)removeFromSuperview; 從父控件中移除當前控件
- (void)insertSubview:(UIView *)view atIndex:(NSInteger)index; 在指定位置插入子控件
+ (void)animateWithDuration:(NSTimeInterval)duration animations:(void (^)(void))animations; 以 block 形式執行動畫
- (void)addGestureRecognizer:(UIGestureRecognizer*)gestureRecognizer; 添加手勢
- (void)removeGestureRecognizer:(UIGestureRecognizer*)gestureRecognizer; 移除手勢
需要注意的是,上述所有位置屬性都是相對於父控件而言,而非相對於螢幕。
autoresizingMask
這個屬性常用於螢幕旋轉時的自動佈局,其值為一枚舉類型:
typedef NS_OPTIONS(NSUInteger, UIViewAutoresizing) {
    UIViewAutoresizingNone = 0,                    //不自動調整
    UIViewAutoresizingFlexibleLeftMargin = 1 << 0,  //自動調整左側間距
    UIViewAutoresizingFlexibleWidth = 1 << 1,       //自動調整自身寬度
    UIViewAutoresizingFlexibleRightMargin = 1 << 2, //自動調整右側間距
    UIViewAutoresizingFlexibleTopMargin = 1 << 3,   //自動調整頂部間距
    UIViewAutoresizingFlexibleHeight = 1 << 4,      //自動調整自身高度
    UIViewAutoresizingFlexibleBottomMargin = 1 << 5  //自動調整底部間距
};
枚舉常透過按位或(|)組合使用。例如當 autoresizingMask 設為 FlexibleWidth | FlexibleLeftMargin 時,iOS 會自動調整左側間距與自身寬度,同時保持右側間距不變,並讓左側間距與寬度按相同比例伸縮。
下面以純程式碼方式建立一個自定義的 KCMainViewController 來示範:
AppDelegate.m
- (BOOL)application:(UIApplication *)application didFinishLaunchingWithOptions:(NSDictionary *)launchOptions {
    self.window = [[UIWindow alloc] initWithFrame:[UIScreen mainScreen].applicationFrame];
    KCMainViewController *mainController = [[KCMainViewController alloc] init];
    self.window.rootViewController = mainController;
    self.window.backgroundColor = [UIColor colorWithRed:249/255.0 green:249/255.0 blue:249/255.0 alpha:1];
    [self.window makeKeyAndVisible];
    return YES;
}
KCMainViewController.m
@interface KCMainViewController (){
    UIButton *_btn;
}
@end

@implementation KCMainViewController
- (void)viewDidLoad {
    [super viewDidLoad];
    _btn = [[UIButton alloc] initWithFrame:CGRectMake(60, 100, 200, 50)];
    _btn.backgroundColor = [UIColor orangeColor];
    [_btn setTitle:@"Hello,world!" forState:UIControlStateNormal];
    _btn.autoresizingMask = UIViewAutoresizingFlexibleWidth | UIViewAutoresizingFlexibleLeftMargin;
    [self.view addSubview:_btn];
}

-(void)didRotateFromInterfaceOrientation:(UIInterfaceOrientation)fromInterfaceOrientation{
    NSLog(@"%@", NSStringFromCGRect(_btn.frame));
}
@end
把 window 背景設為灰色後執行會發現,即使有 UIView 覆蓋,最終仍呈現灰色,這說明 UIView 預設是透明的。
豎屏效果:

橫屏效果:

執行前請先隱藏狀態列:一是在 info.plist 中將 Status bar is initially hidden 設為 YES,二是將 View controller-based status bar appearance 設為 NO。
transform
transform 通常被稱為形變屬性,本質是透過矩陣運算改變控件的大小、位置與角度。下面這個例子同時示範了 UIImageView 的常見操作。
KCTransformViewController.m
#define NORMAL_COLOR [UIColor colorWithRed:75/255.0 green:160/255.0 blue:253/255.0 alpha:1]
#define HIGHLIGHTED_COLOR [UIColor colorWithRed:197/255.0 green:221/255.0 blue:249/255.0 alpha:1]

typedef void(^ ButtonHandle)();

@interface KCTransformViewController (){
    UIImageView *_imageView;
    UIButton *_btnRotation;
    UIButton *_btnScale;
    UIButton *_btnTranslate;
}
@end

@implementation KCTransformViewController
- (void)viewDidLoad {
    [super viewDidLoad];
    [self addImageView];
    [self addRotationButton];
    [self addScaleButton];
    [self addTranslateButton];
}

-(void)addImageView{
    UIImage *image = [UIImage imageNamed:@"promo_ios8.png"];
    _imageView = [[UIImageView alloc] initWithImage:image];
    _imageView.frame = CGRectMake(20, 20, 280, 154);
    _imageView.contentMode = UIViewContentModeScaleAspectFit;
    [self.view addSubview:_imageView];
}

//旋轉:必須傳入弧度,M_PI_4 表示四分之派
-(void)rotation:(UIButton *)btn{
    [self animation:^{
        CGFloat angle = M_PI_4;
        _imageView.transform = CGAffineTransformRotate(_imageView.transform, angle);
    }];
}

//縮放
-(void)scale:(UIButton *)btn{
    [UIView animateWithDuration:0.5 animations:^{
        CGFloat scalleOffset = 0.9;
        _imageView.transform = CGAffineTransformScale(_imageView.transform, scalleOffset, scalleOffset);
    }];
}

//移動
-(void)translate:(UIButton *)btn{
    [self animation:^{
        CGFloat translateY = 50;
        _imageView.transform = CGAffineTransformTranslate(_imageView.transform, 0, translateY);
    }];
}

//自訂動畫方法,實際開發可直接使用 animateWithDuration
-(void)animation:(ButtonHandle)handle{
    [UIView beginAnimations:@"animation" context:nil];
    [UIView setAnimationDuration:0.5];
    handle();
    [UIView commitAnimations];
}
@end
要特別注意:transform 的旋轉、縮放、移動並不會在原有基礎上累加,而是重新計算。若想在疊加效果上操作,需使用 CGAffineTransformRotate、CGAffineTransformScale、CGAffineTransformTranslate 這三個方法,它們會在原有矩陣基礎上生成新值。
運行效果:

iOS 開發中推薦使用 png 圖片,系統會對其進行優化。
UIScrollView
顧名思義,這是一個處理滾動操作的視圖,使用頻率極高,也常作為其他控件的父類,例如 UITableView 就繼承自 UIScrollView。
常用屬性
@property(nonatomic) CGPoint contentOffset; 內容偏移量,預設為 CGPointZero
@property(nonatomic) CGSize contentSize; 內容大小,若不設置則無法滾動
@property(nonatomic) UIEdgeInsets contentInset; 四周邊距,類似 CSS 的 margin
@property(nonatomic,assign) id<UIScrollViewDelegate> delegate; 事件監聽代理
@property(nonatomic) BOOL bounces; 是否啟用彈簧效果,預設 YES
@property(nonatomic,getter=isPagingEnabled) BOOL pagingEnabled; 是否分頁,預設 NO
@property(nonatomic,getter=isScrollEnabled) BOOL scrollEnabled; 是否啟用滾動,預設 YES
@property(nonatomic) CGFloat minimumZoomScale; 最小縮放倍數
@property(nonatomic) CGFloat maximumZoomScale; 最大縮放倍數
常用方法
- (void)setContentOffset:(CGPoint)contentOffset animated:(BOOL)animated; 設置滾動位置
- (void)scrollRectToVisible:(CGRect)rect animated:(BOOL)animated; 滾動並顯示指定區域
代理方法
- (void)scrollViewDidScroll:(UIScrollView *)scrollView; 滾動過程會持續觸發
- (void)scrollViewWillBeginDragging:(UIScrollView *)scrollView; 開始拖拽
- (void)scrollViewDidEndDragging:(UIScrollView *)scrollView willDecelerate:(BOOL)decelerate; 拖拽結束
- (void)scrollViewDidEndDecelerating:(UIScrollView *)scrollView; 滾動停止
- (UIView *)viewForZoomingInScrollView:(UIScrollView *)scrollView; 返回縮放視圖,只有實現此方法才能縮放
contentSize、contentInset、contentOffset 三者的關係可參考下圖:

關於事件執行順序需要說明:拖動時依序為「開始拖拽、滾動、滾動…、停止拖拽、將要停止滾動、滾動…、停止滾動」;縮放時則為「開始縮放、滾動、滾動…、停止縮放」。由於滾動事件會持續觸發,若在其中執行操作務必關注效能。
KCScrollViewController.m
@interface KCScrollViewController ()<UIScrollViewDelegate>
@end

@implementation KCScrollViewController
- (void)viewDidLoad {
    [super viewDidLoad];
    _scrollView = [[UIScrollView alloc] initWithFrame:[UIScreen mainScreen].applicationFrame];
    _scrollView.contentMode = UIViewContentModeScaleToFill;
    [self.view addSubview:_scrollView];

    UIImage *image = [UIImage imageNamed:@"wwdc14-labs-hero-background.jpg"];
    _imageView = [[UIImageView alloc] initWithImage:image];
    [_scrollView addSubview:_imageView];

    _scrollView.contentSize = _imageView.frame.size;
    _scrollView.minimumZoomScale = 0.6;
    _scrollView.maximumZoomScale = 3.0;
    _scrollView.delegate = self;
    _scrollView.showsHorizontalScrollIndicator = NO;
    _scrollView.showsVerticalScrollIndicator = NO;
}

-(UIView *)viewForZoomingInScrollView:(UIScrollView *)scrollView{
    return _imageView;
}

//縮放後讓圖片置中
-(void)scrollViewDidZoom:(UIScrollView *)scrollView{
    CGSize originalSize = _scrollView.bounds.size;
    CGSize contentSize = _scrollView.contentSize;
    CGFloat offsetX = originalSize.width > contentSize.width ? (originalSize.width-contentSize.width)/2 : 0;
    CGFloat offsetY = originalSize.height > contentSize.height ? (originalSize.height-contentSize.height)/2 : 0;
    _imageView.center = CGPointMake(contentSize.width/2+offsetX, contentSize.height/2+offsetY);
}
@end
運行效果如下:

預設情況下縮放後的內容會停在起始位置,若要置中則需自行維護其 center。
擴展—ARC
iOS 5 之後引入 ARC 特性,無需手動 retain、release,編譯器會自動管理記憶體。本質上 ARC 只是編譯器特性,運行時仍以引用計數為基礎:只要有一個強引用指向某對象,該對象就不會被釋放。
開啟 ARC 後可使用四個關鍵字修飾變數與屬性:
strong(變數用 __strong):強引用,相當於舊的 retain;
weak(變數用 __weak):弱引用,對象釋放後會自動置為 nil,避免野指標;
unsafe_unretained(變數用 __unsafe_unretained):與 weak 類似,但釋放後不會置 nil;
__autoreleasing:延遲釋放,常用於 NSError 這類「指標的指標」參數。
KCPerson.h
@interface KCPerson : NSObject
@property (nonatomic,assign) int no;
@end
KCPerson.m
@implementation KCPerson
-(NSString *)description{
    return [NSString stringWithFormat:@"no=%i", _no];
}
@end
main.m
int main(int argc, const char * argv[]) {
    @autoreleasepool {
        //strong 示範
        KCPerson *person1 = [[KCPerson alloc] init];
        __strong KCPerson *person2 = person1;
        person1.no = 1;
        NSLog(@"%@", person2);   //no=1
        person1 = nil;
        NSLog(@"%@", person2);   //no=1,仍指向對象

        //weak 示範
        __strong KCPerson *person3 = [[KCPerson alloc] init];
        __weak KCPerson *person4 = person3;
        person3.no = 3;
        NSLog(@"%@", person4);   //no=3
        person3 = nil;
        NSLog(@"%@", person4);   //(null),對象已釋放
    }
    return 0;
}
person1 與 person2 都是強引用,因此 person1 置 nil 後對象仍存活;person4 是弱引用,當唯一的強引用 person3 置 nil 後對象被釋放,person4 隨之變為 nil。
strong—person1 和 person2 的關係

weak—person3 和 person4 的關係

由此可歸納:strong、weak 只用於對象類型,基本數據類型用 assign 即可;所有指標預設為 __strong;對象一旦沒有強引用便會被釋放,弱引用同步置 nil。因此純程式碼創建的屬性用 strong,而用 IBOutlet 修飾(storyboard 中的元件)則用 weak,因為其頂層容器已持有強引用。
UIScrollView 實戰:無限循環
本實戰要解決兩個問題:如何實現無限循環,以及如何優化效能。
如何無限循環?
直觀做法是首尾各放一張圖片(共 n+2 張)。例如 5 張圖片時,用 7 個 UIImageView 依次存放:圖片5、圖片1、圖片2、圖片3、圖片4、圖片5、圖片1。當滾到末端的圖片1 時,迅速把 contentOffset 跳回真正的圖片1,使用者便會產生循環的錯覺。

如何優化效能?
若圖片過多,全部載入會佔用大量記憶體。其實只需 3 個 UIImageView 即可:始終顯示中間那個,滾動時動態更新三者的內容。例如預設放圖片5、圖片1、圖片2,滾到圖片2 後再迅速把三者重設為圖片1、圖片2、圖片3,並把 contentOffset 拉回中間,如此循環往復,既省記憶體又流暢。
imageInfo.plist
<plist version="1.0">
<dict>
    <key>0.jpg</key><string>iphone 5s</string>
    <key>1.jpg</key><string>iphone 5c</string>
    <key>2.jpg</key><string>ipad mini with retina</string>
    <key>3.jpg</key><string>ipad air</string>
    <key>4.jpg</key><string>ipod</string>
</dict>
</plist>
KCMainViewController.m 的核心實現:
#define SCREEN_WIDTH 320
#define SCREEN_HEIGHT 568
#define IMAGEVIEW_COUNT 3

@interface KCMainViewController ()<UIScrollViewDelegate>{
    UIScrollView *_scrollView;
    UIImageView *_leftImageView;
    UIImageView *_centerImageView;
    UIImageView *_rightImageView;
    UIPageControl *_pageControl;
    UILabel *_label;
    NSMutableDictionary *_imageData;
    int _currentImageIndex;
    int _imageCount;
}
@end

@implementation KCMainViewController
- (void)viewDidLoad {
    [super viewDidLoad];
    [self loadImageData];
    [self addScrollView];
    [self addImageViews];
    [self addPageControl];
    [self addLabel];
    [self setDefaultImage];
}

-(void)loadImageData{
    NSString *path = [[NSBundle mainBundle] pathForResource:@"imageInfo" ofType:@"plist"];
    _imageData = [NSMutableDictionary dictionaryWithContentsOfFile:path];
    _imageCount = (int)_imageData.count;
}

-(void)addScrollView{
    _scrollView = [[UIScrollView alloc] initWithFrame:[UIScreen mainScreen].bounds];
    [self.view addSubview:_scrollView];
    _scrollView.delegate = self;
    _scrollView.contentSize = CGSizeMake(IMAGEVIEW_COUNT*SCREEN_WIDTH, SCREEN_HEIGHT);
    [_scrollView setContentOffset:CGPointMake(SCREEN_WIDTH, 0) animated:NO];
    _scrollView.pagingEnabled = YES;
    _scrollView.showsHorizontalScrollIndicator = NO;
}

//滾動停止後重新載入並回到中間
-(void)scrollViewDidEndDecelerating:(UIScrollView *)scrollView{
    [self reloadImage];
    [_scrollView setContentOffset:CGPointMake(SCREEN_WIDTH, 0) animated:NO];
    _pageControl.currentPage = _currentImageIndex;
    NSString *imageName = [NSString stringWithFormat:@"%i.jpg", _currentImageIndex];
    _label.text = _imageData[imageName];
}

-(void)reloadImage{
    CGPoint offset = [_scrollView contentOffset];
    if (offset.x > SCREEN_WIDTH) {
        _currentImageIndex = (_currentImageIndex + 1) % _imageCount;   //向右滑
    } else if (offset.x < SCREEN_WIDTH) {
        _currentImageIndex = (_currentImageIndex + _imageCount - 1) % _imageCount; //向左滑
    }
    int leftImageIndex = (_currentImageIndex + _imageCount - 1) % _imageCount;
    int rightImageIndex = (_currentImageIndex + 1) % _imageCount;
    _leftImageView.image = [UIImage imageNamed:[NSString stringWithFormat:@"%i.jpg", leftImageIndex]];
    _centerImageView.image = [UIImage imageNamed:[NSString stringWithFormat:@"%i.jpg", _currentImageIndex]];
    _rightImageView.image = [UIImage imageNamed:[NSString stringWithFormat:@"%i.jpg", rightImageIndex]];
}
@end
這裡要特別提醒:核心邏輯盡量放在「滾動停止」事件中,因為滾動事件會持續觸發、較為耗費效能,而停止事件在一次操作裡只會執行一次。
運行效果:
