
iOS 百度地圖實戰:BMK 標注與覆蓋物全攻略
在 iOS 開發裡,地圖一直是不容小覷的重要模塊。我們日常最常打交道的莫過於高德、百度與谷歌這幾家,而就中國大陸的市場而言,蘋果早已不再採用谷歌地圖,官方預設改用了高德。本文就來聊聊百度地圖開發過程中那些值得留意的關鍵環節與延伸知識點。
至於百度地圖開發環境的搭建,這裡就不再赘述,有興趣的讀者可參考官方文件:https://developer.baidu.com/map/index.php?title=iossdk/guide/buildproject
百度地圖 iOS SDK 的下載位置:https://developer.baidu.com/map/index.php?title=iossdk/sdkiosdev-download
關於百度地圖的基本用法,大可直接翻閱官方開發文檔。本文的重點,是替你把文檔中那些真正重要的知識點與延伸應用梳理清楚(以下示範以 iOS SDK 2.9.0 版本為準)。
先來看看百度地圖開發時經常會碰到的幾個問題:
如何添加標注(系統標注與自訂標注)
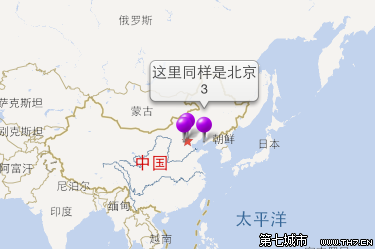

1 //添加標記 2 -(void)viewDidAppear:(BOOL)animated 3 { 4 /* 5 for (int i = 0; i < 3; i++) { 6 BMKPointAnnotation* annotation = [[BMKPointAnnotation alloc]init]; 7 CLLocationCoordinate2D coor; 8 coor.latitude = 39.915 + i*2; 9 coor.longitude = 116.404 + i*2;10 annotation.coordinate = coor;11 annotation.title = @"這裡是北京";12 [myMapView addAnnotation:annotation];13 }14 */15 BMKPointAnnotation* annotation = [[BMKPointAnnotation alloc]init];16 CLLocationCoordinate2D coor;17 coor.latitude = 39.915;18 coor.longitude = 116.404;19 annotation.coordinate = coor;20 annotation.title = @"這裡是北京";21 annotation.subtitle = @"1";22 //[myMapView addAnnotation:annotation];23 24 BMKPointAnnotation* annotation1 = [[BMKPointAnnotation alloc]init];25 CLLocationCoordinate2D coor1;26 coor1.latitude = 38.915;27 coor1.longitude = 113.404 + 2;28 annotation1.coordinate = coor1;29 annotation1.title = @"這裡也是北京";30 annotation1.subtitle = @"2";31 //[myMapView addAnnotation:annotation1];32 33 BMKPointAnnotation* annotation2 = [[BMKPointAnnotation alloc]init];34 CLLocationCoordinate2D coor2;35 coor2.latitude = 38.915;36 coor2.longitude = 119.404 + 2;37 annotation2.coordinate = coor2;38 annotation2.title = @"這裡同樣是北京";39 annotation2.subtitle = @"3";40 //[myMapView addAnnotation:annotation2];41 42 NSArray *arr = [NSArray arrayWithObjects:annotation,annotation1,annotation2, nil];43 [myMapView addAnnotations:arr];44 }45 46 -(BMKAnnotationView *)mapView:(BMKMapView *)mapView viewForAnnotation:(id)annotation47 {48 if ([annotation isKindOfClass:[BMKPointAnnotation class]])49 {50 BMKPinAnnotationView *newAnnotationView = (BMKPinAnnotationView *)[mapView dequeueReusableAnnotationViewWithIdentifier:@"AnnotationView"];51 newAnnotationView = [[BMKPinAnnotationView alloc] initWithAnnotation:annotation reuseIdentifier:@"AnnotationView"];52 newAnnotationView.pinColor = BMKPinAnnotationColorPurple;53 newAnnotationView.animatesDrop = YES;// 設置該標注點動畫顯示54 return newAnnotationView;55 }56 return nil;57 }
系統標記如何自訂大頭針
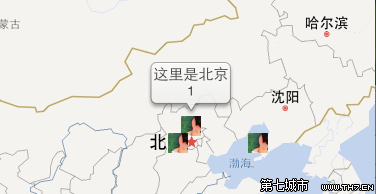
所謂自訂大頭針,其實就是把大頭針的外觀換成你要的樣子。若想用自己的圖片取代畫面上預設的樣式,程式碼寫法與上面幾乎一模一樣,只要在代理實作裡多補上這一行即可:newAnnotationView.image = [UIImage imageNamed:@"2"];(圖片顯示的大小,可以透過 newAnnotationView 的 frame 來設定)如何修改氣泡樣式?氣泡預設可以顯示兩行資訊,一條 title、一條 subtitle。這裡僅調整氣泡的外觀,例如邊框大小、字體等基礎設定,並不改動整體版面配置。
1 -(BMKAnnotationView *)mapView:(BMKMapView *)mapView viewForAnnotation:(id簡單定義氣泡樣式)annotation 2 { 3 if ([annotation isKindOfClass:[BMKPointAnnotation class]]) 4 { 5 BMKPinAnnotationView *newAnnotationView = (BMKPinAnnotationView *)[mapView dequeueReusableAnnotationViewWithIdentifier:@"AnnotationView"]; 6 newAnnotationView = [[BMKPinAnnotationView alloc] initWithAnnotation:annotation reuseIdentifier:@"AnnotationView"]; 7 newAnnotationView.pinColor = BMKPinAnnotationColorPurple; 8 newAnnotationView.animatesDrop = YES;// 設置該標注點動畫顯示 9 10 UIView *view = [[UIView alloc]init];11 view.frame = CGRectMake(0, 0, 100, 60);12 view.backgroundColor = [UIColor greenColor];13 [view.layer setMasksToBounds:YES];14 [view.layer setCornerRadius:3];15 view.alpha = 0.9;16 17 UILabel *label1 = [[UILabel alloc]init];18 label1.frame = CGRectMake(0, 0, 100, 30);19 label1.text = annotation.title;20 label1.numberOfLines = 0;21 label1.font = [UIFont systemFontOfSize:12];22 label1.textColor = [UIColor blackColor];23 [view addSubview:label1];24 25 UILabel *label2 = [[UILabel alloc]init];26 label2.frame = CGRectMake(0, 30, 100, 30);27 label2.text = annotation.subtitle;28 label2.numberOfLines = 0;29 label2.font = [UIFont systemFontOfSize:10];30 label2.textColor = [UIColor lightGrayColor];31 [view addSubview:label2];32 33 BMKActionPaopaoView *pView = [[BMKActionPaopaoView alloc]initWithCustomView:view];34 pView.frame = CGRectMake(0, 0, 100, 60);35 ((BMKPinAnnotationView *)newAnnotationView).paopaoView = pView;36 return newAnnotationView;37 }38 return nil;39 }
那麼,如果我們想連氣泡的版面配置也一併改寫,又該如何著手呢?
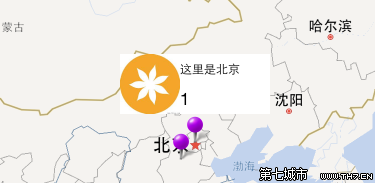
系統預設的氣泡不外乎就是「一個座標、一個標題、一個子標題」。若我們想完全依自己的構想來編排彈出的氣泡,究竟要做哪些功課呢?
首先,系統提供的 BMKPointAnnotation 方法並不足以滿足我們,這時就需要繼承這個類別。假設新類別叫做 myPoint,我們再為它補上幾個自訂屬性,例如這裡要加的三個:NSString *imgName; NSString *placeName; NSString *idNum;
接著我們要自訂氣泡。氣泡本身就是一個 UIView,於是我們可以繼承 UIView 建立一個子類別 myPaopao;在 myPaopao 裡放入三個控件,分別用來呈現上面定義的三個屬性。
1 #importmyPaopao.h2 3 @interface myPaopao : UIView4 @property(nonatomic,retain)UIImageView *imgView;5 @property(nonatomic,retain) UILabel *placeName;6 @property(nonatomic,retain) UILabel *idNum; 8 @end
1 #import "myPaopao.h" 2 3 @implementation myPaopao 4 5 -(instancetype)initWithFrame:(CGRect)frame 6 { 7 self = [super initWithFrame:frame]; 8 if (self) 9 {10 self.frame = CGRectMake(0, 0, 150, 60);11 self.backgroundColor = [UIColor whiteColor]; 12 _imgView = [[UIImageView alloc]init];13 _imgView.frame = CGRectMake(0, 0, 60, 60);14 [self addSubview:_imgView]; 15 _placeName = [[UILabel alloc]init];16 _placeName.frame = CGRectMake(60, 0, 90, 30);17 _placeName.font = [UIFont systemFontOfSize:12];18 [self addSubview:_placeName]; 19 _idNum = [[UILabel alloc]init];20 _idNum.frame = CGRectMake(60, 30, 90, 30);21 [self addSubview:_idNum]; 22 }23 return self;24 }25 @end
myPaopao.m
1 //添加標記 2 -(void)viewDidAppear:(BOOL)animated 3 { 4 myPoint* annotation = [[myPoint alloc]init]; 5 CLLocationCoordinate2D coor; 6 coor.latitude = 39.915; 7 coor.longitude = 116.404; 8 annotation.coordinate = coor; 9 annotation.imgName = @"1.jpg";10 annotation.placeName = @"這裡是北京";11 annotation.idNum = @"1";12 [myMapView addAnnotation:annotation]; 13 myPoint* annotation1 = [[myPoint alloc]init];14 CLLocationCoordinate2D coor1;15 coor1.latitude = 38.915;16 coor1.longitude = 113.404 + 2;17 annotation1.coordinate = coor1;18 annotation1.imgName = @"2.jpg";19 annotation1.placeName = @"這裡也是北京";20 annotation1.idNum = @"2";21 [myMapView addAnnotation:annotation1]; 22 }23 -(BMKAnnotationView *)mapView:(BMKMapView *)mapView viewForAnnotation:(id)annotation24 {25 if ([annotation isKindOfClass:[myPoint class]])26 {27 myPoint *myAnnotation = (myPoint *)annotation; 28 BMKPinAnnotationView *newAnnotationView = (BMKPinAnnotationView *)[mapView dequeueReusableAnnotationViewWithIdentifier:@"AnnotationView"];29 newAnnotationView = [[BMKPinAnnotationView alloc] initWithAnnotation:annotation reuseIdentifier:@"AnnotationView"];30 newAnnotationView.pinColor = BMKPinAnnotationColorPurple;31 newAnnotationView.animatesDrop = YES;// 設置該標注點動畫顯示32 myPaopao *paopapo = [[myPaopao alloc]init]; 33 paopapo.imgView.image = [UIImage imageNamed:myAnnotation.imgName];34 paopapo.placeName.text = myAnnotation.placeName;35 paopapo.idNum.text = myAnnotation.idNum;36 BMKActionPaopaoView *pView = [[BMKActionPaopaoView alloc]initWithCustomView:paopapo];37 ((BMKPinAnnotationView *)newAnnotationView).paopaoView = pView;38 return newAnnotationView;39 }40 return nil;41 }
實現代碼
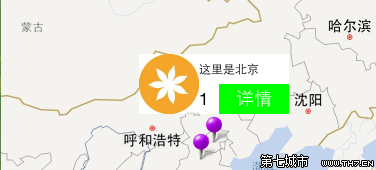
如果有需要,我們還能在氣泡裡再加一顆按鈕,用來跳轉到詳情頁;添加按鈕的做法與上面如出一轍,這裡就不再贅述。
點聚合功能
點聚合是 v2.9.0 新增的一項實用功能。當同一區域內點位密集、彼此層層疊疊時,點聚合能把大量分散的點收攏成一個聚合點,再透過縮放比例來決定要顯示更多細節還是收攏成聚合態。下載 SDK 時會附帶一份 Demo,裡頭就能找到對應的實作程式碼。開發文檔中也提供了核心片段:
折線(連接兩點的線段)
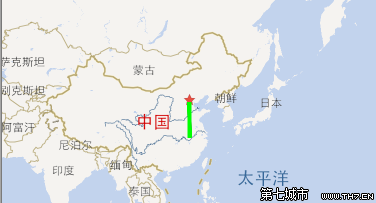
程式碼片段:
1 //添加標記 2 -(void)viewDidAppear:(BOOL)animated 3 { 4 CLLocationCoordinate2D coors[2] = {0}; 5 coors[0].latitude = 39.315; 6 coors[0].longitude = 116.304; 7 coors[1].latitude = 30.515; 8 coors[1].longitude = 116.504; 9 BMKPolyline *polyline = [BMKPolyline polylineWithCoordinates:coors count:2];10 [myMapView addOverlay:polyline];11 }12 -(BMKOverlayView *)mapView:(BMKMapView *)mapView viewForOverlay:(id)overlay13 {14 NSLog(@"sdf");15 if ([overlay isKindOfClass:[BMKPolyline class]])16 {17 BMKPolylineView *polylineView = [[BMKPolylineView alloc]initWithPolyline:overlay];18 polylineView.strokeColor = [[UIColor greenColor]colorWithAlphaComponent:1];19 polylineView.lineWidth = 5.0;20 return polylineView;21 }22 return nil;23 }
折線
分段紋理分段折線
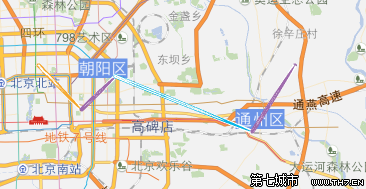 程式碼片段:
1 //添加標記 2 -(void)viewDidAppear:(BOOL)animated 3 { 4 CLLocationCoordinate2D coords[5] = {0}; 5 coords[0].latitude = 39.965; 6 coords[0].longitude = 116.404; 7 coords[1].latitude = 39.925; 8 coords[1].longitude = 116.454; 9 coords[2].latitude = 39.955;10 coords[2].longitude = 116.494;11 coords[3].latitude = 39.905;12 coords[3].longitude = 116.654;13 coords[4].latitude = 39.965;14 coords[4].longitude = 116.704;15 //構建分段文理索引數組16 NSArray *textureIndex = [NSArray arrayWithObjects:17 [NSNumber numberWithInt:0],18 [NSNumber numberWithInt:1],19 [NSNumber numberWithInt:2],20 [NSNumber numberWithInt:1], nil];21 BMKPolyline *polyline = [BMKPolyline polylineWithCoordinates:coords count:5 textureIndex:textureIndex];22 [myMapView addOverlay:polyline];23 }24 -(BMKOverlayView *)mapView:(BMKMapView *)mapView viewForOverlay:(id)overlay25 {26 if ([overlay isKindOfClass:[BMKPolyline class]])27 {28 BMKPolylineView* polylineView = [[BMKPolylineView alloc] initWithOverlay:overlay];29 polylineView.lineWidth = 5;30 polylineView.isFocus = YES;// 是否分段紋理繪制(突出顯示),默認YES31 //加載分段紋理圖片,必須否則不能進行分段紋理繪制32 [polylineView loadStrokeTextureImages:33 [NSArray arrayWithObjects:[UIImage imageNamed:@"1.jpg"],34 [UIImage imageNamed:@"2.jpg"],35 [UIImage imageNamed:@"3.jpg"],nil]];36 return polylineView;37 }38 return nil;39 }
紋理折線
分段顏色分段折線
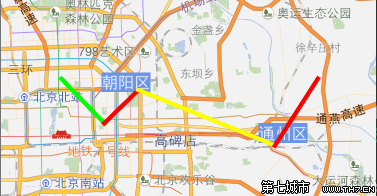
程式碼片段:
1 -(void)viewDidAppear:(BOOL)animated 2 { 3 CLLocationCoordinate2D coords[5] = {0}; 4 coords[0].latitude = 39.965; 5 coords[0].longitude = 116.404; 6 coords[1].latitude = 39.925; 7 coords[1].longitude = 116.454; 8 coords[2].latitude = 39.955; 9 coords[2].longitude = 116.494;10 coords[3].latitude = 39.905;11 coords[3].longitude = 116.654;12 coords[4].latitude = 39.965;13 coords[4].longitude = 116.704;14 //構建分段文理索引數組15 NSArray *colorIndexs = [NSArray arrayWithObjects:16 [NSNumber numberWithInt:0],17 [NSNumber numberWithInt:1],18 [NSNumber numberWithInt:2],19 [NSNumber numberWithInt:1], nil];20 BMKPolyline *polyline = [BMKPolyline polylineWithCoordinates:coords count:5 textureIndex:colorIndexs];21 [myMapView addOverlay:polyline];22 }23 -(BMKOverlayView *)mapView:(BMKMapView *)mapView viewForOverlay:(id)overlay24 {25 if ([overlay isKindOfClass:[BMKPolyline class]])26 {27 BMKPolylineView* polylineView = [[BMKPolylineView alloc] initWithOverlay:overlay];28 polylineView.lineWidth = 5;29 // 使用分段顏色繪制時,必須設置(內容必須為UIColor)30 polylineView.colors = [NSArray arrayWithObjects:[UIColor greenColor], [UIColor redColor], [UIColor yellowColor], nil];31 return polylineView;32 }33 return nil;34 }
顏色分段
弧線(起點、途經點、終點)
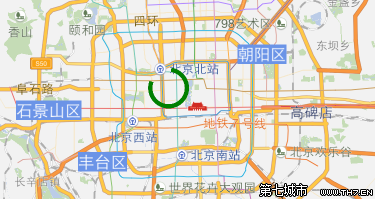
程式碼片段:
1 -(void)viewDidAppear:(BOOL)animated 2 { 3 CLLocationCoordinate2D coords[3] = {0}; 4 coords[0].latitude = 39.9374; 5 coords[0].longitude = 116.350; 6 coords[1].latitude = 39.9170; 7 coords[1].longitude = 116.360; 8 coords[2].latitude = 39.9479; 9 coords[2].longitude = 116.373;10 BMKArcline *arcline = [BMKArcline arclineWithCoordinates:coords];11 [myMapView addOverlay:arcline];12 }13 -(BMKOverlayView *)mapView:(BMKMapView *)mapView viewForOverlay:(id)overlay14 {15 if ([overlay isKindOfClass:[BMKArcline class]])16 {17 NSLog(@"adf");18 BMKArclineView* arclineView = [[BMKArclineView alloc] initWithOverlay:overlay];19 arclineView.strokeColor = [[UIColor blackColor]colorWithAlphaComponent:0.5];20 arclineView.lineWidth = 5.0;21 return arclineView;22 }23 return nil;24 }
弧線
多邊形
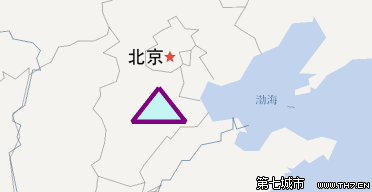
程式碼片段:
1 -(void)viewDidAppear:(BOOL)animated 2 { 3 CLLocationCoordinate2D coords[3] = {0}; 4 coords[0].latitude = 39; 5 coords[0].longitude = 116; 6 coords[1].latitude = 38; 7 coords[1].longitude = 115; 8 coords[2].latitude = 38; 9 coords[2].longitude = 117;10 BMKPolygon *ploygon = [BMKPolygon polygonWithCoordinates:coords count:3];11 [myMapView addOverlay:ploygon];12 }13 -(BMKOverlayView *)mapView:(BMKMapView *)mapView viewForOverlay:(id)overlay14 {15 if ([overlay isKindOfClass:[BMKPolygon class]])16 {17 BMKPolygonView* polygonView = [[BMKPolygonView alloc] initWithOverlay:overlay];18 polygonView.strokeColor = [[UIColor purpleColor] colorWithAlphaComponent:1];19 polygonView.fillColor = [[UIColor cyanColor] colorWithAlphaComponent:0.2];20 polygonView.lineWidth = 5.0; 21 return polygonView;22 }23 return nil;24 }
多邊形
圓
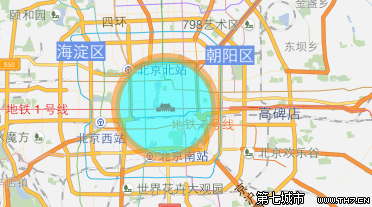
程式碼片段:
1 -(void)viewDidAppear:(BOOL)animated 2 { 3 CLLocationCoordinate2D coor; 4 coor.latitude = 39.915; 5 coor.longitude = 116.404; 6 BMKCircle* circle = [BMKCircle circleWithCenterCoordinate:coor radius:5000]; 7 [myMapView addOverlay:circle]; 8 } 9 -(BMKOverlayView *)mapView:(BMKMapView *)mapView viewForOverlay:(id)overlay10 {11 if ([overlay isKindOfClass:[BMKCircle class]])12 {13 BMKCircleView* circleView = [[BMKCircleView alloc] initWithOverlay:overlay];14 circleView.fillColor = [[UIColor cyanColor] colorWithAlphaComponent:0.5];15 circleView.strokeColor = [[UIColor orangeColor] colorWithAlphaComponent:0.5];16 circleView.lineWidth = 10.0; 17 return circleView;18 }19 return nil;20 }
- 上一篇文章: iOS 視圖控制器實戰:把畫面呈現到屏幕上的完整解析
- 下一篇文章: iOS GCD 多線程完全解析:串行隊列、並行隊列、分組與信號量