
iOS 富文本完全指南:行距、字距、21 種屬性與高度計算
只用 UILabel 的 text 和 textColor,很快就會遇到天花板:同一段文字裡要混搭不同字型與顏色、要調整行距與字距、要加刪除線或底線、要插入圖片、要點擊其中的連結。這些需求都指向同一個答案——NSAttributedString。本文從高度計算開始,完整梳理富文本在 iOS 中的用法。
一、先學會算高度:boundingRect 與段落樣式
富文本最實用的附帶技能,就是「先算出文字要佔多高」。做法是把段落樣式、字型、字距一起打包成屬性字典,再交給 boundingRectWithSize:options:attributes:context: 測量。
- (CGFloat)getSpaceLabelHeight:(NSString *)str withFont:(UIFont *)font withWidth:(CGFloat)width {
    NSMutableParagraphStyle *paraStyle = [[NSMutableParagraphStyle alloc] init];
    paraStyle.lineBreakMode = NSLineBreakByCharWrapping;
    paraStyle.alignment = NSTextAlignmentLeft;

    /** 行高 */
    paraStyle.lineSpacing = 15;
    paraStyle.hyphenationFactor = 1.0;
    paraStyle.firstLineHeadIndent = 0.0;
    paraStyle.paragraphSpacingBefore = 0.0;
    paraStyle.headIndent = 0;
    paraStyle.tailIndent = 0;

    NSDictionary *dic = @{
        NSFontAttributeName: font,
        NSParagraphStyleAttributeName: paraStyle,
        NSKernAttributeName: @1.5f
    };

    CGSize size = [str boundingRectWithSize:CGSizeMake(width, MAXFLOAT)
                                   options:NSStringDrawingUsesLineFragmentOrigin
                                attributes:dic
                                   context:nil].size;
    return size.height;
}
關鍵在於:測量的屬性必須和顯示時的屬性完全一致,否則算出來的高度會和實際排版對不上。實務上聰明的做法是抽一個方法統一產生屬性字典,測高與賦值都用它。
二、AttributedString 的兩種建立方式
在 iOS 中,NSAttributedString 與 NSMutableAttributedString 的關係,和 NSString 與 NSMutableString 類似。差別在於「Attributed」多了一個 attribute(屬性)的概念:同一段文字可以區分成多個區段,每個區段各自套一組屬性,而區段是用 NSRange 來描述。
方式一:先建立可變字串,再逐段 addAttribute
適合文字量不大、但需要分段精細控制的情況。
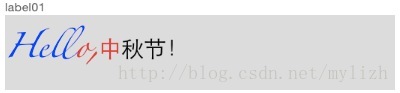
NSString *originStr = @"Hello,中秋節!";

// 建立 NSMutableAttributedString
NSMutableAttributedString *attributedStr01 = [[NSMutableAttributedString alloc] initWithString:originStr];

// 全字串套用 Zapfino 字型,15pt
[attributedStr01 addAttribute:NSFontAttributeName
                       value:[UIFont fontWithName:@"Zapfino" size:15]
                       range:NSMakeRange(0, originStr.length)];

// 前 4 個字元設為藍色
[attributedStr01 addAttribute:NSForegroundColorAttributeName
                       value:[UIColor blueColor]
                       range:NSMakeRange(0, 4)];

// 第 5 個字元起的 3 個字元(第 5、6、7)設為紅色
[attributedStr01 addAttribute:NSForegroundColorAttributeName
                       value:[UIColor redColor]
                       range:NSMakeRange(4, 3)];

_label01.attributedText = attributedStr01;
執行結果:
方式二:先建立屬性字典,再一次套用整段
適合大段文字、需要整體統一風格的情況,例如從檔案讀進來的整篇文章。
// 建立屬性字典
NSDictionary *attrDict = @{
    NSFontAttributeName: [UIFont fontWithName:@"Zapfino" size:15],
    NSForegroundColorAttributeName: [UIColor blueColor]
};

// 建立 NSAttributedString 並賦值
_label02.attributedText = [[NSAttributedString alloc] initWithString:originStr attributes:attrDict];
執行結果:

對比兩種方式:方式一容易處理複雜多變的格式,但屬性設定繁瑣;方式二簡潔明瞭,卻不擅長分段控制。不過「不擅長」並不等於「做不到」——把字串切段、各段各自建 NSAttributedString,再用 appendAttributedString: 合併即可。
// 第一段:前 4 個字元,藍色
NSDictionary *attrDict1 = @{
    NSFontAttributeName: [UIFont fontWithName:@"Zapfino" size:15],
    NSForegroundColorAttributeName: [UIColor blueColor]
};
NSAttributedString *attrStr1 = [[NSAttributedString alloc] initWithString:[originStr substringWithRange:NSMakeRange(0, 4)] attributes:attrDict1];

// 第二段:第 5~7 個字元,紅色
NSDictionary *attrDict2 = @{
    NSFontAttributeName: [UIFont fontWithName:@"Zapfino" size:15],
    NSForegroundColorAttributeName: [UIColor redColor]
};
NSAttributedString *attrStr2 = [[NSAttributedString alloc] initWithString:[originStr substringWithRange:NSMakeRange(4, 3)] attributes:attrDict2];

// 第三段:其餘字元,黑色
NSDictionary *attrDict3 = @{
    NSFontAttributeName: [UIFont fontWithName:@"Zapfino" size:15],
    NSForegroundColorAttributeName: [UIColor blackColor]
};
NSAttributedString *attrStr3 = [[NSAttributedString alloc] initWithString:[originStr substringWithRange:NSMakeRange(7, originStr.length - 4 - 3)] attributes:attrDict3];

// 合併
NSMutableAttributedString *attributedStr03 = [[NSMutableAttributedString alloc] initWithAttributedString:attrStr1];
[attributedStr03 appendAttributedString:attrStr2];
[attributedStr03 appendAttributedString:attrStr3];

_label03.attributedText = attributedStr03;
執行結果:

三、21 個屬性一次看:NSAttributedString Key 清單
富文本能設定什麼?以下是常用的屬性 key 與其取值型態、預設值:
// NSFontAttributeName 字型屬性,預設 Helvetica(Neue) 12
// NSForegroundColorAttributeName 字元顏色,值為 UIColor,預設黑色
// NSBackgroundColorAttributeName 字元區域背景色,值為 UIColor,預設 nil(透明)
// NSLigatureAttributeName 連字屬性,值為 NSNumber(整數),0 無連字,1 使用預設連字
// NSKernAttributeName 字元間距,值為 NSNumber,正值加寬,負值變窄
// NSStrikethroughStyleAttributeName 刪除線樣式,值為 NSNumber(整數)
// NSStrikethroughColorAttributeName 刪除線顏色,值為 UIColor,預設黑色
// NSUnderlineStyleAttributeName 底線樣式,值為 NSNumber,枚舉 NSUnderlineStyle
// NSUnderlineColorAttributeName 底線顏色,值為 UIColor,預設黑色
// NSStrokeWidthAttributeName 筆畫寬度,值為 NSNumber,負值為填滿、正值為中空
// NSStrokeColorAttributeName 描邊部分顏色(非字色),值為 UIColor
// NSShadowAttributeName 陰影屬性,值為 NSShadow
// NSTextEffectAttributeName 文字特殊效果,值為 NSString
// NSBaselineOffsetAttributeName 基線偏移,值為 NSNumber(float),正值上偏、負值下偏
// NSObliquenessAttributeName 字形傾斜,值為 NSNumber(float),正值右傾、負值左傾
// NSExpansionAttributeName 橫向伸縮,值為 NSNumber(float),正值拉伸、負值壓縮
// NSWritingDirectionAttributeName 文字書寫方向,左到右或右到左
// NSVerticalGlyphFormAttributeName 排版方向,值為 NSNumber,0 橫排、1 豎排
// NSLinkAttributeName 連結屬性,點擊後開啟指定 URL
// NSAttachmentAttributeName 文字附件,值為 NSTextAttachment,常用於圖文混排
// NSParagraphStyleAttributeName 段落排版格式,值為 NSParagraphStyle
以下逐一示範。
1. NSForegroundColorAttributeName(字元顏色)
NSDictionary *attrDict1 = @{NSForegroundColorAttributeName: [UIColor redColor]};
NSDictionary *attrDict2 = @{NSForegroundColorAttributeName: [UIColor blueColor]};
NSDictionary *attrDict3 = @{NSForegroundColorAttributeName: [UIColor orangeColor]};

_label01.attributedText = [[NSAttributedString alloc] initWithString:originStr attributes:attrDict1];
_label02.attributedText = [[NSAttributedString alloc] initWithString:originStr attributes:attrDict2];
_label03.attributedText = [[NSAttributedString alloc] initWithString:originStr attributes:attrDict3];
執行結果:

注意:NSForegroundColorAttributeName 設定的顏色與 UILabel 的 textColor 屬性在地位上是相等的,誰最後被賦值,畫面上顯示的就是誰的顏色。
2. NSBackgroundColorAttributeName(背景色)
NSDictionary *attrDict4 = @{NSBackgroundColorAttributeName: [UIColor orangeColor]};
NSDictionary *attrDict5 = @{NSBackgroundColorAttributeName: [UIColor redColor]};
NSDictionary *attrDict6 = @{NSBackgroundColorAttributeName: [UIColor cyanColor]};

_label01.attributedText = [[NSAttributedString alloc] initWithString:originStr attributes:attrDict4];
_label02.attributedText = [[NSAttributedString alloc] initWithString:originStr attributes:attrDict5];
_label03.attributedText = [[NSAttributedString alloc] initWithString:originStr attributes:attrDict6];
執行結果:

仔細觀察會發現一個問題:我並沒有關掉 NSForegroundColorAttributeName,但執行結果裡所有文字都變回了預設的黑色。這說明 NSForegroundColorAttributeName 與 NSBackgroundColorAttributeName 的地位是相等的,最後一次賦值會蓋掉前面的效果。若把兩段程式碼的順序對調:

但 textColor 屬性卻可以與 NSBackgroundColorAttributeName 疊加:
_label01.textColor = [UIColor greenColor];
_label02.textColor = [UIColor yellowColor];
_label03.textColor = [UIColor blueColor];

// 先設定字色屬性
NSDictionary *attrDict1 = @{NSForegroundColorAttributeName: [UIColor redColor]};
NSDictionary *attrDict2 = @{NSForegroundColorAttributeName: [UIColor blueColor]};
NSDictionary *attrDict3 = @{NSForegroundColorAttributeName: [UIColor orangeColor]};

_label01.attributedText = [[NSAttributedString alloc] initWithString:originStr attributes:attrDict1];
_label02.attributedText = [[NSAttributedString alloc] initWithString:originStr attributes:attrDict2];
_label03.attributedText = [[NSAttributedString alloc] initWithString:originStr attributes:attrDict3];

// 再設定背景色屬性
NSDictionary *attrDict4 = @{NSBackgroundColorAttributeName: [UIColor orangeColor]};
NSDictionary *attrDict5 = @{NSBackgroundColorAttributeName: [UIColor redColor]};
NSDictionary *attrDict6 = @{NSBackgroundColorAttributeName: [UIColor cyanColor]};

_label01.attributedText = [[NSAttributedString alloc] initWithString:originStr attributes:attrDict4];
_label02.attributedText = [[NSAttributedString alloc] initWithString:originStr attributes:attrDict5];
_label03.attributedText = [[NSAttributedString alloc] initWithString:originStr attributes:attrDict6];
執行結果:

雖然 textColor 在 NSForegroundColorAttributeName 之前賦值,但由於前者的效果被 NSBackgroundColorAttributeName 蓋掉了,最終顯示的是 textColor 的顏色。理解這個「互相覆蓋」的規則,能省下不少除錯時間。
3. NSLigatureAttributeName(連字)
// 0 表示不使用連字,1 表示使用預設連字,2 表示使用所有連字(iOS 不支援 2),預設值為 1
NSString *ligatureStr = @"flush";

NSDictionary *attrDict1 = @{
    NSLigatureAttributeName: [NSNumber numberWithInt:0],
    NSFontAttributeName: [UIFont fontWithName:@"futura" size:30]
};
_label01.attributedText = [[NSAttributedString alloc] initWithString:ligatureStr attributes:attrDict1];

NSDictionary *attrDict2 = @{
    NSLigatureAttributeName: @(1),
    NSFontAttributeName: [UIFont fontWithName:@"futura" size:30]
};
_label02.attributedText = [[NSAttributedString alloc] initWithString:ligatureStr attributes:attrDict2];
因為要展示連字效果,這裡把原本含中文的字串換成 flush。屬性值必須是 NSNumber 物件,不能直接塞整數,除了 [NSNumber numberWithInt:],也可以簡寫成 @(1)。

注意字母 f 與 l 之間的變化。當 f 和 l 以連字(glyph)組合繪製時,視覺上確實更美觀。不過並非所有字元都有連字,通常只有特定字型的特定組合(如 f+l、f+i)才有。
4. NSKernAttributeName(字元間距)
NSDictionary *attrDict1 = @{NSKernAttributeName: @(-3), NSFontAttributeName: [UIFont systemFontOfSize:20]};
_label01.attributedText = [[NSAttributedString alloc] initWithString:originStr attributes:attrDict1];

NSDictionary *attrDict2 = @{NSKernAttributeName: @(0), NSFontAttributeName: [UIFont systemFontOfSize:20]};
_label02.attributedText = [[NSAttributedString alloc] initWithString:originStr attributes:attrDict2];

NSDictionary *attrDict3 = @{NSKernAttributeName: @(10), NSFontAttributeName: [UIFont systemFontOfSize:20]};
_label03.attributedText = [[NSAttributedString alloc] initWithString:originStr attributes:attrDict3];

5. NSStrikethroughStyleAttributeName(刪除線樣式)
// 樣式取自枚舉 NSUnderlineStyle
// NSUnderlineStyleNone   不設刪除線
// NSUnderlineStyleSingle 細單實線
// NSUnderlineStyleThick  粗單實線
// NSUnderlineStyleDouble 細雙實線

NSDictionary *attrDict1 = @{NSStrikethroughStyleAttributeName: @(NSUnderlineStyleSingle), NSFontAttributeName: [UIFont systemFontOfSize:20]};
_label01.attributedText = [[NSAttributedString alloc] initWithString:originStr attributes:attrDict1];

NSDictionary *attrDict2 = @{NSStrikethroughStyleAttributeName: @(NSUnderlineStyleThick), NSFontAttributeName: [UIFont systemFontOfSize:20]};
_label02.attributedText = [[NSAttributedString alloc] initWithString:originStr attributes:attrDict2];

NSDictionary *attrDict3 = @{NSStrikethroughStyleAttributeName: @(NSUnderlineStyleDouble), NSFontAttributeName: [UIFont systemFontOfSize:20]};
_label03.attributedText = [[NSAttributedString alloc] initWithString:originStr attributes:attrDict3];
幾個重點:枚舉常量的本質仍是整數,所以必須先包成 NSNumber;刪除線與底線共用同一組枚舉常量;目前 iOS 實際只有上述四種效果生效,雖然標頭檔裡能看到更多取值,設了也不會有變化。

可以注意到中文與英文的刪除線位置略有不同。另外,這個屬性其實還接受其他整數:取值 0~7 時是單實線,數字越大線越粗;取值 9~15 時是雙實線,數字越大雙線越粗。
NSDictionary *attrDict1 = @{NSStrikethroughStyleAttributeName: @(1), NSFontAttributeName: [UIFont systemFontOfSize:20]};
_label01.attributedText = [[NSAttributedString alloc] initWithString:originStr attributes:attrDict1];

NSDictionary *attrDict2 = @{NSStrikethroughStyleAttributeName: @(3), NSFontAttributeName: [UIFont systemFontOfSize:20]};
_label02.attributedText = [[NSAttributedString alloc] initWithString:originStr attributes:attrDict2];

NSDictionary *attrDict3 = @{NSStrikethroughStyleAttributeName: @(7), NSFontAttributeName: [UIFont systemFontOfSize:20]};
_label03.attributedText = [[NSAttributedString alloc] initWithString:originStr attributes:attrDict3];

6. NSStrikethroughColorAttributeName(刪除線顏色)
NSDictionary *attrDict1 = @{
    NSStrikethroughColorAttributeName: [UIColor blueColor],
    NSStrikethroughStyleAttributeName: @(1),
    NSFontAttributeName: [UIFont systemFontOfSize:20]
};
_label01.attributedText = [[NSAttributedString alloc] initWithString:originStr attributes:attrDict1];

NSDictionary *attrDict2 = @{
    NSStrikethroughColorAttributeName: [UIColor orangeColor],
    NSStrikethroughStyleAttributeName: @(3),
    NSFontAttributeName: [UIFont systemFontOfSize:20]
};
_label02.attributedText = [[NSAttributedString alloc] initWithString:originStr attributes:attrDict2];

NSDictionary *attrDict3 = @{
    NSStrikethroughColorAttributeName: [UIColor greenColor],
    NSStrikethroughStyleAttributeName: @(7),
    NSFontAttributeName: [UIFont systemFontOfSize:20]
};
_label03.attributedText = [[NSAttributedString alloc] initWithString:originStr attributes:attrDict3];
7. NSUnderlineStyleAttributeName(底線樣式)
底線除了線條位置與刪除線不同,其餘設定方式完全一樣。
NSDictionary *attrDict1 = @{NSUnderlineStyleAttributeName: @(NSUnderlineStyleSingle), NSFontAttributeName: [UIFont systemFontOfSize:20]};
_label01.attributedText = [[NSAttributedString alloc] initWithString:originStr attributes:attrDict1];

NSDictionary *attrDict2 = @{NSUnderlineStyleAttributeName: @(NSUnderlineStyleThick), NSFontAttributeName: [UIFont systemFontOfSize:20]};
_label02.attributedText = [[NSAttributedString alloc] initWithString:originStr attributes:attrDict2];

NSDictionary *attrDict3 = @{NSUnderlineStyleAttributeName: @(NSUnderlineStyleDouble), NSFontAttributeName: [UIFont systemFontOfSize:20]};
_label03.attributedText = [[NSAttributedString alloc] initWithString:originStr attributes:attrDict3];

8. NSUnderlineColorAttributeName(底線顏色)
NSDictionary *attrDict1 = @{
    NSUnderlineColorAttributeName: [UIColor blueColor],
    NSUnderlineStyleAttributeName: @(NSUnderlineStyleSingle),
    NSFontAttributeName: [UIFont systemFontOfSize:20]
};
_label01.attributedText = [[NSAttributedString alloc] initWithString:originStr attributes:attrDict1];

NSDictionary *attrDict2 = @{
    NSUnderlineColorAttributeName: [UIColor orangeColor],
    NSUnderlineStyleAttributeName: @(NSUnderlineStyleThick),
    NSFontAttributeName: [UIFont systemFontOfSize:20]
};
_label02.attributedText = [[NSAttributedString alloc] initWithString:originStr attributes:attrDict2];

NSDictionary *attrDict3 = @{
    NSUnderlineColorAttributeName: [UIColor greenColor],
    NSUnderlineStyleAttributeName: @(NSUnderlineStyleDouble),
    NSFontAttributeName: [UIFont systemFontOfSize:20]
};
_label03.attributedText = [[NSAttributedString alloc] initWithString:originStr attributes:attrDict3];

9. NSStrokeWidthAttributeName(筆畫寬度)
負值為填滿效果,正值為中空(描邊)效果,0 則是原樣。
NSDictionary *attrDict1 = @{NSStrokeWidthAttributeName: @(-3), NSFontAttributeName: [UIFont systemFontOfSize:30]};
_label01.attributedText = [[NSAttributedString alloc] initWithString:originStr attributes:attrDict1];

NSDictionary *attrDict2 = @{NSStrokeWidthAttributeName: @(0), NSFontAttributeName: [UIFont systemFontOfSize:30]};
_label02.attributedText = [[NSAttributedString alloc] initWithString:originStr attributes:attrDict2];

NSDictionary *attrDict3 = @{NSStrokeWidthAttributeName: @(3), NSFontAttributeName: [UIFont systemFontOfSize:30]};
_label03.attributedText = [[NSAttributedString alloc] initWithString:originStr attributes:attrDict3];

10. NSStrokeColorAttributeName(描邊顏色)
NSDictionary *attrDict1 = @{NSStrokeWidthAttributeName: @(-3), NSStrokeColorAttributeName: [UIColor orangeColor], NSFontAttributeName: [UIFont systemFontOfSize:30]};
_label01.attributedText = [[NSAttributedString alloc] initWithString:originStr attributes:attrDict1];

NSDictionary *attrDict2 = @{NSStrokeWidthAttributeName: @(0), NSStrokeColorAttributeName: [UIColor blueColor], NSFontAttributeName: [UIFont systemFontOfSize:30]};
_label02.attributedText = [[NSAttributedString alloc] initWithString:originStr attributes:attrDict2];

NSDictionary *attrDict3 = @{NSStrokeWidthAttributeName: @(3), NSStrokeColorAttributeName: [UIColor greenColor], NSFontAttributeName: [UIFont systemFontOfSize:30]};
_label03.attributedText = [[NSAttributedString alloc] initWithString:originStr attributes:attrDict3];

我們完全沒有設定字色,所以字本身應該是黑色,這張圖清楚說明了 StrokeColor 的作用範圍只限於描邊線條。
11. NSShadowAttributeName(陰影)
NSShadow 物件結構很單純,只有三個屬性:陰影顏色、模糊半徑、偏移量。
NSShadow *shadow1 = [[NSShadow alloc] init];
shadow1.shadowOffset = CGSizeMake(3, 3);     // 陰影偏移(X、Y)
shadow1.shadowBlurRadius = 0.5;              // 模糊半徑
shadow1.shadowColor = [UIColor orangeColor]; // 陰影顏色

NSShadow *shadow2 = [[NSShadow alloc] init];
shadow2.shadowOffset = CGSizeMake(3, 16);
shadow2.shadowBlurRadius = 2.5;
shadow2.shadowColor = [UIColor purpleColor];

NSShadow *shadow3 = [[NSShadow alloc] init];
shadow3.shadowOffset = CGSizeMake(16, 3);
shadow3.shadowBlurRadius = 4.0;
shadow3.shadowColor = [UIColor blueColor];

NSDictionary *attrDict1 = @{NSShadowAttributeName: shadow1, NSFontAttributeName: [UIFont systemFontOfSize:20]};
_label01.attributedText = [[NSAttributedString alloc] initWithString:originStr attributes:attrDict1];

NSDictionary *attrDict2 = @{NSShadowAttributeName: shadow2, NSFontAttributeName: [UIFont systemFontOfSize:20]};
_label02.attributedText = [[NSAttributedString alloc] initWithString:originStr attributes:attrDict2];

NSDictionary *attrDict3 = @{NSShadowAttributeName: shadow3, NSFontAttributeName: [UIFont systemFontOfSize:20]};
_label03.attributedText = [[NSAttributedString alloc] initWithString:originStr attributes:attrDict3];

12. NSTextEffectAttributeName(特殊效果)
目前只有一個可用效果:NSTextEffectLetterpressStyle(凸版印刷),iOS 7.0 起支援。
NSDictionary *attrDict1 = @{
    NSTextEffectAttributeName: NSTextEffectLetterpressStyle,
    NSForegroundColorAttributeName: [UIColor grayColor],
    NSFontAttributeName: [UIFont systemFontOfSize:30]
};
_label01.attributedText = [[NSAttributedString alloc] initWithString:originStr attributes:attrDict1];

// 對照組:不套用特效
NSDictionary *attrDict2 = @{
    NSForegroundColorAttributeName: [UIColor grayColor],
    NSFontAttributeName: [UIFont systemFontOfSize:30]
};
_label02.attributedText = [[NSAttributedString alloc] initWithString:originStr attributes:attrDict2];

NSDictionary *attrDict3 = @{
    NSTextEffectAttributeName: NSTextEffectLetterpressStyle,
    NSForegroundColorAttributeName: [UIColor blueColor],
    NSFontAttributeName: [UIFont systemFontOfSize:30]
};
_label03.attributedText = [[NSAttributedString alloc] initWithString:originStr attributes:attrDict3];

仔細對比 label01 與 label02,就能看出凸版效果的差異。
13. NSBaselineOffsetAttributeName(基線偏移)
NSDictionary *attrDict1 = @{NSBaselineOffsetAttributeName: @(-10), NSFontAttributeName: [UIFont systemFontOfSize:20]};
_label01.attributedText = [[NSAttributedString alloc] initWithString:originStr attributes:attrDict1];

NSDictionary *attrDict2 = @{NSBaselineOffsetAttributeName: @(0), NSFontAttributeName: [UIFont systemFontOfSize:20]};
_label02.attributedText = [[NSAttributedString alloc] initWithString:originStr attributes:attrDict2];

NSDictionary *attrDict3 = @{NSBaselineOffsetAttributeName: @(10), NSFontAttributeName: [UIFont systemFontOfSize:20]};
_label03.attributedText = [[NSAttributedString alloc] initWithString:originStr attributes:attrDict3];

14. NSObliquenessAttributeName(字形傾斜)
NSDictionary *attrDict1 = @{NSObliquenessAttributeName: @(-0.5), NSFontAttributeName: [UIFont systemFontOfSize:30]};
_label01.attributedText = [[NSAttributedString alloc] initWithString:originStr attributes:attrDict1];

NSDictionary *attrDict2 = @{NSObliquenessAttributeName: @(0), NSFontAttributeName: [UIFont systemFontOfSize:30]};
_label02.attributedText = [[NSAttributedString alloc] initWithString:originStr attributes:attrDict2];

NSDictionary *attrDict3 = @{NSObliquenessAttributeName: @(0.8), NSFontAttributeName: [UIFont systemFontOfSize:30]};
_label03.attributedText = [[NSAttributedString alloc] initWithString:originStr attributes:attrDict3];

15. NSExpansionAttributeName(橫向伸縮)
NSDictionary *attrDict1 = @{NSExpansionAttributeName: @(-1), NSFontAttributeName: [UIFont systemFontOfSize:20]};
_label01.attributedText = [[NSAttributedString alloc] initWithString:originStr attributes:attrDict1];

NSDictionary *attrDict2 = @{NSExpansionAttributeName: @(0), NSFontAttributeName: [UIFont systemFontOfSize:20]};
_label02.attributedText = [[NSAttributedString alloc] initWithString:originStr attributes:attrDict2];

NSDictionary *attrDict3 = @{NSExpansionAttributeName: @(0.6), NSFontAttributeName: [UIFont systemFontOfSize:20]};
_label03.attributedText = [[NSAttributedString alloc] initWithString:originStr attributes:attrDict3];

16. NSWritingDirectionAttributeName(書寫方向)
// 取值為以下組合之一
// @[@(NSWritingDirectionLeftToRight | NSTextWritingDirectionEmbedding)]
// @[@(NSWritingDirectionLeftToRight | NSTextWritingDirectionOverride)]
// @[@(NSWritingDirectionRightToLeft | NSTextWritingDirectionEmbedding)]
// @[@(NSWritingDirectionRightToLeft | NSTextWritingDirectionOverride)]

NSDictionary *attrDict1 = @{
    NSWritingDirectionAttributeName: @[@(NSWritingDirectionLeftToRight | NSTextWritingDirectionEmbedding)],
    NSFontAttributeName: [UIFont systemFontOfSize:20]
};
_label01.attributedText = [[NSAttributedString alloc] initWithString:originStr attributes:attrDict1];

NSDictionary *attrDict2 = @{
    NSWritingDirectionAttributeName: @[@(NSWritingDirectionRightToLeft | NSTextWritingDirectionOverride)],
    NSFontAttributeName: [UIFont systemFontOfSize:20]
};
_label02.attributedText = [[NSAttributedString alloc] initWithString:originStr attributes:attrDict2];

NSDictionary *attrDict3 = @{
    NSWritingDirectionAttributeName: @[@(NSWritingDirectionLeftToRight | NSTextWritingDirectionOverride)],
    NSFontAttributeName: [UIFont systemFontOfSize:20]
};
_label03.attributedText = [[NSAttributedString alloc] initWithString:originStr attributes:attrDict3];

實務上 Embedding 與 Override 的差異不容易從單純的範例看出來,通常要在雙向文字(如阿拉伯文、希伯來文)混排的場景才會明顯。
17. NSVerticalGlyphFormAttributeName(排版方向)
// 0 表示橫排,1 表示豎排
// 在 iOS 中一律使用橫排,0 以外的值屬於未定義行為
NSDictionary *attrDict1 = @{NSVerticalGlyphFormAttributeName: @(-10), NSFontAttributeName: [UIFont systemFontOfSize:20]};
_label01.attributedText = [[NSAttributedString alloc] initWithString:originStr attributes:attrDict1];

NSDictionary *attrDict2 = @{NSVerticalGlyphFormAttributeName: @(0), NSFontAttributeName: [UIFont systemFontOfSize:20]};
_label02.attributedText = [[NSAttributedString alloc] initWithString:originStr attributes:attrDict2];

NSDictionary *attrDict3 = @{NSVerticalGlyphFormAttributeName: @(10), NSFontAttributeName: [UIFont systemFontOfSize:20]};
_label03.attributedText = [[NSAttributedString alloc] initWithString:originStr attributes:attrDict3];

18. NSLinkAttributeName(可點擊連結)
UILabel 與 UITextField 無法直接使用這個屬性,因此必須用 UITextView 示範。
NSDictionary *attrDict1 = @{
    NSLinkAttributeName: [NSURL URLWithString:@"https://www.baidu.com"],
    NSFontAttributeName: [UIFont systemFontOfSize:20]
};

_textview01.editable = NO;      // 必須禁止編輯,否則點擊會彈出鍵盤
_textview01.scrollEnabled = NO; // 選用
_textview01.delegate = self;    // 必須設定,否則代理方法不會被回呼
_textview01.attributedText = [[NSAttributedString alloc] initWithString:originStr attributes:attrDict1];
對應的代理方法:
- (BOOL)textView:(UITextView *)textView shouldInteractWithURL:(NSURL *)URL inRange:(NSRange)characterRange {
    NSLog(@"textView is clicked...");
    return YES;
}

點擊 UITextView 中的「Hello,中秋節!」,即可開啟瀏覽器:

19. NSAttachmentAttributeName(圖文混排)
這個屬性是富文本最實用的能力之一,讓圖片可以像一個字元一樣嵌進文字流中。
// 附件一:插入到 index 2
NSTextAttachment *textAttachment01 = [[NSTextAttachment alloc] init];
textAttachment01.image = [UIImage imageNamed:@"10000.jpeg"];  // 圖片來源
textAttachment01.bounds = CGRectMake(0, 0, 30, 30);            // 位置與尺寸

NSMutableAttributedString *attrStr01 = [[NSMutableAttributedString alloc] initWithString:originStr];
[attrStr01 addAttribute:NSFontAttributeName value:[UIFont systemFontOfSize:25] range:NSMakeRange(0, originStr.length)];
NSAttributedString *attrStr11 = [NSAttributedString attributedStringWithAttachment:textAttachment01];
[attrStr01 insertAttributedString:attrStr11 atIndex:2]; // 附件佔一個字元長度,插入後原字串長度 +1
_label01.attributedText = attrStr01;

// 附件二:插入到 index 6
NSTextAttachment *textAttachment02 = [[NSTextAttachment alloc] init];
textAttachment02.image = [UIImage imageNamed:@"10000.jpeg"];
textAttachment02.bounds = CGRectMake(0, -10, 30, 40);

NSMutableAttributedString *attrStr02 = [[NSMutableAttributedString alloc] initWithString:originStr];
[attrStr02 addAttribute:NSFontAttributeName value:[UIFont systemFontOfSize:25] range:NSMakeRange(0, originStr.length)];
NSAttributedString *attrStr12 = [NSAttributedString attributedStringWithAttachment:textAttachment02];
[attrStr02 insertAttributedString:attrStr12 atIndex:6];
_label02.attributedText = attrStr02;

// 附件三:插入到 index 8
NSTextAttachment *textAttachment03 = [[NSTextAttachment alloc] init];
textAttachment03.image = [UIImage imageNamed:@"10000.jpeg"];
textAttachment03.bounds = CGRectMake(0, -6, 50, 30);

NSMutableAttributedString *attrStr03 = [[NSMutableAttributedString alloc] initWithString:originStr];
[attrStr03 addAttribute:NSFontAttributeName value:[UIFont systemFontOfSize:25] range:NSMakeRange(0, originStr.length)];
NSAttributedString *attrStr13 = [NSAttributedString attributedStringWithAttachment:textAttachment03];
[attrStr03 insertAttributedString:attrStr13 atIndex:8];
_label03.attributedText = attrStr03;

bounds 的 y 值為負數時,圖片會往上偏,實務上常用來做「圖片基線對齊文字」的效果。
四、NSParagraphStyleAttributeName:段落排版的 13 個旋鈕
段落樣式是富文本中設定項最多的一塊,可以控制對齊、縮排、行高、行距、斷行等:
// alignment              對齊方式,值為 NSTextAlignment
// firstLineHeadIndent    首行縮進,float
// headIndent             非首行的縮進,float
// tailIndent             行尾縮進,float
// lineHeightMultiple     行高倍數,float
// maximumLineHeight      最大行高,float
// minimumLineHeight      最小行高,float
// lineSpacing            行距,float
// paragraphSpacing       段距,float
// paragraphSpacingBefore 段首空間,float
// baseWritingDirection   句子方向,值為 NSWritingDirection
// lineBreakMode          斷行方式,值為 NSLineBreakMode
// hyphenationFactor      連字號斷詞,0~1
<1> alignment(對齊方式)
// NSTextAlignmentLeft = 0
// NSTextAlignmentCenter = 1
// NSTextAlignmentRight = 2
// NSTextAlignmentJustified = 3
// NSTextAlignmentNatural = 4

NSString *text = [NSString stringWithContentsOfFile:[[NSBundle mainBundle] pathForResource:@"荷塘月色" ofType:@"txt"]
                                          encoding:NSUTF8StringEncoding
                                             error:NULL];

_textview01.editable = NO;
_textview02.editable = NO;

NSMutableParagraphStyle *paraStyle01 = [[NSMutableParagraphStyle alloc] init];
paraStyle01.alignment = NSTextAlignmentNatural;
NSDictionary *attrDict01 = @{NSParagraphStyleAttributeName: paraStyle01, NSFontAttributeName: [UIFont systemFontOfSize:12]};
_textview01.attributedText = [[NSAttributedString alloc] initWithString:text attributes:attrDict01];

NSMutableParagraphStyle *paraStyle02 = [[NSMutableParagraphStyle alloc] init];
paraStyle02.alignment = NSTextAlignmentJustified;
NSDictionary *attrDict02 = @{NSParagraphStyleAttributeName: paraStyle02, NSFontAttributeName: [UIFont systemFontOfSize:12]};
_textview02.attributedText = [[NSAttributedString alloc] initWithString:text attributes:attrDict02];


<2> firstLineHeadIndent(首行縮進)
中文排版最常用的一項,段落第一句空兩格就靠它。
NSMutableParagraphStyle *paraStyle01 = [[NSMutableParagraphStyle alloc] init];
paraStyle01.firstLineHeadIndent = 24;
NSDictionary *attrDict01 = @{NSParagraphStyleAttributeName: paraStyle01, NSFontAttributeName: [UIFont systemFontOfSize:12]};
_textview01.attributedText = [[NSAttributedString alloc] initWithString:text attributes:attrDict01];

NSMutableParagraphStyle *paraStyle02 = [[NSMutableParagraphStyle alloc] init];
paraStyle02.firstLineHeadIndent = 48;
NSDictionary *attrDict02 = @{NSParagraphStyleAttributeName: paraStyle02, NSFontAttributeName: [UIFont systemFontOfSize:12]};
_textview02.attributedText = [[NSAttributedString alloc] initWithString:text attributes:attrDict02];

<3> headIndent(非首行縮進)
NSMutableParagraphStyle *paraStyle01 = [[NSMutableParagraphStyle alloc] init];
paraStyle01.headIndent = 24;
NSDictionary *attrDict01 = @{NSParagraphStyleAttributeName: paraStyle01, NSFontAttributeName: [UIFont systemFontOfSize:12]};
_textview01.attributedText = [[NSAttributedString alloc] initWithString:text attributes:attrDict01];

NSMutableParagraphStyle *paraStyle02 = [[NSMutableParagraphStyle alloc] init];
paraStyle02.headIndent = 48;
NSDictionary *attrDict02 = @{NSParagraphStyleAttributeName: paraStyle02, NSFontAttributeName: [UIFont systemFontOfSize:12]};
_textview02.attributedText = [[NSAttributedString alloc] initWithString:text attributes:attrDict02];

<4> tailIndent(行尾縮進)
特別注意:這個距離是從行首算起,不是從行尾往回算。
NSMutableParagraphStyle *paraStyle01 = [[NSMutableParagraphStyle alloc] init];
paraStyle01.tailIndent = 48;
NSDictionary *attrDict01 = @{NSParagraphStyleAttributeName: paraStyle01, NSFontAttributeName: [UIFont systemFontOfSize:12]};
_textview01.attributedText = [[NSAttributedString alloc] initWithString:text attributes:attrDict01];

NSMutableParagraphStyle *paraStyle02 = [[NSMutableParagraphStyle alloc] init];
paraStyle02.tailIndent = 252;
NSDictionary *attrDict02 = @{NSParagraphStyleAttributeName: paraStyle02, NSFontAttributeName: [UIFont systemFontOfSize:12]};
_textview02.attributedText = [[NSAttributedString alloc] initWithString:text attributes:attrDict02];

<5> lineHeightMultiple(行高倍數)
大於 1 行高變大,小於 1 行高變小。實際上字級不會改變,改變的是行間距。
NSMutableParagraphStyle *paraStyle01 = [[NSMutableParagraphStyle alloc] init];
paraStyle01.lineHeightMultiple = 0.6;
NSDictionary *attrDict01 = @{NSParagraphStyleAttributeName: paraStyle01, NSFontAttributeName: [UIFont systemFontOfSize:12]};
_textview01.attributedText = [[NSAttributedString alloc] initWithString:text attributes:attrDict01];

NSMutableParagraphStyle *paraStyle02 = [[NSMutableParagraphStyle alloc] init];
paraStyle02.lineHeightMultiple = 2.5;
NSDictionary *attrDict02 = @{NSParagraphStyleAttributeName: paraStyle02, NSFontAttributeName: [UIFont systemFontOfSize:12]};
_textview02.attributedText = [[NSAttributedString alloc] initWithString:text attributes:attrDict02];

<6> maximumLineHeight(最大行高)
值小於預設行高時行距變小;值大於預設行高時不會有任何變化。
NSMutableParagraphStyle *paraStyle01 = [[NSMutableParagraphStyle alloc] init];
paraStyle01.maximumLineHeight = 7;
NSDictionary *attrDict01 = @{NSParagraphStyleAttributeName: paraStyle01, NSFontAttributeName: [UIFont systemFontOfSize:12]};
_textview01.attributedText = [[NSAttributedString alloc] initWithString:text attributes:attrDict01];

NSMutableParagraphStyle *paraStyle02 = [[NSMutableParagraphStyle alloc] init];
paraStyle02.maximumLineHeight = 25;
NSDictionary *attrDict02 = @{NSParagraphStyleAttributeName: paraStyle02, NSFontAttributeName: [UIFont systemFontOfSize:12]};
_textview02.attributedText = [[NSAttributedString alloc] initWithString:text attributes:attrDict02];

<7> minimumLineHeight(最小行高)
與最大行高相反:值大於預設行高時行距變大;值小於預設行高時沒有變化。
NSMutableParagraphStyle *paraStyle01 = [[NSMutableParagraphStyle alloc] init];
paraStyle01.minimumLineHeight = 0.6;
NSDictionary *attrDict01 = @{NSParagraphStyleAttributeName: paraStyle01, NSFontAttributeName: [UIFont systemFontOfSize:12]};
_textview01.attributedText = [[NSAttributedString alloc] initWithString:text attributes:attrDict01];

NSMutableParagraphStyle *paraStyle02 = [[NSMutableParagraphStyle alloc] init];
paraStyle02.minimumLineHeight = 25;
NSDictionary *attrDict02 = @{NSParagraphStyleAttributeName: paraStyle02, NSFontAttributeName: [UIFont systemFontOfSize:12]};
_textview02.attributedText = [[NSAttributedString alloc] initWithString:text attributes:attrDict02];

<8> lineSpacing(行距)
可正可負,正值增加行距,負值縮小行距。
NSMutableParagraphStyle *paraStyle01 = [[NSMutableParagraphStyle alloc] init];
paraStyle01.lineSpacing = -7;
NSDictionary *attrDict01 = @{NSParagraphStyleAttributeName: paraStyle01, NSFontAttributeName: [UIFont systemFontOfSize:12]};
_textview01.attributedText = [[NSAttributedString alloc] initWithString:text attributes:attrDict01];

NSMutableParagraphStyle *paraStyle02 = [[NSMutableParagraphStyle alloc] init];
paraStyle02.lineSpacing = 25;
NSDictionary *attrDict02 = @{NSParagraphStyleAttributeName: paraStyle02, NSFontAttributeName: [UIFont systemFontOfSize:12]};
_textview02.attributedText = [[NSAttributedString alloc] initWithString:text attributes:attrDict02];

<9> paragraphSpacing(段距)
負值無效,會被當成 0 處理。
NSMutableParagraphStyle *paraStyle01 = [[NSMutableParagraphStyle alloc] init];
paraStyle01.paragraphSpacing = -7;
NSDictionary *attrDict01 = @{NSParagraphStyleAttributeName: paraStyle01, NSFontAttributeName: [UIFont systemFontOfSize:12]};
_textview01.attributedText = [[NSAttributedString alloc] initWithString:text attributes:attrDict01];

NSMutableParagraphStyle *paraStyle02 = [[NSMutableParagraphStyle alloc] init];
paraStyle02.paragraphSpacing = 25;
NSDictionary *attrDict02 = @{NSParagraphStyleAttributeName: paraStyle02, NSFontAttributeName: [UIFont systemFontOfSize:12]};
_textview02.attributedText = [[NSAttributedString alloc] initWithString:text attributes:attrDict02];

<10> paragraphSpacingBefore(段首距離)
最小取值為 0。
NSMutableParagraphStyle *paraStyle01 = [[NSMutableParagraphStyle alloc] init];
paraStyle01.paragraphSpacingBefore = -7;
NSDictionary *attrDict01 = @{NSParagraphStyleAttributeName: paraStyle01, NSFontAttributeName: [UIFont systemFontOfSize:12]};
_textview01.attributedText = [[NSAttributedString alloc] initWithString:text attributes:attrDict01];

NSMutableParagraphStyle *paraStyle02 = [[NSMutableParagraphStyle alloc] init];
paraStyle02.paragraphSpacingBefore = 25;
NSDictionary *attrDict02 = @{NSParagraphStyleAttributeName: paraStyle02, NSFontAttributeName: [UIFont systemFontOfSize:12]};
_textview02.attributedText = [[NSAttributedString alloc] initWithString:text attributes:attrDict02];

<11> baseWritingDirection(句子方向)
// NSWritingDirectionNatural = -1
// NSWritingDirectionLeftToRight = 0
// NSWritingDirectionRightToLeft = 1

NSMutableParagraphStyle *paraStyle01 = [[NSMutableParagraphStyle alloc] init];
paraStyle01.baseWritingDirection = NSWritingDirectionLeftToRight;
NSDictionary *attrDict01 = @{NSParagraphStyleAttributeName: paraStyle01, NSFontAttributeName: [UIFont systemFontOfSize:12]};
_textview01.attributedText = [[NSAttributedString alloc] initWithString:text attributes:attrDict01];

NSMutableParagraphStyle *paraStyle02 = [[NSMutableParagraphStyle alloc] init];
paraStyle02.baseWritingDirection = NSWritingDirectionRightToLeft;
NSDictionary *attrDict02 = @{NSParagraphStyleAttributeName: paraStyle02, NSFontAttributeName: [UIFont systemFontOfSize:12]};
_textview02.attributedText = [[NSAttributedString alloc] initWithString:text attributes:attrDict02];

<12> lineBreakMode(斷行方式)
// NSLineBreakByWordWrapping      自動換行,以單詞為單位切斷
// NSLineBreakByCharWrapping      自動換行,以字母為單位切斷
// NSLineBreakByClipping          不自動換行,不切斷,直接裁掉
// NSLineBreakByTruncatingHead    不自動換行,行首截斷並加省略符號
// NSLineBreakByTruncatingTail    不自動換行,行尾截斷並加省略符號
// NSLineBreakByTruncatingMiddle  不自動換行,中間截斷並加省略符號

NSMutableParagraphStyle *paraStyle01 = [[NSMutableParagraphStyle alloc] init];
paraStyle01.lineBreakMode = NSLineBreakByTruncatingHead;
NSDictionary *attrDict01 = @{NSParagraphStyleAttributeName: paraStyle01, NSFontAttributeName: [UIFont systemFontOfSize:12]};
_textview01.attributedText = [[NSAttributedString alloc] initWithString:text attributes:attrDict01];

NSMutableParagraphStyle *paraStyle02 = [[NSMutableParagraphStyle alloc] init];
paraStyle02.lineBreakMode = NSLineBreakByTruncatingTail;
NSDictionary *attrDict02 = @{NSParagraphStyleAttributeName: paraStyle02, NSFontAttributeName: [UIFont systemFontOfSize:12]};
_textview02.attributedText = [[NSAttributedString alloc] initWithString:text attributes:attrDict02];


<13> hyphenationFactor(連字號斷詞)
取值 0~1,開啟英文的自動斷詞功能,讓排版邊緣更整齊。
NSString *strstr = @"These two documents provide the perfect starting point for iOS and Mac app development.";

NSMutableParagraphStyle *paraStyle01 = [[NSMutableParagraphStyle alloc] init];
paraStyle01.hyphenationFactor = 0.3;
NSDictionary *attrDict01 = @{NSParagraphStyleAttributeName: paraStyle01, NSFontAttributeName: [UIFont systemFontOfSize:15]};
_textview01.attributedText = [[NSAttributedString alloc] initWithString:strstr attributes:attrDict01];

NSMutableParagraphStyle *paraStyle02 = [[NSMutableParagraphStyle alloc] init];
paraStyle02.hyphenationFactor = 0.9;
NSDictionary *attrDict02 = @{NSParagraphStyleAttributeName: paraStyle02, NSFontAttributeName: [UIFont systemFontOfSize:15]};
_textview02.attributedText = [[NSAttributedString alloc] initWithString:strstr attributes:attrDict02];

五、補充:字元(Character)與字形(Glyph)
排版系統在顯示文字時,有一個關鍵步驟是「字元轉字形」。字元是資訊本身的單位,字形則是它的圖形表徵(同一個字元還可能有發音等其他表徵)。
字元在電腦中就是一個編碼,屬於某個字元集,例如 Unicode 就涵蓋了絕大多數存在的字元。字形則是圖形,通常存在字型檔案中,也有自己的編碼(它在字型中的索引)。一個字元可以對應多個字形(不同字型,或同字型的不同樣式如粗體、斜體);多個字元也可能對應同一個字形,這就是連字(Ligatures)。
 Roman Ligatures
字形度量 Glyph Metrics


bounding box(邊界框 bbox):一個假想的框,盡可能緊密地裝住字形。
baseline(基線):一條假想的線,同一行上的字形都以此線作為上下位置的參考。基線左側有一個點,稱為基線原點。
ascent(上行高度):從原點到字型中最高字形頂部的距離,為正值。
descent(下行高度):從原點到字型中最深字形底部的距離,為負值。例如原點到最深字形底部的距離為 2,則 descent 為 -2。
linegap(行距):也可稱作 leading(更精確地說是 External leading)。整行行高 lineHeight 可由 ascent + |descent| + linegap 計算得出。
想更深入理解這部分,可以參考 FreeType 的文件〈Glyph metrics〉——iOS 正是使用 FreeType 庫進行字型渲染的。以上圖片與部分概念整理自蘋果官方文件〈Querying Font Metrics〉與〈Text Layout〉。
把這 21 個屬性與 13 個段落參數摸熟,基本上就等於掌握了 iOS 文字排版的全部底牌。
- 上一篇文章: iOS 自定義手勢實作:從全域滑動到螢幕邊緣手勢
- 下一篇文章: iOS 開發:CocoaPods 的安裝與使用入門