
iOS 手勢辨識完全指南:從基本用法到手勢衝突的解法
觸控是行動裝置最核心的互動方式,而手勢辨識(UIGestureRecognizer)則是 iOS 把複雜觸控判斷封裝之後交給開發者的禮物。本文以一個圖片瀏覽器為載體,把六種常用手勢一次講透,並重點說明實戰中最容易翻船的兩個問題:手勢衝突與跨視圖手勢並發。
一、使用手勢的四個固定步驟
無論哪一種手勢,接入方式都可以歸納為四步:
1. 建立對應的手勢物件;
2. 設定手勢屬性(可選,例如點擊次數、觸摸點數、最小按壓時長);
3. 把手勢附加到指定視圖;
4. 實作手勢對應的操作方法。
記住這四步,後面的所有內容都只是變奏。
二、Demo 需求設計
為了直觀演示,我們做一個簡單的圖片瀏覽器,功能如下:
· 點按圖片,在導航欄顯示圖片名稱;
· 長按圖片,彈出刪除確認框;
· 雙指捏合,放大或縮小圖片;
· 左右輕掃,切換上一張/下一張;
· 雙指旋轉,旋轉圖片;
· 單指拖動,移動圖片。
版面草圖如下:

為了讓導航欄能顯示標題,需要把主視圖控制器 KCPhotoViewController 包進一個 UINavigationController,並在控制器中放置一個 UIImageView 用於展示圖片。
三、布局與手勢註冊
#define kImageCount 3

@interface KCPhotoViewController () {
    UIImageView *_imageView;   // 圖片展示控件
    int _currentIndex;         // 當前圖片索引
}
@end

@implementation KCPhotoViewController

- (void)viewDidLoad {
    [super viewDidLoad];
    [self initLayout];
    [self addGesture];
}

#pragma mark 布局
- (void)initLayout {
    CGSize screenSize = [UIScreen mainScreen].applicationFrame.size;
    CGFloat topPadding = 20;
    CGFloat y = 22 + 44 + topPadding;
    CGFloat height = screenSize.height - y - topPadding;
    CGRect imageFrame = CGRectMake(0, y, screenSize.width, height);

    _imageView = [[UIImageView alloc] initWithFrame:imageFrame];
    _imageView.contentMode = UIViewContentModeScaleToFill;
    _imageView.userInteractionEnabled = YES;   // 必須為 YES,否則無法接收手勢
    [self.view addSubview:_imageView];

    _imageView.image = [UIImage imageNamed:@"0.jpg"];
    [self showPhotoName];
}
逐一註冊六種手勢
#pragma mark 添加手勢
- (void)addGesture {
    /* 點按:注意添加到控制器視圖上,這樣點擊空白处也能觸發 */
    UITapGestureRecognizer *tapGesture =
        [[UITapGestureRecognizer alloc] initWithTarget:self action:@selector(tapImage:)];
    tapGesture.numberOfTapsRequired = 1;    // iOS 中很少使用雙擊
    tapGesture.numberOfTouchesRequired = 1;
    [self.view addGestureRecognizer:tapGesture];

    /* 長按:添加到圖片上,因為要做「刪除這張圖」的提示 */
    UILongPressGestureRecognizer *longPressGesture =
        [[UILongPressGestureRecognizer alloc] initWithTarget:self action:@selector(longPressImage:)];
    longPressGesture.minimumPressDuration = 0.5;   // 默認 0.5 秒,一般不改
    [_imageView addGestureRecognizer:longPressGesture];

    /* 捏合 */
    UIPinchGestureRecognizer *pinchGesture =
        [[UIPinchGestureRecognizer alloc] initWithTarget:self action:@selector(pinchImage:)];
    [self.view addGestureRecognizer:pinchGesture];

    /* 旋轉 */
    UIRotationGestureRecognizer *rotationGesture =
        [[UIRotationGestureRecognizer alloc] initWithTarget:self action:@selector(rotateImage:)];
    [self.view addGestureRecognizer:rotationGesture];

    /* 拖動 */
    UIPanGestureRecognizer *panGesture =
        [[UIPanGestureRecognizer alloc] initWithTarget:self action:@selector(panImage:)];
    [_imageView addGestureRecognizer:panGesture];

    /* 輕掃:一個手勢物件只負責一個方向,默認為向右 */
    UISwipeGestureRecognizer *swipeGestureToRight =
        [[UISwipeGestureRecognizer alloc] initWithTarget:self action:@selector(swipeImage:)];
    [self.view addGestureRecognizer:swipeGestureToRight];

    UISwipeGestureRecognizer *swipeGestureToLeft =
        [[UISwipeGestureRecognizer alloc] initWithTarget:self action:@selector(swipeImage:)];
    swipeGestureToLeft.direction = UISwipeGestureRecognizerDirectionLeft;
    [self.view addGestureRecognizer:swipeGestureToLeft];
}
手勢回呼實作
#pragma mark - 手勢操作

// 點按:切換導航欄顯示
- (void)tapImage:(UITapGestureRecognizer *)gesture {
    BOOL hidden = !self.navigationController.navigationBarHidden;
    [self.navigationController setNavigationBarHidden:hidden animated:YES];
}

// 長按:連續手勢會回呼多次,必須判斷狀態
- (void)longPressImage:(UILongPressGestureRecognizer *)gesture {
    if (gesture.state == UIGestureRecognizerStateBegan) {
        UIActionSheet *actionSheet = [[UIActionSheet alloc]
            initWithTitle:@"System Info"
                 delegate:nil
        cancelButtonTitle:@"Cancel"
   destructiveButtonTitle:@"Delete the photo"
        otherButtonTitles:nil];
        [actionSheet showInView:self.view];
    }
}

// 捏合:scale 屬性記錄縮放比例
- (void)pinchImage:(UIPinchGestureRecognizer *)gesture {
    if (gesture.state == UIGestureRecognizerStateChanged) {
        _imageView.transform = CGAffineTransformMakeScale(gesture.scale, gesture.scale);
    } else if (gesture.state == UIGestureRecognizerStateEnded) {
        [UIView animateWithDuration:.5 animations:^{
            _imageView.transform = CGAffineTransformIdentity;   // 復位
        }];
    }
}

// 旋轉:rotation 屬性記錄旋轉弧度
- (void)rotateImage:(UIRotationGestureRecognizer *)gesture {
    if (gesture.state == UIGestureRecognizerStateChanged) {
        _imageView.transform = CGAffineTransformMakeRotation(gesture.rotation);
    } else if (gesture.state == UIGestureRecognizerStateEnded) {
        [UIView animateWithDuration:0.8 animations:^{
            _imageView.transform = CGAffineTransformIdentity;
        }];
    }
}

// 拖動:用 translationInView: 取得相對位移
- (void)panImage:(UIPanGestureRecognizer *)gesture {
    if (gesture.state == UIGestureRecognizerStateChanged) {
        CGPoint translation = [gesture translationInView:self.view];
        _imageView.transform = CGAffineTransformMakeTranslation(translation.x, translation.y);
    } else if (gesture.state == UIGestureRecognizerStateEnded) {
        [UIView animateWithDuration:0.5 animations:^{
            _imageView.transform = CGAffineTransformIdentity;
        }];
    }
}

// 輕掃:雖然是連續手勢,但只在識別結束時觸發一次
- (void)swipeImage:(UISwipeGestureRecognizer *)gesture {
    if (gesture.direction == UISwipeGestureRecognizerDirectionRight) {
        [self nextImage];
    } else if (gesture.direction == UISwipeGestureRecognizerDirectionLeft) {
        [self lastImage];
    }
}
切換圖片的實現很簡單,用取餘運算實現循環:
- (void)nextImage {
    int index = (_currentIndex + kImageCount + 1) % kImageCount;
    _imageView.image = [UIImage imageNamed:[NSString stringWithFormat:@"%i.jpg", index]];
    _currentIndex = index;
    [self showPhotoName];
}

- (void)lastImage {
    int index = (_currentIndex + kImageCount - 1) % kImageCount;
    _imageView.image = [UIImage imageNamed:[NSString stringWithFormat:@"%i.jpg", index]];
    _currentIndex = index;
    [self showPhotoName];
}
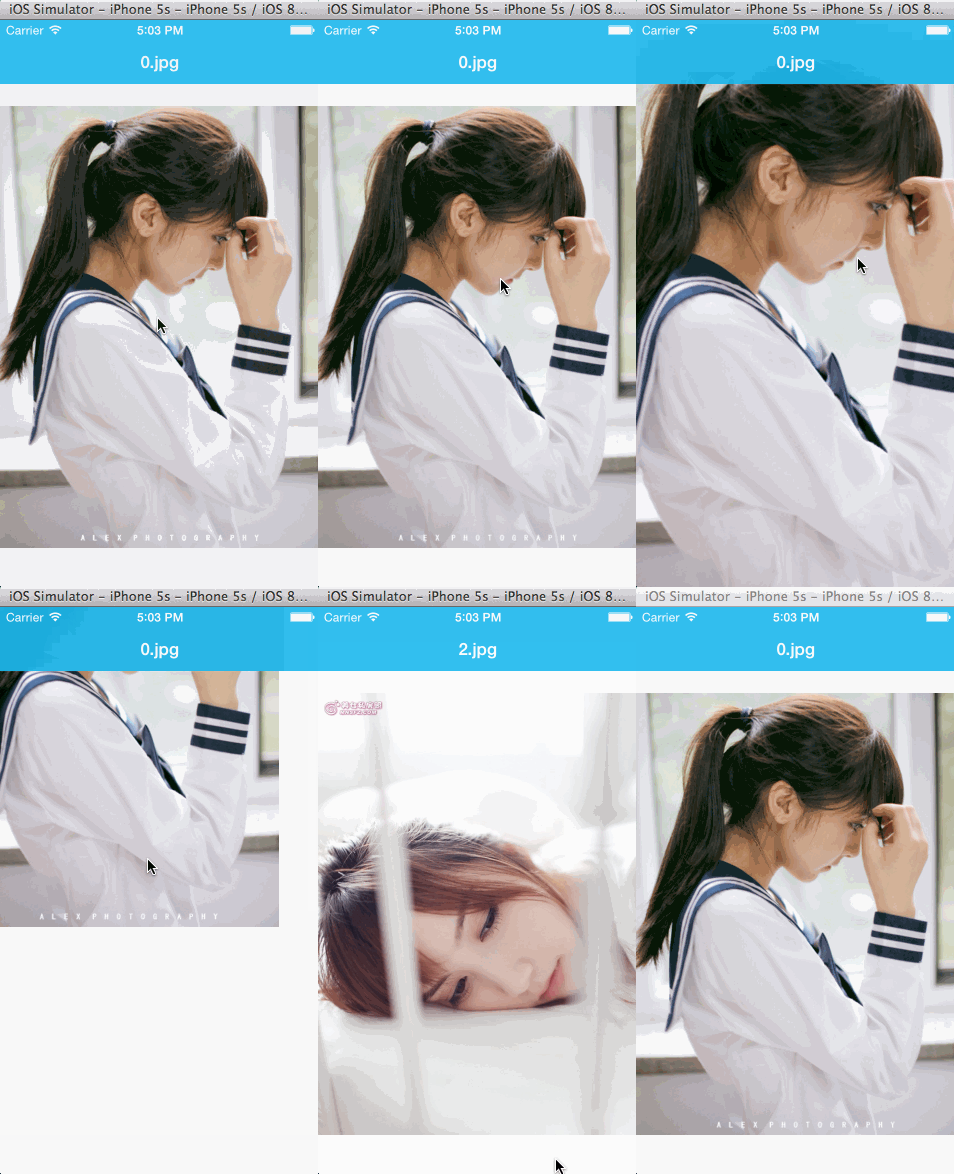
運行效果:
四、兩個必須牢記的細節
第一,UIImageView 默認不接收互動。UIImageView 與 UILabel 的 userInteractionEnabled 默認都是 NO,而 UIButton、UITextField、UIScrollView、UITableView 默認為 YES。要讓圖片能響應手勢,必須手動把它設為 YES,這是最常見的「手勢加了卻沒反應」的原因。
第二,輕掃手勢的特殊性。輕掃屬於連續手勢,但它的操作事件只在識別結束時回呼一次,因此不需要判斷 state;其他連續手勢則會觸發多次,必須判斷狀態。此外,一個 UISwipeGestureRecognizer 只能對應一個方向,要支援四個方向就得建立四個物件。
五、手勢衝突:拖動與輕掃的較量
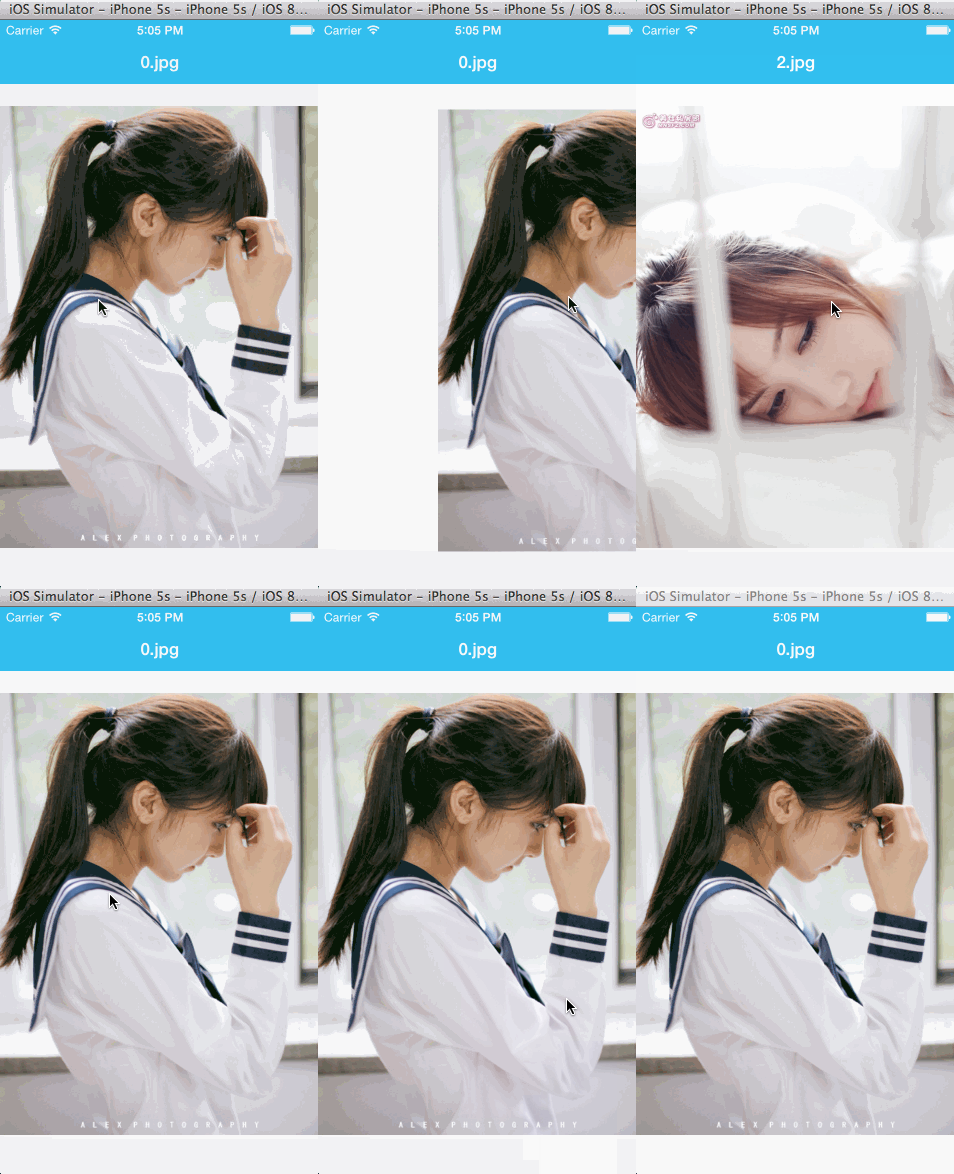
仔細看上圖會發現一個「缺陷」:切換圖片時,手勢是在空白區域完成的,直接在圖片上左右滑動並不生效。原因正是衝突——手指在圖片上滑動時,系統優先識別了拖動手勢。
衝突的根源在於時序差異:拖動手勢的操作事件在識別開始階段(state 1)就執行,而輕掃手勢要等到結束階段(state 3)才執行,於是輕掃永遠被「搶跑」的拖動壓制。
我們期望的行為是:在圖片上拖動就移動圖片,在圖片上輕掃就翻頁。iOS 的解法是利用 requireGestureRecognizerToFail:,指定某個手勢必須在另一個手勢失敗之後才有資格被識別。
// 解決圖片上滑動時拖動與輕掃的衝突
[panGesture requireGestureRecognizerToFail:swipeGestureToRight];
[panGesture requireGestureRecognizerToFail:swipeGestureToLeft];

// 解決拖動與長按的衝突(模擬器中拖動稍快就會被識別成長按)
[longPressGesture requireGestureRecognizerToFail:panGesture];
加入這幾行程式碼後,系統會先嘗試輕掃:若判定為輕掃則翻頁,若最終判定不是輕掃,才退回執行拖動。運行效果:
六、兩個不同控件的手勢同時執行
iOS 的觸控事件沿響應者鏈傳遞,上層處理完就不再往下傳;手勢識別默認也是同樣規則,先識別成功的手勢會阻斷後續識別。那麼,父子層級關係的兩個視圖各自加了手勢,能不能同時生效?
答案是.delegate 方法:
- (BOOL)gestureRecognizer:shouldRecognizeSimultaneouslyWithGestureRecognizer:
該方法默認返回 NO(阻斷向下傳播),返回 YES 則允許並發識別。下面讓圖片上的長按與控制器根視圖上的長按同時生效,並限制只有來自 UIImageView 的手勢才允許向下傳遞:
// 在 addGesture 中追加:給控制器視圖也加一個長按手勢
self.view.tag = 100;
_imageView.tag = 200;

UILongPressGestureRecognizer *viewLongPressGesture =
    [[UILongPressGestureRecognizer alloc] initWithTarget:self action:@selector(longPressView:)];
viewLongPressGesture.delegate = self;
[self.view addGestureRecognizer:viewLongPressGesture];

#pragma mark 手勢代理方法
- (BOOL)gestureRecognizer:(UIGestureRecognizer *)gestureRecognizer
shouldRecognizeSimultaneouslyWithGestureRecognizer:(UIGestureRecognizer *)otherGestureRecognizer {
    // 只有來自 UIImageView 的手勢才允許向下傳播
    if ([otherGestureRecognizer.view isKindOfClass:[UIImageView class]]) {
        return YES;
    }
    return NO;
}

- (void)longPressView:(UILongPressGestureRecognizer *)gesture {
    NSLog(@"view long press!");
}
記得讓控制器遵循 UIGestureRecognizerDelegate 協議,並把需要協調的手勢物件的 delegate 指向 self。
七、小結
手勢系統的學習路徑可以濃縮成三句話:四步驟完成接入;連續手勢要判斷 state,輕掃是例外;衝突用 requireGestureRecognizerToFail: 排優先級,並發用代理方法開閘。掌握這三點,幾乎所有互動場景都能應付。