
iOS 帶箭頭的氣泡彈出視圖:支援十二種方向的完整封裝
編輯:iOS 開發綜合
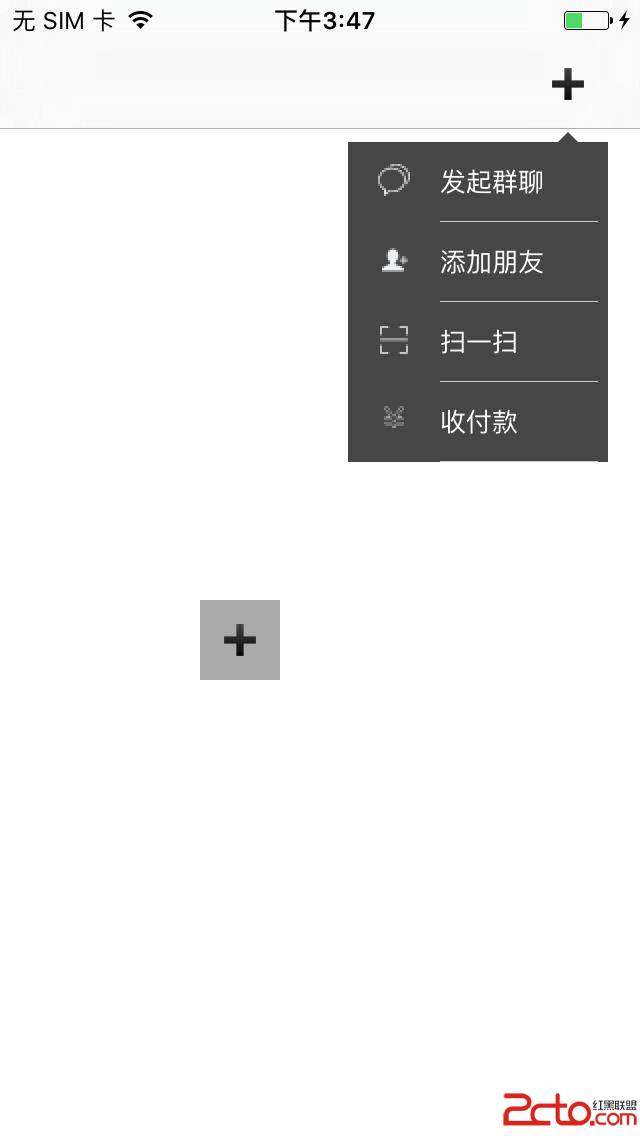
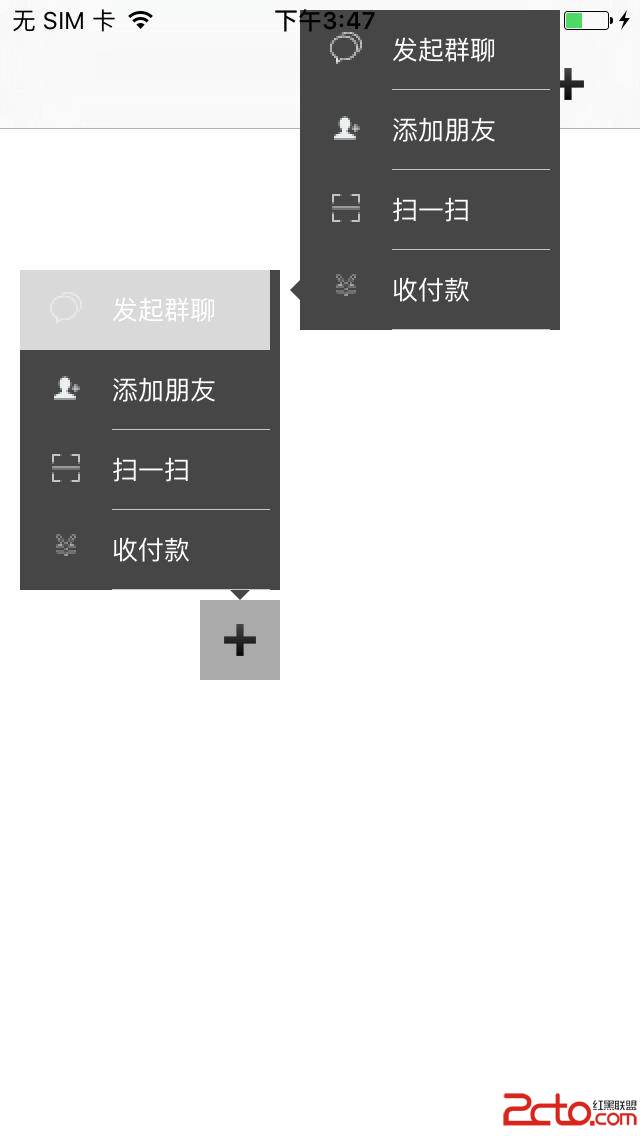
這種帶箭頭的氣泡菜單在很多場景都用得上——微信的「+」按鈕、相機的更多選項等等。以下是我封裝好的完整實作,已放到 GitHub 上,好用請記得 Star 一下,Thanks。
介面設計
建立一個繼承自 UIView 的類別,對外暴露資料源、樣式與代理:
// 背景容器
@property (nonatomic, strong) UIView *backGoundView;
// 標題陣列
@property (nonatomic, strong) NSArray *dataArray;
// 圖示陣列
@property (nonatomic, strong) NSArray *images;
// 單列高度
@property (nonatomic, assign) CGFloat row_height;
// 字級
@property (nonatomic, assign) CGFloat fontSize;
// 文字顏色
@property (nonatomic, strong) UIColor *titleTextColor;
// 代理
@property (nonatomic, assign) id <selectIndexPathDelegate> delegate;

- (instancetype)initWithOrigin:(CGPoint)origin
                         Width:(CGFloat)width
                        Height:(CGFloat)height
                          Type:(XTDirectionType)type
                         Color:(UIColor *)color;
- (void)popView;
並在標頭檔中宣告代理協議:
@protocol selectIndexPathDelegate <NSObject>
- (void)selectIndexPathRow:(NSInteger)index;
@end
初始化與內部結構
整個控制項鋪滿螢幕、背景透明,實際可視內容放在 backGoundView 中,內部再嵌一個 UITableView 作為選單:
#define ScreenWidth  [UIScreen mainScreen].bounds.size.width
#define ScreenHeight [UIScreen mainScreen].bounds.size.height
#define Length  5
#define Length2 15

- (instancetype)initWithOrigin:(CGPoint)origin Width:(CGFloat)width Height:(CGFloat)height Type:(XTDirectionType)type Color:(UIColor *)color {
    self = [super initWithFrame:CGRectMake(0, 0, ScreenWidth, ScreenHeight)];
    if (self) {
        self.backgroundColor = [UIColor clearColor];
        self.origin = origin;
        self.width = width;
        self.height = height;
        self.type = type;
        self.backGoundView = [[UIView alloc] initWithFrame:CGRectMake(origin.x, origin.y, width, height)];
        self.backGoundView.backgroundColor = color;
        [self addSubview:self.backGoundView];
        [self.backGoundView addSubview:self.tableView];
    }
    return self;
}
用 drawRect 畫出箭頭
箭頭本質上就是一個三角形,依方向不同決定三個頂點的偏移方式,再用 CGContext 描邊填色:
- (void)drawRect:(CGRect)rect {
    CGContextRef context = UIGraphicsGetCurrentContext();
    switch (self.type) {
        case XTTypeOfUpLeft:
        case XTTypeOfUpCenter:
        case XTTypeOfUpRight: {
            CGFloat startX = self.origin.x;
            CGFloat startY = self.origin.y;
            CGContextMoveToPoint(context, startX, startY);
            CGContextAddLineToPoint(context, startX + Length, startY + Length);
            CGContextAddLineToPoint(context, startX - Length, startY + Length);
            break;
        }
        case XTTypeOfDownLeft:
        case XTTypeOfDownCenter:
        case XTTypeOfDownRight: {
            CGFloat startX = self.origin.x;
            CGFloat startY = self.origin.y;
            CGContextMoveToPoint(context, startX, startY);
            CGContextAddLineToPoint(context, startX - Length, startY - Length);
            CGContextAddLineToPoint(context, startX + Length, startY - Length);
            break;
        }
        case XTTypeOfLeftUp:
        case XTTypeOfLeftCenter:
        case XTTypeOfLeftDown: {
            CGFloat startX = self.origin.x;
            CGFloat startY = self.origin.y;
            CGContextMoveToPoint(context, startX, startY);
            CGContextAddLineToPoint(context, startX + Length, startY - Length);
            CGContextAddLineToPoint(context, startX + Length, startY + Length);
            break;
        }
        case XTTypeOfRightUp:
        case XTTypeOfRightCenter:
        case XTTypeOfRightDown: {
            CGFloat startX = self.origin.x;
            CGFloat startY = self.origin.y;
            CGContextMoveToPoint(context, startX, startY);
            CGContextAddLineToPoint(context, startX - Length, startY - Length);
            CGContextAddLineToPoint(context, startX - Length, startY + Length);
            break;
        }
    }
    CGContextClosePath(context);
    [self.backGoundView.backgroundColor setFill];
    [self.backgroundColor setStroke];
    CGContextDrawPath(context, kCGPathFillStroke);
}
彈出動畫
popView 的巧思在於「先隱藏子元件,再讓容器從零尺寸展開到目標尺寸,最後才顯示內容」,這樣視覺上就有由箭頭處生長出來的感覺。同時要先把視圖掛到 keyWindow 上,才能浮在所有頁面之上:
- (void)popView {
    for (UIView *view in [self.backGoundView subviews]) {
        [view setHidden:YES];
    }
    UIWindow *windowView = [UIApplication sharedApplication].keyWindow;
    [windowView addSubview:self];

    switch (self.type) {
        case XTTypeOfUpLeft: {
            self.backGoundView.frame = CGRectMake(self.origin.x, self.origin.y + Length, 0, 0);
            [self startAnimateView_x:self.origin.x - Length2
                                 _y:self.origin.y + Length
                     origin_width:self.width
                    origin_height:self.height];
            break;
        }
        case XTTypeOfUpCenter: {
            self.backGoundView.frame = CGRectMake(self.origin.x, self.origin.y + Length, 0, 0);
            [self startAnimateView_x:self.origin.x - self.width / 2
                                 _y:self.origin.y + Length
                     origin_width:self.width
                    origin_height:self.height];
            break;
        }
        case XTTypeOfUpRight: {
            self.backGoundView.frame = CGRectMake(self.origin.x, self.origin.y + Length, 0, 0);
            [self startAnimateView_x:self.origin.x + Length2
                                 _y:self.origin.y + Length
                     origin_width:-self.width
                    origin_height:self.height];
            break;
        }
        // 下、左、右方向依同一邏輯,以負值寬高控制展開方向
        default:
            break;
    }
}

- (void)startAnimateView_x:(CGFloat)x _y:(CGFloat)y origin_width:(CGFloat)width origin_height:(CGFloat)height {
    [UIView animateWithDuration:0.25 animations:^{
        self.backGoundView.frame = CGRectMake(x, y, width, height);
    } completion:^(BOOL finished) {
        for (UIView *view in [self.backGoundView subviews]) {
            [view setHidden:NO];
        }
    }];
}
點擊空白處收起
- (void)touchesBegan:(NSSet<UITouch> *)touches withEvent:(UIEvent *)event {
    if (![[touches anyObject].view isEqual:self.backGoundView]) {
        [self dismiss];
    }
}

- (void)dismiss {
    for (UIView *view in [self.backGoundView subviews]) {
        [view removeFromSuperview];
    }
}
內部列表與點擊回呼
- (UITableView *)tableView {
    if (!_tableView) {
        _tableView = [[UITableView alloc] initWithFrame:CGRectMake(0, 0,
                          self.backGoundView.frame.size.width - 5,
                          self.backGoundView.frame.size.height)
                                                style:UITableViewStylePlain];
        _tableView.dataSource = self;
        _tableView.delegate = self;
        _tableView.backgroundColor = [UIColor clearColor];
    }
    return _tableView;
}

- (UITableViewCell *)tableView:(UITableView *)tableView cellForRowAtIndexPath:(NSIndexPath *)indexPath {
    static NSString *cellIdentifier = @"cellIdentifier2";
    UITableViewCell *cell = [tableView dequeueReusableCellWithIdentifier:cellIdentifier];
    if (!cell) {
        cell = [[UITableViewCell alloc] initWithStyle:UITableViewCellStyleSubtitle reuseIdentifier:cellIdentifier];
    }
    cell.backgroundColor = [UIColor clearColor];
    cell.imageView.image = [UIImage imageNamed:self.images[indexPath.row]];
    cell.textLabel.text = self.dataArray[indexPath.row];
    cell.textLabel.font = [UIFont systemFontOfSize:self.fontSize];
    cell.textLabel.textColor = self.titleTextColor;
    return cell;
}

- (void)tableView:(UITableView *)tableView didSelectRowAtIndexPath:(NSIndexPath *)indexPath {
    if (self.delegate && [self.delegate respondsToSelector:@selector(selectIndexPathRow:)]) {
        [self.delegate selectIndexPathRow:indexPath.row];
    }
}
使用方式
在需要顯示的頁面採用代理,然後在按鈕點擊事件中建立實例即可。方向型別共有十二種,涵蓋上/下/左/右各自的三種對齊:
/* XTTypeOfUpLeft, XTTypeOfUpCenter, XTTypeOfUpRight,
   XTTypeOfDownLeft, XTTypeOfDownCenter, XTTypeOfDownRight,
   XTTypeOfLeftUp, XTTypeOfLeftCenter, XTTypeOfLeftDown,
   XTTypeOfRightUp, XTTypeOfRightCenter, XTTypeOfRightDown */

CGPoint point = CGPointMake(_customBtn.center.x, _customBtn.frame.origin.y + 64);
XTPopView *view1 = [[XTPopView alloc] initWithOrigin:point
                                               Width:130
                                              Height:40 * 4
                                                Type:XTTypeOfUpRight
                                               Color:[UIColor colorWithRed:0.2737 green:0.2737 blue:0.2737 alpha:1.0]];
view1.dataArray = @[@"發起群聊", @"添加朋友", @"掃一掃", @"收付款"];
view1.images = @[@"發起群聊", @"添加朋友", @"掃一掃", @"付款"];
view1.fontSize = 13;
view1.row_height = 40;
view1.titleTextColor = [UIColor whiteColor];
view1.delegate = self;
[view1 popView];
只要實作代理方法,就能取得被點選的索引:
- (void)selectIndexPathRow:(NSInteger)index {
    switch (index) {
        case 0: NSLog(@"Click 0 ......"); break;
        case 1: NSLog(@"Click 1 ......"); break;
        case 2: NSLog(@"Click 2 ......"); break;
        case 3: NSLog(@"Click 3 ......"); break;
        default: break;
    }
}
這套封裝的價值在於把「箭頭繪製」、「展開動畫」、「方向定位」三件麻煩事一次解決,接入新專案時只要餵資料與設定樣式即可。