
iOS 日常開發必備:常用宏定義大整理
編輯:iOS 開發綜合
前言
在日常開發中,許多人都習慣把一些常用片段抽到 PCH 檔案裡做成宏。但宏這東西寫多了容易忘、臨時要用的時候又懶得重新查語法。所以這裡整理了一份實用的宏定義清單,喜歡的朋友可以直接搬進自己的專案裡使用(內容持續更新)。
為方便取用,也提供了對應的宏定義標頭檔供下載。
1. 取得螢幕寬度與高度
#define SCREEN_WIDTH [UIScreen mainScreen].bounds.size.width
#define SCREENH_HEIGHT [UIScreen mainScreen].bounds.size.height
如果需要支援橫向旋轉,可以改用下面這組更嚴謹的寫法:
#if __IPHONE_OS_VERSION_MAX_ALLOWED >= 80000 // 當前 Xcode 支援 iOS8 及以上
#define SCREEN_WIDTH ([[UIScreen mainScreen] respondsToSelector:@selector(nativeBounds)]?[UIScreen mainScreen].nativeBounds.size.width/[UIScreen mainScreen].nativeScale:[UIScreen mainScreen].bounds.size.width)
#define SCREENH_HEIGHT ([[UIScreen mainScreen] respondsToSelector:@selector(nativeBounds)]?[UIScreen mainScreen].nativeBounds.size.height/[UIScreen mainScreen].nativeScale:[UIScreen mainScreen].bounds.size.height)
#define SCREEN_SIZE ([[UIScreen mainScreen] respondsToSelector:@selector(nativeBounds)]?CGSizeMake([UIScreen mainScreen].nativeBounds.size.width/[UIScreen mainScreen].nativeScale,[UIScreen mainScreen].nativeBounds.size.height/[UIScreen mainScreen].nativeScale):[UIScreen mainScreen].bounds.size)
#else
#define SCREEN_WIDTH [UIScreen mainScreen].bounds.size.width
#define SCREENH_HEIGHT [UIScreen mainScreen].bounds.size.height
#define SCREEN_SIZE [UIScreen mainScreen].bounds.size
#endif
2. 取得通知中心
#define LRNotificationCenter [NSNotificationCenter defaultCenter]3. 隨機顏色
#define LRRandomColor [UIColor colorWithRed:arc4random_uniform(256)/255.0 green:arc4random_uniform(256)/255.0 blue:arc4random_uniform(256)/255.0 alpha:1.0]4. RGB/RGBA 顏色與透明背景
#define LRRGBColor(r, g, b) [UIColor colorWithRed:(r)/255.0 green:(g)/255.0 blue:(b)/255.0 alpha:1.0]
#define LRRGBAColor(r, g, b, a) [UIColor colorWithRed:(r)/255.0 green:(r)/255.0 blue:(r)/255.0 alpha:a]
// 透明背景色
#define LRClearColor [UIColor clearColor]
5. 自定義高效率的 NSLog
開發時到處都會埋 Log,但上線時又不想保留,也不可能一個個刪。自訂一個 Log 宏就能優雅解決:
#ifdef DEBUG
#define LRLog(...) NSLog(@"%s 第%d行 \n %@\n\n",__func__,__LINE__,[NSString stringWithFormat:__VA_ARGS__])
#else
#define LRLog(...)
#endif
6. 弱引用/強引用
#define LRWeakSelf(type) __weak typeof(type) weak##type = type;
#define LRStrongSelf(type) __strong typeof(type) type = weak##type;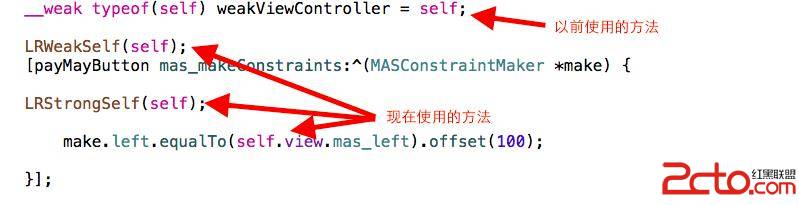
使用方法示意圖

第二種用法:定義好弱引用宏後,直接輸入 weak 即可自動補全。
7. 設定 view 圓角與邊框
#define LRViewBorderRadius(View, Radius, Width, Color)\
    [View.layer setCornerRadius:(Radius)];\
    [View.layer setMasksToBounds:YES];\
    [View.layer setBorderWidth:(Width)];\
    [View.layer setBorderColor:[Color CGColor]]
8. 角度與弧度互轉
#define LRDegreesToRadian(x) (M_PI * (x) / 180.0)
#define LRRadianToDegrees(radian) (radian*180.0)/(M_PI)
9. 載入提示框(Toast)
這個宏相當好用,使用前需透過 CocoaPods 引入第三方庫 Toast。用法如下:
LRToast(@"網絡加載失敗");
#define LRToast(str) CSToastStyle *style = [[CSToastStyle alloc] initWithDefaultStyle]; \
    [kWindow makeToast:str duration:0.6 position:CSToastPositionCenter style:style];\
    kWindow.userInteractionEnabled = NO; \
    dispatch_after(dispatch_time(DISPATCH_TIME_NOW, (int64_t)(0.6 * NSEC_PER_SEC)), dispatch_get_main_queue(), ^{\
        kWindow.userInteractionEnabled = YES;\
    });\
10. 載入提示框(MBProgressHUD)
寫法與上一個類似:
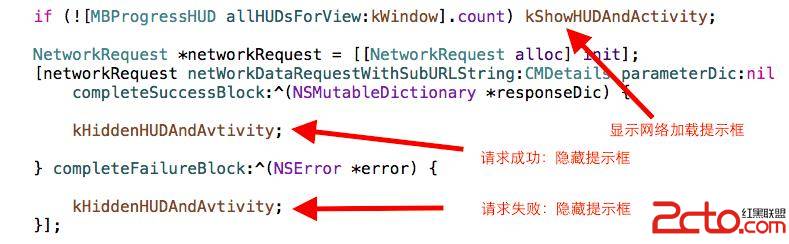
MBProgressHUD 提示框示意圖
// 加載
#define kShowNetworkActivityIndicator() [UIApplication sharedApplication].networkActivityIndicatorVisible = YES
// 收起加載
#define HideNetworkActivityIndicator() [UIApplication sharedApplication].networkActivityIndicatorVisible = NO
// 設置加載
#define NetworkActivityIndicatorVisible(x) [UIApplication sharedApplication].networkActivityIndicatorVisible = x
#define kWindow [UIApplication sharedApplication].keyWindow
#define kBackView for (UIView *item in kWindow.subviews) { \
    if(item.tag == 10000) \
    { \
        [item removeFromSuperview]; \
        UIView * aView = [[UIView alloc] init]; \
        aView.frame = [UIScreen mainScreen].bounds; \
        aView.tag = 10000; \
        aView.backgroundColor = [[UIColor blackColor] colorWithAlphaComponent:0.3]; \
        [kWindow addSubview:aView]; \
    } \
} \
#define kShowHUDAndActivity kBackView;[MBProgressHUD showHUDAddedTo:kWindow animated:YES];kShowNetworkActivityIndicator()
#define kHiddenHUD [MBProgressHUD hideAllHUDsForView:kWindow animated:YES]
#define kRemoveBackView for (UIView *item in kWindow.subviews) { \
    if(item.tag == 10000) \
    { \
        [UIView animateWithDuration:0.4 animations:^{\
            item.alpha = 0.0; \
        } completion:^(BOOL finished) { \
            [item removeFromSuperview]; \
        }]; \
    } \
} \
#define kHiddenHUDAndAvtivity kRemoveBackView;kHiddenHUD;HideNetworkActivityIndicator()
11. 取得 view 的 frame 與圖片資源
//取得 view 的 frame(不建議使用)
//#define kGetViewWidth(view) view.frame.size.width
//#define kGetViewHeight(view) view.frame.size.height
//#define kGetViewX(view) view.frame.origin.x
//#define kGetViewY(view) view.frame.origin.y
//取得圖片資源
#define kGetImage(imageName) [UIImage imageNamed:[NSString stringWithFormat:@"%@",imageName]]
12. 取得當前語言
#define LRCurrentLanguage ([[NSLocale preferredLanguages] objectAtIndex:0])13. 判斷 ARC 與 MRC
#if __has_feature(objc_arc)
// ARC
#else
// MRC
#endif
14. 判斷 iPhone 機型與系統版本
// 是否為 iPhone
#define IS_IPHONE (UI_USER_INTERFACE_IDIOM() == UIUserInterfaceIdiomPhone)
// 是否為 iPad
#define IS_IPAD (UI_USER_INTERFACE_IDIOM() == UIUserInterfaceIdiomPad)
// 是否為 iPod
#define IS_IPOD ([[[UIDevice currentDevice] model] isEqualToString:@"iPod touch"])
// 是否為 iPhone 5SE
#define iPhone5SE [[UIScreen mainScreen] bounds].size.width == 320.0f && [[UIScreen mainScreen] bounds].size.height == 568.0f
// 是否為 iPhone 6/6s
#define iPhone6_6s [[UIScreen mainScreen] bounds].size.width == 375.0f && [[UIScreen mainScreen] bounds].size.height == 667.0f
// 是否為 iPhone 6Plus/6sPlus
#define iPhone6Plus_6sPlus [[UIScreen mainScreen] bounds].size.width == 414.0f && [[UIScreen mainScreen].bounds].size.height == 736.0f
// 取得系統版本
#define IOS_SYSTEM_VERSION [[[UIDevice currentDevice] systemVersion] floatValue]
// 是否為 iOS 8 或更高版本
#define IOS_VERSION_8_OR_LATER (([[[UIDevice currentDevice] systemVersion] floatValue] >=8.0)? (YES):(NO))
15. 判斷真機還是模擬器
#if TARGET_OS_IPHONE
//iPhone Device
#endif
#if TARGET_IPHONE_SIMULATOR
//iPhone Simulator
#endif
16. 沙盒目錄檔案
// 取得 temp
#define kPathTemp NSTemporaryDirectory()
// 取得沙盒 Document
#define kPathDocument [NSSearchPathForDirectoriesInDomains(NSDocumentDirectory, NSUserDomainMask, YES) firstObject]
// 取得沙盒 Cache
#define kPathCache [NSSearchPathForDirectoriesInDomains(NSCachesDirectory, NSUserDomainMask, YES) firstObject]
17. GCD 相關宏
GCD 的方法寫起來冗長,包成宏之後清爽許多:
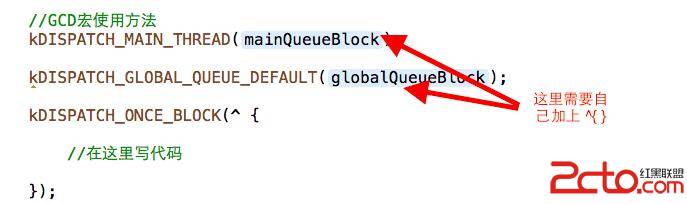
GCD 宏使用方法示意圖
// GCD - 一次性執行
#define kDISPATCH_ONCE_BLOCK(onceBlock) static dispatch_once_t onceToken; dispatch_once(&onceToken, onceBlock);
// GCD - 在主執行緒執行
#define kDISPATCH_MAIN_THREAD(mainQueueBlock) dispatch_async(dispatch_get_main_queue(), mainQueueBlock);
// GCD - 開啟非同步執行緒
#define kDISPATCH_GLOBAL_QUEUE_DEFAULT(globalQueueBlock) dispatch_async(dispatch_get_global_queue(DISPATCH_QUEUE_PRIORITY_DEFAULT, 0), globalQueueBlocl);
宏與 const 該怎麼選
很多人習慣把常量字串(最典型的莫過於伺服器位址)定義成宏。其實對於常量字串,蘋果更推薦使用 const。兩者的差異如下:
1. 編譯時機不同:宏屬於預編譯階段,const 屬於編譯階段。
2. 宏能定義程式碼片段,const 不行;大量宏會拖慢編譯、影響除錯效率,而 const 只編譯一次,能縮短編譯時間。
3. 宏不會檢查型別錯誤,const 會。
結論很簡單:常量字串用 const,程式碼片段用宏。下面示範 const 的實際用法:
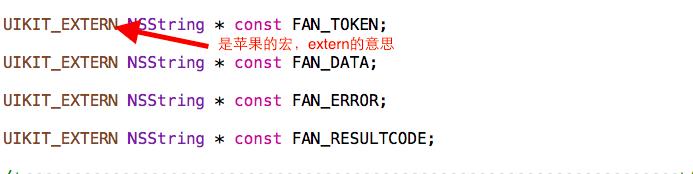
在 FANCommonConst.h 中宣告常量字串
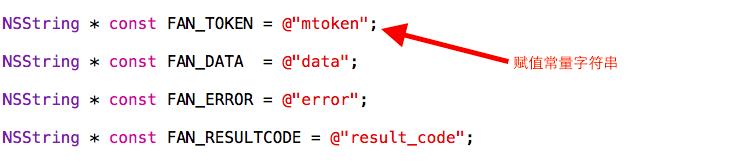
在 FANCommonConst.m 中實作常量字串
建立一個類別後,只要在 .h 與 .m 中引入 #import ,於 .h 宣告字串、於 .m 實作,最後把這個類別匯入 PCH,就能隨心所欲地使用這些常量了。