
iOS 開發入門:UINavigationController 導航欄與左右按鈕實作
編輯:iOS 開發綜合
幾乎每一個 iOS App 都離不開導航控制器。它用「堆疊」的方式管理多個視圖控制器,負責頁面之間的推入與返回,同時在頂部提供一條可以放標題與按鈕的導航欄。本文用最基礎的範例,把導航欄的標題、左側按鈕、右側按鈕與自訂檢視一次做完。
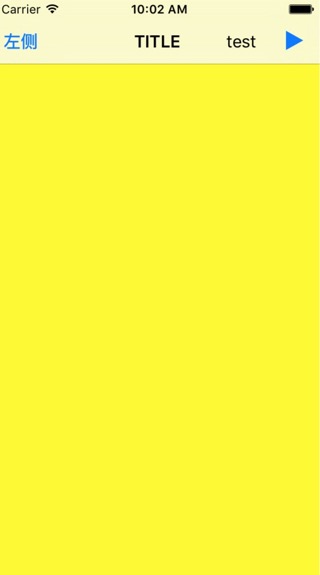
目標很明確:左側放一個文字按鈕,中間顯示標題,右側放系統風格的播放圖示,再加上一個自訂的 test 標籤。
建立根視圖控制器
先新增一個 VCRoot 類別作為導航控制器的根視圖,然後在 AppDelegate 中把 window 的根視圖替換成導航控制器:
#import "AppDelegate.h"
#import "VCRoot.h"

@implementation AppDelegate

- (BOOL)application:(UIApplication *)application didFinishLaunchingWithOptions:(NSDictionary *)launchOptions {
    self.window = [[UIWindow alloc] initWithFrame:[UIScreen mainScreen].bounds];

    // 根視圖控制器
    VCRoot *root = [[VCRoot alloc] init];

    // 導航控制器以「堆疊」的層級方式管理多個視圖控制器
    // 初始化時必須傳入一個根視圖控制器作為堆疊最底層
    UINavigationController *nav = [[UINavigationController alloc] initWithRootViewController:root];

    self.window.rootViewController = nav;
    [self.window makeKeyAndVisible];
    return YES;
}

@end
設定導航欄內容
接下來在 VCRoot 中配置標題與按鈕。這裡有幾個關鍵觀念:
· self.title 與 self.navigationItem.title 是兩回事,後者優先;若未設定 navigationItem.title,系統才會退回使用 title。
· 左側按鈕用「文字 + 樣式 + 事件」的方式建立,右側按鈕則可直接選用系統內建的樣式(新增、播放等),但系統樣式的圖示內容無法自行更改。
· 想放任意檢視(例如 UILabel),可以包成 initWithCustomView:,再用 rightBarButtonItems 一次塞入多個項目。
#import "VCRoot.h"

@implementation VCRoot

- (void)viewDidLoad {
    [super viewDidLoad];
    self.view.backgroundColor = [UIColor yellowColor];

    // 導航欄標題:navigationItem.title 優先於 self.title
    self.title = @"根視圖";
    self.navigationItem.title = @"TITLE";

    // 左側按鈕:以文字建立
    UIBarButtonItem *leftBtn = [[UIBarButtonItem alloc] initWithTitle:@"左側"
                                                               style:UIBarButtonItemStyleDone
                                                              target:self
                                                              action:@selector(pressLeft)];
    self.navigationItem.leftBarButtonItem = leftBtn;

    // 右側按鈕:使用系統樣式(此處為播放圖示)
    UIBarButtonItem *rightBtn = [[UIBarButtonItem alloc] initWithBarButtonSystemItem:UIBarButtonSystemItemPlay
                                                                              target:self
                                                                              action:@selector(pressRight)];

    // 自訂檢視也能放進導航欄
    UILabel *label = [[UILabel alloc] initWithFrame:CGRectMake(10, 10, 50, 40)];
    label.text = @"test";
    label.textAlignment = NSTextAlignmentCenter;
    UIBarButtonItem *item03 = [[UIBarButtonItem alloc] initWithCustomView:label];

    // 一次設定多個右側項目
    NSArray *arrayBtn = [NSArray arrayWithObjects:rightBtn, item03, nil];
    self.navigationItem.rightBarButtonItems = arrayBtn;
}

- (void)pressLeft {
    NSLog(@"左側按鈕被按下!");
}

- (void)pressRight {
    NSLog(@"右側按鈕被按下!");
}

- (void)didReceiveMemoryWarning {
    [super didReceiveMemoryWarning];
}

@end
執行後你會看到導航欄左側一個文字按鈕、中間標題,右側則是播放圖示與 test 標籤並排。把這套寫法記熟,後續要在導航欄放搜尋框、購物車紅點或分段控制器,都只是換掉 customView 而已。