
CoreText 實戰(四):讓文字與圖片自然混排
編輯:iOS 開發綜合
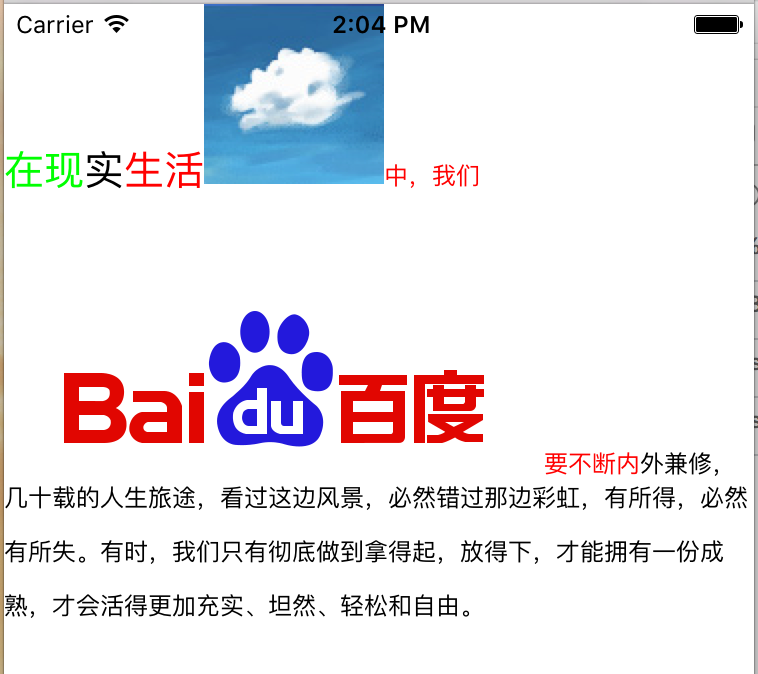
這一篇要解決的問題是:在一個 UIView 的子控件上實現圖文混排,並且同時支援本地圖片與網路圖片。
從純文字過渡到圖文混排,CoreText 的玩法其實不變,仍然以 NSAttributedString 為核心。差別只在於:圖片並不是真的被「畫」進去,而是先用一個空白字元佔位,透過 CTRunDelegate 告訴 CoreText 這個佔位字元需要預留多大的寬高,等文字排版完成後,再把圖片按計算出的座標貼上去。
一、圖片的 Delegate 回呼
這幾個 C 函式決定了排版時要給圖片留出多大的空間。順帶用 refCon 判斷傳進來的是本地圖片名還是網路圖片的尺寸字典。
#pragma mark 圖片代理
void RunDelegateDeallocCallback(void *refCon){
    NSLog(@"RunDelegate dealloc");
}
CGFloat RunDelegateGetAscentCallback(void *refCon){
    NSString *imageName = (__bridge NSString *)refCon;
    if ([imageName isKindOfClass:[NSString class]]){
        // 對應本地圖片
        return [UIImage imageNamed:imageName].size.height;
    }
    // 對應網絡圖片
    return [[(__bridge NSDictionary *)refCon objectForKey:@"height"] floatValue];
}
CGFloat RunDelegateGetDescentCallback(void *refCon){
    return 0;
}
CGFloat RunDelegateGetWidthCallback(void *refCon){
    NSString *imageName = (__bridge NSString *)refCon;
    if ([imageName isKindOfClass:[NSString class]]){
        // 本地圖片
        return [UIImage imageNamed:imageName].size.width;
    }
    // 網絡圖片
    return [[(__bridge NSDictionary *)refCon objectForKey:@"width"] floatValue];
}
二、下載網路圖片
這裡借用 SDWebImage 完成異步下載,回來後切主線程觸發重繪。
- (void)downLoadImageWithURL:(NSURL *)url{
    __weak typeof(self) weakSelf = self;
    dispatch_async(dispatch_get_global_queue(DISPATCH_QUEUE_PRIORITY_DEFAULT, 0), ^{
        SDWebImageOptions options = SDWebImageRetryFailed | SDWebImageHandleCookies | SDWebImageContinueInBackground;
        options = SDWebImageRetryFailed | SDWebImageContinueInBackground;
        [[SDWebImageManager sharedManager] downloadImageWithURL:url options:options progress:nil completed:^(UIImage *image, NSError *error, SDImageCacheType cacheType, BOOL finished, NSURL *imageURL) {
            weakSelf.image = image;
            dispatch_async(dispatch_get_main_queue(), ^{
                if (weakSelf.image) {
                    [weakSelf setNeedsDisplay];
                }
            });
        }];
    });
}
三、完整繪製流程
- (void)drawRect:(CGRect)rect {
    [super drawRect:rect];
    NSString* title = @"在現實生活中,我們要不斷內外兼修,幾十載的人生旅途,看過這邊風景,必然錯過那邊彩虹,有所得,必然有所失。有時,我們只有徹底做到拿得起,放得下,才能擁有一份成熟,才會活得更加充實、坦然、輕松和自由。";

    //步驟1:獲取上下文
    CGContextRef contextRef = UIGraphicsGetCurrentContext();

    //步驟2:翻轉坐標系
    CGContextSetTextMatrix(contextRef, CGAffineTransformIdentity);
    CGContextTranslateCTM(contextRef, 0, self.bounds.size.height);
    CGContextScaleCTM(contextRef, 1.0, -1.0);

    //步驟3:創建NSAttributedString
    NSMutableAttributedString *attributed = [[NSMutableAttributedString alloc] initWithString:title];
    [attributed addAttribute:NSFontAttributeName value:[UIFont systemFontOfSize:20] range:NSMakeRange(0, 5)];
    [attributed addAttribute:NSForegroundColorAttributeName value:[UIColor redColor] range:NSMakeRange(3, 10)];
    [attributed addAttribute:(id)kCTForegroundColorAttributeName value:(id)[UIColor greenColor].CGColor range:NSMakeRange(0, 2)];

    // 設置行距等樣式
    CGFloat lineSpace = 10;
    CGFloat lineSpaceMax = 20;
    CGFloat lineSpaceMin = 2;
    const CFIndex kNumberOfSettings = 3;
    CTParagraphStyleSetting theSettings[kNumberOfSettings] = {
        {kCTParagraphStyleSpecifierLineSpacingAdjustment,sizeof(CGFloat),&lineSpace},
        {kCTParagraphStyleSpecifierMaximumLineSpacing,sizeof(CGFloat),&lineSpaceMax},
        {kCTParagraphStyleSpecifierMinimumLineSpacing,sizeof(CGFloat),&lineSpaceMin}
    };
    CTParagraphStyleRef theParagraphRef = CTParagraphStyleCreate(theSettings, kNumberOfSettings);
    [attributed addAttribute:(id)kCTParagraphStyleAttributeName value:(__bridge id)theParagraphRef range:NSMakeRange(0, attributed.length)];
    CFRelease(theParagraphRef);

    // 插入圖片部分:為圖片設置 CTRunDelegate,delegate 決定留給圖片的空間大小
    NSString *weicaiImageName = @"cloud.jpg";
    CTRunDelegateCallbacks imageCallbacks;
    imageCallbacks.version = kCTRunDelegateVersion1;
    imageCallbacks.dealloc = RunDelegateDeallocCallback;
    imageCallbacks.getAscent = RunDelegateGetAscentCallback;
    imageCallbacks.getDescent = RunDelegateGetDescentCallback;
    imageCallbacks.getWidth = RunDelegateGetWidthCallback;

    // ①本地圖片:直接把圖片名作為 refCon
    CTRunDelegateRef runDelegate = CTRunDelegateCreate(&imageCallbacks, (__bridge void *)(weicaiImageName));
    NSMutableAttributedString *imageAttributedString = [[NSMutableAttributedString alloc] initWithString:@" "]; //空格用於給圖片留位置
    [imageAttributedString addAttribute:(NSString *)kCTRunDelegateAttributeName value:(__bridge id)runDelegate range:NSMakeRange(0, 1)];
    CFRelease(runDelegate);
    [imageAttributedString addAttribute:@"imageName" value:weicaiImageName range:NSMakeRange(0, 1)];
    // 在指定 index 處插入,可以插入多張
    [attributed insertAttributedString:imageAttributedString atIndex:5];

    // ②網絡圖片:需要使用 0xFFFC 作為占位符
    NSString *picURL = @"https://www.baidu.com/img/bd_logo1.png";
    UIImage* pImage = [UIImage imageNamed:@"123.png"];
    NSDictionary *imgInfoDic = @{@"width":@(270),@"height":@(129)};
    CTRunDelegateRef delegate = CTRunDelegateCreate(&imageCallbacks, (__bridge void *)imgInfoDic);
    unichar objectReplacementChar = 0xFFFC;
    NSString *content = [NSString stringWithCharacters:&objectReplacementChar length:1];
    NSMutableAttributedString *space = [[NSMutableAttributedString alloc] initWithString:content];
    CFAttributedStringSetAttribute((CFMutableAttributedStringRef)space, CFRangeMake(0, 1), kCTRunDelegateAttributeName, delegate);
    CFRelease(delegate);
    [attributed insertAttributedString:space atIndex:10];

    //步驟4:創建CTFramesetterRef
    CTFramesetterRef framesetterRef = CTFramesetterCreateWithAttributedString((CFAttributedStringRef)attributed);

    //步驟5:創建繪制區域CGPathRef
    CGMutablePathRef pathRef = CGPathCreateMutable();
    CGPathAddRect(pathRef, NULL, self.bounds);

    //步驟6:創建CTFrame
    CTFrameRef frameRef = CTFramesetterCreateFrame(framesetterRef, CFRangeMake(0, [attributed length]), pathRef, NULL);

    //步驟7:繪制文字
    CTFrameDraw(frameRef, contextRef);

    // 處理繪制圖片的邏輯
    CFArrayRef lines = CTFrameGetLines(frameRef);
    CGPoint lineOrigins[CFArrayGetCount(lines)];
    CTFrameGetLineOrigins(frameRef, CFRangeMake(0, 0), lineOrigins);

    // 遍歷CTRun找出圖片所在的CTRun並繪制
    for (int i = 0; i < CFArrayGetCount(lines); i++) {
        CTLineRef line = CFArrayGetValueAtIndex(lines, i);
        CGFloat lineAscent;
        CGFloat lineDescent;
        CGFloat lineLeading;
        CTLineGetTypographicBounds(line, &lineAscent, &lineDescent, &lineLeading);
        CFArrayRef runs = CTLineGetGlyphRuns(line);
        for (int j = 0; j < CFArrayGetCount(runs); j++) {
            CGFloat runAscent;
            CGFloat runDescent;
            CGPoint lineOrigin = lineOrigins[i];
            CTRunRef run = CFArrayGetValueAtIndex(runs, j);
            NSDictionary* attributes = (NSDictionary*)CTRunGetAttributes(run);
            CGRect runRect;
            runRect.size.width = CTRunGetTypographicBounds(run, CFRangeMake(0,0), &runAscent, &runDescent, NULL);
            runRect = CGRectMake(lineOrigin.x + CTLineGetOffsetForStringIndex(line, CTRunGetStringRange(run).location, NULL),
                                 lineOrigin.y - runDescent, runRect.size.width, runAscent + runDescent);
            NSString *imageName = [attributes objectForKey:@"imageName"];
            if ([imageName isKindOfClass:[NSString class]]){
                // 繪制本地圖片
                UIImage *image = [UIImage imageNamed:imageName];
                CGRect imageDrawRect;
                imageDrawRect.size = image.size;
                imageDrawRect.origin.x = runRect.origin.x;
                imageDrawRect.origin.y = lineOrigin.y;
                CGContextDrawImage(contextRef, imageDrawRect, image.CGImage);
            } else {
                imageName = nil;
                CTRunDelegateRef delegate = (__bridge CTRunDelegateRef)[attributes objectForKey:(__bridge id)kCTRunDelegateAttributeName];
                if (!delegate){
                    continue; // 非圖片的CTRun直接跳過
                }
                // 網絡圖片
                UIImage *image;
                if (!self.image){
                    // 圖片未下載完成,先用占位圖
                    image = pImage;
                    [self downLoadImageWithURL:[NSURL URLWithString:picURL]];
                }else{
                    image = self.image;
                }
                CGRect imageDrawRect;
                imageDrawRect.size = image.size;
                imageDrawRect.origin.x = runRect.origin.x;
                imageDrawRect.origin.y = lineOrigin.y;
                CGContextDrawImage(contextRef, imageDrawRect, image.CGImage);
            }
        }
    }

    //內存管理
    CFRelease(frameRef);
    CFRelease(pathRef);
    CFRelease(framesetterRef);
}
思路小結
本地圖片與網路圖片同時繪製的做法可以概括為:網路圖片尚未下載時,先用一張占位圖頂上(示例中為了省事直接借用了另一張本地圖),同時啟動 SDWebImage 下載;下載完成後呼叫 setNeedsDisplay 觸發重繪,占位圖自然被真圖替換。
有一點值得留意:本地圖片的寬高隨時可以取到,而網路圖片在下載完成前無從得知。實務上常見的折衷做法,是在 URL 後面拼接上寬高資訊一起傳下去。
- 上一篇文章: 用 AVPlayer 打造類網易新聞的影片播放體驗
- 下一篇文章: CoreText 實戰(三):把文字真正畫出來