
iOS 富文本技術(一):TextKit 入門與圖文混排
編輯:iOS 開發綜合
前言
最近專案裡需要做到圖文混排,於是就研究了 iOS 的富文本方案,順便把心得整理出來,也當作自己學習的總結。計畫寫成兩篇,這是第一篇,主要介紹 iOS 7 引進的 TextKit 基礎用法。
簡介
TextKit 是 iOS 7 推出的文字排版技術,用它可以相当方便地實作富文本、表情混排與圖文混排等效果。其中幾個關鍵類別:
- NSAttributedString 與 NSMutableAttributedString:屬性字串與可變屬性字串,是整個 TextKit 體系中最基礎的型別。文字上的所有富文本屬性,都是透過屬性字串來表達的。
- NSTextAttachment:字串附件。可以把圖片等內容當成一個附件插入屬性字串中,从而实现表情混排、行內圖示等效果。
示例一:屬性設定與表情混排
廢話少說,先看效果:
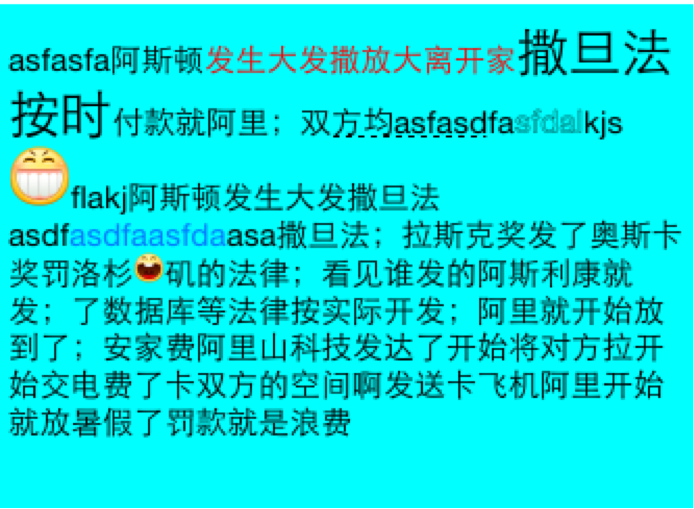
基礎用法相当直觀:先取得 UITextView 的可變屬性字串,再用 addAttribute 針對指定範圍套用屬性;若要插入圖片,則建立 NSTextAttachment、設定 image 與 bounds,轉成 NSAttributedString 後插入到目標位置。
- (void)setupNormalAttribute {
    NSMutableAttributedString *mutStr = [self.textView.attributedText mutableCopy];

    // 文字顏色
    [mutStr addAttribute:NSForegroundColorAttributeName
                   value:[UIColor redColor]
                   range:NSMakeRange(10, 10)];

    // 字型大小
    [mutStr addAttribute:NSFontAttributeName
                   value:[UIFont systemFontOfSize:25]
                   range:NSMakeRange(20, 5)];

    // 虛線下劃線
    [mutStr addAttribute:NSUnderlineStyleAttributeName
                   value:@(NSUnderlineStyleSingle | NSUnderlinePatternDot)
                   range:NSMakeRange(32, 8)];

    // 空心字(描邊寬度)
    [mutStr addAttribute:NSStrokeWidthAttributeName value:@(2)
                   range:NSMakeRange(42, 5)];

    self.textView.attributedText = [mutStr copy];
}

- (void)setupEmojiAndLink {
    NSMutableAttributedString *mutStr = [self.textView.attributedText mutableCopy];

    // 插入表情圖片:bounds 決定圖片在行內的實際尺寸
    UIImage *image1 = [UIImage imageNamed:@"010"];
    NSTextAttachment *attachment1 = [[NSTextAttachment alloc] init];
    attachment1.bounds = CGRectMake(0, 0, 30, 30);
    attachment1.image  = image1;
    [mutStr insertAttributedString:[NSAttributedString attributedStringWithAttachment:attachment1]
                           atIndex:50];

    // 插入第二段表情
    UIImage *image2 = [UIImage imageNamed:@"011"];
    NSTextAttachment *attachment2 = [[NSTextAttachment alloc] init];
    attachment2.bounds = CGRectMake(0, 0, 15, 15);
    attachment2.image  = image2;
    [mutStr insertAttributedString:[NSAttributedString attributedStringWithAttachment:attachment2]
                           atIndex:100];

    // 加上可點擊的連結
    NSURL *url = [NSURL URLWithString:@"https://www.baidu.com"];
    [mutStr addAttribute:NSLinkAttributeName value:url range:NSMakeRange(70, 10)];

    self.textView.attributedText = [mutStr copy];
}
有了屬性字串,互動也變得容易。只要設定 textView 的 delegate,就能攔截附件點擊與連結點擊:
// 點擊圖片附件
- (BOOL)textView:(UITextView *)textView
    shouldInteractWithTextAttachment:(NSTextAttachment *)textAttachment
                             inRange:(NSRange)characterRange {
    NSLog(@"%@", textAttachment);
    return NO;
}

// 點擊連結
- (BOOL)textView:(UITextView *)textView
    shouldInteractWithURL:(NSURL *)URL
                  inRange:(NSRange)characterRange {
    [[UIApplication sharedApplication] openURL:URL];
    return YES;
}
示例二:文字環繞圖片
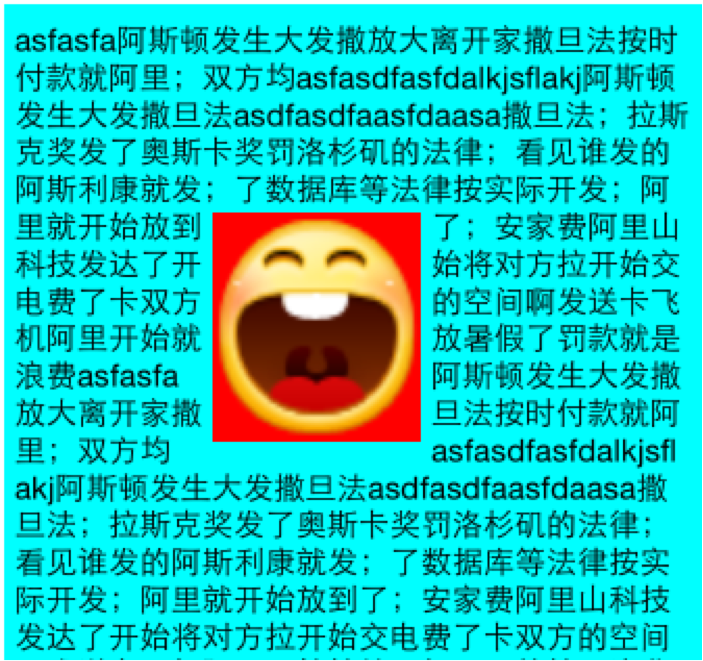
TextKit 更厲害的地方在於排版控制。透過 textContainer 的 exclusionPaths,你可以指定一片「文字必須繞行」的區域,讓文字自動避開圖片,做出雜誌式的環繞效果。
- (void)viewDidLoad {
    [super viewDidLoad];
    self.title = @"文字環繞";
    self.edgesForExtendedLayout = UIRectEdgeNone;

    self.textView = [[UITextView alloc] initWithFrame:
                     CGRectMake(20, 20,
                                [UIScreen mainScreen].bounds.size.width - 40,
                                [UIScreen mainScreen].bounds.size.height - 104)];
    self.textView.backgroundColor = [UIColor cyanColor];
    self.textView.text = str1;
    self.textView.font = [UIFont systemFontOfSize:15];
    self.textView.editable = NO;
    [self.view addSubview:self.textView];

    // 獨立放置一張圖片
    UIImageView *imageView = [[UIImageView alloc] initWithFrame:CGRectMake(120, 120, 100, 110)];
    imageView.image = [UIImage imageNamed:@"011"];
    imageView.backgroundColor = [UIColor redColor];
    [self.view addSubview:imageView];

    // 關鍵:把圖片佔用的區域設為文字排除路徑
    UIBezierPath *path = [UIBezierPath bezierPathWithRect:CGRectMake(100, 100, 100, 100)];
    self.textView.textContainer.exclusionPaths = @[path];
}
這裡有個實務上的小提醒:exclusionPaths 接受的是 UIBezierPath 陣列,因此排除區域不一定是矩形,用橢圓或自訂曲線路徑也完全可行,這讓排版自由度大了許多。
總結
TextKit 大幅簡化了文字排版的複雜度,過去需要自己算行高、自己拆行的苦差事,現在交給系統就能處理得不錯。它的缺點也很明顯:僅能在 iOS 7 之後的系統使用,需要向下相容舊版本的 app 就無法直接採用。不過隨著時間推移,這個限制早已不復存在,TextKit 也成為今日 iOS 排版的首選方案。
- 上一篇文章: iOS 圖形渲染解析:Charts 進階擴充與 GPU 渲染機制
- 下一篇文章: iOS 手勢識別器完整整理:六大子類與代理機制