
iOS 餅狀圖封裝實作:從資料模型到逐段生長動畫
在資料視覺化的場景裡,柱狀圖、折線圖與餅狀圖是最常見的三種呈現方式。它們能把抽象的數字轉化成一眼就能理解的圖形,使用者不必逐行閱讀報表,也能掌握比例關係與分布趨勢。本文以餅狀圖為例,示範如何從零開始封裝一個可重複使用的元件,並在其中加入逐段生長的入場動畫與點擊互動效果。
先備工作:用分類補齊常用能力
正式繪圖之前,建議先把高頻操作抽成 Category,這樣主視圖的程式碼才不會被雜事淹沒。這裡需要四個分類:延遲執行、字串尺寸計算、RGB 通道拆解,以及邊框圓角設定。
// NSObject+XuSong.h —— 在主線程延遲執行,且不阻塞目前流程
- (void)dispatch_after_withSeconds:(float)seconds actions:(void(^)(void))actions;

// NSObject+XuSong.m
- (void)dispatch_after_withSeconds:(float)seconds actions:(void(^)(void))actions {
    dispatch_after(dispatch_time(DISPATCH_TIME_NOW, (int64_t)(seconds * NSEC_PER_SEC)),
                   dispatch_get_main_queue(), ^{ actions(); });
}
// NSString+XuSong.m —— 計算字串在指定寬度下的實際佔用矩形
- (CGRect)stringWidthRectWithSize:(CGSize)size fontOfSize:(CGFloat)font {
    NSDictionary *attributes = @{NSFontAttributeName: [UIFont boldSystemFontOfSize:font]};
    return [self boundingRectWithSize:size
                              options:NSStringDrawingUsesLineFragmentOrigin
                           attributes:attributes
                              context:nil];
}
另外兩個分類同樣實用。UIColor 的分類把 red、green、blue、alpha 四個分量做成唯讀屬性,方便在繪製百分比文字時判斷底色深淺,進而自動切換文字顏色;UIView 的分類則把圓角、邊框寬度與邊框顏色一次設定完成。
// UIColor+XuSong.m 的核心:兼容兩種取色途徑
- (NSDictionary *)getRGBDictionaryByColor {
    CGFloat r = 0, g = 0, b = 0, a = 0;
    if ([self respondsToSelector:@selector(getRed:green:blue:alpha:)]) {
        [self getRed:&r green:&g blue:&b alpha:&a];
    } else {
        const CGFloat *components = CGColorGetComponents(self.CGColor);
        r = components[0]; g = components[1]; b = components[2]; a = components[3];
    }
    return @{@"R": @(r * 255), @"G": @(g * 255), @"B": @(b * 255), @"A": @(a)};
}

// UIView+XuSong.m
- (void)setBorderCornerRadius:(CGFloat)cornerRadius
               andBorderWidth:(CGFloat)borderWidth
              andBorderColor:(UIColor *)color {
    self.layer.cornerRadius = cornerRadius;
    self.layer.borderWidth = borderWidth;
    self.layer.borderColor = color.CGColor;
}
色彩與常數集中管理
把顏色、螢幕尺寸、三角函數換算等常用定義收攏到幾個標頭檔,後續維護成本會大幅下降。ZFColor.h 負責系統色別名,ZFConst.h 則放尺寸、換算與三角函數的巨集。
// ZFConst.h 節錄
#define SCREEN_WIDTH  [UIScreen mainScreen].bounds.size.width
#define SCREEN_HEIGHT [UIScreen mainScreen].bounds.size.height

/** 直接填小數 */
#define ZFDecimalColor(r, g, b, a) [UIColor colorWithRed:r green:g blue:b alpha:a]
/** 填整數(自動除以 255) */
#define ZFColor(r, g, b, a) [UIColor colorWithRed:r / 255.f green:g / 255.f blue:b / 255.f alpha:a]
/** 隨機色 */
#define ZFRandomColor ZFColor(arc4random() % 256, arc4random() % 256, arc4random() % 256, 1)

/** 角度轉弧度 */
#define ZFRadian(angle) (angle / 180.f * M_PI)
/** 弧度轉角度 */
#define ZFAngle(radian) (radian / M_PI * 180.f)
/** 角度求 sin / cos / tan */
#define ZFSin(a)  sin(a  / 180.f * M_PI)
#define ZFCos(a)  cos(a  / 180.f * M_PI)
#define ZFTan(a)  tan(a  / 180.f * M_PI)
半透明弧線層
點擊某一塊扇形時,希望該扇區能以更粗、更外擴的方式被突顯出來。這件事交給一個繼承自 CAShapeLayer 的 ZFTranslucencePath 來負責,它只做一件事:依給定的圓心、半徑與起訖角度產生一段弧線路徑。
// ZFTranslucencePath.m
+ (instancetype)layerWithArcCenter:(CGPoint)center
                            radius:(CGFloat)radius
                        startAngle:(CGFloat)startAngle
                          endAngle:(CGFloat)endAngle
                         clockwise:(BOOL)clockwise {
    return [[ZFTranslucencePath alloc] initWithArcCenter:center radius:radius
                                              startAngle:startAngle endAngle:endAngle
                                               clockwise:clockwise];
}

- (instancetype)initWithArcCenter:(CGPoint)center radius:(CGFloat)radius
                       startAngle:(CGFloat)startAngle endAngle:(CGFloat)endAngle
                        clockwise:(BOOL)clockwise {
    self = [super init];
    if (self) {
        self.fillColor = nil;
        self.opacity = 0.5f;
        UIBezierPath *path = [UIBezierPath bezierPathWithArcCenter:center radius:radius
                                                       startAngle:startAngle
                                                         endAngle:endAngle
                                                        clockwise:clockwise];
        self.path = path.CGPath;
    }
    return self;
}
主視圖 ZFPieChart
對外只暴露必要的屬性:數值陣列、名稱陣列、顏色陣列、百分比格式,以及是否顯示明細與百分比。其餘角度累加、動畫時長、中心點等狀態全部藏在類擴充裡。
typedef enum {
    kPercentTypeDecimal = 0,  // 保留兩位小數(預設)
    kPercentTypeInteger = 1   // 四捨五入取整
} kPercentType;

@interface ZFPieChart : UIView
@property (nonatomic, copy)   NSString     *title;
@property (nonatomic, strong) NSMutableArray *valueArray;  // 存 NSString
@property (nonatomic, strong) NSMutableArray *nameArray;
@property (nonatomic, strong) NSMutableArray *colorArray;  // 存 UIColor
@property (nonatomic, assign) kPercentType    percentType;
@property (nonatomic, assign) BOOL isShowDetail;
@property (nonatomic, assign) BOOL isShowPercent;
- (void)strokePath;   // 重繪
@end
初始化時先算出半徑、線寬與圓心,並把起始角度定在 12 點鐘方向(-90 度)。這裡有個小技巧:環形圖並不是真的畫出甜甜圈,而是用「線寬等於半徑」的 CAShapeLayer 描邊,視覺上就自然形成環狀。
- (void)commonInit {
    _maxRadius = self.frame.size.width > self.frame.size.height ? self.frame.size.height : self.frame.size.width;
    _radius = _maxRadius * 0.27;
    _lineWidth = _radius;
    _totalDuration = 0.75f;
    _startAngle = ZFRadian(-90);
    _extendLength = 10.f;
    _pieCenter = CGPointMake(self.frame.size.width / 2, self.frame.size.height / 2);
    _isShowDetail = YES;
    _isShowPercent = YES;
}
每一段扇形的角度由數值占比決定,動畫則是對 strokeEnd 做 0 到 1 的插值。為了讓多段扇形「接力」生長,每段的開始時間會依照前一段的時長累加後記錄下來。
- (CGFloat)countAngle:(CGFloat)value {
    CGFloat percent = value / _totalValue;
    return M_PI * 2 * percent;
}

- (CABasicAnimation *)animation {
    CABasicAnimation *fillAnimation = [CABasicAnimation animationWithKeyPath:@"strokeEnd"];
    fillAnimation.duration = [self countDuration:_index];
    fillAnimation.timingFunction = [CAMediaTimingFunction functionWithName:kCAMediaTimingFunctionLinear];
    fillAnimation.fillMode = kCAFillModeForwards;
    fillAnimation.removedOnCompletion = NO;
    fillAnimation.fromValue = @(0.f);
    fillAnimation.toValue = @(1.f);
    return fillAnimation;
}

- (void)strokePath {
    self.userInteractionEnabled = NO;
    [self removeAllSubLayers];
    _startAngle = ZFRadian(-90);
    for (NSInteger i = 0; i < _valueArray.count; i++) {
        [self dispatch_after_withSeconds:[self.startTimeArray[i] floatValue] actions:^{
            _index = i;
            [self.layer addSublayer:[self shapeLayer]];
            if (_isShowPercent) { [self creatPercentLabel]; }
        }];
    }
    [self dispatch_after_withSeconds:_totalDuration actions:^{ self.userInteractionEnabled = YES; }];
    if (_isShowDetail) { [self addUI]; }
}
互動部分是整份程式碼裡最有趣的地方。做法是把每段的起訖角度存進 angelArray,觸碰時用 atan2 把觸點換算成弧度,再逐一比對落在哪個區間,命中後就疊上 ZFTranslucencePath 並把對應的百分比文字移到最上層。
- (void)touchesBegan:(NSSet *)touches withEvent:(UIEvent *)event {
    [super touchesBegan:touches withEvent:event];
    CGPoint point = [[touches anyObject] locationInView:self];
    CGFloat x = point.x - _pieCenter.x;
    CGFloat y = point.y - _pieCenter.y;
    CGFloat radian = atan2(y, x);
    if (y < 0 && x < 0) { radian = radian + ZFRadian(360); }  // 超過 180 度時補一週

    for (NSInteger i = 0; i < self.angelArray.count; i++) {
        NSDictionary *dict = self.angelArray[i];
        CGFloat startAngle = [dict[@"startAngle"] floatValue];
        CGFloat endAngle   = [dict[@"endAngle"] floatValue];
        if (radian >= startAngle && radian < endAngle) {
            [self removeZFTranslucencePath];
            [self.layer addSublayer:[self translucencePathShapeLayerWithStartAngle:startAngle
                                                                          endAngle:endAngle
                                                                             index:i]];
            [[self viewWithTag:PercentLabelTag + i] superview];  // 對應文字置於最前
            self.valueLabel.text = _valueArray[i];
            return;
        }
    }
}
百分比文字的位置需要一點三角函數:先取扇形的中心角度,再用 cos 與 sin 求出圓周上的座標。文字顏色則依底色亮度自動在深淺之間切換,避免白底白字或黑底黑字的尷尬。
呼叫方式
封裝完成後,使用端只需要三個陣列與一行重繪指令,就能得到一個具備動畫與互動的餅狀圖。
ZFPieChart *pieChart = [[ZFPieChart alloc] initWithFrame:CGRectMake(0, 0, SCREEN_WIDTH, SCREEN_WIDTH)];
pieChart.valueArray = [NSMutableArray arrayWithArray:@[@"410", @"510", @"380", @"420", @"260"]];
pieChart.nameArray  = [NSMutableArray arrayWithObjects:@"購物", @"美食", @"住房", @"交通", @"娛樂", nil];
pieChart.colorArray = [NSMutableArray arrayWithObjects:
                       ZFColor(253, 118, 152, 1),
                       ZFColor(254, 223, 219, 1),
                       ZFColor(254, 206, 103, 1),
                       ZFColor(81, 146, 218, 1),
                       ZFColor(112, 182, 146, 1), nil];
[self.view addSubview:pieChart];
[pieChart strokePath];
效果預覽
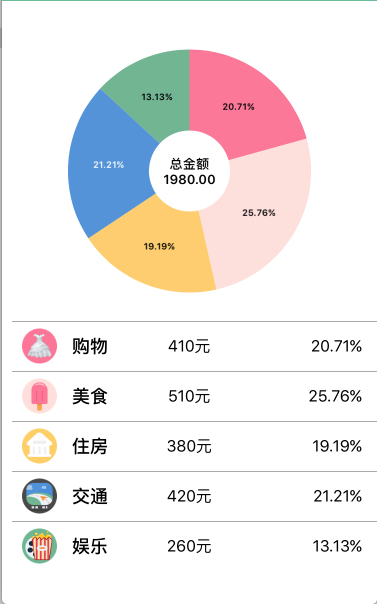
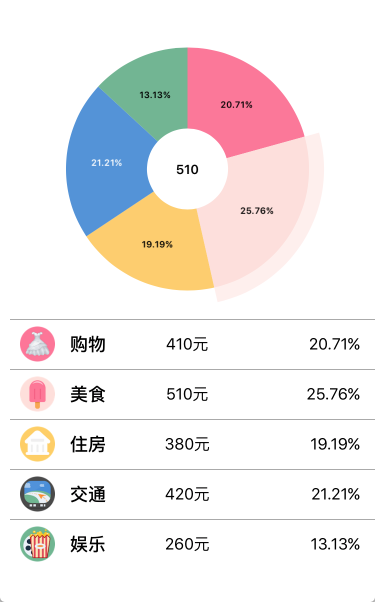
需要補充的是,本文的 Demo 架構參考自網路上的公開範例,並非筆者完全原創,特此說明並感謝原作者分享。