
用 VFL 寫 Auto Layout:視覺格式語言完全說明
本文用一個簡單的 UI 說明如何以 VFL(Visual Format Language)完成自動排版。實務中,純靠圖形介面往往不夠——需要寫程式碼微調,或依內容動態生成介面時,VFL 就是最順手的工具。
一、API 說明
1. NSLayoutConstraint
+ (NSArray *)constraintsWithVisualFormat:(NSString *)format
                                options:(NSLayoutFormatOptions)opts
                                metrics:(NSDictionary *)metrics
                                  views:(NSDictionary *)views;
參數逐一解釋:
format:VFL 語句本體,例如 @"H:|-[button]-|"。
opts:列舉參數,沒有特殊需求時填 0,否則依需求挑選對應列舉值。
metrics:一個字典。當 format 中用到動態數值時,例如 @"H:|-[button(==width)]-|" 表示按鈕寬度等於 width,這個 width 就要在字典裡以 key 對應到實際值。找不到對應值,App 就會崩潰。
views:傳入 VFL 中所有用到的 view。以 @"H:|-[button]-|" 為例,寫法是 NSDictionaryOfVariableBindings(button);若用到多個 view,則寫成 NSDictionaryOfVariableBindings(button, button1, button3)。變數名稱必須與 format 中的一一對應,缺一不可。
2. UIView
- (void)addConstraints:(NSArray *)constraints;
上一個方法的回傳型別是 NSArray,而這個方法的參數恰好也是 NSArray,直接串接即可。若有多組 VFL,可以先用 NSMutableArray 收集所有結果,再一次呼叫 addConstraints:。
二、基本用法
1. 單一控件
建立一個 Single View Application,在裡面寫入:
#import "ViewController.h"

@interface ViewController ()
@end

@implementation ViewController

- (void)viewDidLoad {
    [super viewDidLoad];

    UIButton *button = [[UIButton alloc] init];
    [button setTitle:@"點擊一下" forState:UIControlStateNormal];
    button.translatesAutoresizingMaskIntoConstraints = NO;
    [button setBackgroundColor:[UIColor blackColor]];
    [self.view addSubview:button];

    NSArray *constraints1 = [NSLayoutConstraint constraintsWithVisualFormat:@"H:|-[button]-|"
                                                                  options:0
                                                                  metrics:nil
                                                                    views:NSDictionaryOfVariableBindings(button)];

    NSArray *constraints2 = [NSLayoutConstraint constraintsWithVisualFormat:@"V:|-20-[button(==30)]"
                                                                  options:0
                                                                  metrics:nil
                                                                    views:NSDictionaryOfVariableBindings(button)];

    [self.view addConstraints:constraints1];
    [self.view addConstraints:constraints2];
}

@end
執行後可以看到按鈕正常出現,說明 VFL 語句已生效。
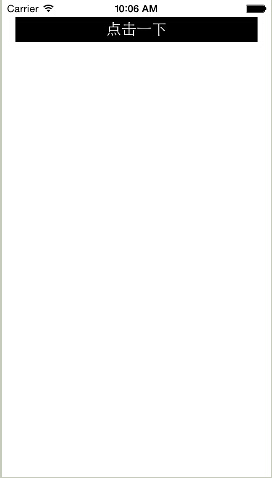
來逐段拆解語法。@"H:|-[button]-|" 中,H: 表示水平方向的約束;| 代表 superView;- 代表一段間距。若這段間距出現在 superView 之間,預設是 20px;若是兩個同層級的 view(如 @"[button]-[button1]"),間距則為 8px。所以這裡按鈕左右各距邊 20px,寬度為 320 - 20 × 2 = 280。
@"V:|-20-[button(==30)]" 中,V: 代表垂直方向;|-20- 表示距頂部 20px,相當於 y 座標為 20;[button(==30)] 指定按鈕高度 30px。y 座標與高度都固定,約束即完成。
高度這類數值還可以用 >=、==、<= 表達,也能組合使用,例如 (>=30,<=40) 表示一個區間。若想指定優先級,寫成 @"V:|-20-[button(==30@1000)]",其中 1000 就是優先級,方便在 XIB 或 Storyboard 中做更細緻的權衡。
特別提醒:用程式碼建立的 UIView,一定要加上這一行,否則約束不生效,控制台還會吐出一長串錯誤。
button.translatesAutoresizingMaskIntoConstraints = NO;
2. 多控件關聯
在上面的基礎上再加一個按鈕:
#import "ViewController.h"

@interface ViewController ()
@end

@implementation ViewController

- (void)viewDidLoad {
    [super viewDidLoad];

    UIButton *button = [[UIButton alloc] init];
    [button setTitle:@"點擊一下" forState:UIControlStateNormal];
    button.translatesAutoresizingMaskIntoConstraints = NO;
    [button setBackgroundColor:[UIColor blackColor]];
    [self.view addSubview:button];

    NSArray *constraints1 = [NSLayoutConstraint constraintsWithVisualFormat:@"H:|-[button]-|"
                                                                  options:0
                                                                  metrics:nil
                                                                    views:NSDictionaryOfVariableBindings(button)];

    NSArray *constraints2 = [NSLayoutConstraint constraintsWithVisualFormat:@"V:|-20-[button(==30)]"
                                                                  options:0
                                                                  metrics:nil
                                                                    views:NSDictionaryOfVariableBindings(button)];

    [self.view addConstraints:constraints1];
    [self.view addConstraints:constraints2];

    UIButton *button1 = [[UIButton alloc] init];
    button1.translatesAutoresizingMaskIntoConstraints = NO;
    [button1 setTitle:@"請不要點擊我" forState:UIControlStateNormal];
    [button1 setBackgroundColor:[UIColor redColor]];
    [self.view addSubview:button1];

    NSArray *constraints3 = [NSLayoutConstraint constraintsWithVisualFormat:@"H:|-[button1]-|"
                                                                  options:0
                                                                  metrics:nil
                                                                    views:NSDictionaryOfVariableBindings(button1)];

    NSArray *constraints4 = [NSLayoutConstraint constraintsWithVisualFormat:@"V:[button]-[button1(==30)]"
                                                                  options:0
                                                                  metrics:nil
                                                                    views:NSDictionaryOfVariableBindings(button1, button)];

    [self.view addConstraints:constraints3];
    [self.view addConstraints:constraints4];
}

@end
執行結果如下:
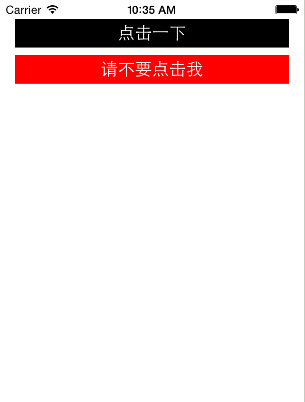
對比程式碼不難看出,button1 的水平約束與 button 相同,差別在垂直方向:
NSArray *constraints4 = [NSLayoutConstraint constraintsWithVisualFormat:@"V:[button]-[button1(==30)]"
                                                              options:0
                                                              metrics:nil
                                                                views:NSDictionaryOfVariableBindings(button1, button)];
這句用到兩個 view。前面提過,- 用於同層級 view 時代表 8px 間距,所以整句的意思是:button1 的 y 座標距 button 8px。不用 Auto Layout 的話,等價寫法是 CGRectGetMaxY(button.frame) + 8。
把高度改成動態數值也一樣可行:
NSArray *constraints4 = [NSLayoutConstraint constraintsWithVisualFormat:@"V:[button]-[button1(==height)]"
                                                              options:0
                                                              metrics:@{@"height": @30}
                                                                views:NSDictionaryOfVariableBindings(button1, button)];
再執行一次,效果完全相同。這下你就知道怎麼動態指定高度、寬度或其他間距了。
那麼,如何讓兩個或多個 view 等高、等寬?除了直接賦值,VFL 還提供了另一種寫法:
NSArray *constraints3 = [NSLayoutConstraint constraintsWithVisualFormat:@"H:|-[button1(button)]"
                                                              options:0
                                                              metrics:nil
                                                                views:NSDictionaryOfVariableBindings(button1, button)];

NSArray *constraints4 = [NSLayoutConstraint constraintsWithVisualFormat:@"V:[button]-[button1(button)]"
                                                              options:0
                                                              metrics:nil
                                                                views:NSDictionaryOfVariableBindings(button1, button)];
靠 @"H:|-[button1(button)]" 與 @"V:[button]-[button1(button)]" 這兩句,等寬等高就輕鬆搞定了。
三、語法速查表
| 功能 | 表達式 |
|---|---|
| 水平方向 | H: |
| 垂直方向 | V: |
| 視圖 | [view] |
| 父視圖 | | |
| 關係運算子 | >=、==、<= |
| 間距 | - |
| 優先級 | @value |
希望對各位有所幫助,若有疏漏之處也歡迎指正。
- 上一篇文章: WatchKit Storyboard 實戰(一):一套圖片搞定兩種錶面
- 下一篇文章: 用 xib 做可複用子控件:一次配置,各處引用