
Core Data 遇上 iCloud:iOS 8 時代的那些坑與排查思路
儘管 Apple 把 iCloud 與 Core Data 的「完美搭配」吹得天花亂墜,但在 iOS 7 之前,想用 iCloud 同步 Core Data 資料簡直是一場噩夢。Apple 自己也承認了先前諸多 bug 與不穩定,於是不得不重新站出來說:工程師已經在 iOS 7 修好問題、強化體驗,巴拉巴拉一堆。而對程式設計師來說,真正重要的是——把 iCloud 整合進 Core Data 變得無比簡單。
官方文件把設定步驟寫得很清楚,可以濃縮成三步:
在 iTunes Connect 建立 App ID,然後在 Xcode 專案的 Capabilities 頁開啟 iCloud。這會為你建立一個預設的 iCloud 容器,名稱格式為「com.XXX.yourAppID」。
建立 NSPersistentStore 時,向 options 參數傳入一個持久儲存的名稱,自己命名即可:
NSDictionary *storeOptions = @{
    NSPersistentStoreUbiquitousContentNameKey: @"MyAppCloudStore"
};

NSPersistentStore *store = [coordinator addPersistentStoreWithType:NSSQLiteStoreType
                                                       configuration:nil
                                                                 URL:storeURL
                                                             options:storeOptions
                                                               error:&error];
註冊
NSPersistentStoreCoordinatorStoresWillChangeNotification、NSPersistentStoreCoordinatorStoresDidChangeNotification與NSPersistentStoreDidImportUbiquitousContentChangesNotification這三個通知,以便收到通知後處理資料。建議用 NSNotificationCenter 的addObserverForName:object:queue:usingBlock:,邏輯更清楚、程式碼也更緊湊。
最後附上 Swift 實作 persistentStoreCoordinator 的程式碼:
var persistentStoreCoordinator: NSPersistentStoreCoordinator! {
    if _persistentStoreCoordinator == nil {
        let storeURL = self.applicationDocumentsDirectory.URLByAppendingPathComponent("HardChoice.sqlite")
        var error: NSError? = nil
        _persistentStoreCoordinator = NSPersistentStoreCoordinator(managedObjectModel: self.managedObjectModel)

        // iCloud 通知訂閱
        let dc = NSNotificationCenter.defaultCenter()

        dc.addObserverForName(NSPersistentStoreCoordinatorStoresWillChangeNotification,
            object: self.persistentStoreCoordinator,
            queue: NSOperationQueue.mainQueue(),
            usingBlock: { (note) -> Void in
                self.managedObjectContext.performBlock({ () -> Void in
                    var error: NSError? = nil
                    if self.managedObjectContext.hasChanges {
                        if !self.managedObjectContext.save(&error) {
                            println(error?.description)
                        }
                    }
                    self.managedObjectContext.reset()
                })
            })

        dc.addObserverForName(NSPersistentStoreCoordinatorStoresDidChangeNotification,
            object: self.persistentStoreCoordinator,
            queue: NSOperationQueue.mainQueue(),
            usingBlock: { (note) -> Void in
                self.managedObjectContext.performBlock({ () -> Void in
                    var error: NSError? = nil
                    if self.managedObjectContext.hasChanges {
                        if !self.managedObjectContext.save(&error) {
                            println(error?.description)
                        }
                    }
                })
            })

        dc.addObserverForName(NSPersistentStoreDidImportUbiquitousContentChangesNotification,
            object: self.persistentStoreCoordinator,
            queue: NSOperationQueue.mainQueue(),
            usingBlock: { (note) -> Void in
                self.managedObjectContext.performBlock({ () -> Void in
                    self.managedObjectContext.mergeChangesFromContextDidSaveNotification(note)
                })
            })

        if _persistentStoreCoordinator!.addPersistentStoreWithType(NSSQLiteStoreType,
                configuration: nil,
                URL: storeURL,
                options: [NSPersistentStoreUbiquitousContentNameKey: "MyAppCloudStore"],
                error: &error) == nil {
            println("Unresolved error \(error), \(error?.userInfo)")
            abort()
        }
    }
    return _persistentStoreCoordinator!
}

var _persistentStoreCoordinator: NSPersistentStoreCoordinator? = nil
當然,你也可以用 lazy 關鍵字來實作同一個惰性載入屬性。
已經有人把整套 Core Data 整合 iCloud 的邏輯抽象出來,例如 iCloudCoreDataStack。你完全不需要再找那些號稱能讓 Core Data 與 iCloud 搭配更簡單的第三方庫了——在 iOS 7 中,Apple 確實已經把它做到極簡。
然而當 Xcode 6 與 iOS 8 到來,一個個坑爭先恐後地冒出來。
首先是 iCloud Drive,它與舊版 iCloud 有衝突。要升級就升徹底,讓所有測試機器都升到 iCloud Drive。
接著是 Xcode 6 中開啟 Capabilities 頁的 iCloud 後,你會看到這種場景:
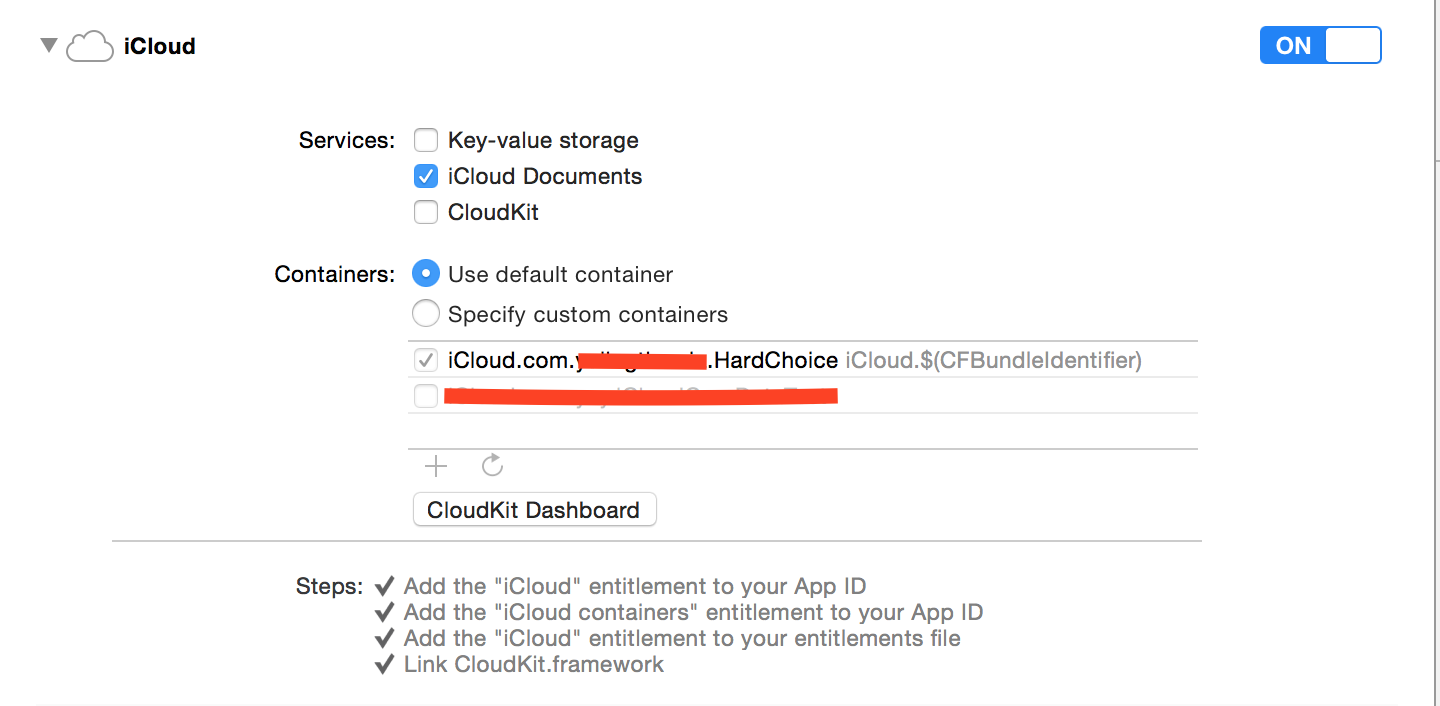
到底該怎麼選?我只能說,照上圖那樣選就對了。順帶一提,iCloud 預設容器名稱格式已經變成「iCloud.com.yourname.yourAppID」——其實這也不算太準確,官方寫法是「iCloud.$(CFBundleIdentifier)」,那個美元號所指的變量就是 General → Identity 裡的 Bundle Identifier。此外,「Key-value storage」與「CloudKit」選不選都可以,但「iCloud Documents」一定要勾,否則 Core Data 是無法同步的。
補充:CloudKit 是 Apple 最新推出的、基於 iCloud 的雲端資料儲存服務,提供低成本的雲端儲存,並能作為後端服務,讓使用者透過 iCloud 帳號共享 App 資料。
接下來檢查 iCloud 容器是否真的加成功。可以在 applicationDidFinishLaunchingWithOptions 中嘗試取得容器 URL 來判斷:
let containerURL = NSFileManager.defaultManager().URLForUbiquityContainerIdentifier("iCloud.com.yulingtianxia.HardChoice")
if containerURL != nil {
    println("success:\(containerURL)")
} else {
    println("URL=nil")
}
如果先前沒在 Capabilities 的 iCloud 中勾選「iCloud Documents」,URLForUbiquityContainerIdentifier 會永遠回傳 nil。Apple 開發者論壇上關於這個主題已有不少討論。
補充:官方文件不建議在主執行緒呼叫 URLForUbiquityContainerIdentifier,因為它可能需要較長時間才回傳 URL,會阻塞主執行緒;這裡只是為了測試方便。
而想確認 iCloud 是否真的與 Core Data 正常協作,Apple 的文件《Using the iCloud Debugging Tools》寫得很詳細。
當我興沖沖打開 Xcode 的 debug navigator、點左側 iCloud 看狀態時,被眼前畫面愣住:
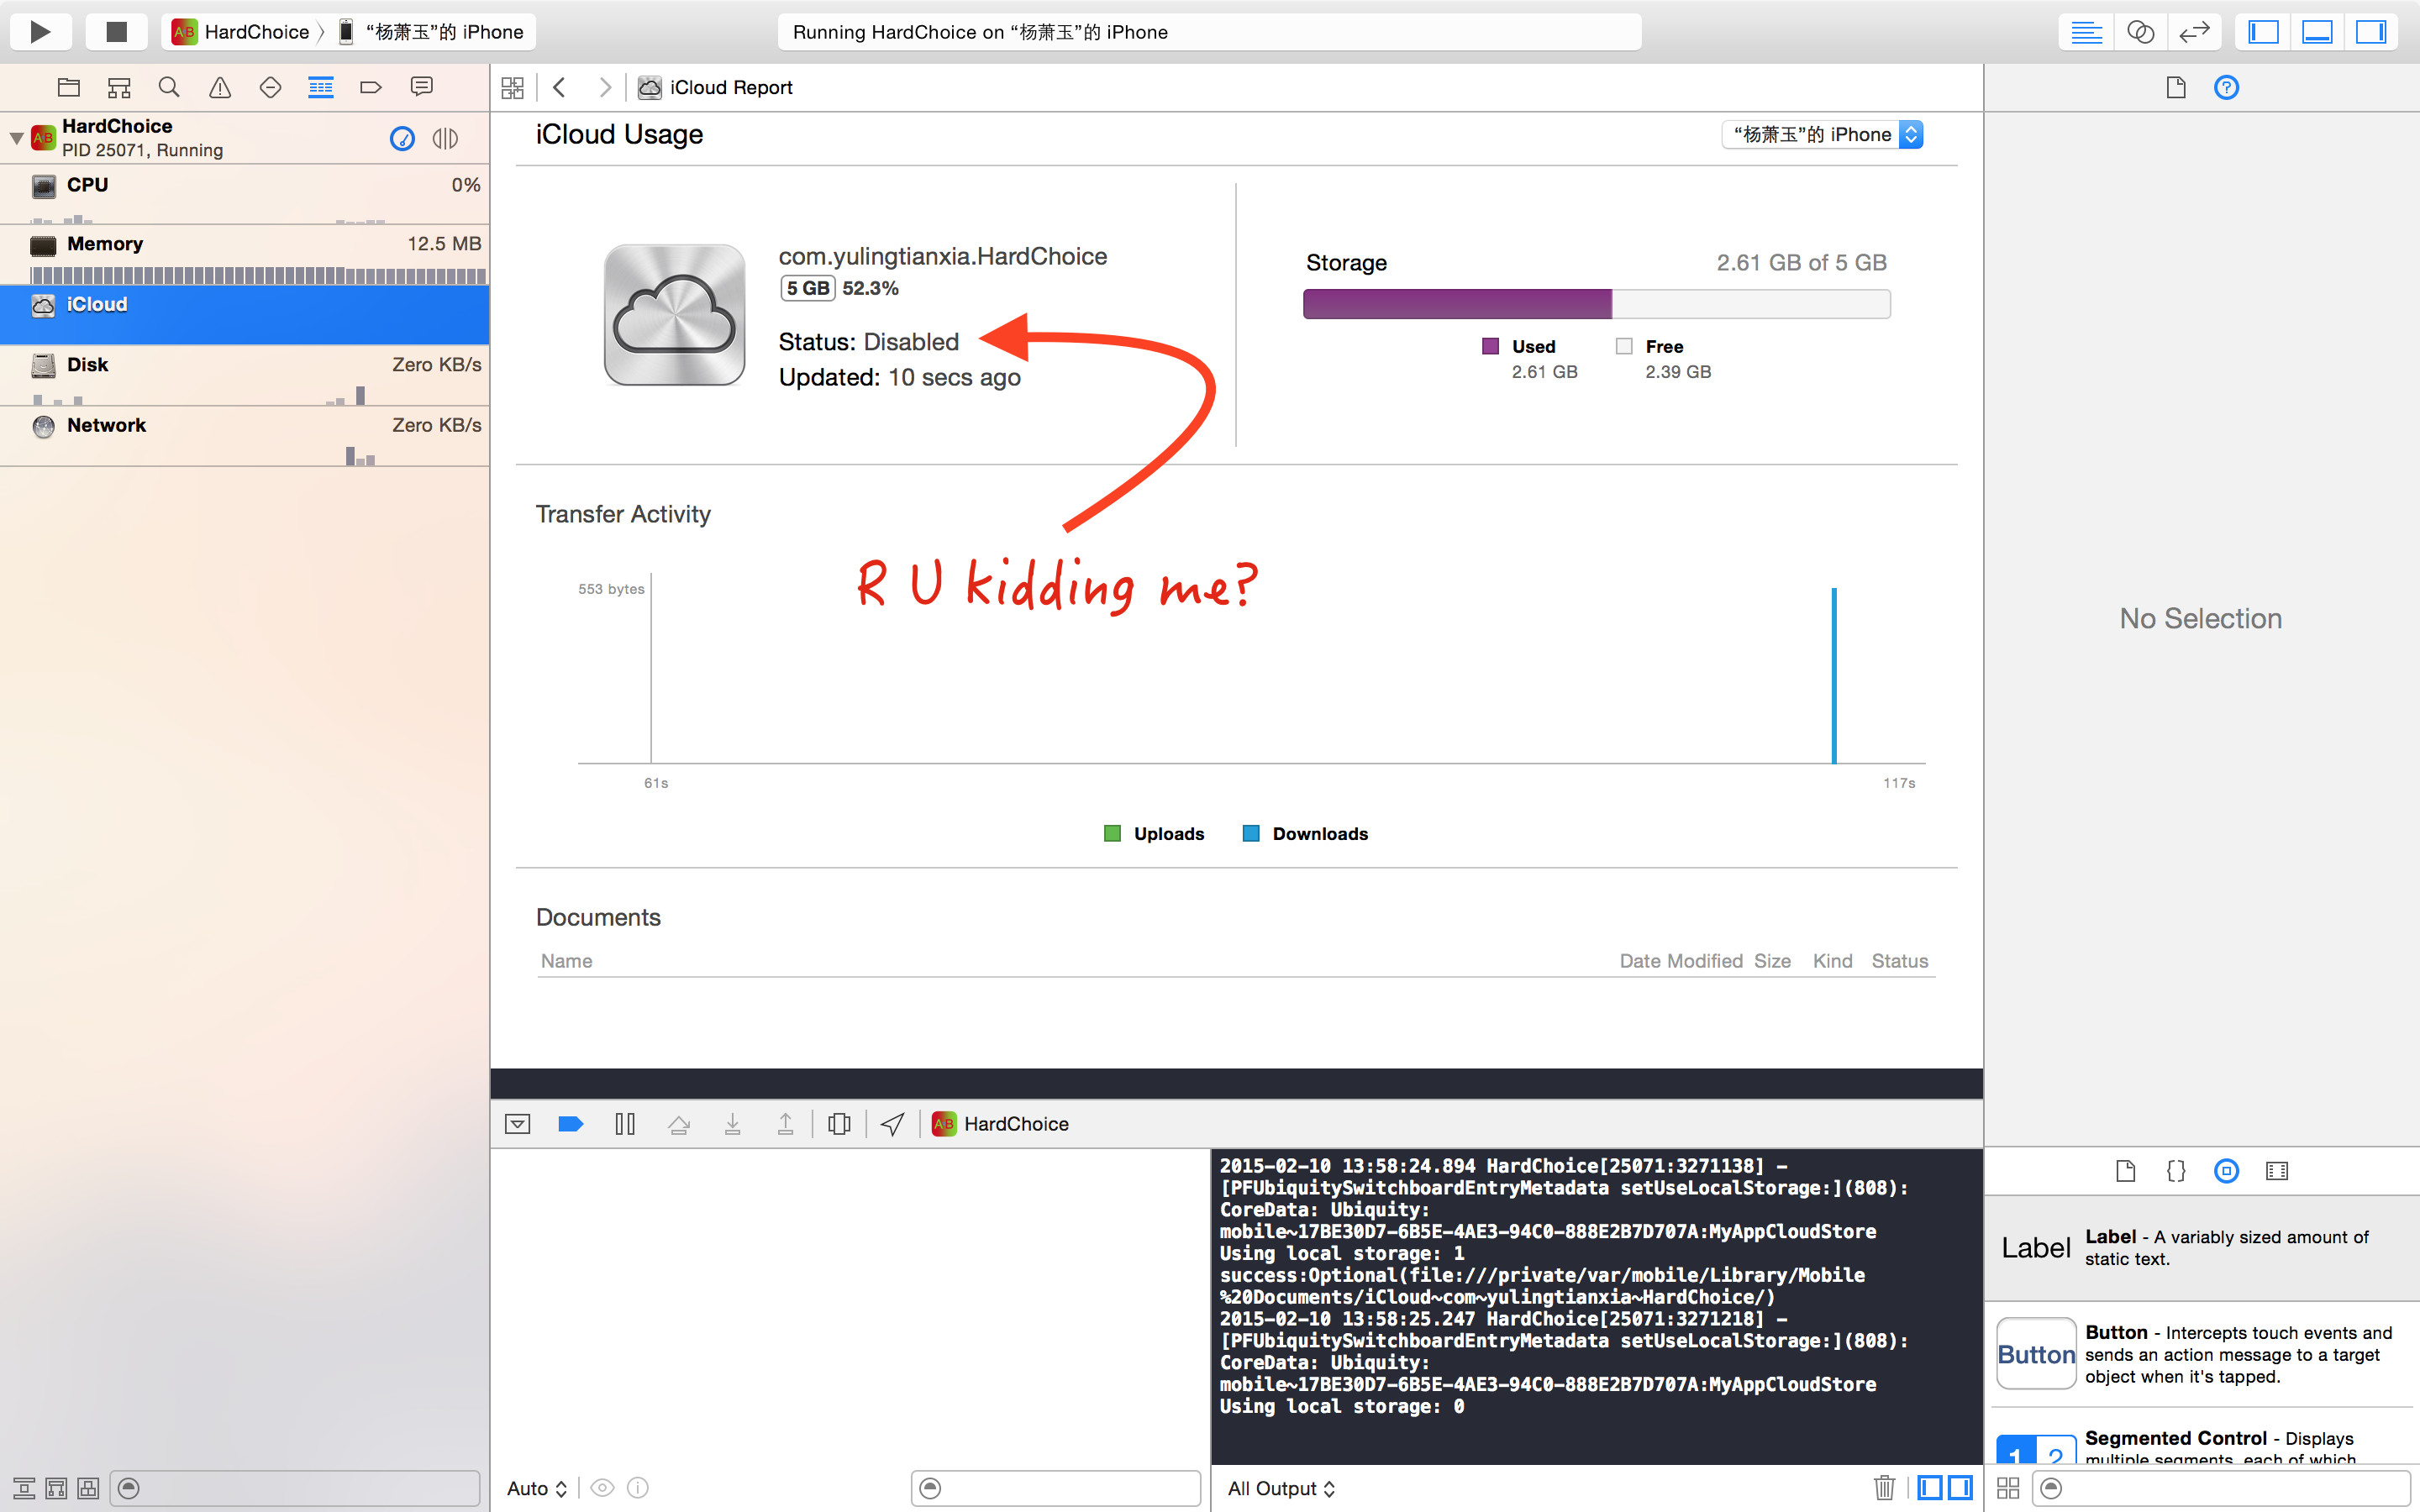
「iCloud Usage」告訴我狀態不可用,然而右下角日誌中「Using local storage」已經從 1 變成 0——也就是證明我的 App(HardChoice)已經從 Core Data 的本地持久儲存,切換到 iCloud 持久儲存了;「Transfer Activity」的柱狀圖更顯示已從 iCloud 下載資料。這其實是 Xcode 6 的一個 bug,已經有人在 Apple 開發者論壇討論過。
依我的測試,只勾選「Key-value storage」或在模擬器上除錯時,「iCloud Usage」根本不會出現;即使出現了,狀態也永遠是 Disabled,「Transfer Activity」也不靈敏。到最後只能相信 Core Data 的日誌。
不過我們可以改看「My Mac」的「iCloud Usage」,而不是 iPhone 的那份:
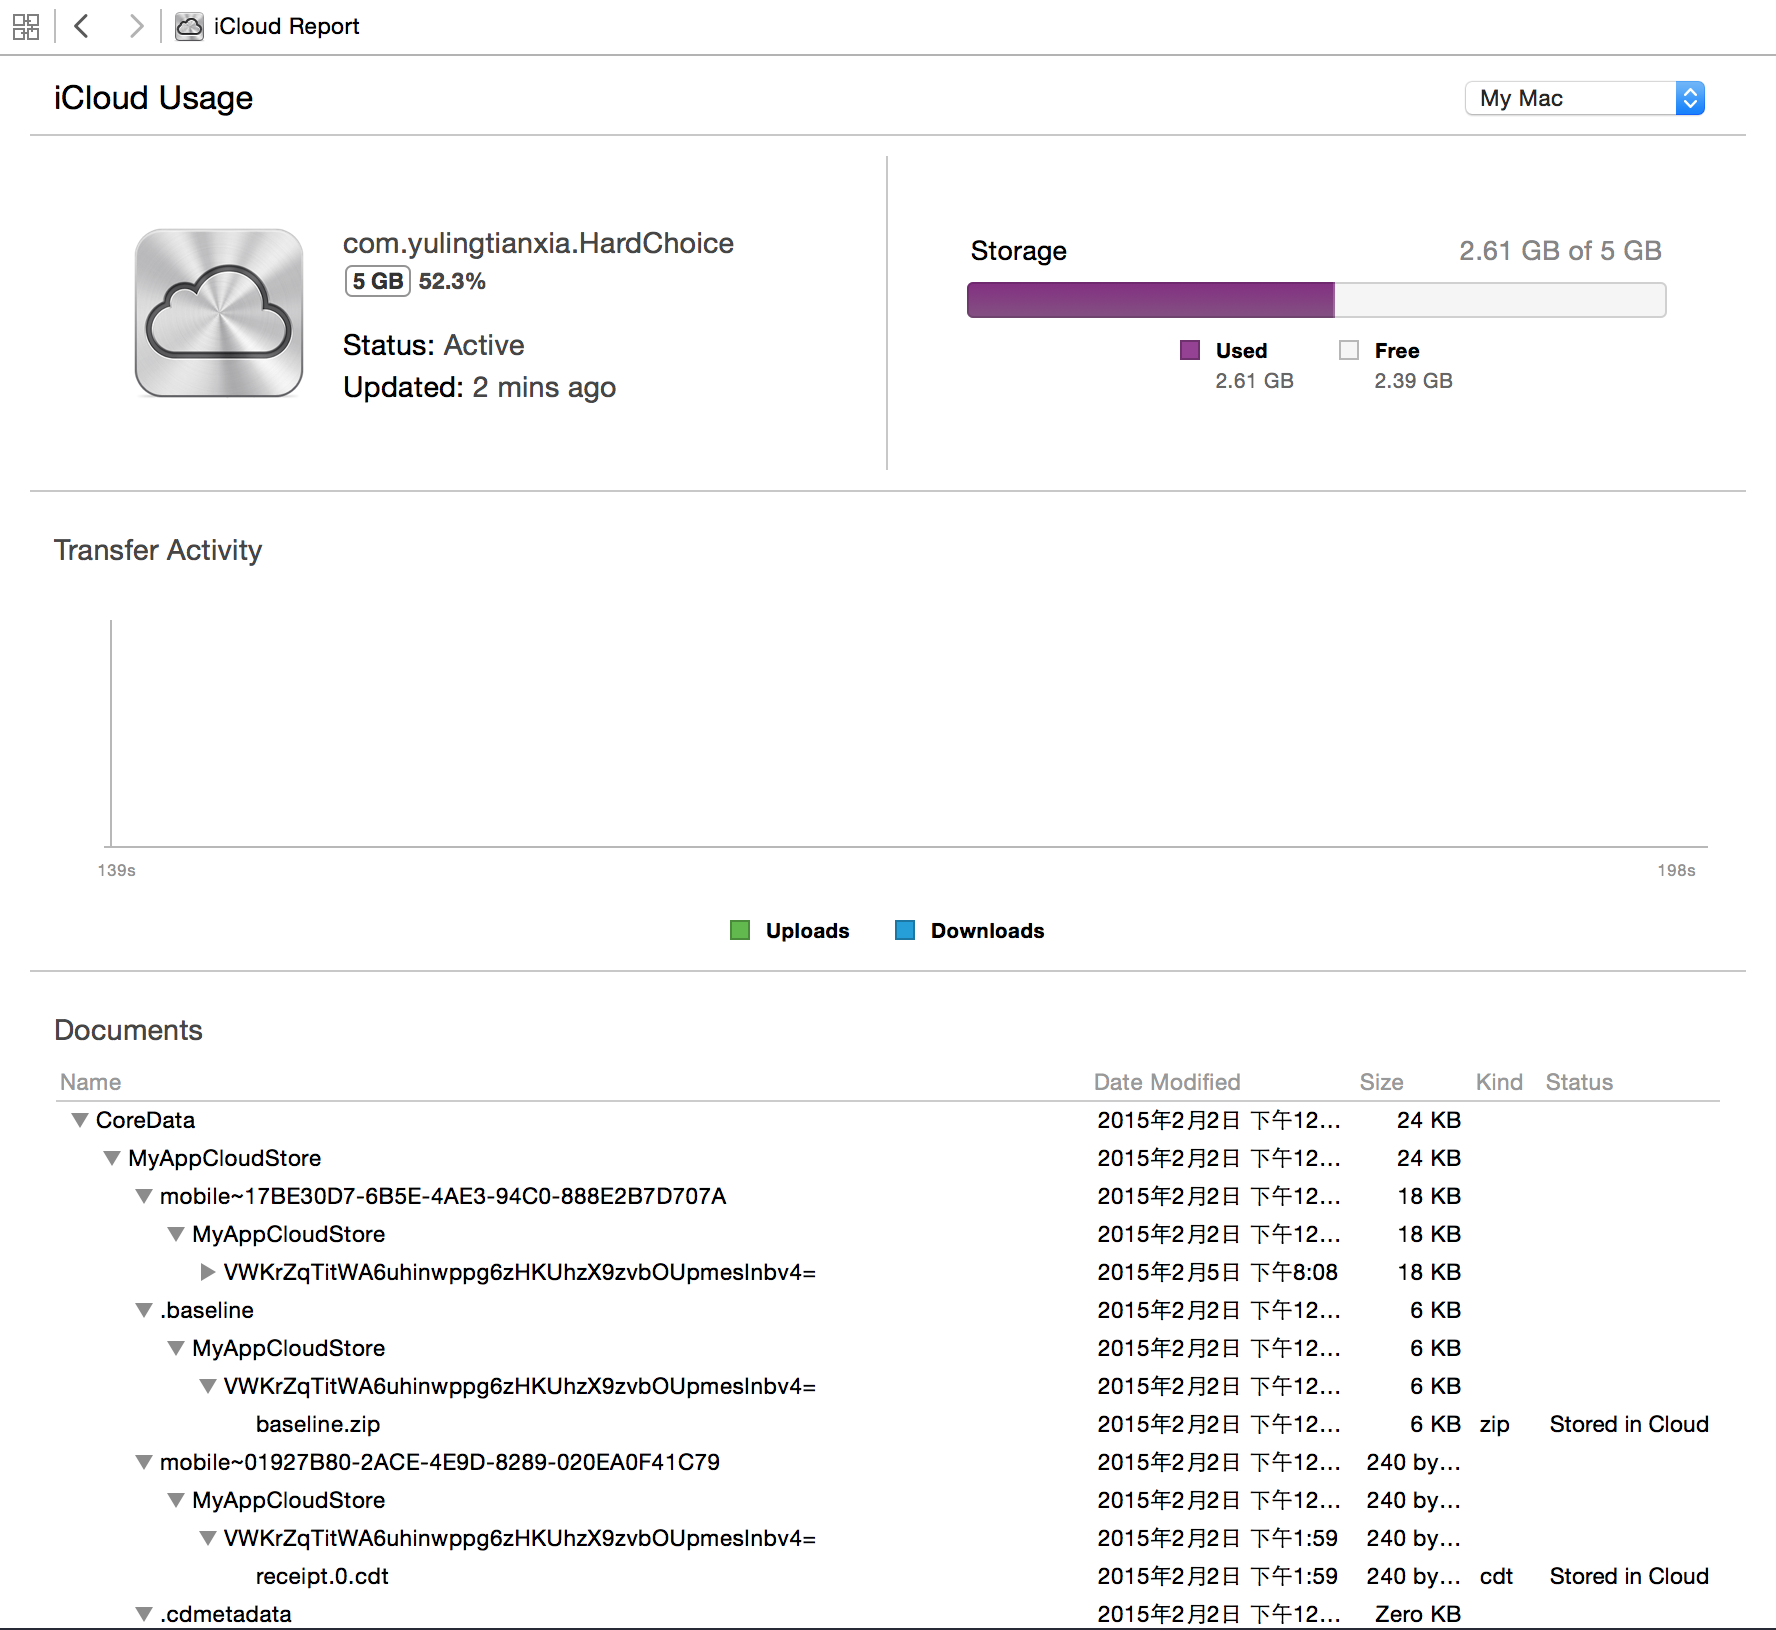
在「Documents」欄可以看出我在兩台裝置間同步了資料,「mobile」後面跟著的是裝置編號。展開後可看到更詳細的同步記錄:
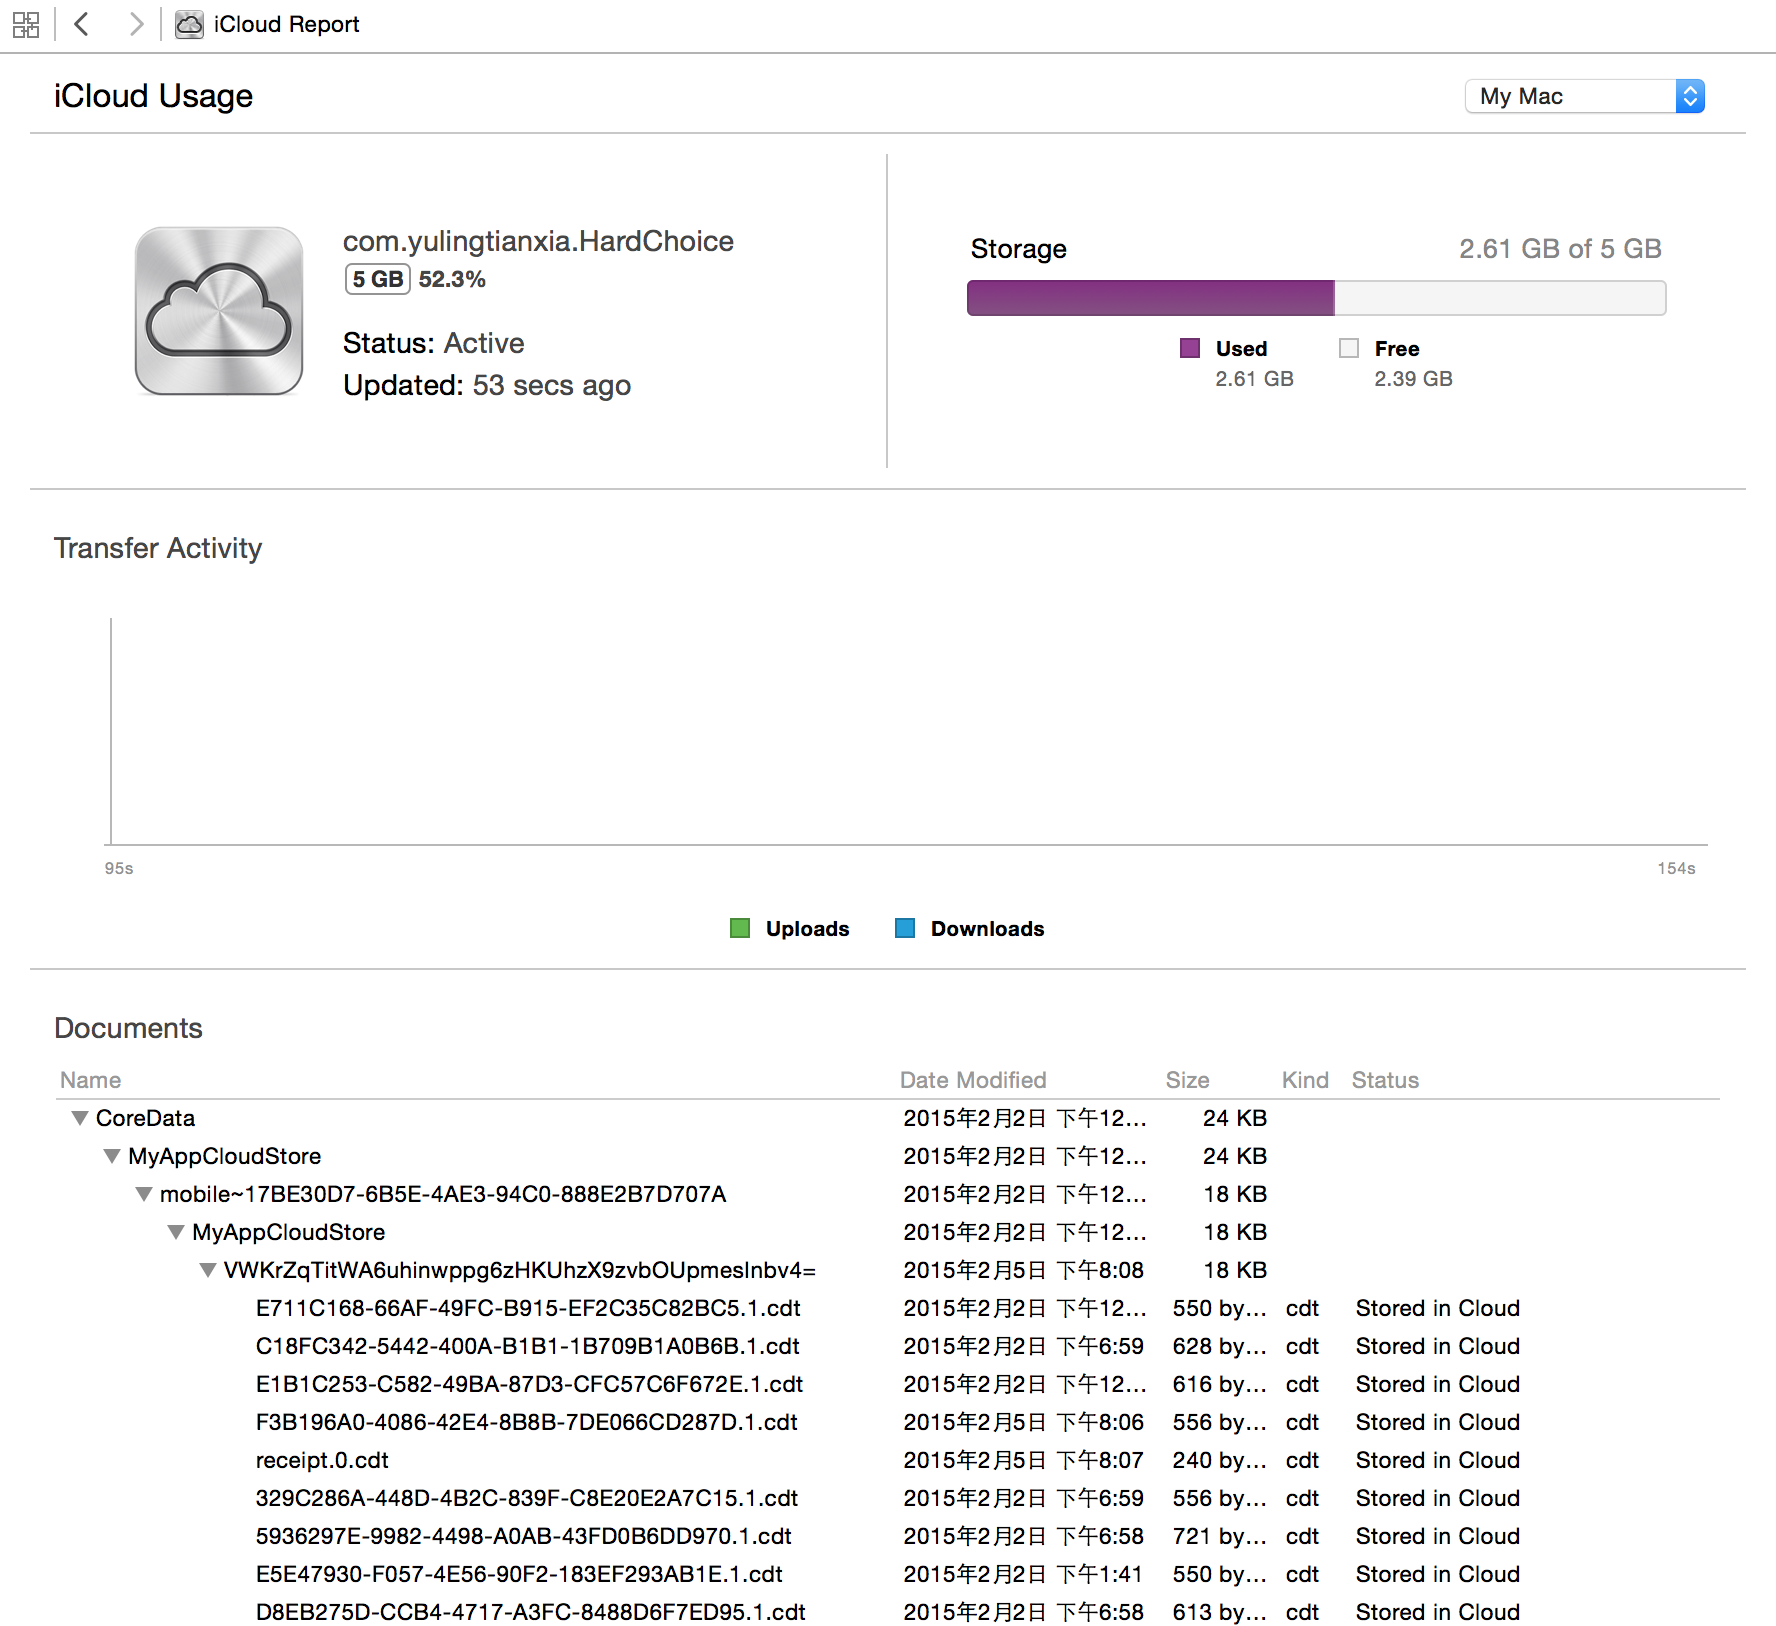
雖然透過「My Mac」能看到 iCloud 與 Core Data 的同步記錄,但在 Xcode 6.1.1 中「Documents」的顯示並不正常;最新的 Xcode 6.2 beta 雖修好了「Documents」的顯示問題,「iCloud Usage」的種種 bug 依然存在。
最後,確保網路暢通。我在中軟實訓那個月網路奇差,或是被屏蔽了 iCloud,一直調不出來。
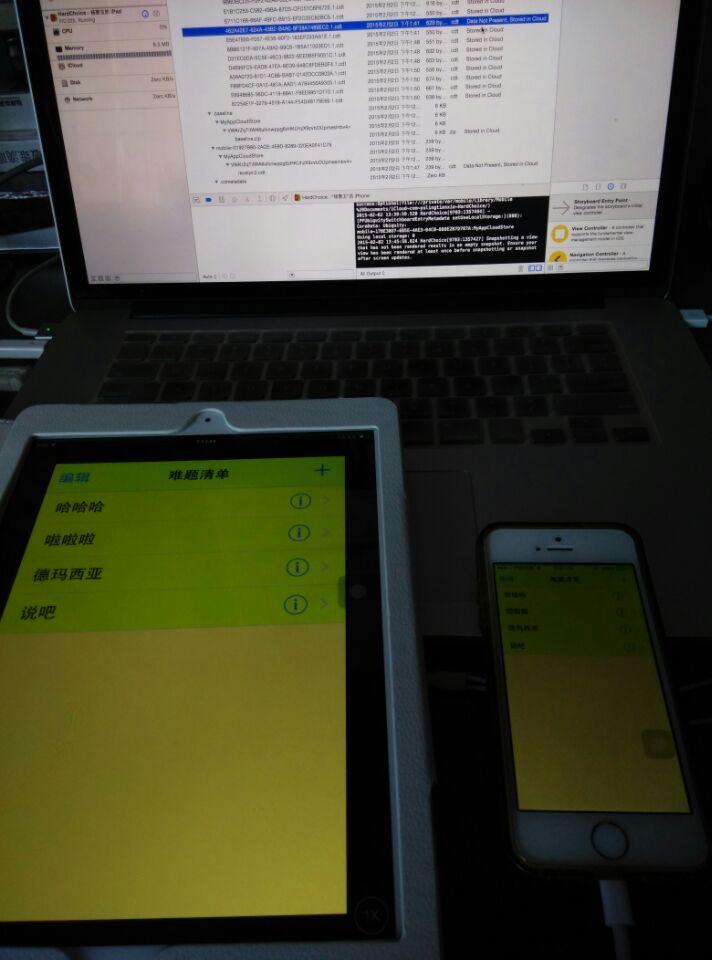
貼一張 HardChoice 同步成功的測試圖。這個 Demo 是我用 Swift 寫的,如果你也用 Swift,可以直接把我那部分程式碼貼過去用:
參考:
https://stackoverflow.com/questions/26195612/icloud-debug-gauge-status-disabled
https://stackoverflow.com/questions/25971816/xcode-6-ios-8-icloud-core-data-setup